1
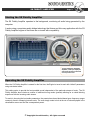
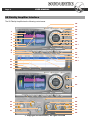
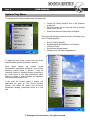
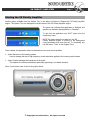
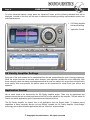
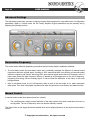
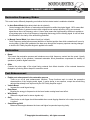
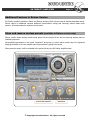
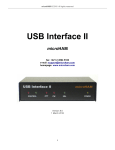
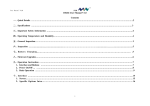
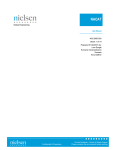
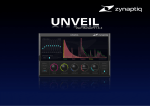
SX Fidelity Amplifier USER MANUAL © Copyright Sound Genetics, All rights reserved USER MANUAL Page 2 Introduction The SX Fidelity Amplifier is a fully automated audio fidelity improvement application. The SX Fidelity Amplifier Menu with Audio Bridge shows in the Start Menu, as well as the uninstall option Whether the automatic settings are used, or the audio signal is reconstructed manually, the amplifier engine has been designed to continually adjust the sound parameters attempting to provide the best high fidelity audio possible. The presence of the SX Fidelity Amplifier system tray icon indicates that the application is running in the background Upon completion of the installation, SX Fidelity Amplifier icon appears on the desktop. The application can also be started using the program bar of the Windows Start menu. To ensure that the program has installed correctly and is operable, the following attributes should appear on the desktop: The desktop icon for the SX Fidelity Amplifier; The Amplifier itself; and The Audio Bridge icon in the active programs toolbar. SX Fidelity Amplifier program, © Copyright Sound Genetics, Audio Bridge All rights reserved SX FIDELITY AMPLIFIER Page 3 Starting the SX Fidelity Amplifier The SX Fidelity Amplifier operates in the background, monitoring all audio being generated by the computer. It works using a proprietary audio bridge technology that listens and links any application with the SX Fidelity Amplifier engine so that there are no issues with compatibility. To help operate the SX Fidelity Amplifier, a tool tip is displayed every time the cursor is hovered over any control area Operating the SX Fidelity Amplifier When the SX Fidelity Amplifier is started for the first time, the Engine is tuned to work with “default” parameters using auto-detect mode. This setting works to provide the best possible sound independent of the particular stream of music. The SX Fidelity Amplifier also includes a number of additional tuning modes (presets) allowing for a varied listening experience with the incoming audio stream. To assist in choosing the best audio parameters, the presets have been labeled based upon frequency ranges commonly found in streaming internet music. The user simply needs to look at the cut off value displayed in the visualization screen and find the correspondent preset. © Copyright Sound Genetics, All rights reserved USER MANUAL Page 4 SX Fidelity Amplifier Interface The SX Fidelity Amplifier has the following control areas: 18 19 20 1 21 2 22 3 23 4 24 5 25 * 6 26 7 8 27 9 28 29 * 10 30 * 11 12 13 31 32 33 14 34 15 35 16 36 37 17 38 © Copyright Sound Genetics, All rights reserved SX FIDELITY AMPLIFIER 1 2 3 4 5 6 7 8 9 10 11 12 13 14 15 16 17 18 19 20 21 22 23 24 25 26 27 28 29 30 29 30 31 32 33 34 35 36 Page 5 Left channel restoration process window Signal strength of the left channel Name of the application whose signal is currently being improved by SX Fidelity Amplifier Signal strength of the right channel Right channel restoration process window Cut off frequency indicator. This displays the maximum frequency available in the incoming audio stream Engine Enhanced Control button; REM: Restoration Frequency Control operates in two modes: Auto and Manual, thus for each mode (regime) tool tips and “?” mark help text has to display information applicable for each mode of operation Application Control Button Sound card control; allows control over which sound card to use with the amplifier Lock/Unlock switch for all applications not included in the list Automatic Application Navigator Removes an application from application control list Add an application into the application control list Restoration Boost Control Restoration Frequency Control Restoration Glider Control Automatic detection of frequency border for sound restoration Help; accesses user manual (PDF format) Minimize SX Fidelity Amplifier control interface window Exit from the SX Fidelity Amplifier Graphics Control interface About button; used to display company and product info Engine Turn on/off button Advanced button; provides SX Fidelity Amplifier Engine Control settings Spectrum button; displays the spectrum of sound enhancement * Add and delete preset. Available in Deluxe version only. See page 13 List of presets with pre-defined parameters for different sound possibilities Tool tip on/off switch; adds the display of additional information when the cursor is held over various buttons Skins; displays the available skins and which is currently selected * Record; provides recording options for enhanced audio. Available in Deluxe version only. See page 15 * Equalizer; shows equalizer presets and controls. Available in Deluxe version only. See page 14 Sound Saturation; controls sound restoration rate Sound Contrast; controls process of restored frequency introduction into the signal Output sound enhancement control switch Volume control Low frequency booster Stereo-panorama extender expands stereo panorama effect (Applicable only for Stereo signals) Sound Gain Control protects speakers from sound errors caused by high sound volume Medium frequencies booster © Copyright Sound Genetics, All rights reserved USER MANUAL Page 6 System Tray Menu To operate the SX Fidelity Amplifier from the system tray: Locate SX Fidelity Amplifier icon in the Windows system tray. Hover the cursor over the icon and click on the right button of the mouse. Select from the list of options that will appear. From here the following functions may be performed using the SX Fidelity Amplifier: Run SX Fidelity Amplifier. Enable/Disable (the Amplifier’s on/off switch). Choose a Preset. Synchronize delayed stream. Change menu look (Menu Appearance). To adjust the auto tuning, choose from one of the available preset options (as shown in picture). Each option adjusts the internal sound reconstruction parameters differently. Once proper frequency related preset is chosen, it may be controlled further by adjusting Engine according to the music genre or any other preferences since hearing is unique to each individual and speakers set used to produce the sound. In the event the Custom option is chosen, the application will open up Full Control interface window. This allows full control over all sound parameters allowing customized sound in a real time. © Copyright Sound Genetics, All rights reserved SX FIDELITY AMPLIFIER Page 7 Starting the SX Fidelity Amplifier Another option available from the System Tray is the ability to Enable or Disable the SX Fidelity Amplifier engine. The System Tray icon displays the current status of the SX Fidelity Amplifier engine. The green icon indicates that application is “Enabled” and grayish icon indicates that application is “Disabled”. To quit from the application use “QUIT” option from the system tray menu. NOTE: By closing down the system tray, the SX Fidelity Amplifier engine is running in the background using parameters that were last set. To completely quit use sub-menu “Tools” in the Program Files. Once enabled, the application allows customization of two main sound qualities: Audio Saturation of the listening stream. Used to manage the rate of high frequency sound restoration applied to the incoming audio stream. Audio Contrast manages the harshness of the audio. This adjusts for occasional harshness potentially appearing in low bitrate streams. Note: Control buttons are circled in the graphic below © Copyright Sound Genetics, All rights reserved USER MANUAL Page 8 For more advanced features, simply press the “Advanced” button and the following extended form will be displayed. Included in this form are two tabs of advanced functionality providing unprecedented control over sound enhancement. SX Fidelity Amplifier Advanced Settings Application Control SX Fidelity Amplifier Settings Every part of the audio stream can be manipulated from this tab, personalizing the user’s listening experience. While the engine improves all encoded music streams, each algorithm encodes the music differently. With those variances, there are always small adjustments that the user can make to the engine that will improve the music quality. With some practice, the perfect sound can be customized for varied music type, source, and speakers. Application Control Not all music needs to be improved by the SX Fidelity Amplifier engine. There may be applications that generate sounds that do not need improvement like DVD movies played on the computer. This tab allows for control over which applications get the improvement and those that do not. The SX Fidelity Amplifier, by default, links to all applications that use DirectX audio. To enhance sound capabilities of those computers that do not have DirectX installed, the SX Fidelity Amplifier “Audio Bridge” technology also enables all audio applications that use “WaveOut” output methods. © Copyright Sound Genetics, All rights reserved SX FIDELITY AMPLIFIER Page 9 Preferences in Application Access The Application Control Tab provides the ability to lock/unlock application(s) that can use the engine and produce improved sound. To compile a list of the applications to “Lock” or Disable, use ADD button or simply drag and drop correspondent executable file inside the Application Control dialog window. Applications that are marked will be denied access to the SX Fidelity Amplifier engine and will not produce any improved sound quality. The control dialog will display a “Disabled” status for these applications. Applications not appearing in the list, or those that are not marked will be allowed access to the SX Fidelity Amplifier engine. To remove an application from the list: Move the cursor over the name of the application to be removed; Click the left mouse button (it will highlight the application); and Click on the REMOVE button. To enable only one application to be used with SX Fidelity Amplifier, add the desired application into the list, and unmark it. For those applications to be denied access to the SX Fidelity Amplifier, simply add those to the list as well, then click on “Disable”. An Easy Trick: In many situations, the name of the application may not be known, nor its location on the hard drive. To help locate and add applications into the control list, SX Fidelity Amplifier has created a Navigator function. Simply start the application to be included into the application control list, run the Navigator and click anywhere within that application window. The application will be added to the list. To disable System sounds running through SX Fidelity Amplifier, simply click anywhere on the desktop while running the Navigator. To stop the Navigator feature, simply click on Navigator button again. REMARK: The Application Navigator will be automatically turned off when closing the application control tab. To avoid unwanted automatic inclusion of applications into the application control list, stop the Navigator once the desired applications are found and successfully added into the application control list. © Copyright Sound Genetics, All rights reserved USER MANUAL Page 10 Advanced Settings The drop down preset menu provides a choice of presets that correspond to a pre-defined set of configuration parameters. When in Custom mode, the SX Fidelity Amplifier Engine parameters may be manually set by adjusting the following controls: Restoration Frequency This control works differently depending on whether the Auto-detect mode is enabled or disabled. The auto-detect mode (the auto-detect check box is selected) manages the diffusion of restored sound frequencies within the original signal. A setting of 100% means that there is no diffusion of restored content within the original sound content, delivering 100% pure restored signal above the cut off frequency value. A lower value means the high frequency diffusion is applied as a percentage prior to the cut-off frequency, integrating that energy into the existing signal. A user will hear the difference in the clarity of the audio being produced. Also in auto-detect mode, the cut off frequency value or level of the low border in Hz, where restoration takes place. This value is displayed in graded color when this process is controlled by auto detect function. Manual Control In manual control mode (Auto-detect check box is blank): The cutoff frequency allows manual definition of the start position from which restoration will occur by moving slider. The cut off frequency value can also be manually entered. The Gain Limiter or anti clipper should be enabled when sound clipping distortion in the output sound quality is noticed. © Copyright Sound Genetics, All rights reserved SX FIDELITY AMPLIFIER Page 11 Restoration Frequency Modes This control works differently depending on whether the Auto-detect mode is enabled or disabled. In Auto-Detect Mode (Auto-detect check box is selected), Control manages the diffusion of restored sound frequencies within the original signal. 100% means that there is no diffusion of restored content within original sound content delivering 100% pure restored signal above the cut off frequency value. A lower value means the high frequency diffusion is applied as a percentage prior to the cut-off frequency integrating that energy into the existing signal. A user will hear the difference in the clarity of the audio being produced. In Manual Control Mode (Auto-detect check box is blank): Cutoff Frequency setting allows manual definition of the start position from which restoration will occur by moving slider. As the knob is adjusted, the bars move through the frequency spectrum causing changes to how the SX Fidelity Amplifier engine is applied to the audio. Restoration Boost This boosts the restoration process and introduces more high frequency content into the sound. Usually with lower quality of the speakers, increased restoration boost parameters compensate for inability of speakers to produce higher harmonics. Glide Controls the pulse edge of the signal being restored that effects duration of the restored harmonics dissipation, producing either sharper or smoother sound. Post-Enhancement Enable post enhancement in the restoration process Turns on or off all post enhancement functions. These functions work to enrich the perceptive characteristics of the outgoing audio signal. It works similar to an equalizer, except the sound being adjusted has already been improved by the SX Fidelity Amplifier engine. Volume Boost Increase the overall signal energy. Bass Boost Boosting the energy to frequencies in the lower bands creating bass boost effect. Wide Stereo Widens the signal base for stereo signals only. Gain Gain Limiter or anti clipper should be enabled when sound clipping distortion in the output sound quality is noticed. Sound Energy Shift Balances the energies between the lower and higher frequencies improving clarity. © Copyright Sound Genetics, All rights reserved USER MANUAL Page 12 Operating the SX Fidelity Amplifier The Sound Restoration visualization window is a unique feature of the Amplifier control interface. It provides visual control over the restoration process by displaying initial and restored parts of the signal for both the left and right channels. It also provides information as to which application is currently being improved using the SX Fidelity Amplifier, and level of signal strength at both the left and right channels. Original Signal Restored Signal Improving Application Cut-off Frequency Value © Copyright Sound Genetics, All rights reserved SX FIDELITY AMPLIFIER Page 13 Additional Features in Deluxe Version SX Fidelity Amplifier available in Basic and Deluxe versions. Both of them have all features described above. Deluxe version in additional contains additional functionalities: storing and removing custom made audio presets, 10-bands parametric equalizer and recorder. Store and remove custom presets (available in Deluxe version only) Deluxe version allows saving custom-made preset into the preset list as well as removing presets that not interesting anymore. Set preferable parameters in the panel “Advanced” and press (+) button above preset drop list. Appeared dialog gives ability to set user defined name for preset that is going to be saved. When preset is saved, it will be available in the preset list any time SX fidelity Amplifier starts. Preset name selection © Copyright Sound Genetics, Add Preset All rights reserved USER MANUAL Page 14 Button (-) in the main panel is used for selected preset removal. Preset is removed permanently from the list, and confirmation window will popup every time before selected presets will be removed. Delete confirmation Delete Preset Equalizer panel (available in Deluxe version only) Equalizer allows changing audio amplification by 10 contiguous frequency bands independently, and saves or removes values in the equalizer preset lit. There are three options available to set the slider-to-slider influence that gives ability to change the set of neighbor sliders moving only one of them, as well as single slider manipulation where each slider fully independent from each other. Slider influence settings Preset control © Copyright Sound Genetics, Value control sliders All rights reserved SX FIDELITY AMPLIFIER Page 15 Recording panel (available in Deluxe version only) There is a recording functionality available in Deluxe version of SX Fidelity Amplifier. Recording panel allows selecting file type for saving. Files only in wav-format are available in the current version. File name for recording forms from 4 parts: Destination folder; small right button opens “Select Folder” dialog. File name prefix; first part of name, by default it is an application name (could be empty). File name main; second part of name, defined by user (could be empty). Counter; sequential number of current recording file, changed every time when stream changed. Small right button resets the counter. Lower line shows current file name that is used for current record, if started, or the fill name that will be used when recording will start. Recording Timer Destination folder Start/Stop Record File name prefix Save file type File name main © Copyright Sound Genetics, File counter Current full file name All rights reserved USER MANUAL Page 16 Specification Operating system: Processor: RAM: Windows 2000, XP, 2003 Pentium III 800 MHz and up 256 MB and more HDD space: 10 MB Sound card: Any hardware sound card with DirectX support Speakers frequency response: 100Hz – 12kHz and upper © Copyright Sound Genetics, All rights reserved