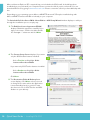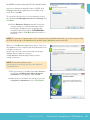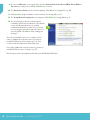
1
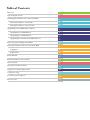
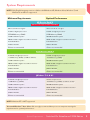
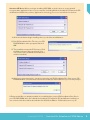
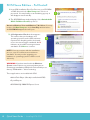
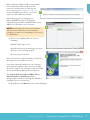
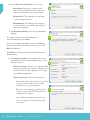
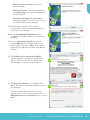
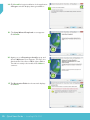
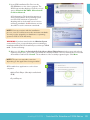
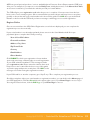
DE
I
QU
C
T
AR
T
KS
I
GU
© MMXIV Glynlyon, Inc.
Switched-On Schoolhouse®, Switched-On®, and their logos are registered trademarks of Glynlyon, Inc. All
rights reserved.
No part of this publication may be reproduced, stored in an electronic retrieval system, or transmitted in
any form by any means – electronic, mechanical, photocopy, recording, or otherwise – without the prior
written permission of Glynlyon, Inc. Brief quotations may be used in literary review.
Table of Contents
Welcome
2
System Requirements
3
Installing Switched-On Schoolhouse® 2014
4
SOS Home Edition – Full Install
6
SOS Home Edition – Client Install
12
Upgrading to SOS 2014 Home Edition
17
Upgrading from 2013 Edition
17
Upgrading from 2012 Edition
18
Upgrading from Earlier than 2012 Versions
19
Removing (Uninstalling) SOS 2014
20
Setting up Switched-On Schoolhouse® 2014
21
Logging In
21
Registration
21
Setup Wizard
25
Backup and Restore Procedures
34
SOS Tutorials
37
SOS Overview Presentation
38
Forgot Your Teacher Password?
40
Troubleshooting
41
Contacting Tech Support
46
Resource List
47
Welcome to Switched-On Schoolhouse®
This guide walks you through how to install Switched-On Schoolhouse (SOS) and do the basic setup
necessary for your student(s) to begin his/her schoolwork. There are many resources available to help you
customize your homeschool. Please see p. 47 for a list of those resources.
A few things to know before you begin:
êêThe SOS box contains all of the curriculum discs for the courses you ordered, this guide, and the
installation discs (located inside the front and back covers of this guide). Also, on the inside cover is a
sticker with your serial number. You will need that during installation and registration.
êêCertain elements must be in place to run SOS on your computer. The table on the next page shows
you what is required to run SOS. The first column covers the absolute minimum requirements. You
may find that you need a computer that exceeds these requirements, giving you more memory and a
faster processing speed. A check is performed during installation to verify that your computer meets
these minimum requirements. If it does not, a list of items that do not meet specification is displayed.
êêSOS uses Adobe Reader. If you do not already have Adobe Reader on the computer(s) you plan to
use for SOS, it is available on SOS Installation Disc Two. See the Preliminaries section on p. 20 for
access instructions.
êêIf the operating system on your computer is Microsoft XP and has or had Internet Explorer version 6
(IE 6) loaded, please go to www.update.microsoft.com to upgrade IE.
Getting Started
There are three major steps to getting started with SOS:
1.Installation
2.Registration
3.Setup
Use this guide to walk you through each of these steps. Let’s get started with Installation
on p. 4.
2
Quick Start Guide • Welcome
System Requirements
NOTE: Only English language versions of Microsoft® Windows XP, Windows Vista, Windows 7, and
Windows 8 and 8.1 are supported.
Minimum Requirements
Optimal Performance
XP Service Pack 3
(XP will not be supported after SOS 2014)
ê Microsoft IE 8 or higher
ê 1 GHz or higher processor
ê 512 MB Memory (RAM)
ê 3 GB hard drive space
ê 1024 X 768 or higher resolution monitor
ê CD-ROM drive
ê Adobe Reader
ê Printer recommended
ê Microsoft IE 8 or higher
ê 2 GHz or higher processor
ê 2 GB Memory (RAM)
ê 10 GB hard drive space
ê 1024 X 768 or higher resolution monitor
ê CD-ROM drive
ê Adobe Reader
ê Printer recommended
Vista Service Pack 2
ê 1.4 GHz or higher processor
ê 1 GB Memory (RAM) (2 GB for 64-bit)
ê 3 GB hard drive space
ê 1024 X 768 or higher resolution monitor
ê CD-ROM drive
ê Adobe Reader
ê Printer recommended
ê 2 GHz or higher processor
ê 4 GB Memory (RAM)
ê 10 GB hard drive space
ê 1024 X 768 or higher resolution monitor
ê CD-ROM drive
ê Adobe Reader
ê Printer recommended
Windows 7, 8, & 8.1
ê 1.4 GHz or higher processor
ê 2 GB Memory (RAM)
ê 3 GB hard drive space
ê 1024 X 768 or higher resolution monitor
ê CD-ROM drive
ê Adobe Reader
ê Printer recommended
ê Dual core processor
ê 4 GB Memory (RAM) (2 GB for 32-bit)
ê 10 GB hard drive space
ê 1024 X 768 or higher resolution monitor
ê CD-ROM drive
ê Adobe Reader
ê Printer recommended
NOTE: Windows RT is NOT supported.
Vista and Windows 7 Aero Users: We strongly recommend that you use a computer meeting the
requirements for optimal performance.
System Requirements • Switched-On Schoolhouse® 2014 Edition
3
Installing Switched-On Schoolhouse®
SOS Home Edition offers two types of installs:
êêFull Install – SOS Teacher, SOS Student, and the database all reside on the same computer. The
teacher uses the same computer as the student to grade and monitor. A Full Install takes on average
around 25-30 minutes.
êêClient Install – This type of install requires a home network with a Full Install (SOS Student, SOS
Teacher, and the database resident on one computer, which is part of a home network that can then
be linked to other computers. For SOS to function properly, the client computer requires a constant
connection to the main computer with the Full Install. A Client Install takes around 10 minutes. If
you choose a Client Install, you MUST perform a Full Install on the main computer first. Then, do the
Client Install on any additional computers on the home network. For Client Install directions, see p. 12.
Before You Install
1.Make sure your Windows® updates are current.
In Windows XP, Vista, or 7, click Start > Programs or All Programs > Windows Update. That should
open a control panel window, where you can select either Check for updates or Install updates.
In Windows 8 and 8.1, go into the Control Panel > System and Security > Windows Updates. Here,
you can either Check for updates or Install updates.
2.Restart your computer.
3.Temporarily disable your anti-virus (for example: Norton or McAfee) during the install.
If you already have a version of SOS installed on your computer: Please go to Upgrading to SOS 2014
Home Edition beginning on p. 17 of this guide BEFORE continuing.
SOS installs the database server, database, and tutorials in separate steps, so it may seem as if you are
repeating the same steps. In a way you are, but each step is installing a different piece of the total package.
XP Users: If you have or had Internet Explorer version 6 (IE 6) loaded on a computer where you plan to
install SOS, please go to www.update.microsoft.com to upgrade IE.
4
Quick Start Guide • Installing SOS 2014
Attention XP Users: When you begin installing SOS 2014, a check is done to ensure that all
necessary base applications are on your computer, including Windows Installer 4.5, Framework 3.5,
and Framework 4.0. If any of these applications is missing, you see a screen like the one below.
1. All unchecked items begin installing when you click the Install button.
2. Put SOS Installation Disc Two into your CDDVD ROM drive when prompted and click
OK.
3. The installation may take 2-3 minutes. Click
the Reboot button when prompted. (You
only need to reboot if Windows Installer 4.5
must be installed.)
4. After your computer restarts, you are prompted to put SOS Installation Disc One in your CDDVD ROM drive. (If Framework 3.5 must be installed, it will install before you see this prompt.)
If Framework 4.0 is not already installed, it is installed when you put SOS Installation Disc One in
your CD-DVD ROM drive. Once Windows Installer 4.5, Framework 3.5 and 4.0 are installed, you
can continue with the install as described in the SOS Home Edition - Full Install section on p. 6.
Installing SOS 2014 • Switched-On Schoolhouse® 2014 Edition
5
SOS Home Edition – Full Install
1.Insert SOS Installation Disc One One into your CD-ROM
or DVD drive and select Run Setup.exe if a choice is
presented. You may briefly see an Initializing pop-up. It
will disappear automatically.
2.The SOS 2014 Setup window displays. Select Switched-On
2014 - Full Home Install (top choice).
Attention Windows Vista and Windows 7 & 8 Users: You may
need to click Run Setup.exe on the AutoPlay window before
the SOS 2014 Setup window will open.
3.A Configuration Check window appears.
This verifies that your hardware and
operating system meet the SOS minimum
requirements. Anything with a checkmark
next to it meets minimum standards. An X
indicates an item NOT meeting minimum
standards. Click Next to continue.
2
NOTE: You may continue with the installation
process, even if not all items meet minimum
standards. You may need to upgrade your
hardware or operating system for SOS to work
effectively.
WARNING: If you have items listed in the Windows
System section of this screen, you must fix them prior to
continuing or installation will likely fail. Click each link you see
that says “Click to fix…” before continuing.
These applications are installed with SOS:
êêAdobe Flash Player (Already installed with IE 10)
êêCrystal Reports
êêSOS 2014 SQL 2008 R2 Express Server
6
Quick Start Guide • Installing SOS 2014
3
1
Microsoft Internet Explorer (IE) is required but
not included in the SOS install. It should
have been installed when you purchased
your computer. Go to www.microsoft.com
to download IE for free. Please contact the 4
seller if you have difficulty with this.
Depending on your operating system,
Microsoft®.NET Framework 3.5 may be
installed along with Microsoft®.NET Framework
4.0 if it’s not already on your computer.
NOTE: Both Framework and server installation
take some time. When the server first begins
installing, you may not see anything for a minute or
two. Be patient.
4
4.
Three screens display while the server is
installing:
êêA black “DOS” type screen
êêA small window pop-up advising you to wait
while the server is being installed.
êêA server progress window.
Each of these three windows displays several times
during the server installation process.
5
If you have a firewall installed on your computer,
you may be prompted to allow access to an SQL
Server file “sqlservr.exe” during this step of the SQL
Server install. Please allow access for this file.
The Switched-On Schoolhouse 2014 - Home
Edition Database - AOP Setup window
displays again to walk you through the database
installation process step by step.
5.
Click Next on the Welcome screen when it displays.
Installing SOS 2014 • Switched-On Schoolhouse® 2014 Edition
7
6.On the Customer Information screen, enter:
6
êêUser Name: Only letters, numbers, and
spaces are allowed. Punctuation marks and
other special characters are not permitted.
êêOrganization: This might be your last name
or something like “Home”.
êêSerial Number: The 16 digit serial number is
on the inside front cover of this guide. Enter it
exactly as it appears.
7.
The Destination Folder screen (for the database)
displays.
7
To retain the location where the database is
automatically placed, click Next.
If you must change this default location, click Change
and enter the path to the folder you want to use. Click
OK when finished.
We HIGHLY recommend you leave the SOS database in the
default location.
8.The Setup Information screen displays. Enter the
following information and click Next when you are
ready to continue:
8
êêTeacher username – Must be no longer than 20
characters. Only letters, numbers, and spaces are
permitted. The username displays on messages
sent within the application.
êêTeacher password – Type in your password.
êêPasswords may be 1-12 characters long. They
are case sensitive and may not contain
blank spaces or special characters.
êêBe sure to write down your password. You
need it to login to SOS Teacher after your
installation is complete.
êêSee p. 40 of this guide for instructions on
how to change your teacher password if
necessary.
8
Quick Start Guide • Installing SOS 2014
9
êêTeacher password confirm – Enter your
password again.
êêTeacher first name – This is what displays on
your Home Page. It cannot be changed after
SOS is installed.
10
êêInitial term description (i.e. the name of
your school year) – The current school year is
the default, but you may change it.
9.Click Install to continue. This may take
several minutes. After it is finished installing, a
completion screen displays.
10.On the Setup Wizard Completed window,
click Finish. The SOS Database is now finished
installing.
11
11.You see a Preparing to Install pop-up and
then the Welcome screen again. This time the
Switched-On Schoolhouse 2014 - Home Edition
application is ready to be installed. Click Next to
continue.
12.The End User License Agreement (EULA)
displays. Read this agreement carefully. If you
agree to the terms, click the checkbox beside
the “I accept...” statement and click Next.
13.The Destination Folder screen displays. Click
Next. (This adds the application shortcut icons to
your desktop.)
12
13
If you do not want the shortcut icons on your
desktop, click to remove the checkmark next to
Add application icons to desktop before you click
Next.
Installing SOS 2014 • Switched-On Schoolhouse® 2014 Edition
9
14.Click Install to begin installation of the application.
A Progress window displays during installation.
15. The Setup Wizard Completed screen appears.
Click Finish.
16.Again you see a Preparing to Install pop-up and
then the Welcome screen appears. This time, the
Switched-On Schoolhouse 2014 – Home Edition
Tutorials are ready to be installed. Click Next to
continue.
17.The Destination Folder for the tutorials displays.
Click Next.
10 Quick Start Guide • Installing SOS 2014
14
15
16
17
18.Click Install to begin installation of the
tutorials.
19.The Setup Wizard Completed screen appears.
Click Finish.
20.You should now see the list of all programs
needed by SOS. Each should have a
checkmark next to it indicating all were
successfully installed. At the bottom of the list,
you should see a message inside a box with
instructions on accessing SOS. Click Close
after reading this message.
18
19
20
You can remove SOS Installation Disc One from your CD-ROM or DVD drive. Your full installation of SOS
is now complete.
If you are using a home network and want to perform a Client Install on one or more networked computers,
continue to p. 12 of this guide.
If you are installing SOS on only one computer, go to p. 21 to continue with the registration and setup steps.
Installing SOS 2014 • Switched-On Schoolhouse® 2014 Edition
11
SOS Home Edition – Client Install
If you want to run SOS on multiple computers and have them networked, the Client Install allows you to
do that. The Full Install (which MUST be done first) allows you to have your database and SOS Teacher
installed on one computer while installing SOS Student on other computers in the home.
Be aware, there is a limitation to the Client Install:
The Client Install requires a connection to the network at all times to function. This can be a wireless
network. Since the client version does not have its own copy of the database, it depends on the
computer with the full installation to provide the database. If your home network is down or either
computer is removed from the network, neither SOS Student nor SOS Teacher can open.
We recommend you do the Full Install on a computer where you can access both SOS Teacher and SOS
Student and do the Client Install on a computer where only SOS Student needs to be accessed.
If you are using a 3rd party firewall, follow the manufacturer’s instructions to add exception rules for SQL
Express 2008.
Attention Windows Firewall Users: If you have Windows Firewall turned on for your computers, you must
first create exceptions to allow the client computers access to the computer with the Full Install:
1.Insert SOS Installation Disc Two into the CD-ROM drive on the computer with the Full Install. When
the installation program opens, close it. Do this ONLY on the computer with the Full Install.
2.At the same time, press the Windows (
the space bar on your keyboard.
) and e keys. The Windows key is beside the Alt key by
3.Right-click the green SOS logo or your CD-ROM drive and select Open.
4.Double-click the Tools folder to open it.
5.Double-click to open the FWConf folder.
6.Open the FWConf_ReadMe.pdf for further instructions.
If you do NOT have Windows Firewall turned on for your computer, continue with the Client Install on p. 13.
Once you have completed the Full Install, you can do a Client Install.
NOTE: If the Client computer does not have Windows Installer 4.5 and Framework 3.5 already installed, you
will be prompted to put SOS Installation Disc Two into your CD-ROM or DVD drive. See p. 5 for instructions.
12 Quick Start Guide • Installing SOS 2014
1.Insert SOS Installation Disc One into the
CD-ROM drive on the client computer. The
SOS Setup window displays. Click the second
option, Switched-On 2014 - Client Install
for Home Network.
1
A Configuration Check window appears to
verify your hardware and operating system
meet the SOS minimum requirements.
Anything with a checkmark next to it meets
minimum standards. An X indicates an item
does NOT meet the minimum standards.
NOTE: You may continue with the installation
process, even if not all items meet the minimum standards.
You may need to upgrade your hardware or operating
system for SOS to work effectively.
WARNING: If you have items listed in the Windows System
section of this screen, you must fix them prior to continuing or
installation will likely fail. Click each link you see that says “Click
to fix…” before continuing.
2.After you click Next, the Switched-On Schoolhouse Home Edition Setup window opens with a list of
required components. Those with a checkmark are already installed. The ones with another icon beside
them will be installed. Click Install. The installation of the needed programs begins. Click Next.
NOTE: This process may take some time
depending on the applications being installed.
SOS installs these applications on the client
computer:
2
êêAdobe Flash Player (Already installed with
IE 10)
êêCrystal Reports
Installing SOS 2014 • Switched-On Schoolhouse® 2014 Edition 13
Microsoft Internet Explorer (IE) is required, but not included in the SOS install. It should have been
installed when you purchased your computer. Please contact the seller if you do not have IE. You can
download IE for free by going to www.microsoft.com. Please contact the seller if you have difficulty with
this.
Depending on your operating system, Microsoft®.NET Framework 3.5 may be installed along with
Microsoft®.NET Framework 4.0 if not already on your computer.
The Switched-On Schoolhouse 2014 - Home Edition - AOP Setup Wizard window displays to walk you
through the installation process step by step.
3.The End User License Agreement (EULA)
displays. Read this agreement carefully. If you
agree to the terms, click the checkbox beside
the “I accept…” statement and click Next.
4.The Custom Setup Screen displays. If you want
only the SOS Student features installed:
3
4
êêSelect Teacher and highlight: X this
feature will not be available
If you want only SOS Teacher features installed:
êêSelect Student and highlight: X this
feature will not be available
Click Next.
5.The Destination Folder & Desktop Icons
screen displays. Click Next, unless you need
to change the location where the application
is automatically placed or you don’t want
the shortcut icons for SOS Teacher and SOS
Student on your desktop.
14 Quick Start Guide • Installing SOS 2014
5
We HIGHLY recommend leaving SOS in the default location.
If you must change the default location of SOS, click
Change and enter the pathname to the folder to be
used. Then, click OK.
6
To remove the shortcut icons on your desktop, remove
the check beside Add application Icons to desktop and
click Next.
6.On the Database Selection window, locate the
computer where your Full Install resides, either
by using the dropdown menu or typing in the
computer name followed by: \SOSHOME80 in
the blank textbox. Click Next after the location is
selected.
NOTE: To locate the computer name of the computer where the Full Install resides, go to the computer with
the Full Install and press the Windows key and the Pause/Break key at the same time.
When you click Next, the application tries to connect to
the database on the computer with the Full Install. If one
is found, continue to
Step 7. If a connection cannot be made, a message
displays that it could not connect to
a valid database. Repeat Step 6 until you have
a valid connection.
7
NOTE: For further assistance, visit
www.aophomeschooling.com/customer/webinar/
soswebinarfront.
7.Once you have successfully located the database
connection, the Wizard is ready to begin the
installation screen displays. Click Install.
8.After all of your new files are copied, you see the
completion confirmation screen. Click Finish.
8
Installing SOS 2014 • Switched-On Schoolhouse® 2014 Edition 15
9.You see the Welcome screen again. This time the Switched-On Schoolhouse 2014 - Home Edition
Tutorials are ready to be installed. Click Next to continue.
10.The Destination Folder for the tutorials displays. Click Next. See image #17 on p. 10.
11.Click Install to begin installation of the tutorials. See image #18 on p. 11.
12.The Setup Wizard Completed screen appears. Click Finish. See image #19 on p. 11.
13.You should now see the list of all programs
needed by SOS. Each should have a checkmark
next to it indicating all were successfully
installed. At the bottom of the list, you should
see a message inside a box with instructions on
accessing SOS. Click Close after reading this
message.
13
Your client installation process is complete. If you
have no additional computers where you plan to
install SOS Client, you are ready to go to p. 21 to
continue with the registration and setup steps.
If you have additional computers where you want to
install SOS Client, return to Step 1 on p. 13.
Don’t forget to remove the application disc from your CD-ROM or DVD drive!
16 Quick Start Guide • Installing SOS 2014
Upgrading to SOS 2014 Home Edition
If you have a version of SOS earlier than 2013, see instructions on p. 19.
Upgrading from 2013 to 2014
If you are currently running the 2013 version of SOS, you can upgrade directly to the SOS 2014 edition.
Your upgrade makes your 2013 data available in the new program, letting you take full advantage of
SOS 2014.
If you have the client version installed, you need to upgrade the Full Install BEFORE doing anything with the
Client Install.
If you plan to use 2014 curriculum, you must upgrade your application.
The 2013 to 2014 upgrade process automatically backs up your database and restores it for use with the
2014 version of SOS. As a precaution, you should always perform a backup from your existing installation
before you install the new version.
To perform a backup, open your existing installation of SOS Teacher, click Help? and select SOS Teacher
> Application > Backing Up Files or view the Backup/Restore tutorial.
If you are upgrading from 2013 to 2014, do NOT uninstall your 2013 version of SOS. The upgrade process
automatically migrates your data and uninstalls the old version for you. You may notice there are duplicate
icons for both SOS Teacher and SOS Student for a very brief time during the upgrade process. This is
expected. There will only be one set when the upgrade is done.
To complete your upgrade from 2013:
Go to p. 6 of this guide and follow the instructions in the SOS Home Edition - Full Install section. If you also
need to perform a Client Install (p. 12), do this after you finish the Full Install on your primary computer.
Upgrading to SOS 2014 • Switched-On Schoolhouse® 2014 Edition 17
Upgrading from 2012 to 2014
Upgrading is necessary if you plan to use either SOS 2014 or the 2014 curriculum. If you have the client
version of SOS 2012 installed, you must have already upgraded the Full Install to 2014 BEFORE you
perform any upgrade activity on the client. After the Full Install has been upgraded, you need to uninstall
the 2012 client and reinstall the client using the 2014 installation disc.
The upgrade process automatically backs up your database and restores it for use with the 2014 version of
SOS. As a precaution, you should always create a backup of your existing database before you install the
new version.
For help creating a backup, open your existing installation of SOS Teacher, click Help? and select User
Manual > SOS Teacher > Application > Backing Up Files.
1.When you put the SOS Installation Disc One in your CD-ROM drive, the first screen you see advises
you that a backup of your database has been created and you must manually uninstall SOS 2012.
Click OK and remove the application disc.
If you have completed your Full Install and are now performing the Client Install, you should see the
message below alerting you if you have not already removed SOS 2012.
2.To uninstall SOS 2012, Press the Windows (
) and r keys at the same time.
3.Type “control” into the run box and click OK.
4.Select Add/Remove Programs (it might say Programs and Features).
5.Remove Switched-On Schoolhouse 2012 Home Edition, Switched-On Schoolhouse 2012 Home
Database, and the Switched-On Schoolhouse 2012 - Home Edition Tutorials.
18 Quick Start Guide • Upgrading to SOS 2014
6.Return the SOS Home Edition 2014 Installation
Disc One into your CD-ROM drive. Follow the
instructions in the SOS Home Edition - Full Install
section beginning on p. 6.
When you reach Step 8 of the Full Install, return
to this page and continue with Step 7 below for
instructions on migrating your 2012 database to
your 2014 application.
7.Click Next on the Migrate SOS Home 2012 Data
screen and return to Step 9 of the Full Install on p.
9. If you do NOT want to migrate your database
to SOS 2014, click the circle next to “Do NOT
migrate Home 2012 data…”, click Next to enter database setup information, click Next again, and
return to Step 14 on p. 10 to finish your upgrade.
NOTE: If you do not migrate your database, the information it contains will not be available to you or your
students in SOS 2014.
NOTE: If you are migrating from 2012 or 2013, any changes you made to your Avatar, Wallpaper, or Photo
Album are not migrated. You need to set those Home Page items when you open the 2014 edition of SOS.
Upgrading from Earlier than 2012 Versions
If you have a version of SOS older than 2012 installed, please create a backup of your database.
For help creating a backup file, open your existing installation of SOS Teacher, click Help? and select SOS
Teacher > Application > Backing Up Files.
To uninstall your old version of SOS:
1.Press the Windows (
) and r keys at the same time.
2.Type “control” into the run box and click OK.
3.Select Add/Remove Programs (it might say Programs and Features).
4.Remove Switched-On Schoolhouse 20XX. (XX being the year of your presently installed version.)
5.Remove Microsoft® SQL Desktop Engine (SOSHOME309)
After your backup is created, please call our tech support team at 866-444-4498 for assistance with
upgrading to the 2014 version.
Upgrading to SOS 2014 • Switched-On Schoolhouse® 2014 Edition 19
Removing (Uninstalling) Switched-On
Schoolhouse® 2014
1.Open Add/Remove Programs in the Control Panel.
2.
Remove Switched-On Schoolhouse 2014 – Home Edition.
3.Remove Switched-On Schoolhouse 2014 – Home Edition Database.
4.
Remove Switched-On Schoolhouse 2014 – Home Edition Tutorials.
All steps below are optional. It is not necessary nor recommended for you to remove Microsoft SQL Server
and its components. If you reinstall SOS, this application and all of the components WILL be installed
again. If you choose to remove Microsoft SQL and have more than one instance of SQL installed on your
computer, do NOT remove any SQL items except SOSHome80.
5.Remove Microsoft SQL Server 2008 R2.
6.On the Uninstall dialog window, select the instance of SOSHOME80 and SQL Client Connectivity
SDK Redistributable Features. Then, click Next.
7.Click Close to proceed when the Complete screen displays.
8.Once the SQL Server 2008 R2 uninstall is finished, one SQL component should remain in your
installed programs list. Remove Microsoft SQL Server Native Client.
NOTE: If you do choose to remove Microsoft SQL Server 2008 R2, it MUST be removed before any of its
components are removed or it will not be properly uninstalled, and any subsequent installation attempts
will fail. If you try to uninstall one of the components first, you will see a warning that the server should be
removed first.
Preliminaries
SOS uses Adobe Reader. If you do not already have Adobe Reader, you can install it from SOS Installation
Disc Two using these steps:
1.Put SOS Installation Disc Two into the CD-ROM or DVD drive of your PC.
2.If the Install window opens, click Close.
3.At the same time, press the Windows (
) and e keys.
4.Right-click the drive containing the SOS installation disc and click Open.
5.Double-click the Adobe Reader folder or right-click your mouse and select Open.
6.Double-click the folder for your operating system or right-click your mouse and select Open.
7.
Double-click the file for your operating system inside that folder to install Adobe Reader.
20 Quick Start Guide • Removing SOS 2014
Setting Up Switched-On Schoolhouse® 2014
Registration
Unless you chose to remove the icons in Step 13 on p. 9, you should see an icon that
looks similar to the one to the right. Double-click that icon to open SOS Teacher. If
you do not have the icon on your desktop, you can still open SOS Teacher. On your
computer’s taskbar, click the Start button. Then, select All Programs > AOP >
Switched-On Schoolhouse 2014 Home > SOS Teacher
Logging In & Registration
The first screen you see asks you to login with the teacher password you created in Step 8 on p. 8. SOS
asks you, the teacher, to login with the password to protect your account because, as the teacher, you have
access to all answer keys, student grades, and teacher controls.
On the Login Page:
1.Enter your password (the one you created in Step 8, p. 8) in the password field. (Check your caps lock
key if you get an error message. Your password is case sensitive.)
2.Click the Login button.
The first time you login, you are asked to register your software installation. Switched-On Schoolhouse
requires the registration process to be completed within 30 days from the time you install the software.
We recommend you register upon initial login and eliminate the daily reminders for both you and your
student(s).
When you click Yes on the Product Registration pop-up box, the application automatically attempts
to connect you to the AOP website page for SOS registration. If a connection is detected, you are
automatically connected to the SOS Registration page where you can complete the registration
electronically. See the Register Online section on p. 23 for more information.
Setting Up SOS 2014 • Switched-On Schoolhouse® 2014 Edition 21
If an Internet connection is not detected, you are presented
with an option to register electronically from another
computer. If you do not have Internet access, you can register
by telephone.
To register electronically, click the first option, I have access
to the internet from another computer.
You then see a page that looks like the second image. You
can click the Print Instructions button to print a copy of this
page to take with you to the other computer.
Alternately, you can copy the serial number provided in Step
2 on this page.
Either way, follow these steps to complete the registration
process:
1.On the alternate computer, open a browser and go to
http://sosreg.aop.com.
2.Enter the serial number.
3.Follow the instructions on the form.
4.Copy the Registration Code you receive on the Thank
You page when the registration process is completed
online.
5.Return to the original computer with the full installation
of SOS and enter the Registration Code in the four boxes shown in Step 4 of the SOS Registration
page as shown in the image above.
6.Click OK.
Register by Telephone
If you cannot register electronically, click the second option,
I have no access to the internet. You then see the toll-free
number to call along with your product name and installation
serial number. The service representative needs the following
information from you:
êêFirst and Last Name
êêAddress, City, State
êêZip/Postal Code
êêCountry
êêEmail Address
êêPhone Number
22 Quick Start Guide • Setting Up SOS 2014
AOP has several optional products / services available that a Customer Service Representative (CSR) may
offer you. For example, if you want to receive the Daily Focus, a daily devotional, or the Homeschool View,
an electronic newsletter, you will also be asked to provide your email address.
The CSR will give you a registration code when the process is complete. You must enter it into the four
boxes on the screen exactly as given. We recommend that you write it down and keep it in a secure place,
possibly on the sticker with your serial number in the front of this guide. Click OK when you are finished.
Remain on the line with the CSR until you have a message confirming your successful registration.
Register Online
Once a screen similar to the SOS Online Registration screen below is displayed, you can complete the
registration process electronically.
If your serial number is not already populated, please enter it in the Serial Number field. If it is prepopulated, please complete the form by entering:
êêYear of Your SOS edition
êêFirst and Last Name
êêAddress, City, State
êêZip/Postal Code
êêCountry
êêEmail Address
êêPhone Number
Click SUBMIT to finish your registration. A new window
opens with a message confirming the successful registration
of your SOS software installation. This message includes
your registration code. Please write this number down and
keep it in a secure location like the front cover of this guide
or print the page and put it in a safe place. Click OK on this
message screen after noting the registration number.
If your Full Install is on another computer, go to Step 5 on p. 22 to complete your registration process.
Should you misplace either your serial number or registration number, you can find it on the About page of
your SOS application. Click the About link in the upper right corner of your Home Page for access. If you
are using the Classic theme, click the SOS logo on your Home Page for access.
Setting Up SOS 2014 • Switched-On Schoolhouse® 2014 Edition 23
Register Later
If you choose not to register your product immediately, you can access the application for up to 30 days
after installation. Each time you open your teacher application, you see a registration reminder with the
number of days you have to register before your software is disabled.
Click Yes anytime you see this message to register.
If you do not register by the end of the 30 day grace period, a message appears on day 30 advising you
that SOS will be disabled if you do not register today.
Click Yes to register now and follow the procedures beginning on p. 21.
If you have not registered by day 31, a message appears when SOS Teacher or SOS Student is opened
advising you that SOS has been disabled and cannot be opened until the product has been registered.
Registration can only be performed from the SOS Teacher application. Students receive a message
advising them to notify their teacher that they cannot continue.
When you try to open SOS Teacher, click OK on the message to register the product at this time.
24 Quick Start Guide • Setting Up SOS 2014
SOS Setup Wizard
The first time you login to SOS Teacher, the Setup Wizard appears. It walks you through the initial
setup steps for your school. There are three basic steps to be completed before your student(s) can begin
working:
1.Selecting a school term and creating a calendar
2.Adding students
3.Installing curriculum and assigning subjects
When you click the Finish button at the end of the Setup Wizard, the basic setup for SOS is complete.
You and your students can immediately begin working. As you use SOS, you may find that you want to
customize assignment or grade options for your school, a specific student, or a subject. Please see the
electronic Help file (press F1) for step-by-step instructions on how to do these functions. You can also
access the Help file by clicking User Manual in the Help widget on your Home Page.
NOTE: Switched-On Schoolhouse includes a tutorial, “How to Use the Setup Wizard” that walks you
through a basic school setup.
To access the tutorials, click Start on your computer’s taskbar and select All Programs > AOP >
Switched-On Schoolhouse > Tutorials. If you have the Tutorials shortcut icon on your desktop, just
double-click it.
The Setup Wizard may also be viewed online at www.sostutorials.com. Click the tutorials tab on that page
to access the tutorials.
Setup Wizard • Switched-On Schoolhouse® 2014 Edition 25
Ready to Begin?
Click Next to begin your setup process or click Cancel to exit the Setup Wizard.
Selecting a School Term
School terms are important because you cannot assign schoolwork to your students without them. There
are a couple of points to keep in mind as you work with terms:
êêStudents can only work in ONE term at a time. If you assign work to students in more than one term,
you MUST switch their active term each time they need to work on an assignment from the non-active
term. Though there is a View Other Term button in SOS Student on the Schoolwork screen, it does
not allow students to work in other terms. This button only allows them to see what work is assigned
to them in any other school term. They cannot perform any work on assignments in other terms until
you change their active term using the SOS Teacher program.
êêTerms help you keep SOS School records
organized. You should create a new term for
each new school year.
You already created a term when you installed
Switched-On Schoolhouse 2014. If you want to use
that term, click Next at the bottom of the School
Term screen and continue creating a calendar below.
If you need to create a new term:
1.Click Add a Term on the School Term screen.
2.Type in the name you want to assign to the
school term.
3.Click Save Term.
4.Click Next to see the Calendar screen.
Creating a Calendar
Creating a calendar allows you to assign due dates
to student assignments. Due dates help students
know how much work must be done each day, so
they can complete their assigned work by the end
of the school year. When due dates are turned off,
students must pace their own schoolwork.
1.Determine if you want to assign due dates:
26 Quick Start Guide • Setup Wizard
êêSelect Yes if you want to assign due dates to
student assignments.
êêSelect No if you do not want to assign due
dates to student assignments. After you click
Next, go to the Adding Students section on p.
28 of this guide.
2.Click Next to continue and click the circle next to
the type of calendar you want to use:
êêI want to use a Traditional calendar - This
calendar begins the day after Labor Day and
lasts 180 school days, excluding time taken
off for holidays. You can change the pre-set
holidays, school days, or school end date for
your school.
êêI want to use a Custom calendar – This
calendar allows you to choose the start and end
days of the term, as well as assign any holidays
to be included. It is useful if you need to start
a term at a time not usually associated with
the start of the school year or if you want to
compress a school year.
3.Click Next to continue.
4.If you chose a traditional calendar, select the school year using the up and down arrows. Then,
click Next to continue. If you chose a custom calendar, you can select start and end dates for your
calendar. SOS defaults the Start Date to today and the End Date to 180 weekdays from today. You
can leave this or change it. To change the dates:
êêSelect the End Date for your school year. Then, select the Start Date for the school year.
êêClick Next to continue.
Customizing Your Calendar
After you have determined the type of calendar you
want to use, you can customize the calendar. You can
change school days to non-school days and vice-versa.
You can change individual days or a series of days.
You may do this now or at any time during the school
term. Just press F1 to access the electronic Help file for
step-by-step instructions or watch the tutorial for a video
demonstration.
Setup Wizard • Switched-On Schoolhouse® 2014 Edition 27
1.Click No if you do not want to customize your
calendar now. Click Next to continue. Skip to the
Viewing the Calendar section below.
Click Yes to customize your calendar now. Then, click
Next to continue.
2.Set each date or range of dates individually. To
choose specific dates for things like holidays and
vacation:
êêSelect the Start Date and End Date of the period
you want to customize.
êêEnter the Description for the date range. For example, type “Family Reunion” or “Weather
Catch-up Days.”
êêSelect Yes to designate these days as school days or select No if these days are not to be
considered school days.
3.Click Customize more days if you want to add more
custom dates and return to Step 2.
4.Click Finished when you have entered the last
date you want to customize. A confirmation box
appears asking you to select Yes if you are finished
customizing calendar dates.
Viewing the Calendar
1.Click View Calendar to see your selected school
term.
After you view the calendar, click Save to retain the changes you made to the calendar or Cancel
Changes to not retain the changes.
2.Click Next to continue or click Back to return to Customized Calendar to make additional changes.
Adding Students
Before students can get started in SOS Student, you need
to “enroll” them in your school. SOS allows you to have
up to five students working in SOS at once. If you want
students to use a password to login, you need to set this
up after you complete the Setup Wizard. You can press
the F1 key to access the electronic Help file for instructions
on setting up a student password. The Student Setup
function allows you to add students, edit student profiles,
or remove students from SOS. For now we are going to
add students.
28 Quick Start Guide • Setup Wizard
1.Click Next on the first Student Setup screen to
begin.
2.
If your student’s name is not displayed on the
screen, click Add to open a small window where
you can enter the student name and username.
3.Enter the Username. This is the name SOS uses
for the student, just like your teacher name. Use up
to 20 letters and/or numbers. No periods or other
special characters are allowed.
4.Enter the student’s First name and Last name.
5.Click OK to see the student information appear in the large
white box at the bottom of the Student Setup screen.
6.
Click Add to add any additional students, Edit to make
changes to a selected student, Remove to delete
a selected student, or Next if you are ready to
continue.
Installing Curriculum
Before students can begin work in SOS Student, you
need to install curriculum and assign it to them. Make
sure you have your curriculum disc(s) handy before you
begin.
1.Click Next on the Curriculum Setup screen to
begin.
2.Put the disc for one of your subjects in the CD-ROM
or DVD drive and click Install.
3.Select Leave on CD-ROM if you want your
student(s) to access the subject using the disc(s)
or select Copy to Drive if you want to install the
subject onto your computer’s hard drive.
4.Click OK.
5.If you chose Leave on CD-ROM, go to Step 6.
If you chose Copy to Drive, a window opens allowing
you to copy to the default folder.
Click OK. You may choose another location provided
there is enough free space on your drive, but we
HIGHLY recommend leaving the curriculum in the
default folder.
Setup Wizard • Switched-On Schoolhouse® 2014 Edition 29
6.SOS begins copying the subject to the selected
drive. If the subject has more than one disc, SOS
prompts you when to put in the next disc.
Perform Steps 2 – 6 until you have installed all of the
subjects you intend to assign. Then click Next.
Remember: If you do NOT load the subject onto your
hard drive, the student must have the disc in the CDROM or DVD drive when working on the subject.
NOTE: Please see the Setup Wizard tutorial “How to
Install a Subject” for additional assistance.
NOTE: If you are using a Client Install, the subject is
copied to the server location. The client computer must
point to the subject on the server location or you must
copy the curriculum to the hard drive of the computer
with the Client Install.
Assigning Subjects
Now that you have installed your subjects, they can be
assigned to your students. The first thing you see when you click Next is the Curriculum Update window.
This is an automatic process. Just click OK and the application automatically checks to see if there are
any revisions or updates to the curriculum you have installed. If there are updates, they are automatically
applied to your database.
NOTE: If you do not have Internet access, you need to contact customer service periodically to see if there
are any updates to your curriculum.
Click OK when the Update Complete message displays, advising you of the number of assignments that
were revised.
Assign each subject to the students who will be taking the course before you click Next. SOS allows you to
assign multiple subjects to every student before you move to the next screen.
30 Quick Start Guide • Setup Wizard
1.On the bottom half of the Curriculum Setup
window, you see a list of your students. Click the
checkbox next to a student’s name. A list with all
of the subjects you installed appears below each
student’s name.
2.Below each student’s name, click the checkbox
beside each subject you want to assign to the
student.
Repeat Steps 1 – 2 to assign subjects to additional
students.
3.Click Next when you are finished.
4.Click OK when the Assignment Complete Confirmation box
appears.
NOTE: Coursework may be assigned to students by day of the week. When you are finished with the Setup
Wizard, click Lesson Plan in the Lesson Book widget on your Teacher Home Page. Select the student
(one at a time) and click the Reschedule button.
Assigning a Sample Lesson
SOS includes a sample lesson to allow both you and
your students to walk through a practice lesson. It should
help both of you to learn about each feature and how to
use it. The sample lesson also offers the opportunity to
practice the various problem types without concern for
the impact to grades.
There are two sample lessons: one for students in
grades 3 – 5 and one for students in grades 6 – 12. Each
covers the same explanation and features. They are just
presented in more age-appropriate context.
1.If you do not want to assign a sample lesson or
you assigned it in the previous step, click the circle
beside No, I am finished. I want to exit the Setup
Wizard. Then, click Next at the bottom of the
screen to exit the Setup Wizard.
To assign the sample lesson to a student now, click
the circle beside Yes, I want to assign a sample
lesson and continue with Step 2 on the next page.
Setup Wizard • Switched-On Schoolhouse® 2014 Edition 31
2.
Click the checkbox beside the Sample Lesson you want to assign under each student’s name just as
you did to assign the regular subjects.
3.Click Finish on the Assignment Complete Confirmation box when you have selected the sample
lesson(s) for each student.
You can assign the sample lesson at a later time using the Curriculum Setup tab in SOS Teacher.
Click Close on the Summary page. Setup is complete. Your students can login and begin working in
Switched-On Schoolhouse any time now!
Click OK on the confirmation window.
You can click the Details button to see a summary of what courses were assigned to each student.
You can also click the Switched-On Schoolhouse Overview link to see a video overview of the application
or click the Switched-On Schoolhouse Tutorials link to select any of the 20 plus SOS feature specific
tutorials.
As a reminder, you can access the overviews, tutorials, user manual, tech support, or a link to sign up for a
free training webinar in the Help widget on your Teacher Home Page.
Customizing the Teacher Home Page
You now see your Teacher Home Page as shown below. You can use any of the functions of SOS Teacher
from this location. Press F1 or click the User Manual link in the Help widget to access the electronic help
files for additional assistance.
32 Quick Start Guide • Setup Wizard
The MiSOS format uses two terms you want to be familiar with:
Avatar: The small picture to the right of your name in the upper right corner of your Home Page.
Widget: These are the boxes on the Home Page containing links to the SOS functions, as well as the new
options available to you. For example, all of your administration, application, and report functions are
in separate boxes (widgets). You can also choose to have a Daily Bible Verse widget, RSS Feeds, or other
information each in a separate widget.
Please visit the Help file (F1) or select User Manual and open Teacher Home Page and MiSOS Custom
Theme under Getting Started for information about how to use these widgets.
NOTE: If your Home Page looks like the picture to the right and
you cannot access the other themes, you must upgrade your
version of Internet Explorer to IE 8 or above.
Setup Wizard • Switched-On Schoolhouse® 2014 Edition 33
Backup and Restore Procedures
Backup/Restore is a feature that protects against the loss of data such as student schoolwork, grades,
teacher commentary, and other information. You can backup your entire SOS database at any time.
Backing up saves everything exactly as it is at the time of the backup, so you can restore a previously
created copy of your database whenever you need.
We strongly recommend you backup your database daily.
Some points to remember when backing up your database:
êêYou are encouraged to backup to a flash drive or burn it to a CD.
êêThe backup file name, including the path, must not exceed 256 characters.
êêVerify that the drive has sufficient free space and you have write permissions to this drive.
êêBackup/restore operations can only be performed when there are NO students doing schoolwork.
Before you begin, make sure all students return to their homepage or completely exit SOS to protect
against losing their work.
Attention Vista Users: If you have a Client Install, it is important to read the Vista Users section on the
next page before performing a backup.
If you have a new computer, first perform the backup procedure on your old computer. Then, complete the
restore procedure on your new computer.
Backing Up Files
1.Click Backup/Restore in the Application
widget on your homepage.
2.A small Backup/Restore window appears.
Make sure the Backup tab is highlighted.
3.Click the Backup button.
4.SOS automatically populates the backup
file name “SOSbackup2014T” in your
SOS Backup folder created at installation.
We strongly recommend that you leave the
backup file with this name and location.
5.Click the Save button. A message appears, telling you the database backup is in progress. Because
this process copies the entire database, you may need to wait a few moments.
34 Quick Start Guide • Backup and Restore Procedures
NOTE: If a backup file was previously created, a message box appears, telling you the file already exists.
Click Yes if you want to replace it with the new one. If you want to save every backup file you make,
rename the file each time you back it up. If you do this, we recommend that you simply add a number
or the date at the end of the current file name and increment it by one with each backup. For example,
SOSbackup2014T1, SOSbackup2014T_20140227, etc.
6.When the process is finished, a message box appears, telling you that the backup file was successfully
created. Click the OK button. You have now backed up your entire SOS database.
NOTE: You can also copy your backup file (SOSbackup2014T.bak) to a flash drive, burn it on a CD, or
store it on a different computer.
NOTE: If you have a Teacher/Client Install, your back-up file is placed on the computer where your
database is installed. Remember this if you need to perform a restoration.
Windows Vista and Windows 7, 8, & 8.1 Users
If you have a Client Install, when you run a backup, you will get a warning telling you that you cannot write
to the location of the backup folder. There are two things you can do:
êêRun as an administrator
êêTurn User Account Control (UAC) off.
To run as an administrator:
1.Open your C: drive.
2.Open Program Files.
3.Open the AOP folder.
4.Open Switched-On Schoolhouse 2014 Home.
5.Right-click SOSHAPP.exe.
6.Select Run as administrator.
To turn off UAC:
1.Open your Control Panel.
2.Select User Accounts and Family Safety.
3.Select User Accounts.
4.Select Turn User Account Control On or Off or drag sliding bar down to “never notify”.
5.Click OK.
Backup and Restore Procedures • Switched-On Schoolhouse® 2014 Edition 35
Restoring Files
NOTE: The backup/restore operations can
only be performed when there are no students
currently doing schoolwork. Before you begin,
have all students exit their schoolwork so their
work is not lost.
NOTE: You must have a backup file you have
already created before you can restore.
1.Click Backup/Restore in the Application
widget on your homepage.
2.A small Backup/Restore window appears. Click the Restore tab to highlight it. This means you want
to restore your SOS data.
3.Click the Restore button on the bottom of the screen. A warning message appears. If you are simply
restoring a backup of your normal database, click Yes and continue with Step 5 below. Your current
data is replaced with the backup file you selected. If you want to merge the work performed by a
student on another computer, click No and return to the Application menu and select Import/
Export instead.
4.A window appears, so you can find and open the backed-up SOS database file you want to restore. It
is in the default folder created when you installed SOS. Unless you selected a different name, the file
is called “SOSbackup2014T.” If you have been retaining copies of previous backups, you may have an
incremental number after the “T.”
REMEMBER: If you have a Teacher/Client Install, your back-up file is located on the computer where your
database is installed.
5.Click the backup file you want to restore and click Open.
6.You are returned to the Backup/Restore window. The restore process starts automatically and a
message appears telling you the database restoration is in progress.
7.When the process is finished, another message box appears telling you that the restore file was
successfully created. Click OK. You have now restored your entire SOS database. The application
closes, and you must restart it.
36 Quick Start Guide • Backup and Restore Procedures
Tutorials
All of the tutorials below are available on your computer after you install SOS 2014.
To view them on your computer, double-click the desktop Tutorials icon or:
1.Click Start on your computer’s taskbar.
2.Click All Programs.
3.Select AOP.
4.Select Switched-On Schoolhouse 2014.
5.Select Tutorials.
Windows 8 Users: Find the tutorials using the tile view or on the desktop.
Tutorials
êêHow to Setup Wizard
êêHow to Backup/Restore Your Database
êêHow to Use the Homepage Settings
êêHow to Set up a MiSOS Custom Theme
êêHow to Add a New Term
êêHow to Edit a Student Attendance Calendar
êêHow to Change Between School Days and Non-School Days
êêHow to Exclude a Range of Days
êêHow to Install a Subject
êêHow to Create a Custom Subject
êêHow to Create a Custom Assignment
êêHow to Assign a Subject
êêHow to Globally Block and Unblock Quizzes and/or Tests
êêHow to Add an Event to a Student Calendar
êêHow to Create a Lesson Plan
êêHow to Update a Lesson Plan (Regenerate Due Dates)
êêHow to Remove an Assignment
êêHow to Remove a Duplicate Subject
êêHow to Block and Unblock Individual Assignments
êêHow to Clear Highlighting
êêHow to Clear an Assignment
êêHow to Zero a Unit or an Assignment
êêHow to Create a Transcript
Tutorials • Switched-On Schoolhouse® 2014 Edition 37
SOS Overview Presentation
Switched-On Schoolhouse also offers another view of the program. It is called the SOS Overview
Presentation. It includes:
1.Teacher Homepage
2.Administration - Assignment Settings
3.Administration - Quiz and Test Settings
4.Administration - Grade, Term, and Homepage Settings
5.Administration - Student Setup
6.Administration - Curriculum Setup
7.Lesson Book - Assignments
8.Lesson Book - Lesson Plan and Attendance
9.Student Homepage
10.Student Schoolwork
11.Student Lesson Presentation
You can access this presentation by clicking SOS Overview in the Help Center widget on your homepage.
You can also access additional grade level presentations by going to
www.aophomeschooling.com and following these steps:
1.Under Christian Homeschool Curriculum Options, click Switched-On Schoolhouse.
2.Select Grades.
3.Click the grade level or subject folder.
4.Click the SOS box or specific subject CD.
5.Click the View On-Demand Presentations link in the middle of the page.
SOS Free Training Webinar
AOP offers a free training webinar for Switched-On Schoolhouse. You can register for these training
sessions by clicking the link in the Help widget on your Teacher Homepage or by going directly to
www.aophomeschooling.com/webinar/index/soswebinar
38 Quick Start Guide • SOS Overview Presentation
SOS User Manual and Help File
The Help file is the SOS User Manual. It answers most questions about how to use the program. You
can access it either by clicking the User Manual link in the Help Center widget on the SOS Teacher
Homepage or by pressing the F1 key from anywhere in either the Teacher or Student application. If you
prefer a paper copy, you may download one at
http://www.aophomeschooling.com/customer/webinar/soswebinarfront. Click the Resources tab in the
middle of the page.
Tutorials
SOS includes a series of video tutorials to demonstrate how to perform various functions. There are several
ways to access them. Double-click the Tutorials icon on your desktop, click the User Manual link in the
Help Center widget on your SOS Teacher Homepage and select Tutorials, or click the Start button on
your taskbar and select All Programs > AOP > Switched-On Schoolhouse > Tutorials. Additionally, you
can view the tutorials on the Internet at http://www.sostutorials.com. Click the Tutorials tab in the middle
of the page.
Attention Windows 8 Users: Find the tutorials using the tile view.
SOS Overview Presentation
This presentation provides an overview of Switched-On Schoolhouse. View it online by clicking the User
Manual link in the Help Center widget on the SOS Teacher Homepage and selecting SOS Overview on
the web at www.aophomeschooling.com. See the steps for navigating to this site on p. 38.
Online Support
There is an extensive database of solutions to questions, answers, and problems
with solutions others have encountered while using SOS available online at
http://www.aophomeschooling.com/customer/webinar/soswebinarfront. This is the fastest way to answer
most of your questions. This database is updated regularly as new issues and solutions are identified.
Clicking the Tech Support link in the Help Center widget on your SOS Teacher Homepage opens the
website. Additional AOP products are available at this site as well.
Phone Support
If you are still in need of assistance, call the technical support team at 866-444-4498. Our shortest wait
times are typically Thursday and Friday afternoons.
Customer Service
Call 800-622-3070
SOS Overview Presentation • Switched-On Schoolhouse® 2014 Edition 39
Forgot Your Teacher Password?
SOS does not limit how many times you can try your password. SOS does have a data utility on SOS
Installation Disc Two you can use to change or reset your password.
Remember:
êêYour password is case sensitive, so check to see if your Caps Lock key is on.
êêIf your password is longer than 12 characters, you will get an error.
êêYou may use letters or numbers in your password, but NO special characters.
1.Put SOS Installation Disc Two into the CD-ROM or DVD drive of your PC.
2.If the Install window opens, click Close.
3.At the same time, press the Windows (
) and e keys.
4. Right-click the drive containing the SOS installation disc and click Open.
5.Double-click the Tools folder found on SOS Installation Disc Two and double-click the DataUtilities.exe.
6.When you are prompted to select a database, choose SOS Home 2014 and click Connect.
7.Use the dropdown menu to select the Change Password option and click
Execute Command.
8.Enter your new password twice and click Save.
9.When the window closes, notice the “Successfully Changed Password” message below the Execute
Command button. Click X in the upper right corner to close the Data Utilities window.
10.Remove the disc from the CD-ROM or DVD drive.
NOTE: Be sure to write your password down and put both the password and the SOS installation disc
somewhere safe. Protect your teacher password by keeping the disc in a safe location.
40 Quick Start Guide • Forgot Your Teacher Password?
Troubleshooting
If you experience problems with the installation of your application, try the following before calling
technical support.
êêClose any open applications.
êêRestart your computer.
êêDisable/turn off any anti-virus software.
êêDouble-check that your computer meets or exceeds the minimum system requirements as shown on
p. 3.
êêRemove the application and reinstall it. Before you do this, be sure you have a backup and carefully
follow the procedures on p. 34.
êêVerify that you have the most recent application and curriculum updates by visiting
http://www.aophomeschooling.com/customer/webinar/soswebinarfront and www.sosupdates.com.
êêVisit http://www.aophomeschooling.com/customer/webinar/soswebinarfront for detailed solutions
to the most frequently encountered questions.
êêRead the Contacting Technical Support section on p. 46 before emailing or calling.
êêSee the Resource List on p. 47 for contact information.
êêSee the SOS Tech Support Videos folder on SOS Installation Disc Two for help on some common
issues people have experienced.
Common Issues
There are several common issues people encounter. Please take a look at these solutions before contacting
tech support.
Q: When I clicked on a lesson, I was prompted to “browse for folder.” What do I do?
A: This means Switched-on Schoolhouse is not sure where to locate your curriculum.
1.Put the curriculum CD-ROM/DVD for that subject in the CD-ROM/DVD drive on your computer. If a
window opens asking what you want to do, click the Close button.
2.Open the SOS Student application and click the Copy Curriculum link in the Application widget on
the Student Homepage.
3.Click OK on the Copy Curriculum window. A progress window displays while it is copying to the hard
drive of your computer. It may take a few minutes.
4.Click the Close button when the copy is complete. You can now remove the subject disc from your
CD-ROM/DVD drive and access the lesson without the disc or the “browse for folder” message.
Troubleshooting • Switched-On Schoolhouse® 2014 Edition 41
Q: I have a message telling me I have an invalid database connection. How do I fix it?
A: There are a couple of possibilities. Please check the following:
1.Confirm that your SQL server is running. Press the Windows and r keys together. In the Run dialogue
box, type “services.msc” (no quotation marks). This opens your Services Manager. It sometimes takes
a minute or two to open and list all of the services on your computer that run in the background. Look
for SQL Server (SOSHOME80).
2.If it is not listed as STARTED, right-click the service name and click Start. A progress bar displays
while it is starting.
3.Close the Services window and log into Switched-On Schoolhouse.
If restarting SQL did not fix the problem, the problem might be that Windows Firewall is blocking the
database connection. If the problem is on the computer with the Client Install, there is a tool on SOS
Installation Disc Two to help open the ports on your Firewall specific to Switched-On Schoolhouse.
Do these steps on the computer with the Full Install (the one where your database resides). To run the
Firewall utility:
1.Insert SOS Installation Disc Two in your CD-ROM/DVD drive on your computer. Close the
application when it opens to the Installation window.
2.Press the Windows and e keys at the same time.
3.Right-click the drive containing SOS Installation Disc Two and click Open.
4.Double-click the Tools folder and double-click the FWConf folder.
5.Right-click the FWconf.exe file. Choose Run As Administrator (If you are using XP, the choice is
Run.)
6.On the Firewall Exception window, click the Create Exceptions button.
7.When the indicator at the bottom of the box with the exceptions reads True, close the windows you
opened while following these seven steps and log into Switched-On Schoolhouse.
If ONLY the computer with the Full Install is getting the invalid database message:
1.Insert SOS Installation Disc Two in the CD-ROM/DVD drive on your computer.
2.Press the Windows and e keys on your keyboard simultaneously.
3.Right-click the drive containing SOS Installation Disc Two and click Open.
4.Double-click the Tools folder.
5.Double-click the InvalidDBConnectionTool.exe folder.
6.Double-click InvalidDBConnectionTool.exe
7.On the Invalid Database Connection Tool window, click Correct Database.
8.If you get a message to close the windows, repeat steps 5 – 6 one more time. If you still get a message,
call tech support.
9.If you get a Successful message, close the window and try SOS Teacher or SOS Student to see if the
program is now working correctly.
42 Quick Start Guide • Troubleshooting
Q: I’m having trouble performing a Client Install. What do I do?
A: There are a couple of possibilities. We’ll walk through each problem and solution.
1.Make sure you can see the SQL Instance name of the database (SOSHOME80) in the drop-down list
to pick your database. If you do not see it:
êêManually type the network path to where the SQL instance (SOSHOME80) is located into
the box. It should look something like this: “Computer Name\SOSHOME80”. Do not type in
the quotation marks. Substitute your computer’s name for “Computer Name”. (To locate your
computer’s name, press the Windows and e keys at the same time. Then, right-click Computer
(XP users, My Computer) and select Properties.
Continue with your Client Install
2.Occasionally, Windows Firewall blocks the connection between SOS and the SQL database. If this
happens, follow steps 1-7 on the previous page to access and run the Firewall Utility.
3.Third-party security software (anti-virus, Internet family safety, filters, spyware, or spam scanners) on
your computer sometimes blocks the connection between SOS and the SQL database. There are a
few things you can do to try to make sure they are not interfering.
a.Make sure you are not running more than one anti-virus suite. Different types of anti-virus
programs are not meant to be run simultaneously. This can open your computer to outside risks.
If you have more than one anti-virus program on your computer, choose the one you want to
keep and completely uninstall others using the Add/Remove Programs or Programs area of your
Control Panel. Even if the other program is just an expired trial program that came with your
computer, remove it.
b.AT YOUR OWN RISK, you can temporarily disable your security software for the duration of
the SOS installation process. Many security programs have an option to disable the software in
increasing increments of time. Check your security software documentation for instructions.
c.Often, you can set your security software to grant SOS an exception, meaning it treats SOS
and its database as a trusted connection. Check your security software documentation for
instructions. You may need to contact the security software manufacturer’s technical support for
assistance.
4.Confirm your computers can “talk” to each other over your network. There are three identifiers
that allow other computers on your network to identify and work with them. Once you gather the
information, you can save it in the table on p. 45. Each computer has a:
êêName
êêInternal Address (for self-identification within your home network)
êêWorkgroup
Troubleshooting • Switched-On Schoolhouse® 2014 Edition 43
To gather this information:
Computer Name and Workgroup:
1.Press the Windows and e keys at the same time.
2.Right-click Computer (XP users, My Computer)
3.Select Properties (XP Users click the Computer Name tab.)
IP Address
1.Press the Windows and r keys at the same time.
2.Type CMD into the Run box that appears.
3.Click OK.
4.A DOS prompt window opens. Type IPCONFIG and press the Enter key on your keyboard.
5.Your IP Address displays in the list.
6.Make sure all of the computers you want networked are in the same workgroup and all the computers
can “ping” one another both by Computer Name and IP Address. On each computer, do the
following:
a.Press the Windows key and the r keys on your keyboard at the same time.
b.Type CMD into the Run box that appears.
c.Type Ping “ComputerName” using the name of each of the other computers. Do this one at a
time. Type your computer’s name in after Ping without the quotation marks.
d.Press the Enter key.
If the ping was successful, you should see a list of statistics. If it was not successful, you get a timeout
message or other error indicating failure.
To ping by IP Address, repeat the same four steps, substituting IP Address for Computer Name in step 3.
Again, you know the ping was successful if you see a list of statistics. If it failed, you see a timeout or error
message.
If you were unable to successfully ping the other computers, try the following:
êêConfirm both computers are connected to the home network.
êêYou can connect to the Internet.
44 Quick Start Guide • Troubleshooting
êêMake sure the wireless adaptor is turned on. (Many laptops have a physical switch for WiFi or a
function key to turn it on and off.)
êêConfirm that both computers are connected to the same network. Occasionally, you might
inadvertently connect to a neighbor’s network.
êêMake sure your router is turned on and functional. Power cycle it by turning the router off for 30
seconds and turning it back on.
êêIf your router limits internal connections or routes traffic externally, you may need to contact tech
support for your router manufacturer.
If you are still unable to complete the Switched-On Schoolhouse Client Install, please contact tech support
as described on p. 46.
Use the table below to enter and save Client Install information.
Full Install Computer
Client Install Computer
Computer Name
IP Address
Workgroup
Troubleshooting • Switched-On Schoolhouse® 2014 Edition 45
Contacting Technical Support
Please verify that your computer meets or exceeds the minimum requirements listed on p. 3 before
contacting technical support. Additionally, you should have the following information available prior to
contacting tech support:
The version of Windows you are currently using, the amount of RAM, and how much available disk
space you have.
Windows XP Users: Click Start on your computer’s taskbar, right-click My Computer, and select
Properties.
Vista and Windows 7 Users: Click Start on your computer’s taskbar, double-click Computer, and rightclick your hard drive.
Windows 8 Users: Press the Windows (
drive.
) and e keys at the same time. Then, right-click your hard
Determine the version of SOS you are using:
êêIf you have already installed SOS, click the About link located in the upper right corner on your SOS
homepage. Click the SOS Logo if you are using the Classic theme.
êêIf you have not installed SOS yet, look on the left-hand side of your SOS Installation Disc. It has a V.
with a series of numbers and/or letters.
46 Quick Start Guide • Contacting Tech Support
Resource List
SOS User Manual (Help File)
Click User Manual in the Help Center widget on your homepage or press the F1 key on the top row of your
keyboard from anywhere in the application.
Students, click Help in the Application widget on your homepage or press the F1 key anywhere in the
application.
SOS Tutorials
Start > All Programs > AOP > Switched-On Schoolhouse 2014 > Tutorials or click
the Tutorials icon on your desktop, the link in the Help widget on your Homepage or
http://www.sostutorials.com
Windows 8 Users: Find the tutorials in the tile view.
SOS Overview Presentation
www.aophomeschooling.com
See p. 38 for navigation steps.
Online Support
www.aophomeschooling.com/webinar/index/soswebinarfront
Email Tech Support
[email protected]
Curriculum Feedback
www.aophomeschooling.com/errors
SOS Application and Curriculum Updates
www.sosupdates.com
Facebook
www.facebook.com/switchedonschoolhouse.homeschool
Toll-Free Phone Assistance
Customer Service
800-622-3070
Technical Support
866-444-4498
Resource List • Switched-On Schoolhouse® 2014 Edition 47
H
OMESCHOOLING RISES ABOVE standards to
teach children to think for themselves and learn
freely in ways that suit them best.
Like homeschooling, we go beyond the ordinary,
from our passion for homeschooling and variety of
curriculum to our foundation in faith and tradition
of excellence.
Being uncommon is a badge of honor that we owe
to all the homeschool families who inspire us to aim
higher with each new day.
www.UncommonHomeschooling.com