1
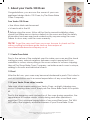
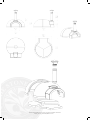
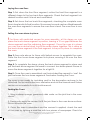
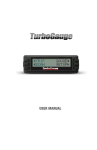
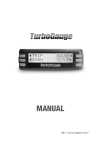
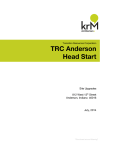
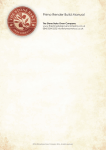
Vento 100 Oven Assembly and Operation Manual
The Stone Bake Oven Company
Units 18 + 19
Christchurch Business Park
The Runway
Christchurch, Dorset
BH23 4FL
[email protected]
For further information, printable manuals, our favourite recipes and more,
visit us at www.thestonebakeovencompany.co.uk
© The Stone Bake Oven Company 2015. All rights reserved.
Reference : Date : Vento_Oven_Manual/Version 1.2.2
July 2015
FIRE AND SAFETY NOTICE: SAVE THESE INSTRUCTIONS
Failure to follow the Vento Oven Manual and Health and Safety instructions
may result in oven damage, cause damage to property, cause bodily injuries
or in some cases even cause death.
If you choose to use the oven, it is done so at your own risk. No liability is
accepted by The Stone Bake Oven Company for any injury, damage or loss
incurred.
DO NOT burn flammable liquids or similar at any time in the oven, including
but not limitied to; firelighter fluid, petrol, diesel, lantern oil or kerosene.
DO NOT artificially attempt to induce airflow through the oven, e.g. using a
fan.
ONLY USE untreated dry hardwood as a fuel and DO NOT burn any refuse,
plastics, treated wood; including laminates, charcoal, chipped wood,
pressure treated lumber, sappy wood (for example, pine) or fossil fuels.
ALWAYS WEAR PROTECTIVE CLOTHING: We strongly recommend gloves for
use during oven operation. ALWAYS keep children, groups of people and
pets a safe distance from the oven whilst in operation and whilst cooling.
ENSURE all tools and materials used in the oven are appropriate for high
temperatures and take care whilst handling tools. No liability is accepted for
any injury, damage or loss that occurs because non-approved tools have
been used.
BEWARE of high temperatures achieved on the outside and inside of the
oven and be cautious of flying sparks. Ensure wood storage is covered by a
non-combustible material. Do not leave the oven unattended.
ENSURE if you install your oven and flue indoors/under cover the appropriate
building regulations and safety restrictions are met. Check with your local
authority.
DO NOT keep any combustible materials, near or within range of the oven
at any time. This includes clothing, furniture, electrics, nearby shrubs or trees,
flammable materials, liquids or the like.
DO NOT touch the oven or flue, or artificially block or cover the oven
entrance at any time during and after operation.
DISPOSE of ashes in a safe way once they are cold. Ensure you regularly
clean your flue parts, failure to do so may result in flue fires.
DO NOT modify the oven in any way from the manufacturer’s design and
specification. “Building in” as detailed by The Stone Bake Oven Company
Build Manuals does not count as a modification.
FIRE PRECAUTION:
Ensure a water fire extinguisher of at least 9 litres capacity (to deal with the
oven and surrounding area) and a bucket of sand are positioned within easy
reach. Although we have tested the use of fire extinguishers on the oven with
no adverse affect, in case of an emergency, we recommend only sand is
used to knock down a fire within the oven. In order to satisfy UK Fire Safety
Legislation we strongly suggest that anyone who may tackle a fire should be
adequately trained by a fire safety professional.
© The Stone Bake Oven Company 2015. All rights reserved.
Vento_Oven_Manual/Version 1.2.2
Contents
1. About your Vento 100 Oven
1.1 Vento Oven finish
1.2 Soot
1.3 If your Vento Oven chips/cracks
1.4 Vento Oven reinforcement fibres
1.5 Vento Oven maintenance
2. Vento 100 Oven assembly
2.1 Vento Oven and Flue Clearances
2.2 Vento Oven Delivery
2.3 Vento Oven Location
2.4 Vento Oven Installation
2.5 Vento Oven Assembly
3. Vento 100 Oven use
3.1 The ‘don’ts’ when using your Vento Oven
3.2 What wood to use in your Vento Oven
3.3 How to make fire
3.3.1 Lighting your oven for the first time / in Autumn and Winter
3.4 How to cook in your Vento Oven
3.5 How to dispose of ashes safely
3.6 Oven tools
4. The Clean Air Act 1993 and Smoke Control Areas
5. Vento 100 Oven Warranty
© The Stone Bake Oven Company 2015 All rights reserved.
Vento_Oven_Manual/Version 1.2.2
1. About your Vento 100 Oven
Congratulations, you are now the owner of your own
registered design Vento 100 Oven, by The Stone Bake
Oven Company.
Your Vento 100 Oven:
• Has Micro-Mesh reinforcement
• Is hand cast in the UK
! Before using the oven, follow all the Vento manual installation steps,
check that there are no obvious defects in the oven and that the safety
information has been read and understood by anyone using the oven.
Failure to do so may void the oven warranty.
TOP TIP: To get the very most from your oven, be sure to check out the
online cooking techniques guide and our free recipes at
www.thestonebakeovencompany.co.uk
1.1 Vento Oven finish
Due to the nature of the materials used to make your oven and the hand
casting process, natural variations between ovens is expected. From
variations in colour, minor pitting in the oven surface to surface chipping.
Here at The Stone Bake Oven Company, we believe each oven is unique,
adding to its rustic and individual charm.
1.2 Soot
After the first use, your oven may become blackened in parts. This is due to
soot accumulation and is a normal expectation of any wood fired oven.
1.3 If your Vento Oven chips/ cracks
Take care when maneuvering your Vento Oven, as slight chipping may
occur. If chipping does occur, simply ask The Stone Bake Team for a patch
kit.
Due to the expansion and contraction of the oven during operation, the
appearance of hairline cracks, visible during and after operation is
expected. This is a normal expectation of any wood fired oven. This WILL
NOT affect the longevity and effectiveness of your Stone Bake Oven.
© The Stone Bake Oven Company 2015. All rights reserved.
Vento_Oven_Manual/Version 1.2.2
1.4 Vento Oven reinforcement fibres
On very rare occasions, there is potential for fine metal fibres to protrude from
the oven base or dome. Please take care and consideration when
maneuvering the oven. These fibres can simply be removed or trimmed.
1.5 Vento Oven maintenance
Great! A self-cleaning oven! The Vento 100 boasts very little cleaning and
maintenance. All spilled or stuck on food will be burnt off by the heat achieved
within the oven. Simply remove the ashes before the next firing in a safe way
(see section 3.5).
! Ensure you regularly clean your Vento Oven flue, failure to do so may result
in a flue fire.
2. Vento 100 Oven Assembly
2.1 Vento Oven and Flue clearances
!
Oven clearances are recommended for your safety and the safety of
your property. It is essential that these clearances are maintained from any
combustible materials, failure to do so may result in fire.
If the Vento 100 is installed to meet The Stone Bake Oven Company
specifications, oven clearances are 100mm from all walls of the oven and
900mm from the flue length. Ensure nothing obstructs the flue from directly
above.
2.2 Vento Oven Delivery
The oven weighs approx 380 kg in total; 3 x approx 50kg base pieces and 2
x approx 115 kg dome pieces. Take care when assembling with at least 2-3
strong adults who are trained in lifting techniques.
Included in the Vento 100 package: The Vento 100 Oven, Vento Oven door,
flue length, rain cap, high heat refractory insulating blanket, calcium silicate
insulating board, high heat fire cement and decorative archway.
© The Stone Bake Oven Company 2015 All rights reserved.
Vento_Oven_Manual/Version 1.2.2
© The Stone Bake Oven Company 2015. All rights reserved.
Vento_Oven_Manual/Version 1.2.2
2.3 Vento Oven Location:
Ensure the oven is in a sheltered location, taking common wind direction and
drafts into consideration. If you are installing it under cover/indoors the
appropriate measures to meet fire regulations, local restrictions/laws and health
and safety measures must be under taken. The Stone Bake Oven Company do
not accept any liability where these or similar measures have not been met.

2.4 Vento Oven Installation
The Vento 100 Oven can be installed in a range of different designs using
different materials. For inspiration why not visit our website or ask the Stone Bake
team for the Oven Style Guide to select an oven with a finished design to suit
your home or garden. For Build manuals on how to build a base and enclosure
for the Vento Oven, contact the Stone Bake team or visit the ‘Manuals and
Videos’ section on our website.
2.5 Vento Oven Assembly
! Note: wear protective mask and goggles when cutting insulation board and
using insulation wool.
! DO NOT place fire cement between the oven joints, this will affect its ability
to fit together.
!Heavy: The oven dome and base parts are heavy and fragile, handle with
extreme care when moving to prevent oven chipping.
!
We recommend anyone lifting the oven is adequately trained in lifting
techniques. Lift the oven with two or more people.
! To ensure the oven floor is installed level, you can bed the base pieces down
using sand or fire cement for a level finish.
! Keep fingers and clothing clear from oven base and joints during set down
and assembly.
After building your oven base to The Stone Bake Oven Company’s build
manual instruction, lay your insulation board beneath the oven to cover the
footprint of the oven floor. You may trim excess board using a saw.
With the base of the oven complete and your insulation boards in position,
follow the steps below to assemble the oven.
© The Stone Bake Oven Company 2015 All rights reserved.
Vento_Oven_Manual/Version 1.2.2
Laying the oven floor:
Step 1: Set down the front floor segment, notice the front floor segment is a
different shape to the two back floor segments. Check the front segment is in
desired location and it is level and centralised.
Step 2: Set down the two back floor segments, checking the complete oven
floor is level and in its final location. Fire cement or sand can be utilised beneath
the oven floor segments to ensure the oven floor is level. The oven floor is now
laid.
Setting the oven dome in place:
! For those with restricted access for oven assembly, at this stage you can
place the back dome segment in position, leaving a 10 cm gap between the
dome segment and the adjoining floor segment. Once the oven is in place
you can use a ratchet strap to pull the entire dome together. This is done as
the back dome segment is the final segment to be put in place to complete
the oven.
Step 3: See note above for those with limited access to assemble the oven.
Place the front oven dome segment into place, ensuring it fits over the floor
segment.
Step 4: To complete the dome, place the back dome segment in place and
pull the back dome segment forwards to connect two dome pieces. Ensure to
move the dome segments together for a tight fit.
Step 5: Once the oven is assembled, use the included fire cement to ‘seal’ the
joint between the two dome segments. See below: Sealing the Oven.
The oven is now ready for insulating and for the decorative archway to be
attached. For tips and instructions, see below and visit the Manuals and Videos
section on our website for a full build manual.
Sealing the Oven:
1. Using a damp sponge, generously dab water on the joint line in the oven
dome.
2. Generously apply fire cement to fill the joint lines in the oven dome surface.
Do not fill inside the oven.
3. Once the oven is assembled and fire cement is applied, check the seal
of the oven by lighting a small fire with two pieces of newspaper. Check for
© The Stone Bake Oven Company 2015. All rights reserved.
Vento_Oven_Manual/Version 1.2.2
smoke leaks, if so, fire cement the gap.
Installing the Flue Manifold:
Different shapes and finishes can be achieved with a flue system, ask The Stone
Bake Oven Company team for more details.
The Vento Oven takes a 6 inch/150mm flue. Place your flue into the flue hole
in the Vento 100 Oven, this should be a snug fit.
! Single walled flue systems are for outdoor installation ONLY, DO NOT install
indoors/under awnings/ covers, gazebos or similar. For more information on
indoor installation, contact the Stone Bake team.
! It is your responsibility to ensure your flue meets government guidelines and is
regularily cleaned to reduce the risk of flue fires.
Insulating wool:
Lay the included insulation wool over the oven, ensuring you overlap any
joints. DO NOT leave any part of the ovens dome on show. Insulation thickness
is dependent on your requirements, with a minimum of one to two layers thick.
TOP TIP: For an igloo style, follow this step with foil and plasterers lathe/chicken
wire and finish with render. For build details, ask for the Render Instructions and
see the Stone Bake website for build images and manuals.
TOP TIP: For brick enclosures, brick around the oven, layer with insulation wool
and fill the void with vermiculite, for extra insulation. Next build a roof to the
oven. For Build Manuals ask the Stone Bake team or visit our ‘Manuals and
Videos’ section on our website.
!
Note: wear a protective mask and goggles when cutting insulation wool
and board.
Finishing Your Oven:
There are many different types of enclosures you can create with a Vento
Oven using different building materials, from wood to brick, tiles, render and
stone, the options are endless.
For more inspiration on build styles for the Vento Oven, see The Stone Bake
Oven Company website www.thestonebakeovencompany.co.uk.
For details on how to build different types of enclosures, visit the Manuals and
Videos section of our website.
© The Stone Bake Oven Company 2015. All rights reserved.
Vento_Oven_Manual/Version 1.2.2
3. Using your Vento Oven
3.1 The ‘dont’s when using your Vento Oven
DO NOT use flammable liquids or sappy wood
DO NOT use treated wood or non-organic firelighters
DO NOT cover the entrance of the oven
DO NOT place combustible materials within oven clearances
DO NOT overfill the oven
DO NOT use coals in the oven
DO NOT touch hot surfaces with naked skin
DO NOT leave the oven unattended whilst in operation
3.2 What wood to use in your Vento Oven
The Stone Bake Oven Company strongly recommends using Capo Forresta
Beech Briquettes (available on our online shop) with a moisture content of
less than 7%. Alternatively, kiln dried wood (20% moisture content) will also be
suitable for using in your oven. Seasoned wood, green wood or any wood
with moisture content above 20% will cause your oven to smoke and it will
struggle to reach high temperatures.
TOP TIP: To ‘kiln dry’ your own wood, simply place a stack in the oven after
cooking one evening. The retained heat will dry your logs. Ensure you have
removed all embers before you place the logs in the oven. Do not leave the
oven unattended. Please note, this tip only applies to natural hardwood.
Capo Forresta briquettes do not require any further drying.
3.3 How to make a fire
Very soon you will be used to firing up your oven and getting a feel for cooking
environments. In the meantime, you can watch our firing up videos, read our
cooking techniques guide or purchase a thermometer from our online shop
to help you along your way.
TOP TIP: For tips on firing up your oven using Capo Forresta Beech Briquettes,
contact the Stone Bake team!
Step 1
Using your kiln dried, non treated wood, chop into chunky kindling lengths of
around 10 inches and about 3 inches thick.
! Shop bought, ready cut kindling can often be too small for the oven and will
not last in the oven resulting in little heat output. Contact the Stone Bake team
© The Stone Bake Oven Company 2015. All rights reserved.
Vento_Oven_Manual/Version 1.2.2
if you are unsure on your wood size.
Using a natural fire lighter, place it in centre of the oven floor, make a small
cross sectioned structure around it using your cut kindling. Light the natural fire
lighter.

Place Fire Lighter
Form kindling stack
Light kindling stack
Step 2
Leave the fire stack to burn in the centre of the oven. This ensures the oven
dome and base is saturated with heat evenly. Add to the burning kindling
stack. You will start to approach optimum cooking temperatures 450+ degrees
celcius. You can tell this by using an infrared thermometer, a floor standing
thermometer or when the sooty deposits in the oven diminish.
Step 3
Once you have reached optimum cooking temperatures,(450+ degrees
celsius) you are ready to start the cooking process. Move the embers of the
fire to the back or side of the oven, exposing an area to place food, you can
do this using the metal pizza peel, and can clear the oven floor using an oven
brush or hearth mop.
TOP TIP: Always bring your oven up to optimum cooking temperature first,
whether you are cooking pizza in a hot oven or roasting and baking in a cooler
oven. This ensures the oven is saturated with heat, and will make sure it stays
hotter for longer.
TOP TIP: Remember to rotate your items to ensure even cooking, also remember
to alternate embers on each side of the oven when cooking over long periods
to ensure even distribution of heat.
3.3.1 Lighting your oven for the first time/in Autumn and Winter
Your oven may take a little longer to reach optimum temperatures on your
first firing. This is normal. This is due to residual moisture in the oven from
storage and transit.
In Autumn and Winter during wet weather or low temperatures, ensure you
light the oven slow and steady, at a stable rising temperature for over 55+
minutes. Then resume with your regular firing technique.
© The Stone Bake Oven Company 2015. All rights reserved.
Vento_Oven_Manual/Version 1.2.2
! Failure to light the oven slowly in these instances may cause oven damage
and affect your oven warranty.
3.4 How to cook in your Vento Oven:
The Vento 100 Oven has the same cooking abilities as all of our wood fired
oven range. You can cook virtually anything in a wood fired oven and
achieve a range of different cooking techniques. Cook pizza, roast, grill,
bake and more, using the different phases of heat in the oven. For an easy
step-by-step guide, visit our cooking techniques guide, available online with
our free recipes. For foodie inspiration visit our Twitter and Facebook page, or
get interactive and send in your pictures.
TOP TIP: The door provided with your oven can be used for a range of
different cooking techniques including roasting and baking. Take care whilst
using the oven door, it may get hot.
3.5 How to dispose of ashes safely
Even if its been over 24 hours since firing, the ashes from your oven can still be
a fire risk. Ensure you wait until the oven is definitely cool before attempting
to remove the ash. Remove ash with appropriate tools e.g. oven brush and
place in a metal bucket with a sealable lid away from combustible materials.
3.6 Oven Tools
To run your oven safely and effectively it is essential that you use the correct
tools. A large range of tools are available to purchase on our website from
our online store. Ensure all pots and pans used are appropriate for high
temperatures. We recommend cast iron pots and pans for cooking in your
wood fired oven.
© The Stone Bake Oven Company 2015. All rights reserved.
Vento_Oven_Manual/Version 1.2.2
4. The Clean Air Act 1993 and Smoke Control Areas
Under the Clean Air Act local authorities may declare the whole or part of
the district of the authority to be a smoke control area. It is an offence to
emit smoke from a chimney of a building, from a furnace or from any fixed
boiler if located in a designated smoke control area. It is also an offence to
acquire an “unauthorised fuel” for use within a smoke control area unless
it is used in an “exempt” appliance (“exempted” from the controls which
generally
apply in the smoke control area).
The Secretary of State for Environment, Food and Rural Affairs has powers
under the Act to authorise smokeless fuels or exempt appliances for use
in smoke control areas in England. In Scotland and Wales this power rests
with Ministers in the devolved administrations for those countries. Separate
legislation, the Clean Air (Northern Ireland) Order 1981, applies in Northern
Ireland. Therefore it is a requirement that fuels burnt or obtained for use
in smoke control areas have been “authorised” in Regulations and that
appliances used to burn solid fuel in those areas (other than “authorised”
fuels) have been exempted by an Order made and signed by the Secretary
of State or Minister in the devolved administrations.
Further information on the requirements of the Clean Air Act can be found
here : https://www.gov.uk/smoke-control-area-rules
Your local authority is responsible for implementing the Clean Air Act 1993
including designation and supervision of smoke control areas and you can
contact them for details of Clean Air Act requirements.
The Stone Bake Oven Co. Vento oven has been recommended as suitable
for use in smoke control areas when burning wood and in accordance with
the instructions in this manual.
© The Stone Bake Oven Company 2015. All rights reserved.
Vento_Oven_Manual/Version 1.2.2
5. Vento 100 Oven Warranty
Vento 100 Oven warranty
The Stone Bake Oven Company, producer of wood-fired ovens, warrants the Vento
100 Oven to be free from defects in workmanship and materials for the period of 1
year from the date of delivery.
Investigation of claims against warranty
The Stone Bake Oven Company reserves the right to investigate any/all claims against
it’s warranty’s/this warranty, then subsequently decide upon method of settlement.
Warranty Qualifications
The warranty outlined above is subject to accordance with the following qualifications:
1) The warranty does not apply to normal wear and tear of the oven or small/ fine
cracks which may appear due to the natural expansion and contraction under heat
of the oven dome and base.
2) The Stone Bake Oven Company Vento Oven is installed in accordance to the
Vento Installation Instructions, as outlined in The Stone Bake Oven Company Manual
and complies with local building regulations.
3) The Vento Oven is subject to normal use, as defined by the operational manual.
The Stone Bake Oven Company does not warrant the Vento Oven when any other
fuels apart from dry untreated wood is burnt, as this may cause damage to the
Vento Oven.
4) This warranty does not apply to cracking after overfilling the oven, or failing to use
recommended fuels and/or failing to follow the guidelines of slow firing in autumn
and winter.
Limitation Liability
Under this warranty and any other warranty expressed or implied by the Stone Bake
Oven Company to the purchaser/s, shall be limited to repair, replacement or refund,
subject to warranty qualifications being met as defined above.
In no event shall The Stone Bake Oven Company be responsible or liable for any
incidental and consequential damages to property, losses, bodily injuries and the
like, caused by defects in it’s products. Whether or not such damage is caused by
The Stone Bake Oven Company’s negligence or such damage is discovered before
or after replacement or repair.
Dealers and employees have no authority to alter this warranty
Dealers and Stone Bake Oven Company employees have no authority to make any
warranties or authorise any remedies which are not in accordance, or which are in
addition, to those stated above.
How to register a claim against the warranty
In order for a claim against this warranty and for it to be valid, The Stone Bake
Oven Company must be notified by telephone 0845 834 0252 or in writing to; The
Stone Bake Oven Company, Units 18 + 19, Christchurch Business Park, The Runway,
Radar Way BH23 4FL. Claims should include the description of defect and original
date of delivery with copy of original delivery/ advice note. Claims are to be made
within 1 year of the advice note and delivery date.
© The Stone Bake Oven Company 2015. All rights reserved.
Vento_Oven_Manual/Version 1.2.2
Notes
© The Stone Bake Oven Company 2015. All rights reserved.
Vento_Oven_Manual/Version 1.2.2
For further information, printable manuals, our favourite recipes and more,
visit us at www.thestonebakeovencompany.co.uk
Vento_Oven_Manual/Version 1.2.2