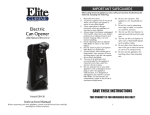
1
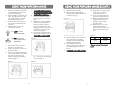
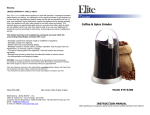
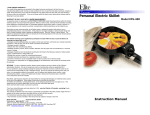
 IMPORTANT SAFEGUARDS
When using any electrical appliance, basic safety precautions should always be
followed, including the following:
4 oz. Tabletop Popcorn Maker
Maquina De Mesa Rosetas De Maiz
WARNING: TO AVOID THE RISK OF ELECTRICAL SHOCK, ALWAYS MAKE SURE
THE PRODUCT IS UNPLUGGED FROM THE ELECTRICAL OUTLET BEFORE
ASSEMBLING, DISASSEMBLING, RELOCATING, SERVICING, OR CLEANING.
1.
2.
3.
4.
5.
READ ALL INSTRUCTIONS BEFORE
FIRST USE.
Do not touch hot surfaces. Always
use handles or knobs to operate.
To protect against risk of
electrical shock, do not immerse
cord, plug, or any non-removable
parts of this appliance in water or
other liquid.
Close supervision is necessary
when any appliance is used by or
near children.
12. WARNING: NEVER immerse
popping kettle into water or any
other liquids.
WARNING: KEEP OUT OF REACH OF
CHILDREN.
13. Kettle surface is very HOT when in
use. Do NOT touch the hot kettle
when in use or just after use.
14. Do not let cord hang over edge of
table or counter, or touch hot
surfaces.
15. Always attach plug to appliance
first, then plug cord in the wall
outlet. To disconnect, turn any
control to “off’, then remove
plug from wall outlet.
16. A fire may occur if this
appliance is covered by or
touches flammable material
including curtains, draperies,
walls, etc. when in operation.
Do not store any item on top of
the appliance.
17. Do not place on or near a hot gas
or electrical burner, or in a heated
oven.
18. Extreme caution must be used
when moving an appliance
containing hot oil or other hot
liquid.
19. Turn all controls to "OFF" before
inserting or removing plug from
wall outlet.
6.
Model EPM-450
Instruction Manual
Before operating your new appliance, please read all instructions carefully
and keep for future reference.
Unplug from outlet when
not in use and before
cleaning. Allow to cool
before installing or
parts. To
removing
disconnect, grasp plug and
remove from outlet. Do not
pull by the cord.
7. Do not operate the appliance if
the power cord or plug is
damaged, it must be replaced by
the manufacturer or its service
agent before use. Return
appliance to the nearest service
facility for examination, repair or
adjustment.
8. The use of any accessories or
attachments not supplied by the
manufacturer is not
recommended as it may cause
injuries.
9. Do not use outdoors.
10. Do not pop kernels in a dry kettle
(without oil).
11. CAUTION: NEVER use
when popping
butter/margarine
kernels. This will burn the popcorn
and leave an unpleasant residue.
1 IMPORTANT SAFEGUARDS (CONT.)
20. Do not use appliance for
anything other than
intended use.
21. Never steam food in the
popping kettle.
22. A popping kettle that is
plugged into an outlet
should not be left
unattended.
23. Extreme caution must be
used when removing and
serving popcorn.
24. Do not
clean with metal
scouring pads. Pieces can break
off the pad and touch electrical
parts resulting in a risk of
electric shock.
25. NEVER FORCE ANY PARTS OR
BRACKETS INTO POSITION.
26. CAUTION: Injury and/or Burns
may result from noncompliance with these
operating procedures.
27. No parts are intended for
dishwasher.
INTRODUCTION
Thank you for purchasing the Elite 4 oz. Tabletop Popcorn Maker. It will add
a touch of nostalgic delight to any recreation room with its great turn of
the century vendor style design. Although the popcorn maker may look old
fashioned, rest assured that the unit uses the latest technological advances
in kettle popcorn operation. You never have to go without the old
fashioned taste of delicious freshly popped popcorn when watching a movie
right at home with your family.
Here are some great recipe tips to use with your popcorn maker
¾
¾
SAVE THESE INSTRUCTIONS
¾
FOR HOUSEHOLD USE ONLY!
SHORT CORD PURPOSE
If an extension cord is used: (1) the
marked electrical rating of the
extension cord should be at least as
great as the electrical rating of the
product; (2) the extension cord
should be arranged so that it will not
drape over the countertop or
tabletop where it can unintentionally
be pulled on or tripped over by
children or pets.
POLARIZED PLUG
If this appliance is equipped with a
polarized plug (one blade is wider
than the other), please follow the
below instructions:
To reduce the risk of electrical
shock, this plug is intended to fit
into a polarized outlet only one
way. If you are unable to fit the
plug into the electrical outlet, try
reversing the plug.
2 If the plug still does not fit, contact
a qualified electrician. Never use the
plug with an extension cord unless
the plug can be fully inserted into
the extension cord. Do not alter the
plug of the product or any extension
cord being used with this product. Do not attempt to defeat the safety
purpose of the polarized plug.
Muy Caliente – A touch of
cayenne pepper, ½ teaspoon
of powdered cheddar cheese,
and ½ a cup of jalapeño
peppers that have been pat
dried.
The Works – ¼ teaspoon each
of garlic powder, powdered
cheese, onion powder, cayenne
pepper, and salt and pepper.
* Make sure to shake or toss well in order to cover all the popcorn with
the seasonings from above.
* All the above are just references and can be adjusted to your own
taste.
NOTE: A short power cord is
provided to reduce the risk of
personal injury resulting from
becoming entangled in or tripping
over a longer cord.
Longer power-supply cords or
extension cords are available and
may be used if care is exercised in
their use.
¾
Theater Style Popcorn – Simply ¾
add butter and salt to your
liking.
Southwestern Flare – Add one
teaspoon of powdered ranch
dressing mixed with some
cayenne pepper to your liking. ¾
Garlic Gourmet – ¼ teaspoon
each of garlic powder and
garlic salt and shake it up.
Cheesy Cheddar – ½ teaspoon
of powdered cheddar cheese.
The popcorn maker is a great excuse to have celebrations or gatherings for
no particular reason at all. Simply invite your friends or neighbors, or gather
around with the family and enjoy! Here are a few fun ideas for when to use
your popcorn maker:
PARTIES & GET-TOGETHERS:
¾ Birthdays and Graduations
¾ 50s, 60s, 70s or 80s music
theme nights
¾ Board Games Night
¾ Sports Night
¾ Poker Night
¾ Karaoke Night
MOVIES:
¾ A night of Cowboys and
¾
Indians movies with
Southwestern Flare flavored
popcorn.
An evening of sappy romantic
comedies accompanied with
Regular flavor or Cheddar
flavor. You are now ready to use your popcorn maker. Have fun and enjoy!
3 ASSEMBLY
INSTRUCTIONS
PARTS &
ASSEMBLY
ASSEMBLY INSTRUCTIONS (CONT.)
Specifications:
Voltage: AC 120V~60Hz
Input Power:600W
Please read this user manual carefully before assembling and using.
A. Main Unit x 1 pc
B. Popping Kettle x 1 pc
C. Block plate x 1 pc
D. Detachable plastic
door x 1 pc
E. Crumb Tray x 1 pc
PART 2. HOW TO ASSEMBLE THE MAIN BODY:
PART 1. HOW TO ASSEMBLE THE POPPING KETTLE:
1.
2.
3.
4.
5.
Screw the lid, axle fixer and stirrer onto the gear box in clockwise
(Figure 1).
Hold the kettle on the supporter (Figure 2).
Insert a pin through the kettle and supporter (Figure 3).
Use a pin to fix kettle at the right position (Figure 4).
Finally insert the internal plug into the socket on the inner top of the
popcorn machine (Figure 5).
1.
2.
3.
Place the kettle (B) on the
supporter after completing
Part 1 of the Assembly
Instructions.
Put the block plate (C) onto
the front of the unit.
4.
4 5 Insert the detachable plastic
door (D) onto the hinges.
Slide the crumb tray (E) into
the hole at the bottom of
the unit.
USING YOUR POPCORN MAKER
1.
2.
3.
4.
¾
Make sure the popcorn maker
is unplugged before you do
any of the following.
Popcorn Maker is rated at 120
volt. Only plug unit into 120
volt power source to avoid
potential damage to unit.
Clean the internal surface of
the kettle pot and main unit
surfaces.
Main unit has 2 function
switches as follows:
or margarine inside the kettle
at any time. It will burn.
8. Kettle should be pre-heated
for 3 to 4 minutes with oil
(until steam rises from the
pot).
9. Measure out corresponding
amount of plain popcorn
kernels from the chart in
Figure 5. Make sure to use
plain popcorn kernels with no
seasoning or salt as it will
cause oil to splatter.
10. Lift the lid and then pour in
the kernels carefully. (Fig. 2)
CAUTION: Lid will be HOT!
(1) LIGHT: to turn
the internal light
(2) POP: to turn the
stirring stick motor
& heater on.
5.
6.
7.
CAUTION: NEVER use butter
Figure 2
Secure the kettle onto the
hanger of the main unit.
Plug in the power cord to the
popcorn maker.
Switch on the light and heater
(1 & 2) and fill the kettle with
the correct amount of oil
(Figure 1) based on popping
chart in Figure 5.
9. Shut the door carefully.
13. Keep heater switch (2) OFF
if the unit is not being
continuously used.
14. Serve your popcorn with
popcorn scoop provided.
15. Remove plug from power
supply if the unit is not
being used for a long
period of time.
16. Repeat steps 7 to 12 for
continuous popping.
Allow kettle to cool for at
least 5 minutes between
uses.
10. Popcorn starts popping out
through the lid after about 2 to
3 minutes. (Fig. 4)
Figure 4
Figure 5
OIL
11. Switch OFF the stirrer & heater
switch (2) when popping is
complete (No more popping
sounds from the pot).
12. Rotate handle on kettle
counter clockwise to pour out
all remaining popcorn from
kettle.
¾ CAUTION: Kettle will be HOT!
1 Tbsp
8.
Figure 1
Switch ON the Stirrer switch
(2). Stirring stick will begin
to rotate (Fig. 3).
Figure 3
6 7 KERNELS
½ Cup
*Do not exceed 1/2-cup per
batch
USING YOUR POPCORN MAKER (CONT.)
TIP: It is strongly recommended to clean the kettle after EVERY use to avoid
burning of excess oils on the bottom of the kettle pot and to prevent hard
to clean oil build up.
1.
2.
3.
¾
Allow unit to cool down
completely before cleaning.
Always make sure unit is
unplugged from outlet.
Use a hot damp towel to
clean the kettle surface inside
and out.
WARNING: NEVER immerse
popping kettle into water or
any other liquids.
4.
5.
¾
With a clean damp cloth,
wipe down the inside
interior, glass surfaces and,
door.
Frequently empty plastic
kernel tray. Wash with soap
and warm water and dry
thoroughly.
DO NOT WASH ANY PARTS
IN DISHWASHER.
ADDITIONAL CLEANING TIPS
TO CLEAN POPPING KETTLE:
NOTE: To thoroughly clean the kettle, first make sure the unit is ‘OFF’ and
completely cool.
1.
2.
3.
LIMITED WARRANTY* ONE (1) YEAR
WARRANTY IS ONLY VALID WITH A DATED PROOF OF PURCHASE
CLEANING & MAINTENANCE
¾
Add 1 to 1 1/2 cups of hot
water (no detergent is
necessary) into the kettle. Turn the stirrer switch and
the heater switches ‘ON’ and
and bring water to boil for 2
to 3 minutes. Place a towel in the bottom
of the unit with a
large bowl on top.
4.
¾
5.
¾
NOTE: make sure bowl is
large enough to pour out the
water from the kettle. Turn off stirrer and heater
switches and carefully pour
out water into bowl. CAUTION: Kettle and water
will be HOT!
Repeat same procedure 2 to
3 times for best results.
CAUTION: Never immerse the
kettle into water.
1. Your small kitchen appliance is built with precision, inspected and tested before
leaving our factory.
2. It is warranted, to the original purchaser to be free from any manufacturing defects
under normal use and conditions for one (1) year, cord excluded. This Warranty
applies only to the original purchaser of this product.
3. If you need to exchange the unit, please return it in its original carton, with a sales
receipt, to the store where you purchased it. If you are past the stores allowed return
policy period, please see the enclosed Warranty.
4. If you use your appliance for household use and according to instructions, it should
give you years of satisfactory service.
5. During the one-year warranty period, a product with a defect will be either repaired
or replaced with a new or reconditioned comparable model (at our option) when the
product is returned to our Service Center. (See the “Returns” section below).
6. The repaired or replacement product will be in warranty for the remaining balance
of the one-year warranty period and an additional one-month period.
7. This limited warranty covers appliances purchased and used within the 50
contiguous states plus the District of Columbia and does NOT cover:
- Damages caused by unreasonable use, neglect, normal wear and tear, commercial
use, improper assembly or installation of product.
- Damages caused in shipping.
- Damages caused by replacement or resetting of house fuses or circuit breakers.
- Defects other than manufacturing defects.
- Breakage caused by misuse, abuse, accident, alteration, lack of proper care and
maintenance, or incorrect current or voltage.
- Lost or missing parts of the product. Parts will need to be purchased separately.
- Damages of parts that are not electrical; for example: cracked or broken plastic or
glass.
- Damage from service or repair by unauthorized personnel.
- Extended warranties purchased via a separate company or reseller.
- Consumer’s remorse is not an acceptable reason to return a product to our Service
Center.
*One Year Limited Warranty valid only in the 50 contiguous states plus the District
of Columbia, excluding Puerto Rico and the Virgin Islands.
This warranty is effective only if the product is purchased and operated in the USA;
product usage which is in violation of the written instructions provided with the unit will
void this warranty.
For international warranty, please contact the local distributor.
**Any instruction or policy included in this manual may be subject to change at any
time.
MAXI-MATIC, USA
18401 E. Arenth Ave. City of Industry, CA 91748
Customer Service Dept: (626) 912-9877 Ext: 120/107 MON-FRI 8am-5pm PST
Website: www.maxi-matic.com email: [email protected]
RETURN INSTRUCTIONS
8 9 RETURNS:
A. Any return of defective merchandise to the manufacturer must be processed
accordingly by first contacting customer service (contact information shown below) to
obtain an RA # (Return Authorization Number). We will not accept any returns of
merchandise without an applicable RA #.
B. IMPORTANT RETURN INSTRUCTIONS. Your Warranty depends on your
following these instructions if you are returning the unit to Maxi-Matic USA:
1. Carefully pack the item in its original carton or other suitable box to avoid
damage in shipping.
2. Before packing your unit for return, be sure to enclose:
a) Your name, full address with zip code, daytime telephone
number, and RA#,
b) A dated sales receipt or PROOF OF PURCHASE,
c) The model number of the unit and the problem you are having
(Enclose in an envelope and tape directly to the unit before the box
is sealed,) and
d) Any parts or accessories related to the problem.
3. Maxi-Matic USA recommends you ship the package U.P.S ground service
for tracking purposes. We cannot assume responsibility for lost or damaged
products returned to us during incoming shipment. For your protection,
always carefully package the product for shipment and insure it with the
carrier. C.O.D shipments cannot be accepted.
4. All return shipping charges must be prepaid by you.
5. Mark the outside of your package:
MAXI-MATIC USA
18401 E. ARENTH AVE.
CITY OF INDUSTRY, CA 91748
6. Once your return has been received by our warehouse, Maxi-Matic USA
will repair or replace the product if it is defective in material or workmanship,
subject to the conditions in paragraph B.
7. Maxi-Matic will pay the shipping charges to ship the repaired or
replacement product back to you.
10