1
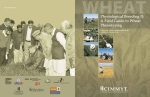
Collecting and preserving
plant specimens, a manual
Queensland Herbarium
Version 5, March 2010
ISBN: 1-920928-06-5
This work may be cited as: Bean, A.R. (editor) (2010). Collecting and
Preserving Plant Specimens, A Manual, Version 4. Queensland
Herbarium, Department of Environmental and Resource Management,
Brisbane.
© The State of Queensland, Department of Environmental and
Resource Management 2010.
Acknowledgements
This manual was prepared and collated by Tony Bean (Queensland
Herbarium) with some material donated by Jane Morton (Biosecurity
Queensland, Department of Employment, Economic Development and
Innovation). There has been input from various members of
Queensland Herbarium staff, in particular, Lorna Ngugi, Ron Booth and
Paul Forster.
Table of Contents
Why collect ?.................................................................................................... 2
Before you collect............................................................................................ 2
Safety................................................................................................................ 2
Commonly used equipment............................................................................ 3
Selecting the plant material ............................................................................ 4
Handling plants during collection .................................................................. 5
Step-by-step procedure for plant collecting and pressing .......................... 6
Data to be recorded in the field .................................................................... 11
Drying specimens.......................................................................................... 11
Writing a final label to accompany the specimen ....................................... 12
References ..................................................................................................... 13
Appendix 1. Collecting Weeds...................................................................... 15
Appendix 2. Notes on the collection of some flowering plant families..... 17
Appendix 3. Collecting difficult groups ....................................................... 18
1
Why collect ?
Herbarium specimens are used for a variety of purposes. They:
•
allow and support accurate identification of plants, algae, lichens and fungi
•
provide a permanent record for a species occurring at a particular time and
place
•
form the basis of reliable distribution, habit and habitat information
•
document the introduction and spread of invasive weeds over time
•
are the reference point for the application of the scientific names
•
provide the basic biological material for taxonomists, ecologists and other
researchers
•
serve as vouchers for seed collections, toxicological cases, biochemical
analyses and biodiscovery.
Voucher specimens
Voucher specimens are specimens collected of taxa that are the subject of
research or investigation, generally resulting in a publication in a scientific
journal or report. Their importance cannot be over-emphasized. If lodged in a
recognised herbarium, they will endure in the collection for many years, and
their identity can be checked and verified at any future time from the voucher
reference in the publication. This means that research and survey data will
remain useful many years after publication, even though names and
classifications change. The advent of genetic techniques in plant taxonomy has
increased the need for well-annotated, correctly identified specimens to be
stored as vouchers for published sequences, reducing the need to resample at
a future time.
Before you collect
Permits
Before going on to private land you must request permission from the owner to
access and traverse their land.
Collecting specimens in National Parks and State forests is illegal unless you have
a permit. Permits to collect for scientific purposes can be obtained from
www.derm.qld.gov.au/ecoaccess/plants_and_animals
Safety
Protective equipment
It is advisable to take personal protective equipment such as sunscreen, a hat,
long-sleeved shirt and long trousers, sturdy shoes, a first-aid kit, water and food on
any collecting trip. Make sure you have additional suitable equipment as required
2
for the particular job. For example, gloves will be needed for handling prickly or
sappy material, and a hard hat for collecting material from trees (see list of
equipment on next page).
Safe travel procedures
Always let someone know where you are, and when you expect to return. For
prolonged journeys, details of your intended route and destination, call-in procedure
and expected time of return should be left with someone who can raise help if
necessary. Always travel with someone and discuss safety issues before you
leave. Always make sure that the vehicle is suitable for the job, and functioning
properly prior to leaving. All safety equipment such as satellite phones and
recovery gear should also be checked prior to leaving.
Commonly used equipment
For general collecting you may require
− a day press that is light enough to carry around. This should include only a few
cardboard corrugates, and a few dozen sheets of newspaper.
− a field press with many more corrugates and more newspaper. This can be left
at the campsite, accommodation, or in the vehicle.
− spare corrugates and newspaper and some sheets of foam for bulky items
− secateurs to cut and trim specimens
− GPS for recording an accurate latitude and longitude. Alternatively, mark the
position on a topographic map.
− a field notebook and pencil. This can be a pocket-sized notebook or a book of
pre-printed specimen labels may be used.
− large and small plastic bags, to hold specimens temporarily
− small brown paper bags for collecting fruits, seeds, bryophytes, lichens and
seeds that may fall off during drying
− a hand lens
− gloves, for handling prickly plant material or plants with corrosive sap
− tie-on tags, often called jewellers tags
− felt tipped pens and pencils for numbering collection and writing notes.
In addition you may require
− a trowel for digging out herbaceous plants with underground structures. For
example, Haemodorum species have bulbs 15-20 cm below the surface and
Murdannia species have tubers that will be left behind if you pull plants from
above.
− plastic bottles with preserving liquid, to preserve fleshy plants or delicate
flowers. This usually consists of 70% alcohol. Note: alcohol cannot be sent
through the mail.
3
− a camera for photographing the form of the plant, flower colour and its natural
habitat. Photographs should be linked to a specimen voucher so that the plant
names can be kept up-to-date in the future.
For collecting specimens from trees you will need
− a throwing rope
− a hard hat
− binoculars to help you locate the optimum material.
Selecting the plant material
Select vigorous, typical specimens. Avoid insect-damaged plants. Collect at least
two sets of specimens (duplicates) and number each set. Keep one set for your
reference, and send the duplicate set to the Herbarium for identification or as a
voucher if required. The Queensland Herbarium does not return specimens.
A good specimen includes underground parts, stems, leaves, flowers and fruits.
Basal parts of grasses, sedges, ferns and bulbous plants are essential for
identification.
The plant material should be fertile i.e. in flower or fruit (both if possible), as these
characteristics are often vital for identification. Some time should be spent looking
at a number of individuals, and choosing one with a number of flowers or more
mature fruits.
Choose individuals that show the variation in leaf, flower and fruit size. It may be
important to show morphological variation, involving the collection of individuals of
different sizes or ages.
Size of the specimen
A specimen should ideally be 25-40 cm long and up to 26 cm wide, allowing it to fit
on a standard herbarium mounting sheet which measures 42 x 27 cm.
Conveniently, this is also the approximate size of newspapers.
Plant parts that are too large for a single sheet may be cut into sections pressed on
a series of sheets, for example a palm or cycad frond.
Long and narrow specimens such as grasses and sedges can be folded once,
twice or even three times at the time of pressing. In this way a plant of up to 1.6
metres high may be pressed onto a single sheet.
For very small plants, a number of individuals may be placed on each sheet.
Features of the plant
When collecting from trees or large shrubs, distinctive or notable features should be
recorded, for example branching habit, height and width of the plant and details of
the bark.
You may need to collect more than one specimen to show the range of variation
that is present, for example mature and immature parts, juvenile and adult leaves,
coppice shoots.
4
If the plant is dioecious, with male and female flowers on different plants, collect
from each plant and label the specimens A & B.
Handling plants during collection
For best results, specimens should be pressed within a few minutes of being
removed from the plant. Many species wilt and fade soon after collection. A day
press is convenient for short trips taken from the vehicle.
If specimens cannot be pressed at the point of collection, for example if it is raining
or on steep terrain, they may be stored in large plastic bags. The bags should be
kept moist, and the specimens not jammed in too tightly. Make sure that each bag
is correctly labelled, using one bag per collection site. However, storing
specimens in plastic bags is not recommended because it is easy for
specimens to become damaged or mixed and they are more likely to go mouldy.
5
Step-by-step procedure for plant
collecting and pressing
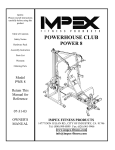
FIGURE 1. Find a specimen that is representative of the existing population.
Collect both flowers and fruits if available.
FIGURE 2. Use secateurs for a clean cut of the stem. Collect two specimens if you
wish to retain one sample for yourself.
6
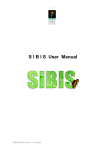
FIGURE 3. Every specimen (and its duplicates) should be tagged. Jeweller’s
tags are used by most botanists. Write your name (or initials) and a collection
number for the specimen on one side of the tag. The date and site number may
be written on the other side. Use a pencil or waterproof pen.
FIGURE 4. Attach tags securely to each specimen.
7
FIGURE 5. Consider how the pressed specimen will appear. Its form at this time
largely determines its ultimate appearance. Unnecessary twiggy shoots and excess
material may be cut away.
FIGURE 6. Flatten out the specimen by closing the day-press and securely
attaching the straps (in this case, Velcro straps).
8
FIGURE 7. Record the latitude and longitude of the site using a GPS unit.
Alternatively, mark your position on a map, and record the grid reference.
FIGURE 8. Record site/habitat data (locality, soil/geology, vegetation type,
associated species) and individual specimen data (habit, flower colour, abundance)
in a notebook. All notes should be recorded at the collecting site and not at a later
time.
9
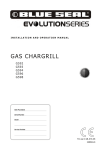
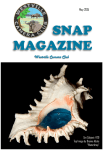
FIGURE 9. Example of a mounted and labelled herbarium specimen.
(Hymenachne amplexicaulis).
10
Data to be recorded in the field
Many botanists use a small notebook to record information about the specimens
they collect, and the sites at which they collect them.
The following information should be recorded before you leave the collection
site, otherwise the chance of giving erroneous information is greatly increased.
1. A preliminary descriptive locality. This can be modified later after consulting
maps, but the preliminary locality reminds you about which site it is.
2. GPS location. This can be recorded as latitude and longitude or AMG.
Remember to also record the datum that you are using e.g. GDA94.
3. Habitat (site) data, including landform, slope, dominant plant species, structural
formation, for example “open forest”, “open woodland”, “shrubland” or regional
ecosystem. Soil type and geology should be added if known. Record whether
the collection site was a disturbed site such as a roadside, burnt area or grazed
paddock.
4. Information about the individual species collected at the site, particularly height,
form, presence of rhizomes, presence and colour of sap in cut stems, colour of
new growth and flower colour. Flower colour often changes on drying. Also
record the relative abundance of the species, particularly for rare or threatened
species or weeds.
Drying specimens
It is essential to dry the specimens fairly quickly, to prevent the onset of fungal
attack. Fungus affected specimens are of limited value to a Herbarium.
If your field trip involves car travel, specimens placed in presses on the roof rack
will dry within a few days if the humidity is low.
In warm environments, the damp papers and corrugates must be replaced daily. In
drier inland areas, every 2 or 3 days will suffice. After changing the papers and
corrugates, the specimens should be again tightly packed in the press, otherwise
they will not remain flat.
At the first paper change, adjust any undesirable features of the specimen, for
example folded leaves, leaves all showing the same face, flowers obscured by
leaves. Such adjustments will not be possible once the specimen has fully dried.
Look for any evidence of insect attack, especially caterpillars in flowers, and
remove any insects found.
Drying in the field
Placing the presses in the sun during the day appears to have little drying effect
except for the topmost and bottommost specimens. However, the sun is invaluable
for drying the damp papers and corrugates once they have been removed from the
press.
11
Collapsible field driers are useful in remote areas. Typically these consist of an
outer metal frame with a wire grid where the press sits on top of a gas burner on
very low flame.
Drying when based in a powered building
A fan heater (set on the lowest heat) will assist drying, provided you ensure the air
is directed towards the press and has free access through the gaps in the
corrugates. Placing specimens near an air conditioning unit will also assist with the
drying process.
Some species tend to fall apart when made into a specimen, usually the leaves
detach from the stem. This especially applies to specimens of Erythrina, Ficus,
Loranthaceae, and mangroves. Leaf detachment can be prevented by dipping the
newly pressed specimen in very hot water for 15 seconds, or placing it in a
microwave oven for a similar time. If leaves detach, place them in a labelled paper
packet and keep with the specimen. These can still be useful.
Writing a final label to accompany
the specimen
The data that accompanies a herbarium specimen is just as important as the
specimen itself. Even a very good quality specimen is of no use to a Herbarium
unless it has a written label with the information detailed below.
Collector’s name: [mandatory] the name(s) of the person/people who collected
the specimen, preferably no more than 2 people. Don't include everyone who was
on the trip.
Collector's number: [optional] A unique number, usually sequential, given by the
collector as a private record.
Date of collection: [mandatory].
Botanical name: [optional] If you are unsure of the identity it is still helpful to
suggest a name, or at least a genus.
Locality: [mandatory] A written description of the precise collection locality is
necessary, AS WELL AS a latitude and longitude reading. A GPS location alone is
not sufficient. The locality description should be detailed enough to enable any
person to revisit the approximate place of collection. On the other hand, the locality
description should not be too verbose and should not include information better
included under "Habitat". Commonly, the description includes distance and/or
direction from a town or a well known locality that is on a readily available map. It
should be meaningful to someone not familiar with the local area.
Here are some examples of a good locality description:
W CLAUDIE RIVER, 10.3 KM WNW OF LOCKHART RIVER (GPS 12 44 38; 143
15 30)
JOHNSTON CREEK, 1 KM N OF MT ETNA (GRID REF 8951-389331)
INJUNE-ROLLESTON ROAD, 86 KM N OF INJUNE, GRID REF 8647 - 576145FN
(ARCADIA MAP)
12
23.4 KM BY ROAD NNW OF PROSERPINE P.O. ON ROAD TO DINGO BEACH
15.8 KM S OF LAKE CARGELLICO ON RD TO RANKINS SPRINGS
Here are some examples of a poor locality description:
NOLAN CK [ambiguous]
ROCKHAMPTON [too vague]
LAURA-COEN [too vague]
SF64, PARISH OF CAMBOON, COUNTY OF DAWSON [maps giving this
information not readily available; too vague]
POR 105 W OF COMP 5 ON POR 6 PARISH OF BULLI [maps giving this
information not readily available]
SF144 [too difficult to establish where this state forest might be and where plant
was collected]
548 KM N OF MT MOLLOY [locality should be given from a nearby town, in this
case, Coen]
WIDBURY [very few people would know where this is; no town mentioned]
Geocode: [mandatory] Transfer the GPS reading obtained in the field, e.g. Lat.: 35o
26’ 43” S Long.: 135o 17’ 29” E, GDA94; or determine a grid reference from map.
For Geocode, specify the format e.g. degrees, minutes, seconds, decimal degrees
or degrees and decimal minutes (see specimen advice note at end of manual).
Altitude: [optional]
Pastoral district: [optional] Refers to the Queensland Pastoral districts, for
example North Kennedy, Moreton, Darling Downs.
Habitat: [mandatory] Transfer the information from the field note book, for example
“eucalypt woodland of E. populnea, regional ecosystem 11.3.2”.
Habit etc.: [mandatory] This information is transferred from the field note book, for
example “spreading shrub to 2 m”.
Abundance: [optional] A comment on the frequency of the plant at the site where
you collected it.
You may use terms such as "common" or "occasional", or you may give the actual
numbers of plants. If you can’t distinguish individual plants then record the
approximate area covered. This field is especially important for documenting the
extent of rare or threatened species and the early spread of invasive weeds.
Other notes: [optional] Any other relevant information, for example a reference to a
photographic image or material in spirit, ethno-botanical usage, or observed
interaction with fauna.
References
Anon. (no date). Plant Collection Procedures and Specimen Preservation. Centre
for Plant Biodiversity Research: Department of Environment and Heritage.
www.anbg.gov.au/cpbr/herbarium/collecting/index.html [accessed 18 Jan 2010].
13
Anon (no date). Preparing herbarium specimens. National Herbarium of Victoria,
Royal Botanic Gardens, Melbourne. http://www.rbg.vic.gov.au/science/informationand-resources/identification-and-information-services/preparing-herbariumspecimens [accessed 22 Feb 2010]
Bridson, D. and Forman, L. (1992). The Herbarium Handbook, revised edition.
Royal Botanic Gardens, Kew: London.
Harris, W.., Morton, J., and Holland, A.E. (eds) (2008). Difficult to collect plants: a
manual for Weed Spotters. CRC for Australian Weed Management, Adelaide.
Available at http://www.weedscrc.org.au/documents/CRC_CDP_manual_v8.pdf
Victor, J.E., Koekemoer, M., Fish, L., Smithies, S.J., & Mossmer, M. (2004).
Herbarium essentials: the southern African Herbarium user manual. Southern
African Botanical Diversity Network Report No. 25. SABONET, Pretoria.
14
Appendix 1. Collecting Weeds
Strict hygiene must be observed when collecting specimens of species listed as
Declared (in Queensland) under the Land Protection (Pest and Stock Route
Management) Act 2002 in order to prevent the further spread of these pests.
Declared pest plants are listed on http://www.dpi.qld.gov.au/4790_7005.htm
An exemption under the Land Protection (Pest and Stock Route Management) Act
2002 allows for persons to collect specimens of declared weed species for the
purpose of identification by the Queensland Herbarium. The Queensland
Herbarium has a set of weed hygiene protocols for the safe collection of weed
material to prevent weed spread.
Prior to travelling
Ensure that you have sufficient equipment and storage material for collecting and
handling weed specimens. Include small and large sealable plastic bags (for dry
material), dust pan and brush, and information on weed infested areas and washdown facilities. A list of wash-down facilities can be found on
http://www.dpi.qld.gov.au/4790_8243.htm
Collecting your specimens
At the site, care must be taken to make sure reproductive material or propagules
are not spread through the landscape by collecting activities. For example, seed
heads may be collected separately (detached) and placed in sealed paper
envelopes. Material that is already dry may be placed in sealed plastic bags.
Alternatively, where the reproductive material constitutes a large part of the
specimen, the whole specimen may be sealed in a large paper envelope inside the
press. Loose seeds and pieces should be placed in sealed envelopes, or discarded
at the site of collection.
After you have pressed your sample make sure that reproductive material can’t fall
out of the press or storage box. At each site, the storage area should be swept prior
to leaving. Make sure that you dispose of any excess collection material at the site
of collection.
Before departing the site, remove any attached seeds and plant parts from your
boots, clothing, and equipment. Vehicles should be thoroughly cleaned. This
includes removal of mud attached to the wheel arches and chassis, soil or organic
material in the foot wells (in the cabin), engine bay and recesses and storage
areas. Consult the clean-down procedures given on
http://dpi.qld.gov.au/documents/Biosecurity_EnvironmentalPests/IPA-CleandownProcedures.pdf
Transportation
When transporting high-risk material, the whole press should be transported in
such a way as to prevent seed falling from the press. For example, the press may
be placed in a plastic storage box while in transit, in such a way that still allows
moisture to escape. Material should be carried inside the vehicle, and not on roof
racks unless in properly sealed containers.
15
Processing and maintaining presses and specimens in the field
Processing of specimens in the field usually involves replacing damp paper with
dry, trimming and tidying specimens and completing labels. These activities should
be carried out in a clean area, preferably inside a building, and care should be
taken so that all excess plant material, trimmings, used newspaper and envelopes
and other loose bits are collected into sealed plastic bags, which are then disposed
of appropriately.
When specimens are completely dry they should be double sealed in a plastic bag
(one inside another) suitable for transportation or posting. Packages sent to the
Queensland Herbarium should be clearly labelled with the name or suspected
name and declared status of the species on the outside of the packaging.
References
Harris, W.., Morton, J., and Holland, A.E. (eds) (2008). Difficult to collect plants: a
manual for Weed Spotters. CRC for Australian Weed Management, Adelaide.
Available at http://www.weedscrc.org.au/documents/CRC_CDP_manual_v8.pdf
Marchant, N., Gathe, J., & Lewington, M. (2001). How to collect and record weeds.
Weed Information Network. Western Australian Herbarium, Department of
Conservation and Land Management, The Natural Heritage Trust. Western
Australia.
Morton, J. (2005). Collect, Prepare and Preserve Weed Specimens. CRC for Weed
Management, Brisbane.
http://www.weedscrc.org.au/documents/weed_collectors_manual_nwdp_vet.pdf
16
Appendix 2. Notes on the
collection of some flowering plant
families
Apiaceae: ripe fruits are essential
Asteraceae: collection of mature achenes (fruiting structures) is essential. Always
ensure that at least some of the flowering heads are past flowering.
Brassicaceae: ripe fruits are essential
Cucurbitaceae: these species are often dioecious so correlated male and female
collections are very valuable. Flowers and fruits are best placed in spirit.
Cyperaceae: ripe fruits (nuts) are essential and collection of rhizomes and/or
tubers is recommended.
Lamiaceae: record the smell of crushed leaves
Leguminosae (Caesalpiniaceae, Fabaceae, Mimosaceae): mature pods are
very important for identification. Some pods will shatter on drying. To catch seeds,
place paper envelopes over pods in the press. Some legumes have underground
pods or tubers. Carefully dig out the plant and gently brush away the soil.
Loranthaceae: fruiting specimens without flowers cannot be identified. To prevent
leaf-fall, dip material in very hot water or use a microwave oven, then dry in a press
as usual.
Myrtaceae: For Eucalyptus and related genera, photographs and notes about the
type of bark are essential. Collection of juvenile leaves is very helpful. Include new
(soft) vegetative growth for Melaleuca and Callistemon.
Rainforest plants: flowers and fruits are desirable but not essential. Collect
branchlets with leaves and actively growing shoots from mature plants if possible.
Orchidaceae: it is essential to place some flowers in spirit. Photographs are useful.
Poaceae: collect the whole plant, including roots, rhizomes or stolons (except
bamboos).
Solanaceae: fruits in spirit are highly desirable
Stylidiaceae: flowers in spirit are highly desirable
17
Appendix 3. Collecting difficult
groups
Macro-algae and mucilaginous water plants
Because these plants stick readily to newspaper it is best to prepare them as
follows:
If small they can be floated onto a mounting sheet by laying the clean specimen
in a tray of water and gently sliding the sheet underneath, then lifting it out with
the specimen arranged appropriately on the sheet.
With larger plants such as water lilies, the specimen can be taken out of the
water and carefully arranged on the sheet.
The sheet is then placed in a dry place to partially dry for perhaps a day. The
specimen will be stuck or partially stuck to the mounting board.
Carefully press, preferably with waxed paper or nylon sheeting between the
specimen and the usual newspaper.
Bananas (Musa spp.)
A good collection of a banana (Musa sp.) comprises herbarium sheets of
pressed material, written notes, spirit material and photographs.
Portions to include on herbarium sheet:
•
half lamina base + midrib, and upper section of petiole. Imagine the junction
between lamina and petiole as forming the middle of the herbarium sheet.
Cut off the top of the leaf, cut off the bottom of the petiole, and cut off one
side of the lamina leaving the midrib intact, so that what remains will fit onto
a herbarium sheet. One reference recommends collecting from the fourthlast fully developed leaf below the inflorescence.
•
petiole base. Remove petiole very close to stem. Split petiole in half,
longitudinally. Put both halves on a second sheet.
•
one 'hand' of fruits. Include one fruit cut in longitudinal section
•
one cluster of male flowers, attached to the subtending bract
•
portion of the male peduncle (the hanging 'tail' between bunch and male
flowers).
The reproductive parts should all fit on one sheet i.e. 3 sheets in total.
Layers of foam should be used to allow parts to press properly, and because of
the bulky and moist reproductive parts (especially the fruits), some weeks in a
specimen drying oven are essential for the successful production of the dried
specimen.
Things to note on the specimen label: plants suckering freely or hardly
suckering at all, colour of sap in suckers (watery, or red to violet, or milky),
colour of pseudo-stem; older bracts strongly revolute or scarcely revolute,
18
inflorescence erect or pendulous, total length of lamina and petiole, colour of
fruit, colour of male flowers.
Portions to include in spirit material: use a large screw-top glass jar.
Include some male flowers, some female flowers, some fruits and a bract.
Things to photograph: whole plant, pseudo-stem (to show colour), whole
inflorescence, bracts and male flowers.
Cacti and succulents
Preparation
Cut large flowers longitudinally or cut one side and open like a fan and flatten.
Make longitudinal sections and cross sections (about 1cm thick) of the stem.
Include roots if possible. Keep aside some flowers and a piece of attached stem for
a spirit collection.
Pressing
Press in the normal way with cardboard and newspaper and tie into a bundle.
Put the whole bundle into a plastic bag and add 1-2 cups of alcohol. Seal up
and leave for 24 hours to fume. Place the bundle in an airy position away from
any source of flame. Allow it to ‘dry out’. Place bundle into drying oven.
Succulents can be treated as for cacti, or frozen for 24 hours. Once frozen, the
papers initially need changing 2-3 times per day.
Note: specimens sent to the Queensland Herbarium for identification may be
sent in the fresh state, in a cardboard box or something similar, clearly labelled
if spines are present.
Cycads
Specimens will need to include a cone or at least a number of the sporophylls
(scales) that make up a cone. Also include an entire leaf (i.e. the entire "frond", not
just an individual pinnule (leaflet)) and an idea of how many leaves are present in
the crown of the plant. As a leaf may be anything from 50 cm to 3 metres in length,
they may be cut into c. 30 cm lengths for ease of handling.
Fungi
Please refer to Leonard, P. (ed.) (2009). A Guide to Collecting and Preserving
Fungal Specimens for the Queensland Herbarium. Queensland Herbarium,
Department of Environment and Resource Management, Brisbane, or contact the
Queensland Mycological Society at http://www.qms.asn.au .
Caution: Many fungi are toxic. Avoid inhaling spores. Wash hands after handling
fungi.
Grass trees (Xanthorrhoea)
Note the lengths of the flowering and non-flowering parts of the spike ("spear"), and
of the trunk (if any) below the leaves. The middle part of the spike (including the
base of the flowering/fruiting portion and the top of the smooth portion) should be
collected, as should a few complete leaves, including the leaf bases if possible. Be
very careful not to damage the plant when collecting leaf bases; grass trees grow
very slowly and may be a hundred or more years old.
19
Mosses, lichens and liverworts
Try to include fruiting bodies. These consist of tiny capsules or disks or
"umbrellas" on stalks, or cupped to spherical appendages. Remove a few
square centimetres of the plant mat gently from the substrate or, if adhering
closely to bark, soil crust, or rock, cut or chip away pieces of the substrate with
the plant in place. If the specimen is bulky or very wet, flatten it very carefully.
Do not squash or press - place each specimen in a separate paper (not plastic)
bag with a collection number and notes, and allow to air dry.
Palms (Arecaceae)
Record the label information on each piece with a tag. Photograph the plant
and each entire part before sectioning. Place a common object such as a pencil
in the photograph to provide scale.
Leaves
Measure the petiole, blade, rachis and leaflet lengths of pinnate leaves, the
petiole and blade length of palmate (segments radiating from a single point)
leaves and the petiole, blade and rib lengths of costapalmate (leaf stalk
extending into leaf blade - rib) leaves.
1) If leaves are small, keep and press whole leaf.
2) For large leaves divide the petiole into mounting paper size pieces. Number
the pieces on the tags to keep them in order of cutting.
a) Pinnate leaf. Take several pieces from the blade. Include tip. For each
piece, apart from the tip, cut the rachis into a mounting sheet size length,
remove the leaflets on one side leaving the stubs near the rhachis. Fold
the other side back and forth to fit the mounting sheet.
b) Palmate leaf or costapalmate leaf. Keep the point of attachment to the
petiole and ensure that the hastula is showing. Cut off one side of the
blade, part of the other side and fold several times to fit the mounting
sheet and press.
Inflorescence
If the flower cluster is small, fold and press all of it. If it is large, keep several
portions including the base and also showing the origin of the side branches in
successive order.
If applicable try to keep an entire inflorescence main stem with the side
branches removed. Selected side branches from noted positions should be
kept and pressed.
All of the spathe should be kept, cutting it into sections if necessary. Some
flowers may be preserved in spirit.
Fruits
Fruits should be treated as for flowers. The cupule (or cup) at the base of the
fruit should be kept. Large fruits may be dried quickly if cut in half.
20
Pandans (Pandanus, Freycinetia)
For details on collecting Pandans, see B.C.Stone (1983). A Guide to collecting
Pandanaceae (Pandanus, Freycinetia and Sararanga). Annals of the Missouri
Botanic Gardens 70: 137-45.
References:
Argent, G.C.G. (1976). The Wild Bananas of Papua New Guinea. Notes from
the Royal Botanic Garden Edinburgh 35: 77-114.
Bailey, L.H. (1946) The Palm Herbarium. Gentes Herb. Ithaca 7 (fasc. 2): 153180.
Fosberg, F.R. and Sachet, M. (1965) Manual for Tropical Herbaria. Regnum
Vegetabile Vol 39.
Harris, W.., Morton, J., and Holland, A.E. (eds) (2008). Difficult to collect plants:
a manual for Weed Spotters. CRC for Australian Weed Management, Adelaide.
Available at http://www.weedscrc.org.au/documents/CRC_CDP_manual_v8.pdf
McCurrach, J.C. (1960) Palms of the World. Harper & Brothers, New York.
21
VERSION 6
–
1 2 / 1 / 2 0 1 0
Queensland Herbarium
Department of Environment & Resource Management
Botanical Specimens for Identification
Complete this form (one for each specimen) and send with specimen/s to:
Office Use Only
Botanical Information and Advisory Service
Queensland Herbarium, DERM
Brisbane Botanic Gardens Mt Coot-tha
Mt Coot-tha Road,
TOOWONG QLD 4066
[email protected]
Date received
Identification no.
Date of despatch
Name:
Company / Department:
Postal Address
Postcode
Telephone:
Fax:
email:
post
Please send results by
email
threatened species
Purpose
poisonous
fax
weed detection
telephone
commercial
other
Information required
Label Information: Specimens sent to the Queensland Herbarium for identification are frequently retained in the collection for scientific research
and geographic distribution records. The label information below when accompanying each specimen aids the identification process and greatly
increases the scientific value of the specimen.
Collector’s Name & No.:
Date of collection
/
/
Botanical name (if known)
Locality (include road name and/or distance and direction from nearest town)
S
Latitude
degrees, minutes, seconds
decimal degrees
E
Longitude
degrees & decimal minutes
Or Map and grid reference (e.g. 9442 333 666)
Or AMG Coordinates ( Zone, Easting, Northing)
Geodetic System Used ( GPS systems): e.g. WGS84, GDA94
Situation (e.g. plain, creekbank, mountain)
Cultivated?
YES
NO
Vegetation Type (e.g. forest, heath, woodland)
Soil/ Geology/ Regional
Ecosystem
Kind of plant (e.g. tree, vine, herb)
Description (e.g. height, bark type, flower or fruit colour)
Abundance
Other Notes
22
number mature individuals
number seedlings/ juveniles
OR
ha/ m2 size of clump