1
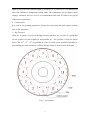
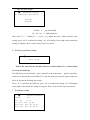
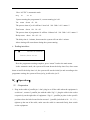
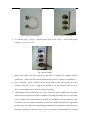
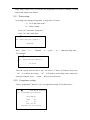
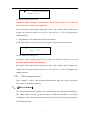
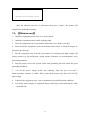
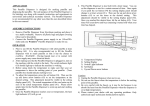
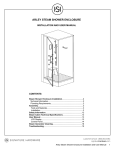
TSJ-1A+
AUTOMATIC TISSUE PROCESSOR
USER MANUAL
MOSS INSTRUMENTS CO., LTD
No. 5 Hepanxiang, Jinhua, Zhejiang, China 321001
TEL: 86-579-8237 3070
FAX: 86-579-8353 3099
www.mossinstruments.com
CONTENTS
I.【Brief introduction】 .............................................................. 0
II.【Function】 ................................................................................ 1
III.【Control panel】 .................................................................... 3
IV.【Operation】 .............................................................................. 7
V.【Error alarm】 .......................................................................... 11
VI.【Maintenance】 ........................................................................ 12
VII.【Appendix】 ............................................................................ 13
Appendix 1:specimen process program .................................. 14
Appendix 2:main technical specification .......................... 15
I.【Brief introduction】
TSJ-1A+ automatic tissue processor is an equipment that perform fixing, dehydrating,
transparency and wax immersing treatment for tissue of human beings, animals or plants.
It’s widely applied in pathologic departments of various hospitals, pathologic teaching
offices of various medical colleges and universities, animal and plant scientific research
institute and food inspection department. TSJ-1A+ tissue processor has following feature:
1.Microcomputer controlling of the whole operating process so as to ensure operating
convenience and working stability;
2.Tissue basket relocating controlling perch enabling the tissue to be put in any jar;
3.Electricity protection and obstacle protection functions;
4.Agitation dehydrate mode to guarantee the complete mix and contact with the tissue,
solvent and paraffin so as to achieve good dehydrate effect.
5. Large LCD screen showing every step of processing and easy for monitoring.
6. Timing: delay timing max 99 day 99 hour 59 min
jar process timing max 99 hour 59 min
timing increment: 1 min
7. Constant temperature controlling system adopted on the paraffin jar to ensure high
precision of temperature controlling, nonstick TEFLON coating painted on the internal
surface that provide the good condition for tissue protection.
8. There are 8 programs selectable.
9. Battery backup for 8 hours except the paraffin jar.
10. Adopted with electric lock and password for specific person use.
Please read this “User Manual” carefully before operation, and please properly keep the
manual.
II.【Function】
5
Fig 1 Main part and function
Main part and function of TSJ-1A+ automatic tissue processor as following:
1. Obstacle detector
It’s in the jar position just ahead of that of the tissue basket. If any obstacles (e.g. the
paraffin in the paraffin jar hasn’t melted) is met during changing relocating tissue basket
into another jar, the obstacle detector will be lifted and generate fault signals. An alarm
and warning of “POWER FAILURE!” will be shown.
2. Reposition control lever
When the tissue basket is lifted up, pull out the reposition control lever by your hand. The
top cover and the tissue basket then can be manually pulled to another jar position.
Notice: After pull the tissue basket to the corresponding jar position, please put the lever
into the locating slot insure the exact positioning.
3. Paraffin jar
The paraffin jar is an automatic constant temperature controlling system with temperature
controlling accuracy of ± 5℃. It is preset to be 70℃. During heating the red indicator
1
lights up while the state indicator lights up when the jar is powered off. The tuning knob
above the indicator is temperature tuning knob. The temperature will get higher when
tuning it clockwise and vice versa. It is recommended not to tune it if there is no special
temperature requirement.
4. Control panel
It is used to set operating parameters, display the processing data and control working
state of the equipment.
5. Big Carousel
There are 12 group of screws on the Big carousel, and there are 4 screws as a group that
fix the position for each reagent jar and paraffin jar.
The position of each jar shown
below. The 10th , 11th , 12th are paraffin jar. There is a hole on the position of paraffin jar
that can hide the cable and not be visible to the user when he look from the front part.
Fig 2
Jar position
2
III.【Control panel】
1. Start up interface:
After starting up the equipment, it requires password setting:
↑
▊
2011-01-29 14:00:00
Password:??????
Here “ ↑ ” for main VAC power supply, here “ ▊ ” for battery VDC power supply, when
the equipment connect to main VAC power supply, the “ ↑ ” and “ ▊ ” all light up, when
the equipment is backup with battery power supply, the “ ▊ ” light up, but the “ ↑ ” will
display “ X ”.
Pressing: Set→Pause→Auto→Manual→Ok→↑
Password:
* * * * * *
If the password is wrong, it will display “reload” at the right corner, follow the sequence
Set→Pause→Auto→Manul→Ok→↑ to reload your password. After inputting the correct
password, it will go to “waiting operation” interface.
Notice: Set→Pause→Auto→Manual→Ok→↑
2. Interface(waiting operation)
↑
▊
2011-01-29 14:00:00
Waiting operation...
In the main interface, user can choose the manual mode, press “manual” and operate
the system manually, tissue basket will go to jar by jar, user can press “pause” to stop the
running of tissue basket. In the automatic mode, the “manual” and “pause” will
deactivated during the system running.
If user want to stop the system running in automatic mode, please lift the obstacle
detector, the system will run into the interface of obstacle process, it display below:
3
↑
▊
2011-01-29 14:00:00
Obstale error!please return
Here please press “return” back to main interface.
3. Setting interface:
In the main interface, press “set” and go to setting interface below:
↑
Set
▊
2011-01-29 14:00:00
Delaytime
Programme
Shortcutkey
Date/time
Press ↑ or ↓ to choose the item, press “ok” and go to the setting of each item, after setting,
press “return” back to previous menu. The default setting of delay time is 2 hours, user
can set the data specifically.
① Delay time setting:
↑
▊
2011-01-29 14:00:00
Set →Delaytime←Auto Manual→
00-00-00
Here “Auto” is ←, ”Manual” is →, press ↑ or ↓ adjust the value, according to day hour – minute, user can set the value as they need, system will run delay according to the
setting. For example:
↑
▊
2011-01-29 14:00:00
Set →Delaytime←Auto Manual→
01-12-30
Here the system will run after 1 day 12 hour and 30 minute, after setting, press “return”
back to previous menu.
② Programme setting
4
↑
▊
2011-01-29 14:00:00
Set →programme←Auto Manual→
Programme 01
Index
01
Vat
01
Time 00:00
Pagedown←P3 P4→ Pageup
For example:
Programme 01:
Step 01:
Jar:01
Process time:01:00(hour :minute)
It means the step 01 of programme 01 requires the process time of 1 hour in the jar 01,
press “ok” to confirm the setting, “ok” will display in the right corner means the setting is
complete. In this way, user can set each step from 1 to 12. Here the last step must set as
step 12, jar 12:
Programme 01:
Step 12:
Jar:12(must be 12)
Process time:01:00(hhh :mmm)
After setting, user can press “P3” or “P4” to review the data of each programme stored,
press “return” back to the previous menu.
③ Shortcut setting:
↑
▊
2011-01-29 14:00:00
Set →shortcutkey←Auto Manual→
Key P1→Prog 01
Here “Auto” is ←, ”Manual” is →, press ↑ or ↓ adjust the value, “P1” is programme 01,
“P2” is programme 02, press “ok” to confirm the setting, “ok” will display in the right
corner means the setting is complete. Press “return” back to previous menu.
5
④ Date and time setting:
↑
▊
2011-01-29 14:00:00
Set →Date/Time ←Auto Manual→
00-00-00
00:00:00
00-00-0 is
00:00:00
yyy-mmm-ddd
is
hhh-mmm-ssss
Here “Auto” is ←, ”Manual” is →, press ↑ or ↓ adjust the value of date and time, after
setting, press “ok” to confirm the setting, “ok” will display in the right corner means the
setting is complete. Press “return” back to previous menu.
4. Initial jar position setting:
↑
▊
2011-01-29 14:00:00
Input vat 02
Notice: the one near the obstacle detector is tissue basket No. 1, tissue basket
No.1 is in the initial jar.
First lift the top cover manually(press ”manual” in the main menu), pull the reposition
control lever and put the tissue basket No.1 into the initial jar expected, please make sure
the lever go into the locating slot exactly.
Press ↑ or ↓ to position the initial jar, press “ok” to confirm the setting, “ok” will display
in the right corner means the setting is complete. Press “return” back to previous menu.
5. Automatic mode:
↑
▊
2011-01-29 14:00:00
Running
Auto
Prog
01
vat 01
Vat count down 01:00
Total count down 00:14:00
Delay count down 00:00:01
6
Here “AUTO” is automatic mode.
Prog
01
vat
01
System running the programme 01, current running jar is 01.
Vat count down 01:00
The process time of jar 01 still has 1 hour left.(00(hhh):00(mmm))
Total count down 00:14:00
The process time of programme 01 still has 14 hours left.(00(hhh):00(mmm))
Delay count down 00:00:01
The delay time is 1 minute, that means the system will run after 1 minute.
Above timing will count down during the system running.
6. Ending interface:
↑
▊
2011-01-29 14:00:00
Finish!please return
Here the programme running complete, press “return” back to the main menu.
In the automatic mode, the system will count down the delay time first, after count
down or/and if the delay time is 0, the system will run the initial jar and according to the
programme setting, the system will run jar by jar till to the jar 12.
IV.【Operation】
(I): Preparation
1、Plug in the cable of paraffin jar(don’t plug in or off the cable when the equipment is
switch on), connect 3 paraffin jars with the cable(fig.3), plug the cable in the socket
respectively on the right side of equipment(fig.4), paraffin jar place in the specific
position where the hole located in the carousel.(paraffin jar default is 10、11、12),
tighten up the nut of the cable, make sure the cable is connected firmly, then switch
on the equipment.
7
Fig.3 cable of paraffin jar
Fig.4 socket for paraffin jar
2、Go into the gear 2(Fig.5), turn the power key to left(Fig.5), turn on the power
supply(1 is on,0 is off).
Fig.5 power switch
3、Add some reagent into the reagent jar and add 2/3 capacity of paraffin into the
paraffin jar.(make sure the melted paraffin will beyond 2/3 capacity of paraffin jar).
4、Press “manual”, “pause” and lift up the tissue basket, place the reagent jar in the
position from No.1 to No. 9, place the paraffin jar in the position from No.10 to
No.12. (according to the request of tissue processing)
5、Choosing the tissue basket, there are 2 types of tissue basket available. One is copper
double layer tissue basket which is suitable for loading the small piece of specimen,
one is cylinder tissue basket which is suitable for loading the cassette specimen. User
can choose the tissue basket according to their need. When the quantity of specimen
is more, user can choose the programme for running 2 tissue baskets at the same time.
when the quantity of specimen is less, user can choose the programme for running
8
single tissue basket. Here we provide the programmes for both of running 2 tissue
baskets and single tissue basket.
(II)、Data setting:
According to the timing of Appendix 1, delay time is 2 hours:
(1) Go to the main menu:
(2) Delay setting:
Press “set” and select “delaytime”:
Press “ok” and set the data.
↑
▊
2011-01-29 14:00:00
Set →Delaytime←Auto Manual→
00-00-00
Here “Auto” is ←, ”Manual” is →, press ↑ or ↓ adjust the delay time.
For example:
↑
▊
2011-01-29 14:00:00
Set →Delaytime←Auto Manual→
01-12-30
Here the system will run after 1 day(24 hours)12 hours 30 minutes, then press
“ok” to confirm the setting, “ok” will display in the right corner means the
setting is complete. Press “return” back to previous menu.
(III)
、Programme setting:
Select “programme” and press “ok” to programme setting, LCD show below:
↑
▊
2011-01-29 14:00:00
Set →programme←Auto Manual→
Programme 01
Index
01
Vat
01
Time 00:00
Pagedown←P3 P4→ Pageup
9
Here “Auto” is ←, “Manual” is →, press ↑ or ↓ to adjust the timing of each jar,
press “ok” to confirm the setting of each jar, the“ok” will display in the right corner
means the setting is complete. after the setting from jar 01 to jar 12. Press “P3” or “P4” to
review the programme setting. Press“return”back to previous menu.
Attention: the system have stored the programme 01 for using the 2 tissue baskets,
and stored the programme 02 for using the single tissue basket for user reference. User
can change the data according to their specific need.
(IV)、Shortcut setting:
User can set the shortcut key for common use of 4 programmes as P1 – P4 for easy
and convenient operation. The system has set the shortcut key of P1 – P4 as the
corresponding programme 01-04, user can change it or set the shortcut key according to
the specific need.
(V)、Date and time setting:
First time running the system, user can set the current date and time according to
Greenwich. After setting, press “return” back to main menu.
If user want to run the programme 01, and the shortcut key “P1” is for programme 01,
then press “P1”, system will display the interface for initial jar position setting, here user
need to input the jar No. for positioning initial jar, when running the 2 tissue baskets, the
initial jar shall be jar 02, if user don’t like jar 02 as the initial jar, but jar 05, then input the
jar No.5 as the initial jar, and pull the tissue basket No.1 into the jar 05 manually.
Attention: Tissue basket No.1 must in the initial jar when the
system start running, Otherwise the tissue basket will go into the
jars not accordance with the programme setting.
(VI)、Automatic mode:
After the programme setting, press “ok” and run the programme 01 for running the
2 tissue baskets.
1)Programme 01 for running the 2 tissue baskets:
In the main menu, press “P1” and the system go to initial jar position setting:
10
↑
▊
2011-01-29 14:00:00
Input vat 02
Set the initial jar as the jar 02.
Attention: when running 2 tissue baskets, the initial jar must be set, and the
tissue basket No.1 must in the initial jar.
The system will count down the delay time, after 1 day 12 hours and 30 minutes the
system run from the initial jar (jar 02) to the end jar 12. LCD will display the
ending interface.
2)Programme 02 for running the single tissue basket:
In the main menu, press “P2” and the system go to initial jar position setting:
↑
▊
2011-01-29 14:00:00
Input vat 01
Set the initial jar as the jar 01.
Attention: when running single tissue basket, the initial jar must be set, and
the tissue basket must in the initial jar.
The system will count down the delay time, after 1 day 12 hours and 30 minutes the
system run from the initial jar (jar 01) to the end jar 12. LCD will display the
ending interface.
(VII)
、 Take out the specimen:
Press “manual”, “pause” and lift up the tissue basket, then take out the specimen.
The system is running completely.
V、【Error alarm】
The system can detect the possible error and alarm the error and operate intelligent.
The tissue basket will not go into paraffin jar while the paraffin is not melted
completely, in this situation, the tissue basket will stay in the previous jar and alarm,
LCD showing below:
11
↑
▊
2011-01-29 14:00:00
Obstacle error!please return
After the obstacle and error is eliminated, then press “return”, the system will
complete the unfinished running.
VI、【Maintenance】
1.
Install the equipment where there is no water splash.
2.
Install the equipment on the stable working stand.
3.
Store the equipment in dry environment where there is no flame or no dust.
4.
Don't install the equipment in the environment where there is chemical reagent or
poisonous gas flowing.
5.
Put the equipment away from the big machine of consuming the high voltage and
strong current (e.g. big refrigerator, drying cabinet, ultrasonic or electromagnetic wave
generating machine).
6.
Plug the power cord in the special socket with grounding line that ensure the good
grounding condition.
7.
Cut off the power supply before any repairing. Open the top cover and 3
Brush-Armature structure is visible. Don’t touch them because they have the VAC220
high voltage.
8.
Lubricate the equipment once a year to guarantee the good lubrication condition.
9.
Cut off the power supply of equipment when connecting or disconnecting the cable
of paraffin jars.
12
VII、【Appendix】
1、user manual
1
2、glass jar
9
3、paraffin jar
3
4、power cord
1
5、plastic encloser
1
6、tissue basket
4
7、cable for paraffin jar
3
8、fuse box Φ5×20 5A
4
9、screw driver -2 inch
1
10、screw driver -3 inch
1
13
Appendix 1: Typical programme
Processing time
Reagent
Program 01 for 2 basket
Program 02 for 1 bask
Jar1
AF reagent
(alcohol & formalin mixing)
1 hour
1 hour
Jar 2
AF reagent
(alcohol & formalin mixing)
1 hour
1 hour
Jar 3
95% alcohol
1 hour
1 hour
Jar 4
95% alcohol
1 hour
1 hour 30 min
Jar 5
95% alcohol
2 hour
1 hour 30 min
Jar 6
absolute alcohol
1 hour
1 hour 30 min
Jar 7
absolute alcohol
1 hour
20 min
Jar 8
xylene
30 min
20 min
Jar 9
xylene
30 min
20 min
Jar 10
paraffin
30 min
1 hour 30 min
Jar 11
paraffin
1 hour 30 min
1 hour 30 min
Jar 12
paraffin
2 hour
1 hour
13 hour
12.5 hour
Quantity: 80-160 pc
Quantity: 1-80 pc
Total time:
Process specimen:
(Attention: these data just for user reference only.)
14
Appendix 2: Technical specification
1、Processing jar:
12
2、Reagent jar
Quantity: 9
Capacity: 2.2L
3、Paraffin jar
Quantity: 3
Quantity: 1.8L
Temperature setting:
45 - 85 ℃
4、Programme
Jar processing time:
0
-
99 hour 59 min
Delay time: 0 – 99 day 99 hour 59 min.
5、Net weight: 80 kg.
6、Overall dimension:
7、Power supply:
8、Power:
780(diameter)× 780~590(height)mm
VAC 220V, 50Hz
800 W
9、 Working ambient:
Temperature: 5 ~ 40℃
Humidity: < 85% ( 20℃ + 5℃).
15
XS2
D14B
74ALS08
D13A
74ALS00
XS3
+24
J1
1
L
2
N
RD
V1
WR
H1
D4
2
6
5
R1
1
VCC
+24
V2
J2
4
E1
3
A0
RST
R/W
VDD
D14A
74ALS08
RP2
P14
3
1
GN
D7
D6
D5
D4
D3
D2
D1
D0
VCC
3
2
E2
VDD
4
D5
VCC
5
H2
R2
6
7
P15
D9
+24
J3
8
D2
3
10
H3
9
WP
R3
D6
7
12
RES
5
6
2
1
SI
SCK
SO
CS
P14
P15
P16
P17
P16
11
+24
J4
RES
H4
D7
C1
18
12
13
V13
R6
H5
D12
J5
R5
GN
10
11
14
15
J5
P00
P01
P02
P03
P04
P05
P06
P07
RESET
P20
P21
P22
P23
P24
P25
P26
P27
X1
X2
INT0
INT1
EA/VP
RXD
TXD
WR
RD
ALE/P
PSEN
T0
T1
39
38
37
36
35
34
33
32
D0
D1
D2
D3
D4
D5
D6
D7
21
22
23
24
25
26
27
28
E1
E2
A0
RST
R/W
31
VCC
16
17
30
29
WR
RD
D0
D1
D2
D3
D4
D5
D6
D7
34
33
32
31
30
29
28
27
9
8
6
WR
RD
36
5
RST2
35
PC4
PC5
PC6
PC7
13
12
11
10
RP1
D0
D1
D2
D3
D4
D5
D6
D7
PA0
PA1
PA2
PA3
PA7
PA6
PA5
PA4
A0
A1
CS
RESET
PB7
PB2
PB1
PB0
PC3
PC2
PC1
PC0
PC4
PC5
PC6
PC7
PB3
PB4
PB5
PB6
WR
RD
4
3
2
1
37
38
39
40
1
L
N
AC
+
-
3
C10
1
Vin
Vout
R10
3
+24
C9
4
C3
GND
2
2
AC
V5
H7
C4
PB7
PB2
PB1
PB0
PC3
PC2
PC1
PC0
21
22
23
24
PB3
PB4
PB5
PB6
PB3
2
3
4
1
N
AC
+
-
3
1
C7
4
C6
Vin
R13
R14
R15
R16
5
6
7
8
VCC
PC4
H6
D11
R7
VCC
H9
R8
PC7
GN
VCC
V6
Vout
3
R9
VCC
C8
GND
2
2
AC
1
V12
D10
+24
L
H5
H6
H7
H8
H12
H11
H10
H9
RP3
2
3
4
5
6
7
8
9
V8
GN
V9
16
15
14
13
12
11
10
9
D8
1
D3
B1
1
2
3
4
5
6
7
8
25
20
19
18
17
16
15
14
XS1
V10
B2
PB3
PB4
PB5
PB6
PB7
PB2
PB1
PB0
PC3
PC2
RST2
PC0
H5
H6
H7
H8
H12
H11
H10
H9
VCC
C2
VCC
GN
V11
P10
P11
P12
P13
P14
P15
P16
P17
GM
P17
+24
9
19
R4
FM
J5
1
2
3
4
5
6
7
8
GN
V4
2
4
6
8
10
12
14
16
18
20
22
24
26
28
30
32
34
36
38
40
D1
GN
V3
1
3
5
7
9
11
13
15
17
19
21
23
25
27
29
31
33
35
37
39
GND
LP1
LP2
R11
PC6
VCC
R20
C5
LP1
R12
PC5
GN
R19
H8
GN
R17
GN
TSJ-1A+
electric circuit drawing
R18
LP2