1
ENGLISH
SRAM CORPORATION • 2004 GPS USER MANUAL
SRAM CORPORATION • 2004 GPS USER MANUAL
Fork Travel
I N S TA L L AT I O N
It is extremely important that your RockShox fork is installed correctly by a qualified mechanic.
Improperly installed forks are extremely dangerous and can result in severe and/or fatal injuries.
1.
Remove the existing fork from the bicycle and the crown race from the fork. Measure the length of the
fork steerer tube against the length of the RockShox steerer tube. The RockShox steerer tube may need
cutting to the proper length. Make sure there is sufficient length to clamp the stem (refer to the stem
manufacturers instructions).
ENGLISH
Sag
60mm
3-6 mm
50mm
2-5 mm
To measure sag, lift the fork boot and install a zip tie on the upper tube of the fork flush against
the dust wiper. Sit on the bike in the normal riding position. Step off the bike, and measure the
distance between the dust wiper and the zip tie. This is your sag.
MAINTENANCE
To maintain the high performance, safety, and long life of your fork, periodic maintenance is
required. If you ride in extreme conditions, maintenance should be performed more frequently.
! WA RN I N G
DO NOT REMOVE OR REPLACE THE STEERER TUBE. THIS COULD RESULT IN
THE LOSS OF CONTROL OF THE BICYCLE WITH POSSIBLE SERIOUS AND/OR
FATAL INJURIES.
2.
3.
4.
5.
6.
Install the headset crown race (27.0mm for 1" steerers, 29.9mm for 1 1/8" steerers) firmly against the
top of the fork crown. Install the fork assembly on the bike. Adjust the headset until you feel no play
or drag.
Install the brakes according to the manufacturer's instructions and adjust brake pads properly. Use the
fork only with V-type or hydraulic cantilever brakes mounted to the existing brake posts or disc style
brakes mounted through the provided mounting holes. Do not use any cantilever brake other than
those intended by the brake manufacturer to work with a hangerless brace.
Adjust the front wheel quick release to clear the dropout's secondary retention feature. The quick
release nut must be tightened after the wheel is properly seated into the dropout's secondary
retention feature. Make sure four or more threads are engaged in the quick release nut when it is
closed. Orient the quick release lever in front of and parallel to the lower tube in the locked position.
Keep in mind tire clearance as you choose tires. Maximum size is 26 x 2.0 333 mm radius (26”
fork) or 700 x 47 C 359 mm radius (700 C fork) installed. Be sure to check this radius whenever you
change tires. To do this, remove the top caps and spring stack and compress the fork completely.
Verify that at least 5mm of clearance exists between the top of the tire and the bottom of the crown.
Exceeding maximum tire size will cause the tire to jam against the crown when the fork is fully
compressed.
Disc Brake Installation: Disc Brake mounting tabs are provided on the left lower leg. Use your brake
manufacturer's instructions to install a disc brake system on your fork. Do not modify the lower leg
casting to fit the disc brake.
PERFORMANCE TUNING
Ev
ery
Rid
e
25
Ho
urs
50
Ho
urs
DO NOT ADD THREADS TO ROCKSHOX THREADLESS STEERERS. THE STEERER
TUBE CROWN ASSEMBLY IS A ONE-TIME PRESS FIT. REPLACEMENT OF THE
ASSEMBLY MUST BE DONE TO CHANGE THE LENGTH, DIAMETER OR HEADSET
TYPE (THREADED OR THREADLESS).
Maintenance
Clean dirt and debris from upper tubes
Check upper tubes for scratches
Check top caps, brake posts and shaft bolts for
proper torque
Apply 2 to 3 drops of Teflon-based oil to the
upper tube/lower tube junction
Clean and lubricate all internal parts and check
for bushing play
*
WE
*
RECOMMEND THIS SERVICE BE PERFORMED BY A QUALIFIED BICYCLE MECHANIC.
TO
OBTAIN
SERVICE INFORMATION OR INSTRUCTIONS, VISIT OUR WEBSITE AT WWW.ROCKSHOX.COM OR CONTACT
YOUR LOCAL
ROCKSHOX DEALER OR DISTRIBUTOR.
Torque Tightening Values
Top Caps
Brake Posts
Plunger Bolts
Rack & Fender Bolts
Bolt-on Hub Nuts
40 in-lb
80 in-lb
80 in-lb
50 in-lb
180 in-lb
RockShox forks can be tuned for your particular weight, riding style, and terrain.
Setting Sag
RockShox forks can be tuned for your particular weight, riding
style, and terrain. GPS forks are designed to sag when you are
sitting on your bike. Sag is the compression of the fork caused by
the rider's weight. Proper sag allows the front wheel to follow the
contour of the terrain as you ride.
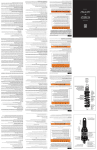
Sag is adjusted by turning the top cap preload adjuster (fig. 1).
Turning the adjuster clockwise increases spring preload (i.e.
stiffening the spring) decreasing sag. Turning the adjuster counter
clockwise decreases spring preload which increases sag.
Fig. 1
4
954-308084-000, REV. B
SRAM CORPORATION. • MARCH 2003
5