1
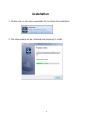
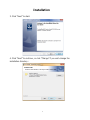
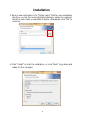
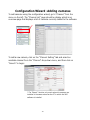
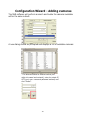
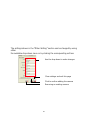
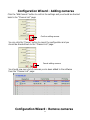
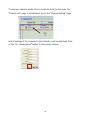
CMS Quick Installation Guide
FCW-SE064 V1.0
1
Table of Contents
Terms and Conditions
System Requirements
Installation
Running the software in Windows Vista or Windows 7
Using the Configuration Wizard
Configuration Wizard - Add Cameras
Configuration Wizard - Remove Cameras
2
3
5
6
10
11
13
18
Terms and conditions
This End-user License Agreement is a legally binding agreement between you (either an
indi- vidual or a single entity) and our company for the software product, which may
include associ- ated software components, media, printed materials, and online or
electronic documentation.
By installing, copying, or otherwise using the product covered by this EULA, you agree to
be bound by the terms of this EULA. If you do not agree to the terms of this EULA, do
not install
or use the product, instead you may return it, within 30 days, along with all associated
mate- rial to your place of purchase for a full refund. The product is protected by
copyright laws and international copyright treaties, as well as other intellectual property
laws and treaties. Note that the product is licensed to you, not sold. The license you have
been granted is identified
by the Software License Code on the License Certificate.
* Installation and Use *
The company hereby grants you the right to install and use the software product with
the following restrictions:
1. The product may be installed on as many computers that meet the hardware
and software requirements.
2. The product may only be used on computers running operating systems for
which the prod- uct was designed.
3. You can and may only use the product in connection with video hardware
equipment for which you have rightfully obtained the corresponding Device
License Keys from our authorized dealer or from our company’s web site
* Copyright *
All titles, including but not limited to copyrights, in and to the software product and
any copies thereof are owned by our company. All rights not expressively granted are
reserved by our company.
* No Warranties *
The company expressly disclaims any warranty for the product. The software product
and any related documentation is provided as is without warranty of any kind, either
express or implied, including, without limitation, the implied warranties or
merchantability, fitness for a particular purpose, or non-infringement.
Terms and conditions
The entire risk arising out of use or performance of the software product remains with you as
the user. You are notified that the product, when used with certain equipment or other software,
may enable you to perform surveillance actions and data processing which are likely to be
3
restricted by or contrary to applicable law, including without limitation data privacy and criminal
law. The sole responsibility for verification of your use against compliance with applicable law lies
with you as the user.
* Limitation of Liability *
The provisions of this paragraph are in effect to the maximum extent permitted by applicable law.
In no event shall Seenergy or its suppliers be liable for any special, incidental, indirect, or
consequential damages whatsoever (including, without limitation, damages for loss of business
profits, business interruption, loss of business information, or any other pecuniary loss) arising out
of the use of or inability to use the software product or the provision of or failure to provide proper
support, even if our company has been advised of the possibility of such damages. Absent any
willful misconduct or gross negligence, Seenergy's entire liability under any provision of this
agreement shall be limited to the amount actually paid by you for the product.
* Miscellaneous *
(a) You may make as many copies of the software product as may be necessary for backup and
archival purposes.
(b) You may distribute copies of the software product to third parties.
(c) You may not reverse engineer, decompile, or disassemble any of the software product’s
components except to the extent permitted by applicable law which cannot be contractually waived.
(d) You may permanently transfer all of your rights for this product, provided the recipient agrees
to the terms of this agreement.
* Termination *
Without prejudice to any other rights, our company may terminate this license agreement
if you fail to comply with its terms and conditions. In such event you must destroy all copies
of the software product.
* Governing Law *
These License Terms and the contract between you and our company are governed by Taiwanese
law and the sole and proper forum for the settlement of disputes hereunder shall be the Taiwan
Shihlin District Court.
4
System Requirements
Minimum System Requirements
•
•
•
•
•
Hardware requirement:
CPU: Intel Core 2 Duo or above
RAM: Minimum 1 GB, 2GB or above is recommended
HDD: SATA 200GB or above is recommended
Display card: Independent display card suggested
• Make sure your display dPi setting is set to
default at 96dPi
• To set dPi value, right-click on desktop,
choose “Settings” tab >> “Advanced”
>> “general”
Ethernet interface: 10/100Mb Ethernet card or above
Software requirement:
• OS: Windows 2000(SP4), Windows XP, Windows
2003, Windows Vista, and Windows 7
Installation CD Contents
•
•
•
•
Installation File
Quick Installation Guide
User’s Manual
Datasheet
5
Installation
1. Double-click on the setup executable file to initiate the installation:
2. The setup wizard will be initialized and preparing to install:
6
Installation
3. Click “Next” to start:
4. Click “Next” to continue, or click “Change” if you wish change the
installation directory:
7
Installation
5. Enter a new valid path in the “Folder name” field for new installation
directory, or click the icons highlighted below to switch to a desired
directory and create a new folder if desire. Afterwards, click “OK” to
continue:
6. Click “Install” to start the installation, or click “Back” to go back and
make fur-ther changes:
8
Installation
7. The installation process should be displayed:
8. Simply click “Finish” to exit the setup wizard when installation finishes:
Running the software in
9
Windows Vista or Windows 7
Due to the UAC (User Access Control) function in Windows Vista or
Windows 7, the software would need to be run under the “Administrator”
privilege. To run the Config Wizard or the main program with the
Administrator” privilege every-time you start the program, follow the
instruction below:
1. Go to “Start” >> “All Programs” >> “FUHO.” >> “FCW-SE064”, right-click
either the config program or the main program and click on the “Properties”
option:
A dialog will be displayed and click on the “Compatibility” tab:
Check the “Run this program as an administrator”. Do the same to the
FCW-SE064
main program:
10
Using the Configuration Wizard
The software comes with two application, the “config” program, and the “main
program”. The software needs to be configured with the config program before
using the main program. Configurations such as adding new cameras,
configuring e-map, or event notification are all done in the config program.
To access the config program or the main program, Click “Start” (or the
Windows icon in Windows Vista or 7) >> “All Programs” >> “FUHO” >> “FCWSE064”:
Upon the start of the configuration wizard, the “System” page should be
displayed:
11
Using the Configuration
Wizard
Software Version Drop-down menu
for multiTime zone setting of the PC
language
IP address of the PC
Connection port for video
streaming
Port number used by the
software’s web server
12
Configuration Wizard -Adding cameras
To add cameras using the configuration wizard, go to “Channel” from the
menu on the left. The “Channel List” page should be display which is an
overview page that displays a list of cameras currently added to the software.
To add a new camera, click on the “Channel Setting” tab and select an
available channel from the “Channel” drop-down menu, and then click on
“Search” to begin:
* The “Search” function only works when the cameras are
installed in the same subnet as the PC in which the NVR
software is installed
13
Configuration Wizard - Adding cameras
The NVR software will perform a search and locate the cameras available
within the same subnet:
A new dialog should be prompted and displays a list of available cameras:
* For cameras located in different subnet (but
within the same local network), enter its private IP,
HTTP port, user- name and password manually and
click “Detect”.
14
Configuration Wizard - Adding cameras
Double-click on a camera from the list and it should direct you back to the
“Channel Setting” page. The camera’s IP address and HTTP port should be
automatically filled in the “Network Setting section:
Fill in the camera’s username and password (must be the root privilege
account) in the corresponding fields shown below and click “Detect”:
1
2
3
Configuration Wizard - Adding cameras
Upon a successful detection, the camera’s information and its current settings should
be detected: (as shown below)
15
The settings shown in the “Other Setting” section can be changed by using
either
the available drop-down menu or by clicking the corresponding cell box:
Use the drop-down to make changes
Clear settings and exit this page
Click to confirm adding the camera
Removing an existing camera
16
Configuration Wizard - Adding cameras
Click the “Add Camera” button to confirm the settings and you should be directed
back to the “Channel List” page:
Confirm adding camera
You can click the “Cancel” button to cancel the configuration and you
should be directed back to the “Channel List” page:
Cancel adding camera
You should now see a list of cameras you’ve been added to the software
from the “Channel List” page:
Configuration Wizard - Remove cameras
17
To remove a camera, simply click on a camera from the list under the
“Channel List” page, it should direct you to the “Channel Setting” page:
Clic
k
and all settings of the camera you just clicked on will be displayed. Click
on the “Re- move camera” button to remove the camera:
18