1
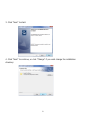
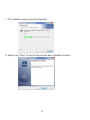
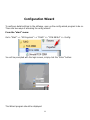
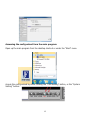
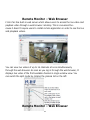
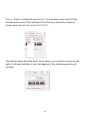
 CMS User Manual
FCW‐SE064 V1.0 1
Table of Contents
Terms and Conditions 4 System Requirements 6 Installation 7 Configuration Wizard 11 Running the software in Windows Vista or Windows 7 12 Configuration Wizard ‐ Adding Cameras 14 Configuration Wizard ‐ Remove Cameras 20 Configuration Wizard ‐ PTZ Setting (Preset Point) 21 Configuration Wizard ‐ Intelligent (Overview) 24 Configuration Wizard ‐ Intelligent (Motion Detection) 25 Configuration Wizard ‐ Event Handling 29 ‐Event Servers 31 ‐Event Trigger Schedule 41 Configuration Wizard ‐ E‐Map (Overview) 43 ‐Location Setting 44 ‐Detail Setting 46 Configuration Wizard ‐ User Account 52 Configuration Wizard ‐ User Account (User Group) 53 Configuration Wizard ‐ Recording 54 Configuration Wizard ‐ Recording (Motion) 56 57 Configuration Wizard ‐ Recording (Schedule) Configuration Wizard ‐ Backup 59 Configuration Wizard ‐ Log View 63 Main Program ‐ Log In 64 2
Table of Contents
Main Program ‐ Live View ‐Overview 65 ‐Adjust Viewing Layout 67 ‐Full Screen 68 ‐Video Bar Quick Access 68 ‐PTZ & Preset Control 72 ‐Sequencing Viewing 73 Main Program ‐ E‐Map Monitor 74 Client Viewer ‐ Event Monitor 76 Client Viewer ‐ Playback 78 Media Player 82 Remote Monitor ‐ Web Browser 93 3
Terms and Conditions
This End-user License Agreement is a legally binding agreement between you (either an individual or a single entity) and our company for the software product, which may include associ- ated
software components, media, printed materials, and online or electronic documentation.
By installing, copying, or otherwise using the product covered by this EULA, you agree to be bound
by the terms of this EULA. If you do not agree to the terms of this EULA, do not install
or use the product, instead you may return it, within 30 days, along with all associated mate- rial
to your place of purchase for a full refund. The product is protected by copyright laws and
international copyright treaties, as well as other intellectual property laws and treaties. Note that
the product is licensed to you, not sold. The license you have been granted is identified
by the Software License Code on the License Certificate.
* Installation and Use *
The company hereby grants you the right to install and use the software product with the
following restrictions:
1. The product may be installed on as many computers that meet the hardware and software
requirements.
2. The product may only be used on computers running operating systems for which the prod- uct
was designed.
3. You can and may only use the product in connection with video hardware equipment for
which you have rightfully obtained the corresponding Device License Keys from our authorized
dealer or from our company’s web site.
* Copyright *
All titles, including but not limited to copyrights, in and to the software product and any
copies thereof are owned by our company. All rights not expressively granted are reserved by our
company.
* No Warranties *
The company expressly disclaims any warranty for the product. The software product and any
related documentation is provided as is without warranty of any kind, either express or implied,
including, without limitation, the implied warranties or merchantability, fitness for a
particular purpose, or non-infringement.
4
Terms and Conditions
The entire risk arising out of use or performance of the software product remains with you as
the user. You are notified that the product, when used with certain equipment or other
soft- ware, may enable you to perform surveillance actions and data processing which are likely to
be restricted by or contrary to applicable law, including without limitation data privacy and criminal
law. The sole responsibility for verification of your use against compliance with applicable
law lies with you as the user.
* Limitation of Liability *
The provisions of this paragraph are in effect to the maximum extent permitted by applicable law.
In no event shall Seenergy or its suppliers be liable for any special, incidental, indirect,
or consequential damages whatsoever (including, without limitation, damages for loss of busi- ness
profits, business interruption, loss of business information, or any other pecuniary loss) arising
out of the use of or inability to use the software product or the provision of or failure
to provide proper support, even if our company has been advised of the possibility of such
damages. Absent any willful misconduct or gross negligence, Seenergy's entire liability under any
provision of this agreement shall be limited to the amount actually paid by you for the product.
* Miscellaneous *
(a) You may make as many copies of the software product as may be necessary for backup and
archival purposes.
(b) You may distribute copies of the software product to third parties.
(c) You may not reverse engineer, decompile, or disassemble any of the software product’s
components except to the extent permitted by applicable law which cannot be contractually
waived.
(d) You may permanently transfer all of your rights for this product, provided the recipient agrees
to the terms of this agreement.
* Termination *
Without prejudice to any other rights, our company may terminate this license agreement
if you fail to comply with its terms and conditions. In such event you must destroy all copies
of the software product.
* Governing Law *
These License Terms and the contract between you and our company are governed by Taiwanese law and the sole and proper forum for the settlement of disputes hereunder shall be the
Taiwan Shihlin District Court.
5
System Requirement
Minimum System Requirements
Hardware requirement:
• CPU: Intel Core 2 Duo or above
• RAM: Minimum 1 GB, 2GB or above is recommended
• HDD: SATA 200GB or above is recommended
• Display card: Independent display card suggested
• Make sure your display DPI setting is set to default at
96DPI
• To set DPI value, right-click on desktop, choose
“settings” tab >> “advanced”>> “General”
• Ethernet interface: 10/100Mb Ethernet card or above
Software requirement:
• OS: Windows 2000(SP4), Windows XP, Windows
2003, Windows Vista, and Windows 7
Installation CD Contents
•
•
•
•
Installation File
Quick Installation Guide
User’s Manual
Datasheet
6
Installation
1. Double-click on the setup executable file to initiate the installation:
2. The setup wizard will be initialized and preparing to install:
Installation
7
3. Click “Next” to start:
4. Click “Next” to continue, or click “Change” if you wish change the installation
directory:
8
Installation
5. Enter a new valid path in the “Folder name” field for new installation directory, or
click the icons highlighted below to switch to a desired directory and create a new
folder if desire. Afterwards, click “OK” to continue:
6. Click “Install” to start the installation, or click “Back” to go back and make
further changes:
Installation
9
7. The installation process should be displayed:
8. Simply click “Finish” to exit the setup wizard when installation finishes:
10
Configuration Wizard
To configure detail settings to the software, open up the config wizard program to do so.
There are two ways of accessing the config wizard:
From the “start” menu:
Go to “Start” >> “All Programs” >> “FUHO” >> “FCW-SE064” >> Config:
You will be prompted with the login screen, simply click the “Enter” button:
The Wizard program should be displayed:
11
Accessing the config wizard from the main program:
Open up the main program from the desktop shortcut or under the “Start” menu
Access the config wizard by either clicking the “CAM Setting” button, or the “System
Setting” button:
12
Running the software in
Windows Vista or Windows 7
Due to the UAC (User Access Control) function in Windows Vista or Windows 7,
the software would need to be run under the “Administrator” privilege. To run the Config
Wizard or the main program with the Administrator” privilege everytime you start the
program, follow the instruction below:
1. Go to “Start” >> “All Programs” >> “FUHO” >> “FCW-SE064”, right-click
either the config program or the main program and click on the “Properties” option:
A dialog will be displayed and click on the “Compatibility” tab:
Check the “Run this program as an administrator”. Do the same to the Pi Vu Lite
main program:
Configuration Wizard - Adding Cameras
To add cameras using the configuration wizard, go to “Channel” from the menu on
13
the left.
The “Channel List” page should be display which is an overview page that displays a list of
cameras currently added to the software.
To add a new camera, click on the “Channel Setting” tab and select an available
channel from the “Channel” drop-down menu, and then click on “Search” to begin:
* The “Search” function only works when the cameras are
installed in the same subnet as the PC the NVR software is
installed
14
Configuration Wizard - Adding Cameras
You can also click on any of the empty slot in the Camera List to start searching
cameras on the network:
The NVR software will perform a search and locate the cameras available within the same
subnet:
Configuration Wizard - Adding Cameras
15
A new dialog should be prompted and displays a list of available cameras:
* For cameras located in different subnet (but within the same
local network), enter its private IP, HTTP port, user- name and
password manually and click “Detect”.
Double-click on a camera from the list and it should direct you back to the “Channel
Setting” page. The camera’s IP address and HTTP port should be automatically filled
in in the “Network Setting section:
16
Configuration Wizard - Adding Cameras
Fill in the camera’s username and password (must be the root privilege account) in the
corresponding fields shown below and click “Detect”:
Upon a successful detection, the camera’s information and its current settings
should be detected: (as shown below)
Configuration Wizard - Adding Cameras
17
The settings shown in the “Other Setting” section can be changed by using either
the available drop-down menu or by clicking the corresponding cell box:
Click the “Add Camera” button to confirm the settings and you should be directed
back to the “Channel List” page:
18
Configuration Wizard - Adding Cameras
You can click the “Cancel” button to cancel the configuration and you should be directed back to the “Channel List” page:
You should now see a list of cameras you’ve been added to the software from the
“Channel List” page:
19
Configuration Wizard - Remove Cameras
To remove a camera, simply click on a camera from the list under the “Channel List”
page, it should direct you to the “Channel Setting” page:
and all settings of the camera you just clicked on will be displayed. Click on the “Re- move
camera” button to remove the camera:
20
Configuration Wizard - PTZ setting (Preset Point)
After adding cameras to the software, all the PTZ cameras will be available in the
“PTZ Setting” page (Channel >> PTZ Setting)
Only PTZ cameras will be listed in the “Channel” drop-down menu: (as shown be- low)
Configuration Wizard - PTZ setting (Preset Point)
Its live video should then be displayed in the lower-right hand corner:
21
Use the on-screen PTZ panel to move the view point and select PTZ movement
speed from the “Speed” drop-down to determine the distance of each movement:
22
Configuration Wizard - PTZ setting (Preset Point)
Next, type in a name in the “Preset Point Name” field to name the preset point and click
“Add” to finish:
The preset point will then be added and will be available in the “Preset Points List”
(as shown below)
Click to highlight the preset point will give you the options to “Modify”, or “Remove”
the preset point:
* To modify an existing preset point, click to highlight the
preset point from the list, then move to a new view point
with the PTZ panel. Finally, click “Modify” to confirm and
save the new point
Configuration Wizard - Intelligent (Overview)
23
The software has built-in motion detection function which needs to be configured
and enabled in the configuration wizard. The configuration page can be accessed in the
configuration wizard under “Intelligent” from the menu on the left. You should
be greeted with an overview list when first access this page.
The overview provides the overall configuration status of the motion detection func- tion
on the available channels.
Only the channels that have been configured with cameras (regardless if they are
online or not) would have the “X” or O” mark.
X: Disabled
O: Enabled
Configuration Wizard - Intelligent (Motion)
To configure the detail settings of each intelligent functions, click on the “Intelligent
Setting” tab to access the detail configurations:
24
* ROI: Region of Interest
25
Configuration Wizard - Intelligent (Motion)
To start configuring the detail settings, select a channel by clicking on the radio button first, and its video should be displayed in the lower-right hand corner:
Check the “Start” checkbox to enable motion detection for the selected channel:
26
Configuration Wizard - Intelligent (Motion)
Adjust the detection sensitivity by altering the “Sensitivity” value (smaller number
means less sensitive)
Select the motion detection trigger source:
Server --> Use software’s built-in motion detection function
Camera --> Receive motion detection trigger from the camera
27
Configuration Wizard - Intelligent (Motion)
Finally click and hold the mouse left button to draw multiple squares on the video to
define motion detection region:
You can click the “Clear” button to remove the defined regions and re-define new
motion detection regions:
28
Configuration Wizard - Event Handling
The software can receive different types of events and respond to certain actions such as
performing recording, send warnings to various event servers or FTP an event image...etc.
Users can also create an “action group” and apply it to a certain type of event on a
particular channel.
To create an event action group, go to the “Action Group” tab and click the “+”
button to begin:
Configuration Wizard - Event Handling
Noticing a new event action group has been added but the “Detail Setting” section
29
is not available for configuration yet:
By default, all the event servers are grayed out as none has been added to the soft- ware
yet. Settings of these event servers will be described in the next page.
30
Configuration Wizard Event Handling (Event Servers)
Mail server
Mail servers are used to send warning emails with pre-defined text content to designated recepients when events are triggered.
To add a new mail server, click on the “Add” button at the bottom:
31
Configuration Wizard –
Event Handling (Event Servers)
Next, fill in the empty fields like shown below:
FTP server
FTP servers are used to send warning with pre-defined text content or camera
snapshot to designated FTP servers when events are triggered.
32
Configuration Wizard - Event Handling (event servers)
Click “Add” button at the bottom to add a new FTP server:
Fill in the empty fields as illustrated below:
* By default, the software uploads files to
the top-level directory of the FTP server.
Enter the folder name after the “\” in the
“Upload Path” field if you would like to software to upload to a specific folder.
33
Configuration Wizard Eevent Handling (Event servers)
HTTP server
HTTP servers are used to send warning with pre-defined text content or camera
snapshot to designated HTTP servers when events are triggered.
Click “Add” button at the bottom to add a new HTTP server:
34
Configuration Wizard - Event Handling (event servers)
Fill in the empty fields as illustrated below:
* Enter a valid public IP address or FQDN
(Fully Qualified Domain Name) in the “Host
Address” field
TCP server
TCP servers are used to send warning with pre-defined text content to designated
TCP servers when events are triggered.
35
Configuration Wizard –
Event Handling (Event Servers)
Click “Add” button at the bottom to add a new TCP server:
Fill in the empty fields as illustrated below:
* Enter a valid public IP address or FQDN
(Fully Qualified Domain Name) in the “Host
Address” field
36
Configuration Wizard Event Handling (Event Servers)
Warning Sound
Users can set up sound files in the software and have the software play them when events
are triggered. Different warning sounds can be used for different types of triggered events.
* Only .Wav file is supported
To Configure, click the “Add” button:
Configuration Wizard Event Handling (Event Servers)
37
Put in a description for the warning sound in the “Description” field (as shown
below):
Click on the “folder” icon to locate the sound file:
You can preview the sound before applying the new configuration by clicking on the
“Speaker” button:
38
Configuration Wizard –
Event Handling (Event servers)
Emergency
This allows users to create emergency contact information and it can be assigned to
a particular channel. This information will be shown in the remote client viewer
program under the “E-Map Monitor” when a particular channel is selected:
To add information, click “Add” button:
Configuration Wizard Event Handling (Event servers)
39
Fill in the empty field with desired information:
Finishing Configuring Action Group
Once you have all the event servers configured, you can go back to the “Action
Group” tab and finish the “Detail Setting” section by selecting the desired event
servers for a particular event action group:
40
Configuration Wizard Event Handling (Event Trigger schedule)
The software provides users the ability to set one schedule per channel and only events
triggered during the defined schedule will be treated as events and the con- figured event
actions will be triggered.
To configure an event schedule for a particular channel, select one from the top
(only the ones available will a checkbox next to the channel number):
41
Configuration Wizard Event Handling (Event Trigger schedule)
By default, the schedule is set in full:
To quickly clear the default setting, click on the “Clear” button as shown below:
Click and hold the mouse then move the house cursor from left to right (horizontally or diagonally) to define (add) new hours or days for event trigger:
* Click and hold the mouse then move it
from right to left (horizontally or diagonally) will erase the previously added
hours/days
42
Configuration Wizard E-map (Overview)
The software provides E-Map function in a multiple layered structure. Users can place
cameras on one map and create a “group” that contains those cameras, and then place
the camera “group” on a different map. Users can also create an additional group that contains multiple camera groups and place the new group onto a
different map.
When accessing the “E-Map” configuration page in the wizard, you should be
promtped with the “Overview” page first:
* Cameras and camera groups can exist on the same layer of E-Map
43
Configuration Wizard E-map (Location setting)
This page is an overview page based on the final E-Map settings. It displays all EMaps and the positions of each camera (or camera group).
Double-click on a “camera group” (ex. Group 1) icon will direct you to the E-Map
that represents camera group 1 and displays the positions of each camera (or cam- era
group) in camera group 1.
44
Configuration Wizard E-map (Location setting)
To go back to the previous layer, simply double-click anywhere on the map in the
current layer:
* The position of each camera (or camera group) can not be re-arranged in this page. This can only be
done in the “Detail Setting” page.
A camera can be quickly placed to a new camera group (a group that’s on the same
layer) on the fly in this page. To do so, simply click and drag a camera icon then
drop it onto a camera group icon:
45
Configuration Wizard E-map (Detail setting)
This page allow users to define new camera groups, E-Map image, and the positions
of each camera (or camera group).
By default, all the cameras should be listed in the tree-view list on the left (as
shown below). All cameras should be listed under the “Home” group (or Group#1):
46
Configuration Wizard E-map (Detail setting)
Configure E-Map for a camera group
To create a new group, click on the “Add new group” button as shown below:
The next available group ID and group name should be automatically filled in to the
corresponding fields. If you’d like to configure this group as a sub group of another
group, choose the main group from the “Dependent” drop-down menu:
47
Configuration Wizard E-map (Detail setting)
To change the map image, click on the icon (as shown below) to do so:
Then locate the new map image:
48
Configuration Wizard E-map (Detail setting)
Finally, click on the “camera group” icon and hold the mouse then drag the icon to the
desired position on the map to determine its new position.
49
Configuration Wizard -E-map (Detail setting)
Configure E-Map for a camera
Similar to the instructions described from page 51 ~ 53, except you click on the
camera from the list on the left this time:
The “Channel” and “Name” fields will be automatically filled. Simply select a desired
camera group this camera will belong to from the “Dependent” drop-down menu:
Click and drag the camera icon to determine its new position:
50
Configuration Wizard E-map (Detail setting)
You can also change the camera’s pointing direction on the map from the “Direc- tion”
drop-down menu nased on its actual setup in the real world environment:
51
Configuration Wizard - User account
The software provides the option to allow users to set different access privileges
and they can be assigned to different user groups. Users can then create multiple
user accounts and assigned them to different user groups to determine the access
privilege of each user account.
* By default, the software does not have any user account/user group created. It’s strongly recommended that you create an user account to prevent unauthorized access to the software.
* Please do not create an additional user group account that has less access privilege and assign the
only user account to that group. You will be asked to log in next time you start the software which you will
then only have limited access.
* You can not create an user account until you create an user group (the first user group will be the
“Admin” group)
52
Configuration Wizard - User account (User Group)
To create a new user group account, click on the “User Group Setting” tab and click on the
“Add Group” button at the bottom:
You will then be able to assign access privileges to the new group. You may also
change the name of the group if you wish:
53
Configuration Wizard - Recording
The recording configuration page allows users to configure the followings:
*
*
*
*
*
Quickly enable/disable certain types of recording
Recording storage path
Recording frame rate of each recording type on each channel
Pre-alarm/Post-alarm time
Schedule recording
You should first be prompted with the overview page that displays the current recording configurations of each channel and the storage path.
54
Configuration Wizard - Recording
To add a new storage path, click on the “Add” button (as shown below):
A new dialog should be prompted which you can select a new path to store the recording data:
You can also configure the software to always keep the previous number of days of
recording data if you wish to do so:
55
Configuration Wizard Recording (setting)
You can configure the detail recording settings in the “Recording Setting” page. In this
page, you can configure the followings:
* Enable/disable recording types
* Recording frame rate
* Pre-Alarm/post-alarm time
56
Configuration Wizard - Recording (Schedule)
Schedule recording allows users to set the software start and stop recording automatically within the scheduled time frame:
To configure schedule recording for a particular channel, click on one of the channel
from the “CH” column in the upper-left hand corner. Then you can edit the record- ing
schedule of the selected channel in the “Schedule” section:
57
Configuration Wizard recording (schedule)
Next, click on the cell boxes on the schedule table to configure the desired record- ing
time. Selected cell boxes will be marked in green which means recording will be
started at that particular time of that particular day:
* Each cell box represents 15 minutes
To set the software to record in consecutive hours on a particular day, click on a cell box
(as the starting point) and hold the mouse then move it horizontally. Release
the mouse when you are done.
To set the software to record on consecutive days during a particular hour, click on
a cell box (as the starting point) and hold the mouse then move it vertically. Re- lease
the mouse when you are done.
Click and drag the mouse horizontally to set consecutive hours
Click and drag the mouse vertically to set consecutive days
* Click and drag the opposite direction to clear previously selected time frame
Configuration Wizard - Backup
58
The software provides the backup function which can back up the followings:
* Media database: Recorded data in the database format
* AVI export: Recorded data exported to AVI file format
* Configuration: The configuration file of the software
Backup media Database
To backup the media database, follow the procedures below:
*
*
*
*
Select channels from the “Channel List” to back their media database
Change or accept the default backup directory
Set the “Begin Time
Set the “End Time” or select the “Export length”
* Click
to begin the backup process
Configuration Wizard - Backup
You should be notified once the process completes. The stored file name and the
storage directory should also be displayed:
59
AVI Export
The software provides the function to allow users to backup the recorded file of one
or more channels and export them as AVI file format. The file can then be played by
the bundled media player.
* The default directory that stores the exported AVI files
is C:\Program Files\FUHO\FCW-SE064\AVI and this can’t not be
changed.
60
Configuration Wizard - Backup
To export the recorded video to AVI, follow the procedures below:
* Select channels from the “Channel List” for AVI export
* Set the “Begin Time
* Set the “End Time” or select the “Duration time”
* Click
to begin the backup process
Configuration Backup
In the “Configuration” page, you can backup the current settings or restore a previously saved configuration file.
61
Configuration Wizard - Backup
You should be notified once the backup is completed successfully (as shown below):
To restore a previously saved configuration file to the system, locate the file first
and then click “Restore”:
You should be prompted to confirm the restore process: (as shown below)
Click “Yes” and restart the configuration wizard to complete the restoration.
62
Configuration Wizard - Log View
The software provides a detailed log which records what has been done and who has
done what to the software:
Click “Export” to export the log file to text file. You should be prompted once it’s ex- ported
successfully and the directory of where it’s save to would also be displayed:
63
Main Program - Log In
Once the main program is started, you should be prompted with the login
screen.
Click the “Login” button to enter the software:
64
Main Program - Live View (Overview)
Sub-pages in the “Video Control
side Bar”
1. Camera list
2. Camera status
3. Sequence View Setup
65
Main Program - Live View (Overview)
Side menu
66
Main Program - Live View (Adjust Viewing Layout)
The program starts up with the Live Monitor view by default and displays videos from
cameras with 64-video split view.
Single left-click on a video gets the video displayed in single view mode in full screen. Single click on it again will
return the screen to the previous display mode.
You can switch to different display modes by using the “pattern switch buttons” from the side bar under the
“Split” tab. The software allows users to display the monitoring area in single video mode, quad video mode,
6-video mode, 9-video mode, 13-video mode, 16-video mode, 25-video mode, and 36-video mode...etc.
Despite the video display patterns the software provides, it also comes with a feature that allows users to
re-arrange the locations of each video window by doing a simple drag and drop. Simply click on a video
window you wish to move its location from and move the video with your mouse left button keep holding
down. Release it until you move it to a new location. You may also use this feature to switch locations
between two video windows.
67
Main Program - Live View
(Full screen monitoring)
With a click of a button, you can quickly hide all the menu options and fill the moni- tor
with live video(s) only. This is quite helpful because the scale of each video
window is enlarged while the number of live videos that are being viewed can re- main
unchanged. To switch to “Full Screen Monitoring”, simply click on “Full Screen Button” (as
shown below) at the bottom of the “Live Monitor” screen. You can then left-click anywhere
on the screen to return to the previous state.
68
Main Program - Live View (Video Bar Quick Access)
Take Snapshot
You can find the “snapshot” icon on the upper-right hand corner of each video win- dow
which allows you to take an instant snapshot of a live video. Click on the icon and the
snapshot should be displayed in a pop up window. You can then right-click
on the image and choose “Save” from the drop-down menu. The snapshot is saved
at a pre-defined location under C:\Program Files\FUHO\FCW-SE064\Snap- shot
Simply close the window and you should be prompted with a message asking
whether you would like to save the snapshot picture. Simply click “Submit” to save
it in the default directory at C:\Program Files\FUHO\FCW-SE064\Snapshot
69
Main Program - Live View (Video Bar Quick Access)
Manual Recording
You can quickly start recording of a particular channel from the video bar. Refer to the
following button to do so:
Motion Display
It will turn on the motion display and mark an overlay paint on the object that’s mov- ing in
the video
* Please make sure motion detection
has been turned on and properly configured in the config wizard and make sure
“Server” is chosen as the MD trigger
source.
70
Main Program - Live View
(Video Bar Quick Access)
Audio
It allows the software to receive audio from the camera.
Reconnect
Overtime, some cameras may automatically adjust its frame rate depends on the
network traffic. They don’t tend to increase the frame rate back even when the avail- able
network bandwidth is increased. Use the reconnect function to re-esablish the
connection between the camera in order to get a better frame rate
Digital PTZ
Click on the digital PTZ button to enable the function. Once it’s enabled, click anywhere on the video and hold the mouse left button. Move the mouse diagonally to
draw a square on the video to zoom. Use the mouse scroll button to zoom in and out.
Right click the mouse to exit the digital PTZ mode.
* This function is only
available in the single
or quad window
viewing
mode 71
Main Program - Live View (PTZ & Preset Control)
The virtual PTZ control keypad is available at the bottom-right hand corner of the
Live Monitor page. All the PTZ-capable cameras will be listed in the drop-down menu
in this section. Use the virtual keypad to control where the selected camera will be
pointed to.
* You must select a camera from the drop-down menu first before using the virtual PTZ control keypad
You can also find a list of the preset points of this camera that you
previously con- figured available in the drop-down menu under the “Preset”
tab in the PTZ control section. Select a preset point and click on the “Go to” button
will make the camera to point to that spot right away.
You can also make the camera to do a non-stop pan in clockwise by clicking on the
“Auto Right” button or in counter-clockwise by clicking on the “Auto Left”. To stop it,
simply click on the “Stop” button.
To do an automatic sequence viewing with the available preset points, select a dwell
time from the drop-down menu first then click “Start” to begin the preset
sequence viewing.
72
Main Program - Live View (Sequence Viewing)
Sequence view is a feature that allows you to perform live monitoring from multiple
cameras and have the system automatically switch those live videos for you with
a time interval you desire. You can set the system to run the sequence view under
different screen split modes and display, for example, four videos at once and then
display the other four in sequence. You can manually pick out the cameras that you
wish to perform the sequence view on, or simply select to sequence them all. Below
is the instructions to setting up the sequence view function:
1. Under the “Live Monitor” page, click on the “SEQ” tab under the main menu
2. Different screen split modes will be available depends on the number of cameras that
are currently connected to the system. For example, if there is only three cameras
connected to the system, only the single view mode will be available.
3. Set the time interval for the sequence view (time is calculated by second)
4. Finally, choose you would like to sequence all available channels by choosing “SEQ ALL”,
or sequence by camera groups:
73
Main Program - E-map monitor
E-Map Monitor provides monitoring with instant event notifications with the geographical information of each camera (and camera group). Small-sized video of a
channel will be shown on the map during a trigger of an event.
The E-Map Monitor displays the top layer of E-map by defaults. Double-click on the
camera group icon to go down a layer and enter the E-map of the camera group.
74
Main Program - E-map monitor
When there is an event going on, the camera icon (or the camera group icon) will
be surrounded with red square flashes on the map:
Double-click on the “camera group” icon will direct you to the E-map of that camera
group (like what’s shown on page 95)
Double-click on the “camera” icon” will display the small-sized video of that
channel:
75
Main Program - Event monitor
Event Monitor is a function that plays back videos that are recorded during event
triggers. It’s a convenient tool that allows users to play through a list of event recordings that are happening at the moment:
Events are received every 10 seconds and they will be listed in the event list with
the newest record on the top. Simply click on any of the event entry in the list to
playback the video:
76
Main Program - Event monitor
When the list is full, the older entries will be removed from the list, you can click on the
“Event Log Search” to search for older event recordings:
You can then perform a search by choosing the channel, event type or a particular
time range:
77
Main Program - Playback
Playback is a function that allows you to play videos that were previously
recorded from one or more cameras. The program allows you to playback videos
in single view mode or quad view mode. Multiple videos recorded
from different cameras (up to four) can be played on a quad view screen at the
same time. The program provides certain ways for searching playback videos.
You can perform a search by choosing one or more cameras listed at the
bottom right hand corner. The search starts automatically as soon as you
select the one or more camera(s) you wish to perform search on.
Main Program - Playback
78
The search result will be displayed at the bottom with bars in either dark
gray or red. The dark gray bar representing videos that were recorded by manual,
continuous, or schedule recording. The red bar representing videos that were
recorded by event trigger.
You can click and drag the green indicator horizontally to jump to a specific play
time:
79
Main Program - Playback
Click on the thumbnail image in the side bar on the right to playback event recording data from one of the selected channels:
You can select one or more channels to export the recording videos to the local PC
as AVI files. Click “Start” to proceed:
You will then be prompted to choose the length of the export file. Make a selection
from the drop-down menu and click “Convert” to begin:
80
Main Program - Playback
The process will be displayed, click “STOP” at any time to seize the conversion:
You will be notified when the conversion is done:
You can quickly access the exported files by clicking on the icon highlighted below, and
it will open up the Windows Explorer displaying the directory of where AVI files are
saved:
81
Media Player
The software comes with a player program which plays the recording files that are
in their original database file format or in the AVI file format that were exported by
the NVR software:
To access the media player, double-click on the executable file in the CD, or you can
copy it directly and place it on the desktop for quicker access in the future:
Play the exported AVI file
To playback the exported AVI file, go to “Open” >> “AVI File” from the top menu:
82
Media Player
A new dialog will be displayed asking you to locate the AVI file. Go to C:\Program
Files\FUHO\FCW-SE064\AVI as it’s the default directory of where the exported AVI files
are saved:
The playback should begin and the video should be played back in its original reso- lution
by default:
Move the indicator horizontally to jump back and forth to a specific time:
83
Media Player
Use the control buttons at the bottom to play/stop/pause/rewind/fast forward the
video
You can click on the “Snapshot” button at the bottom to take a snapshot of the
video:
* The snapshots can only be saved in
“JPEG” format
84
Media Player
Click on the “OSD” button at the bottom displays the OSD on the video:
* The OSD displays in the upper-left hand
corner by default. More settings can be done to
it such as font size/color and dis- play position.
More details about this will be covered in page
121.
The player also supports the digital function. Simply use the scroll button to zoom
in/out. You can also click and hold the house then drag diagonally to select a par- ticular
area to zoom in.
Draw a square on the video
to zoom in a particular area
85
Media Player
Once the video is zoomed in, click and hold the mouse button then move the mouse
to move the zoomed area:
Click and hold the mouse
button then move the mouse
to move the zoomed in area
To exit digital PTZ mode, simply right-click anywhere on the video.
86
Media Player
Play the database file
To play the media database file, simply go to “Open” >> “Media Data Base” from
the top menu:
A dialog shown like below should be displayed:
87
Media Player
The default MDB path should be displayed. If you have altered the database storage
path in the Config Wizard, click “Browse” to locate the new path:
A new dialog should be displayed to allow you to locate the directory of where the
database files are stored:
After the directory is selected, click on “Check”:
88
Media Player
A pop-up message should be displayed once the database is successfully located
(as shown below):
Next, select a desired time zone from the drop-down menu:
* The MDB file does not contain any time zone information. Simply
select a time zone based on your current location or select one
if you know the time zone of NVR server where the MDB was
exported from.
89
Media Player
The “Channel” drop-down menu lists only the channels that have recording files
available. Simply select a channel and press “Search”:
The database begin and end time of the selected channel should then be found:
Simply specify the “Start Time” within the range of begin and end time and click
“OK” to play the database file:
90
Media Player
The playback should begin and the video should be played back in its original resolution:
91
Media Player
Configuration of the OSD display in media player
To make changes of how OSD is displayed on the playback video, go to “Setting”
>> “OSD” from the top menu:
A new dialog should be displayed which lets you change the OSD setting (as shown
below):
92
Remote Monitor – Web Browser
FUHO CMS has built-in web server which allows users to access the live video and
payback video through a web browser remotely. This is convenient because it doesn’t require users to install remote application in order to see the live
and playback videos.
You can view live videos of up to 16 channels at once simultaneously
through the web browser. As soon as you log in through the web browser, It
displays live video of the first available channel in single window view. You
can switch the split mode by clicking the camera list on the left:
Remote Monitor – Web Browser
93
The camera icons are marked with different colors representing their current status:
PTZ Control:
The PTZ control is available at the lower-left hand corner. Select a camera from the dropdown menu to use PTZ control:
Remote Monitor –Web Browser
Preset:
94
Click on “Preset” to access the preset menu. The drop-down menu should list the
available preset points of the selected channel that were previously configured.
Simply select one from the list and click “Go to”:
The buttons below the drop-down menu allows you to set the camera to pan
right or left automatically or pan 360 degrees if the camera supports such
function:
95
Remote Monitor – Web Browser
You can also set the camera to “patrol” among the preset points continuously by clicking the “Start” at the bottom:
Sequence Viewing:
You can also set to view all or selected channels in sequence automatically by going
to “Sequence”:
96
Remote Monitor – Web Browser
Select “All Channels” to start sequence view on all channels in single window view.
You can set the sequence interval by selecting one of the pre-defined options from
the “Interval drop-down menu. Click “Start” to begin:
Select “All Groups” to start sequence view in quad window view (4 cameras
in one group):
Remote Monitor – Web Browser
97
You can also set to start sequence view in 16 window view by checking the
“1 - 16”, “17 - 32”...etc checkboxes:
Video Window Control Bar:
Each video window in live view comes with its control bar. The control bar allows users
to:
* Take snapshot of the live video
* Turn on/off audio (speaker)
* Turn on/off audio post (Mic.)
98
Remote Monitor – Web Browser
To take a snapshot, click on the snapshot icon and a new window should be
displayed. Simply close the window to finish as the snapshot will be saved to
C:\SnapshotFolder automatically:
Digital PTZ:
The digital PTZ function is supported to all video window, which you can click and hold
the mouse and drag diagonally to draw a square to zoom in a particular area
on the video:
99
Remote Monitor – Web Browser
Once zoomed in, a
icon will be available on the video. Simply click and
hold the mouse and then drag to move the zoomed in area to a desired direction:
You can right-click anywhere on the video to exit the digital PTZ mode at any
time:
100
Remote Monitor – Web Browser
Keep video in original aspect ratio and full screen:
At all time, you can set to display all videos in their original aspect ratio by clicking the
function button available at the upper-right hand corner.
To display in full screen, click the button next to it:
Change display language:
The web user interface supports display in different languages. To change the
display language, click the logged in user account at the upper-right hand
corner:
101
Remote Monitor – Web Browser
A pop-up window should be displayed (as shown below):
Select a desired language from the “Language” drop-down menu and click
“Apply”:
102
Remote Monitor – Web Browser
Playback:
Playback is a function that allows you to play one or more videos that were
previously recorded by a chosen recording method or due to an event trigger. The
web interface offers synchronized playback from up to 4 channels and various
types of search methods are provided to help you find the footage you need
quickly.
You can turn on or off the audio of a recorded video at your choice if audio was also
recorded during the recording of the video.
Playback video can be viewed in full screen and snapshots can be taken and saved
during a video playback.
103
Remote Monitor – Web Browser
Methods to Search Playback Videos
The NVR offers four methods to quickly help users find videos that were previ- ously
recorded:
* Search by time chart: Select a desired date of recording from
the time chart
* Search by specific time: Find videos by specifying a start time
* Search by event: Display recording data that were recorded due to
event triggers
* Search by event (most recent): Display the most recent event
recording data
104
Remote Monitor – Web Browser
search by time chart
Start by selecting which channel(s) you would like to perform a search on:
* Selected channels will be marked in red
Select “Search by time chart” from the “Search Method” drop-down list and click
“Go” to start the search:
105
Remote Monitor – Web Browser
Results will then be displayed in a “Date/Channel” table and boxes marked in dark
gray represent videos found on those dates:
Click on any dark gray cell box should direct you to the hour/channel table if there
were multiple videos recorded during that date:
* Videos from other cameras that
are recorded on the same date will
also be displayed
106
Remote Monitor – Web Browser
Click on the cell box again will start playing back the videos if you have reached the
end of search results:
Videos found from other cameras that were recorded at the same time will also
be played.
107
Remote Monitor – Web Browser
Search by event
Start by selecting which channel(s) you would like to perform a search on:
Select “Search by event” from the “Search Method” drop-down list and click
“Go” to start the search:
Results will then be listed like what is shown below (displays the oldest record top
down). Click on a particular result to start the playback:
* You can click “Next Search” to
display the next 15 results.
108
Remote Monitor – Web Browser
You may also specify a new start time to search and display results from
then on. You can restrict the number of results to be displayed at once (max.
30) and perform the search again
109
Remote Monitor – Web Browser
Play by specific time
If you know when a recording was taken place, you may choose the “Play by start
time” from the “Search Method” drop-down list
Then you will be prompted to enter a specific time and date for the
recorded video.
110
Remote Monitor – Web Browser
Search by event (Most recent)
This function quickly displays the most recent event recordings from the se- lected
channels, displaying the most recent result top down. You may click
“Update” to update the list to display the most recent result
111