1
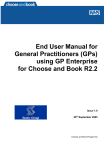
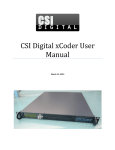
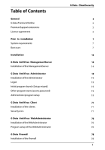
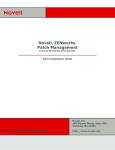
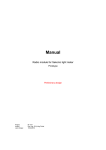
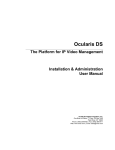
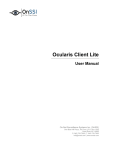
Technical Notes for Ocularis 5.1 The purpose of this document is to provide technical details for various new features in the Ocularis 5.1 release. Topics in this Document Update Service......................................................................................................................................................................... 1 Server-side Motion Detection ................................................................................................................................................... 8 Ocularis Recorder VA Administration Tool ............................................................................................................................. 14 Data Validation ....................................................................................................................................................................... 16 Local Ocularis Client Views .................................................................................................................................................... 18 Update Service Ocularis v5.1 includes a new service called 'Update Service'. The Update Service is a service that will automatically check online for software updates to recording system components and download the update if it is available. Recorder updates are typically made available once per month. By default the system will check for the update nightly at 3:00 a.m. and if found, will download and install the update patch for the recorder components. These settings may be modified. Encoder IP Video Cameras DM Ocularis Recorder (Device Manager) Update Service Agent (VMS_UPDATER) Core Ocularis Recorder (Master Core) UpdateService SVR (VMS_UPDATESVR) IP Video Cameras Core DM Slave Core + Failover Ocularis Recorder (Device Manager) Update Service Agent (VMS_UPDATER) Base Ocularis Administrator + Ocularis Recorder Manager Update Service Agent (VMS_UPDATER) Ocularis Base Ocularis Client Ocularis Client Figure 1 Sample system layout There are two components to the Update Service: the Update Service SVR (Server module) and Update Service Agent (Client module). By default, the server service will be installed on the Master Core (unless unchecked using the 'Custom' installation option). You may also install this service on a separate server, however there should be only one instance of the server module in an ENT or ULT system. For PRO, the Update Service SVR service should be installed on each Master Core Server (it will be installed by default). Components installed on remote/satellite PCs will have an Update Service Agent installed by default. This allows the Update Service SVR (VMS_UPDATESVR) to communicate and push any updates out to Agents (VMS_UPDATER) on the remote machines. Therefore, if you decide to use the default and include the Update Service SVR (Server) on the Master Core server, use either the 'Manager & Server' installation option or 'Custom' option during software installation or upgrade. With the 'Custom' installation option, be sure that 'UpdateService' is among the checkboxes selected. On-Net Surveillance Systems Inc. | One Blue Hill Plaza, PO Box 1555, Pearl River NY 10965 | T 845-732-7900 | www.onssi.com | page 1 Technical Notes for Ocularis 5.1 If you choose to install the Update Service SVR (Server) on a server other than the Master Core, be sure to use the 'Custom' option and that 'UpdateService' is among the checkboxes selected when installing the Update Service. Once the Update Service SVR option is installed, if you decide to use the 'Custom' installation option to install other components, the 'UpdateService' should be unchecked (since it is already installed on the Master Core computer). The Update Service uses port 63000 and 63001. It is advised to keep these default values. If you need to change these port numbers, please contact OnSSI Technical Support prior to doing so. For detailed installation instructions, see the Ocularis Installation and Licensing Guide for 5.1. UPDATE SERVICE CONFIGURATION TOOL This tool manages the configuration of the Update Service on the Master Core Server (or whereever the server service is installed) as well as the Update Agents installed on the other recorder components. The configuration tool is installed automatically with the Update Service server component. This configuration tool can: • Display all connected Update Agents (Clients), their hardware specifications, installed features and applied patches of each Update Agent • Display status information of all Update Agents in a group • Be used to create groups of Update Agents to configure • Be used to rename and delete groups and obsolete Update Agents from the configuration • Import and export download packages and patch files for the Update Service • Configure how to deploy recorder update patches • Check for updates online CONFIGURE THE UPDATE SERVICE 1. On the computer with the Update Service SVR (server component), which is by default the Master Core Server, launch the Update Service tool from the Windows menu: Start All Programs OnSSI Ocularis Recorder Ocularis Recorder UpdateServer configuration tool 2. If required, confirm the system's administration privileges. The 'Information' tab is displayed. Figure 2 Information tab 3. On the left is a tree folder structure where you can create a hierarchy of logical groups. The 'Default' group contains all Update Agents not assigned to another group. 4. Click a group folder to display the status overview of all Update Agents (Clients) in that group. Colorful bullets indicate the status of each: • Red - an error occurred at the client or the Update Agent of the client is offline for more than 3 minutes. On-Net Surveillance Systems Inc. | One Blue Hill Plaza, PO Box 1555, Pearl River NY 10965 | T 845-732-7900 | www.onssi.com | page 2 Technical Notes for Ocularis 5.1 • Yellow - the Update Agent is currently busy (patching, downloading, etc). or waiting for an event triggered by the Update Service SVR (e.g. manual distribution of patches). • Green - the Client's Update Agent is up-to-date 5. Click a client name to display the installed components, the system software, the software version , the status and the installed patches. 6. Click 'Refresh' to refresh the list to a more current status. 7. Click 'Configure group' to create, rename or delete a group and specify the group's update settings. See Configure A Group below. 8. Click 'Delete clients' to remove clients from the configuration tool. Manually Triggering an Action If a group is configured to be updated manually, a button 'Start patch/update at the UpdateAgents' button is displayed in the group's status pane. Click the button 'Start patch/update at the UpdateAgents' to start the update. It will require up to 60 seconds before the update process is started. CONFIGURE A GROUP When you click 'Configure group', a group configuration screen appears. Figure 3 Group Configuration We recommend taking advantage of organizing your system with groups. Create a group (based on location or network bandwidth, etc.) and then select Clients (UpdateAgents) as members of that group. You can, for instance, group all clients that have a low bandwidth connection in a specific group. Or you can put all New York clients in a 'New York' group and all New Jersey clients in a 'New Jersey' group, etc. The advantage of groups is that you can control update parameters on a per group basis. The group configuration displays: • Specific Transfer time (and date) of the update patch file(s) to be downloaded. If the time is in the past, downloads and patches will start immediately. • Transfer interval between Clients (UpdateAgents) in minutes. This allows you to stagger the download of the software patch for each client. (e.g. in Figure 3, if the Transfer interval is 10, the first UpdateAgent starts the download for the patch at 4:00 AM, the second UpdateAgent starts its download ten minutes later at 4:10 AM PM, the third starts at 4:20 AM and so on.) • Patch time: This is the date and time when the patch is applied (installed). 1. Specify the required settings for this group. (Transfer time, transfer interval and patch time) On-Net Surveillance Systems Inc. | One Blue Hill Plaza, PO Box 1555, Pearl River NY 10965 | T 845-732-7900 | www.onssi.com | page 3 Technical Notes for Ocularis 5.1 2. Select 'Do not distribute patches to these clients' to prevent automatic distribution to the clients in this group if there is low bandwidth. Keep in mind if this option is selected, patches must be distributed manually. 3. Select 'Don't start patching automatically' to prevent automatic installation of patches. Patching must be performed manually. 4. Select 'Automatic restart before and after the patch' to shut down the software and log out all users before applying the patch. Warning: there will not be any notification beforehand. 5. If required, deselect Clients from the group's list. Only the selected clients will be a part of the group and affected by the group settings. Note: Keep in mind that if a download on a single Client fails or is delayed, subsequent patches for other Clients in the group will not download nor will any of the patches be applied for any Client in the group. Default Group Since the Default group does not have the same configurable parameters as a group you can create, its behavior is different. For the UpdateClients in the Default group, the software patch will not be installed until all Clients in the group have received the patch download. Then, the UpdateServer will send out a signal for all patches to be installed/applied on the Clients at the same time. Keep in mind that if a download on a single Client fails or is delayed, none of the patches will be applied for other Clients in the Default group. Therefore, it is highly recommended to create specific groups for the Clients, rather than keep Clients in the Default group. Creating a Group Click Create new group, enter a name for the new group and click OK. The new group will be displayed in the Group list. Renaming a Group Click Rename group, change the name for the group and click OK. All assigned UpdateAgents will remain in the group and adhere to the group's settings. Deleting a Group Select a group in the Groups list and click Delete group. All clients in the group will be moved into the Default group and will be exempt from the update settings. UpdateAgents in the Default group will get patches as soon as they are available. The Default group cannot be deleted. GLOBAL REPOSITORY The second tab of the Update Service Configuration Tool displays the available recorder update patches. If the UpdateService has been configured for manual distribution in the 'Server configuration' tab, all updates can be imported from the server and exported to a directory on the server or an attached media. On-Net Surveillance Systems Inc. | One Blue Hill Plaza, PO Box 1555, Pearl River NY 10965 | T 845-732-7900 | www.onssi.com | page 4 Technical Notes for Ocularis 5.1 Figure 4 Global Repository tab 1. Click Import patches to download the available patches from the server which are displayed. 2. Click Refresh to check at the server for update patches not yet displayed. 3. Click Export to copy the updates to a directory that can be copied to any media such as a USB drive. The updates have to then be installed at each client separately. 4. If certain patches are not required, select the patch(es) from the list and click Delete patches before exporting them. Only the patches listed will be distributed. SERVER CONFIGURATION On the Server configuration tab, the basic settings for the communication between the UpdateService SVR (Server) and UpdateAgent (clients) are managed. By default, the UpdateService connects to the server providing the updates (an OnSSI server), downloads and distributes the update patches to the UpdateAgents. However, if manual distribution or a different server for downloads is preferred, the automatic setting can be modified. Figure 5 Server configuration tab The options for downloading update patches include: • Download and install patches automatically from the internet (recommended) This is the recommended and default setting for automatic updates and distribution of patches. • Download patches from the internet, but do not install them automatically Update patches will be automatically downloaded from the server but will not be distributed to the UpdateAgents. The update patches must be installed manually. See Global Repository on page 4. • Download and install patches automatically from a defined remote location The update patches will be downloaded from an FTP server that must preconfigured (See Configuring the FTP Server below) and will be automatically installed. • Download patches from a defined remote location, but do not install them automatically The update patches will be downloaded from an FTP server that must preconfigured (See Configuring the FTP Server below), but will not be distributed to the UpdateAgents. The update patches must be installed manually. See Global Repository on page 4. • Do not search for patches on the internet or any remote location (not recommended) This option is not recommended as no update patches will be downloaded or distributed automatically. The patches will have to be downloaded and exported manually. See Global Repository on page 4. Configuring the FTP Server If you prefer to use an FTP Server to distribute update patches across the network, use these steps for configuration. On-Net Surveillance Systems Inc. | One Blue Hill Plaza, PO Box 1555, Pearl River NY 10965 | T 845-732-7900 | www.onssi.com | page 5 Technical Notes for Ocularis 5.1 1. After selecting the option: Download and install patches automatically from a defined remote location, enter the IP address and port number of the FTP server. Figure 6 Configure FTP Server Settings 2. Provide a username and password for the server. 3. To establish a secure connection, activate 'Use FTP via SSL' (if the server supports SFTP). Contact the network administrator for the correct settings. IMPORT OF PATCHES AT THE UPDATE AGENT 1. After successfully exporting patches (see Global Repository on page 4), copy the directory to a USB drive and insert into the computer where the UpdateAgent is running. 2. Start the application 'SeeTec.UpdatePatchImport.exe' and click Yes. The SeeTec.UpdatePatchImport.exe is created after you've clicked 'Export' on the Global Repository tab. 3. Click OK and start the update patch process. The UpdateAgent will be stopped for the update process. After completion, the UpdateAgent (VMS_UPDATER) will be restarted automatically. M ANUALLY CONFIGURE & ACTIVATE UPDATE AGENT(S) The UpdateService Agent (VMS_UPDATER) is installed by default for all recorder components (except the Master Core). If the IP address of the UpdateService Servier (VMS_UPDATESVR) should change after installation, you can configure the agent manually without having to reinstall the software. 1. Open the configuration file in the installation directory on the agent pc. This file should be located in '...\conf\' and named: updateclient.conf.xml 2. Replace the existing IP address with the new IP address of the Update Server server component (VMS_UPDATESVR). For example: <?xml version="1.0"?> <ServerInformation xmlns:xsi="http://www.w3.org/2001/XMLSchema-instance" xmlns:xsd="http://www.w3.org/2001/XMLSchema"> <ip>192.168.11.155</ip> <port>63000</port> </ServerInformation> Replace 192.168.11.155 with the new IP address. 3. Save the changes. On-Net Surveillance Systems Inc. | One Blue Hill Plaza, PO Box 1555, Pearl River NY 10965 | T 845-732-7900 | www.onssi.com | page 6 Technical Notes for Ocularis 5.1 4. Restart the agent update service (VMS_UPDATER). On-Net Surveillance Systems Inc. | One Blue Hill Plaza, PO Box 1555, Pearl River NY 10965 | T 845-732-7900 | www.onssi.com | page 7 Technical Notes for Ocularis 5.1 Server-side Motion Detection Ocularis v5.1 includes server-side motion detection. This feature is useful for cameras that do not support camera-side motion detection or for those users who prefer server-side motion detection. When motion is detected in the frame or configured area within a frame, it can be recorded and / or trigger an alarm scenario. The analysis process comparing frames for motion is done at the server level and uses CPU processing and additional memory. RECORD ON MOTION: STANDARD VS. ADVANCED SERVER-SIDE MOTION DETECTION Standard motion detection recording is easy to set up but has limitations. Once motion is detected, it will record video for 30 seconds regardless of the idle timer settings. If motion is detected again once the idle time is reached, video will record for another 30 seconds. This can result in excess video being recorded. To Configure Standard Record on Motion Using Server-Side Motion Detection 1. Configure Motion Detection Settings On The Full Frame a. Select Motion Detection under Server side functions for the camera you wish to configure. You may also select multiple cameras, click the Edit icon and configure selected cameras as a group. b. Change the Activate motion detection field from No to Yes. (Check the box if configuring multiple cameras at once). c. Set the Sensitivity, Idle timer and Threshold. 2. Verify that Record on Motion is Selected 3. Turn Off Standard Recording With Standard motion detection recording, the system will use the default (Home) stream for motion analysis, choose a default Motion Detection module for you and use the full frame for motion analysis. There is no pre-alarm buffer or post-alarm duration recorded for this method. Advanced motion detection recording is recommended since it allows you to have more control over what is analyzed and the duration of the recording. To Configure Advanced Record on Motion Using Server-Side Motion Detection (Recommended) 1. Configure the Motion Detection Analysis Stream 2. Configure Motion Detection Settings On The Full Frame or create regions to be used for motion detection analysis 3. Verify that Record on Motion is Selected 4. Turn Off Standard Recording 5. Create Alarm Scenarios for Configured Motion Configure the Motion Detection Analysis Stream 1. In the Ocularis Recorder Manager, open the configuration page for the camera you wish to configure. 2. Click Server side functions on the left panel. Figure 7 Server side functions On-Net Surveillance Systems Inc. | One Blue Hill Plaza, PO Box 1555, Pearl River NY 10965 | T 845-732-7900 | www.onssi.com | page 8 Technical Notes for Ocularis 5.1 3. A default Video analysis module will be selected. Motion Detection Modules perform the actual analysis of frames to determine motion. It is recommended not to exceed 30 devices assigned per module. Two modules are installed by default. You may select an alternate module from the drop-down list. If you need to add additional modules, see To Add a New Motion Detection Module. 4. The Video classification will default to None. To reduce CPU and memory utilization, we recommend adding a low resolution MJPEG video stream and assigning it to a video classification. Then select the video classification here that you want to be used in the server-based analysis for motion detection. Note: Add a new stream by clicking 'Video Streams' and then New. Select the Stream, change to Motion JPEG, set the resolution, assign a video classification and click Apply. Note: the label for video classifications may be modified in System Video classifications 5. Click Apply. Configure Motion Detection Settings On The Full Frame 1. In Ocularis Recorder Manager, open the configuration page for the camera you wish to configure. 2. Click Motion detection under Server side functions on the left panel. Figure 8 Motion Detection Settings 3. Change the Activate motion detection drop-down from No to Yes. 4. Adjust the Sensitivity slider and Threshold for the desired settings. Sensitivity refers to the amount of pixel change required in order to sense motion and threshold is how much motion you want to occur before the system recognizes it as motion. 5. If desired, adjust the Idle timer setting. This is the time (in seconds) that the system will wait before resuming motion detection. 6. Remember to click Apply to save settings. Once the settings are applied if you see the image frame outlined and blinking in red, it means that the system recognizes motion as having triggered. On-Net Surveillance Systems Inc. | One Blue Hill Plaza, PO Box 1555, Pearl River NY 10965 | T 845-732-7900 | www.onssi.com | page 9 Technical Notes for Ocularis 5.1 Figure 9 Red Border indicates motion triggered When motion is detected based upon the settings specified on this screen, an alarm scenario may be triggered. If you want, you can designate different areas within the image for use with different alarm scenarios. To Create a Motion Detection Region within an Image You can create one or more areas within a frame for motion detection analysis. This is useful to avoid false positives for items that are known to be moving, such as a tree swaying from the wind. You configure motion parameters for each region individually. If you create a specific motion detection area within the image, you will not have the ability to use motion detection analysis on the full image. Avoid overlapping regions. 1. In the Motion detection screen under Server side functions, click the 2. Click the 3. icon to establish an Unnamed group. icon and you can begin to draw a polygon for the area to be analyzed. a. Click on the image for the first corner of the polygon. b. Move the mouse and click again for the first tangent. c. Repeat this to draw a shape. d. When you return to the original starting point double-click the mouse to complete the shape. e. Give the region a logical name which will allow you to identify it later when you use this in an alarm scenario. f. Repeat for each region. Select a region by clicking its name and set the Sensitivity, Idle timer and Threshold for that region. Repeat for each region. Note: when one region is selected, other regions are not visible on the image. On-Net Surveillance Systems Inc. | One Blue Hill Plaza, PO Box 1555, Pearl River NY 10965 | T 845-732-7900 | www.onssi.com | page 10 Technical Notes for Ocularis 5.1 Figure 10 Sample Motion Detection Area 4. Click Apply when done. Verify that Record on Motion is Selected If you want to record video on motion, make sure the Record on motion drop-down on the left panel is set to Yes. Figure 11 Record on Motion set to Yes Turn Off Standard Recording If you've committed to recording on motion (whether it is camera-based or server-based motion), it makes no sense to continue with Standard Recording set to Always (the default value). This setting should be turned off. 1. In the Ocularis Recorder Manager, on the configuration page for the camera you wish to configure, click Multimedia database (or Image storage) on the left panel. 2. Set Standard recording to No. Figure 12 Turn off Standard Recording On-Net Surveillance Systems Inc. | One Blue Hill Plaza, PO Box 1555, Pearl River NY 10965 | T 845-732-7900 | www.onssi.com | page 11 Technical Notes for Ocularis 5.1 3. Click Apply. Now you can create an alarm scenario using server-side motion detection. Create Alarm Scenarios for Configured Motion It is recommended to use alarm scenarios when recording on motion in order to have better control over the video being recorded. Use the steps below to create the alarm scenario. It is assumed that motion detection settings have already been configured. 1. In Ocularis Recorder Manager, create a new alarm by either, selecting 'Alarms' in the Control Bar and then 'Create new Object' or click 'Create alarm' in the main configuration screen. Figure 13 Create New Alarm Scenario 2. Enter a descriptive name for the alarm and click OK. 3. Click 'Start' on the left panel and then click the Edit button to select the event that will trigger the alarm. 4. Expand the camera configured for motion and check the box for Motion Detection for the configured region or full frame. You can select more than one motion detection event. Figure 14 Configure Motion to Trigger the Alarm On-Net Surveillance Systems Inc. | One Blue Hill Plaza, PO Box 1555, Pearl River NY 10965 | T 845-732-7900 | www.onssi.com | page 12 Technical Notes for Ocularis 5.1 5. When done, click OK. 6. Click 'End' on the left panel to configure when to end the alarm. In most cases, it will be the 'Maximum server alarm duration', a time value in seconds. Note: We recommend setting the Maximum server alarm duration to 2 seconds longer than the Idle timer in order to ensure that all video is captured. If you take advantage of pre-alarm buffer, the Maximum server alarm duration and Idle timer values can be the same. Figure 15 Set the Duration 7. Click 'Server' on the left panel. Enter the number of seconds for 'Pre-alarm duration for camera recording(s)'. This alarm setting overrides the global pre-alarm buffer setting for alarm recording in the camera's 'Image Storage' section. 8. Click the Edit button to set the 'Actions at start of alarm'. Expand the list and click 'Start alarm recording' for the camera. Click OK. Figure 16 Start alarm recording 9. Click Save to save settings. So now when there is motion on this camera or within the configured region on this camera, video will be recorded based on the alarm recording settings. This alarm scenario will appear in Ocularis Administrator and allow you to set alert notifications in Ocularis Client. On-Net Surveillance Systems Inc. | One Blue Hill Plaza, PO Box 1555, Pearl River NY 10965 | T 845-732-7900 | www.onssi.com | page 13 Technical Notes for Ocularis 5.1 Ocularis Recorder VA Administration Tool The Ocularis Recorder VA Administration Tool is used to configure settings for the Core Server and install the 'Versatile Application' extensions. Extension parameters are then configured in the Ocularis Recorder Manager. One of the components controlled by the VA Administration tool is Server-based motion detection. When you install the software, two Server-based motion detection modules are automatically installed. Each module can support up to 30 cameras/channels. Once you exceed this amount, we recommend adding additional Server-based motion detection modules. Server-based motion detection modules are the components that perform the analysis of motion on each frame. Therefore, consider where these are installed. If you observe a degradation of CPU performance or are running low on memory, consider moving the server-based motion detection module to another computer. Another methodology is to configure a single server with adequate hardware and use this solely for server-based motion detection modules. To Add a New Motion Detection Module 1. From the Windows Start menu All Programs OnSSI Ocularis Recorder Ocularis Recorder VA Administration Tool. 2. Right-click 'VAConfig' and select 'Add new module' 'Server-based motion detection'. Figure 17 VA Administration Tool A new module appears. On-Net Surveillance Systems Inc. | One Blue Hill Plaza, PO Box 1555, Pearl River NY 10965 | T 845-732-7900 | www.onssi.com | page 14 Technical Notes for Ocularis 5.1 Figure 18 VA - Server based Motion Detection Module 3. Modify the name of the module in 'Module name' to make it easily identifiable. 4. Enter the IP address of the Master Core in the 'Core server IP' field. Note: Do not use localhost or 127.0.0.1 5. The 'Service ID' field changes on the first connection to the OnSSI server. Do not reset the Service ID without first contacting OnSSI Technical Support. 6. Click the 'Connection test' button to check the connection between the module and the Core Server. If the module does not connect, check and configure the network and firewall settings. 7. Select the 'Module IP' from the drop-down list. 8. The 'Module Port' number is automatically set. If you need to change this port, check with OnSSI Technical Support first. 9. Select 'Enforce 32bit' if the devices are not 64-bit capable. This setting only applies to devices that have not yet been released for 64-bit. Do not check this box until contacting OnSSI Technical Support. 10. Click Save to save changes. 11. Restart all SeeTec services. On-Net Surveillance Systems Inc. | One Blue Hill Plaza, PO Box 1555, Pearl River NY 10965 | T 845-732-7900 | www.onssi.com | page 15 Technical Notes for Ocularis 5.1 Data Validation When cameras are added to a recorder (device manager), the default behavior with Ocularis 5.1 is to validate specific settings on the device. This aids in troubleshooting issues with installed cameras. The software checks whether the following fields are valid on the device: • the IP Address • the Port # • the username and password • the correct class of driver (This is not necessarily the exact driver but the software sends an API command to the camera and if the camera understands it then it assumes a match) You can turn this data validation off as well. You may want to do this if you wish to remotely configure the system from the convenience of your own office without actually having connected cameras or devices. Then, you can take the system onsite and install, saving you a great deal of time in the field. The following camera manufacturers are supported for data validation: ACTi Pelco Arecont Vision Samsung Axis Sony Bosch Vivotek IQinVision Onvif Panasonic The data validation check occurs when you add a single camera: Figure 19 Data Validation Check Box Note: The Validate settings before device creation checkbox will appear for all manufacturers, even those devices which do not support this feature. If you use the Device Finder tool, you will also have data validation as an option. On-Net Surveillance Systems Inc. | One Blue Hill Plaza, PO Box 1555, Pearl River NY 10965 | T 845-732-7900 | www.onssi.com | page 16 Technical Notes for Ocularis 5.1 Figure 20 Device finder data validation checkbox Note: The Validate settings before device creation checkbox setting will be retained for the next session. For example, if you uncheck this setting, the next time you log in and add a device it will still be unchecked. On-Net Surveillance Systems Inc. | One Blue Hill Plaza, PO Box 1555, Pearl River NY 10965 | T 845-732-7900 | www.onssi.com | page 17 Technical Notes for Ocularis 5.1 Local Ocularis Client Views With Ocularis 5.1, Operators can log directly into a Core and save views locally using Ocularis Client in Limited Mode. Keep in mind, however, that this procedure bypasses Ocularis Base and therefore you will not benefit from any Base functionality (such as alerts, events, maps, video walls, etc). Additionally, a separate user account must be created on the recorder's Core for the operator to use. This user account may be configured to have privileges to all or only some cameras. Refer to the Ocularis Recorder Configuration Manual for instructions on how to create a user. 1. Log in to the Master Core using Ocularis Client. To do this, use the IP Address of the Core in the Server field. 2. The first time you log in, the screen will be blank. To configure views, click the Set up icon. Figure 21 Set up icon 3. Click the '+' to expand the 'Company' folder. 4. Click the create view icon and select a layout. Supported layouts are: 1 x 1, 2 x 2, 3 x 3, 4 x 4 On-Net Surveillance Systems Inc. | One Blue Hill Plaza, PO Box 1555, Pearl River NY 10965 | T 845-732-7900 | www.onssi.com | page 18 Technical Notes for Ocularis 5.1 Figure 22 Create a View Layout 5. Once the layout is selected, the view name is displayed and editable. Figure 23 Name a View 6. Populate each view pane by dragging and dropping a camera from the list on the left to the pane position desired. On-Net Surveillance Systems Inc. | One Blue Hill Plaza, PO Box 1555, Pearl River NY 10965 | T 845-732-7900 | www.onssi.com | page 19 Technical Notes for Ocularis 5.1 Figure 24 Drag & Drop to populate a pane 7. Use the Filter field if you need to quickly locate a camera based on a keyword. 8. Remember to click Save. 9. Click Close to exit set up mode and return to live viewing. Figure 25 Filter, Save & Close On-Net Surveillance Systems Inc. | One Blue Hill Plaza, PO Box 1555, Pearl River NY 10965 | T 845-732-7900 | www.onssi.com | page 20 Technical Notes for Ocularis 5.1 • Select the new view from the 'Views' menu. • All views created in Limited Mode are stored on the Master Core server and are shared amongst all users • You will see these views on any workstation you use to log in with Ocularis Client Limited Mode • For more details on using Ocularis Client in Limited Mode, refer to the Ocularis Client User Manual. 0000102120150.1330.5.1.0.180 On-Net Surveillance Systems Inc. | One Blue Hill Plaza, PO Box 1555, Pearl River NY 10965 | T 845-732-7900 | www.onssi.com | page 21