1
Chronos Process Integration Sdn Bhd
eStockCard V3 Warehouse
User Manual
1 e-StockCard Overview
2 Setting
2.1 User Master Maintenance
2.1.1
2.1.2
2.1.3
Create New User
Create New Group & Privileges
Assign User to Group
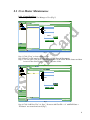
2.2 Location Master Maintenance
2.2.1
2.2.2
Default Configuration
Modification
2.2.2.1
2.2.2.2
2.2.2.3
2.2.2.4
Add or Delete Rack
Add or Delete Level & Column
Rename Prefixes
Properties
Change P
roperties
2.3 Item Master Maintenance
2.3.1
Components Requirement
2.3.1.1
2.3.1.2
2.3.2
2.3.2
Create New Item
2.3.2.1
2.3.2.2
2.3.3
UOM
Group & Category
Preset
on the fly
Modification
3 Operation (Basic)
3.1 IN
3.1.1
3.1.2
3.1.3
Components Requirement
Application
Validation
3.2 OUT
3.2.1
3.2.2
3.2.3
Components Requirement
Application
Validation
3.3 LOCK
3.3.1
3.3.1
3.3.2
Application
Validation
3.4 UNLOCK
3.4.1
3.4.2
Application
Validation
3.5 CYCLE COUNT
3.5.1
3.5.2
3.5.2
Initiate Cycle Count
Adjustment
Validation
3.6 ALERT
3.6.1
Components Requirement
3.6.1.1
3.6.1.2
3.6.2
3.6.3
Activate “Chronos eStockCardAlertService”
Setting
System Settin
g
Events Setting
Events Listing
3.6.3.1
3.6.3.2
Workstation Mode
Email Mode
3.7 STOCK TRANSFER
3.7
3.7.1
Application
2
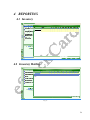
4 Reporting
4.1 Inventory
4.2 Inventory Holdings
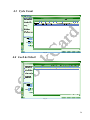
4.3 Cycle Count
4.4 Lock & Unlock
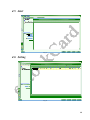
4.5 Alert
4.6 Setting
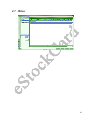
4.7 Others
5 Stock Edit
5.1 Application
3
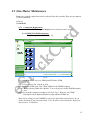
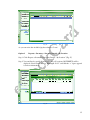
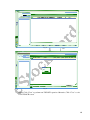
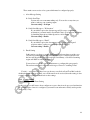
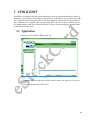
1. eStockCard Overview
Fig. 1
Fig. 2
4
Fig. 3
Fig. 4
The eStockCard v3 Warehouse consists of Inventory (Fig.1), Reports (Fig.2), Tools (Fig. 3) and
Settings (Fig.4)
Inventory – The main function of the eStockCard, IN, OUT, Cycle Count, Stock Transfer, Lock,
Unlock and Alert
Reports – All the reporting documents
Settings – Where all the settings such as item code, location, alert and etc are being set and input
Tools – Where the backup, restore, import, export and etc of the database are performed here
5
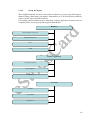
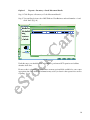
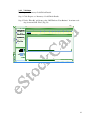
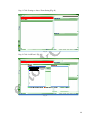
2.1 User Master Maintenance
2.1.1 Create New User
Path: Settings > System > User Manager > User (Fig. 5)
Fig. 5
Step 1 Click “Clear” to clear existing record.
Step 2 Enter User ID (must be unique), Password, Full Name & Department.
Step 3 You can paste your photo (optional).Just click on the Select Picture button and then
browse for the desired picture from the respective folder.
Fig.6
Step 4 Click “Add New User” & “Save”. New user with User ID = “A” with Full Name =
“Evaluator” was created and saved (Fig.7)
6
Fig. 7
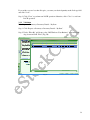
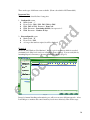
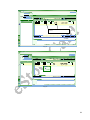
2.1.2 Create New Group & Privileges
Path: Settings > System > User Manager > Group
You can create several users but assign to the same group who are having similar access
privileges.
Fig. 8
7
Step 1
Step 2
Step 3
Step 4
Select “Group” and “Particular” from main screen. (Fig. 8)
Click “Clear” to clear existing record.
Enter “Group Name” & “Group Description”
Click “Add New Group” follow by “Save”, new group name will be added to the list.
(Fig.9)
Fig. 9
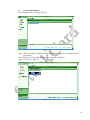
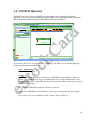
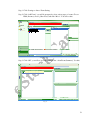
Step 5 Now, you have to assign which configure certain operation privileges to this newly
created group. Select “Group > Privileges” from drop down. Tick any operation
privilege you want, multiple selections to any module can be made. To ause IN & OUT
only, just tick “Access IN” and “Access OUT” Screen and Save it. (Fig.10)
Fig. 10
8
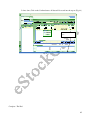
2.1.3 Assign User to Group
Path: Settings > System > User Manager > User
Every user requires to be assigned to appropriate Group in order to have suitable access
privileges.
Step 1 Select “User > Group ID” from drop down. You will see newly created user “A” is
NOT assigned to any Group yet.
Fig. 11
Step 2 We decide to allow user “A” to do simple “IN” & “OUT” operations. Hence, it will be
assigned to Operation group. Click “Save” once done. To exit just click the Close
button. (Fig. 12)
Fig. 12
9
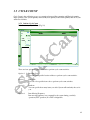
2.2 Location Master Maintenance
You are advised to plan, organize your storage locations properly and thoroughly. Several
issues must be taken into consideration: a. Number of storage locations
b. Arrangements
c. Restricted Area (also called Fixed Area) for certain items which may sensitive to certain
environmental factors such as direct expose to sunlight, humidity, free from contamination.
After you have done so, we need to assign unique location ID (location code) to every storage
location, this process is called “Naming”. It is similar to every house should be assigned with
specific address for proper identification purpose.
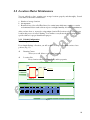
2.2.1 Default Configuration
Path: Settings > Location
If you launch Settings > Location, you will see the following screen which consists of two
portions (Fig. 13):
Drawing Canvas
Allow you to add, delete or edit logical mapping.
Location List
Every location address (Location Code) and its properties.
Fig. 13
10
The default setting of storage locations are having the following properties and attributes:a. There are two types of locations, i.e. Normal & Overflow.
b. Normal storage locations have its unique location code and properties:
a. Number of racks = 2. (with prefix = Racking01, Racking02)
b. Each rack has 3 layers. (with prefix = L)
c. Each layer has 10 columns. (with prefix = C)
d. Total number of unique location code = 60.
e. Every unique location code has defaulted to the following properties:
1. Multiple and different items can be mixed. (default value = unlimited)
You can store more than one type of item in this location code with NO limit.
2. Serial Nos Limit (default value = 999,999)
For examples,if you required 5 cartons of Coca-Cola can be stored into this
location with 5 different serial numbers, then just enter 5 at the Serial Nos
column.
And for only 1 cartons of Coca-Cola can be stored at the respective location,
just enter 1 into it.
For info,the serial number will be auto-generated by the system during IN
operation.
c. Overflow storage location refer to those temporary storage areas. The location code is
defaulted to = Overflow Racking-L1-C1. By default, you are allowed to store unlimited item
as well as serial number.
d. In total, there are 61 unique location codes inclusive of overflow area.
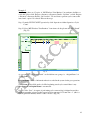
2.2.2 Modification
Path: Settings > Location
It is very common to re-layout your warehouse facilities or storage areas such as
Add, delete or edit number of racks, levels or columns
Change properties
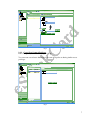
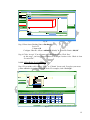
2.2.2.1 Add or Delete Rack
Step 1 Launch Settings > Location
Step 2 Pick the rectangle shape named “Rack” under “Tools” sub-screen and drag it to
“Drawing Canvas”. (Fig.14)
11
Fig. 14
Step 3 Enter data to Racking Name = Racking03
Level = 5
Column = 10
Configure “Max No of Item = unlimited (default)” & “Serial No Limit = 999,999”
Step 4 Clicks “Accept”. You will return to location main screen. Click “Save”
At this stage, you have created additional 50 unique location codes. Check it from
“Location List”.
2.2.2.2 Add or Delete Level & Column
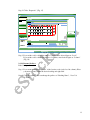
Step 1 If you wish to add or delete “Level” or “Column” for any rack. Just place your mouse
pointer within the desired rack and right clicks. For examples, rack = Racking01.
Fig. 15
12
Step 2 Clicks “Properties”. (Fig. 15)
Fig. 16
Step 3 If you wish to add or delete the number of layers, enter desired figure at “Level”
If you wish to add or delete the number of columns, enter desired figure at “Column”
(Fig. 16)
2.2.2.3 Rename Prefixes
Path: Settings > Location
Step 1 If you want to rename the “prefix” of the location codes (rack, level & column), Place
your mouse pointer within the desired racking and right click.
Step 2 Click “Properties”. You can change the prefixes of “Racking Name”, “Level” &
“Column”.
13
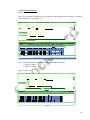
2.2.2.4 Change Properties
Path: Settings > Location
Step 1 If you wish to modify the storage properties (either single location or batch of location),
Select Settings > Location (Fig. 17)
Fig. 17
Step 2 Select the desired location code and proceed with amendment.
a. Serial No Limit
=1
b. Max No of Item
=1
Step 3 Clicks “Save”.
Fig. 18
14
2.3 Item Master Maintenance
Item is the essential component in order for eStockCard works smoothly. There are two methods
to create a new item:
Preset
On-the-fly
2.3.1 Components Requirement
You need to define UOM, Group & Category before a new item can be created.
2.3.1.1 UOM (Unit Of Measurement)
Path: Settings > Item > UOM (Fig. 19)
Fig. 19
You can add, modify or deactivate UOM (but NOT delete) UOM.
Step 1 Select “Active List” from drop down.
Step 2 Add new UOM, click “New”. Enter UOM Code & UOM Description.
Step 3 Modify existing UOM, click “Modify”. You are allowed to modify UOM Description
only.
Step 4 If you wish to duplicate existing record, click “Copy”. However, only UOM
Description can be duplicated but must assign with new UOM Code.
Note: Old or existing records CANNOT be removed or deleted but can deactivate it. If you
wish to deactivate it, just select it and click “Void”. It will be removed from the “Active List”
and relocate to “Voided List”.
15
2.3.1.2
Group & Category
There might be thousand of items in your warehouse, therefore, you may group and categorize
them according to their nature, performance, characteristics etc. You can reap many benefits by
doing so in later stage especially in analysis.
For examples, there are numerous types of hardware, software applications and accessories in a
computer retailer. You may group and categorize them like this:
Hardware
CPU (Central Processing Unit)
HDD (Hard Disk Drive)
Printer
DRAM
Software Applications
OS (Operating System)
Office Application
Utilities
Accessories
Cartridge
Storage Media
Input Devices
16
From the above examples, we can divide them into 3 groups and 10 categories. In general,
Group can be treated as “parent” level where Category is the “child” level.
a.
Group Maintenance
Path: Settings > Item > Group (Fig. 20)
Fig. 20
Step 1 Add new Group, Clicks New button. Enter Item Group Code & Item Group Description.
Step 2 To delete record, select the respective row and click the Void button
Step 3 Click “Save”. (Fig. 21)
Fig. 21
17
b.
Category Maintenance
Path: Settings > Item > Category (Fig. 22)
Fig. 22
Step 1 Add new Category, click New button . Enter Item Category Code & Item Category
Description.
Step 2 Delete record, select the respective row and click Void button.
Step 3 Click “Save”. (Fig. 23)
Fig. 23
18
2.3.2 Create New Item
As mentioned earlier, you can add or create new item through Preset mode or On-the-fly
mode.
Preset
You must create it before any operation or transaction. This is the most
common practice in most ERP/MRP/Accounting systems.
On-the-fly
Create it when you need them during transaction or operation without going to
setting. This can be done during IN operation only.
2.3.2.1
Preset
Path: Settings > Item > Master (Fig. 24)
Fig. 24
You can add, modify or VOID (but NOT delete) item.
Step 1 Select “Active List” from drop down.
Step 2 Add new items, click “New”. (Fig. 25)
19
Fig. 25
Please be informed that if more information are entered, it will be useful for the reporting stage
in the near future
Now, we must learn how to add a new item by using Preset mode.
Assume that a computer retailer want to add Microsoft newly-launched OS, Windows Vista
Business to his item master list. Here are the steps:Step 1 Enter data into “Item Code”, “Item Type’ & “Item Description”.
There are free text fields except Item Type
You must be reminded that item code must NOT replicate.
For Item Type, there are 3 selection: Inventory – For an inventory Item
Services – For service job such as labour, repair and etc
Non_Inventory – For an item which is not an inventory item
“Item Specification” is an optional field.
Step 2 Item Pick Out Property: - Select “FIFO”, “LIFO” or “No Rule”. Default value = FIFO.
This will affect listing sequences during OUT operation. It is crucial.
Step 3 Select “Item Group” & “Item Category”. Do you still remember we have created new
item group called “Software Applications” & new item category called “Operating
Systems”?
You can select them from the drop down.
Step 4 Enter numerical values into “Item Shelf Life” field. This is an important field if your
item is sensitive to shelf life, for instances, food & beverages, chemical substances etc.
20
Step 5 There are some optional field such as Item lead Time, Warranty, Item Dimension, Item
Manufacturer, EPC Code and Supplier Part No.
Step 6 Enter numerical values in “Max Level”, “Reorder Level”, and “Min Level & Reorder
Qty” fields if you wish to monitor its inventory level. If data are entered, the system
will monitor the inventory status and you will be alerted automatically. Please refer to
Alert function.
Step 7 Assign proper UOM. You can see a sub-menu called “Item UOM”. Click “Edit”
and select proper UOM Code. System has some default values (most common use), if
you can’t find an appropriate one, you must pre-define first Settings > Master > UOM.
Step 8 Click “Save”. To exit from this screen, clicks the Close button. You will see this:
Fig. 26
New item has been created successfully!! You can proceed with any operation now.
If you wish to modify or amend existing records, you are allowed to do so. Settings > Item >
Master, Click “Modify”. You are allowed to modify any record except item code.
If you wish to duplicate existing records, you are allowed to do so. Settings > Item > Master,
Click “Copy”. All the fields will be duplicated except item code.
If you wish to deactivate particular record, you are allowed to do so. Settings > Item > Master,
Click “Void”. It will be removed from the “Active List” and relocate to “Voided List”.
Note:
Old or existing records CANNOT be removed or deleted but can be deactivated (become NOT
active)
21
2.3.2.2
On-the-fly
To enable this mode, you must activate“Auto Update Option” by launching Settings > System
> Operation Setting and tick “Auto Update Option”. Here it is:
Fig. 27
Now, you can start to add a new item. Here are the steps:
Step 1 Launch IN operation by click Inventory > IN (Fig. 28)
Fig. 28
22
Step 2 Assume you have received 10 pieces (in one box) of Seagate 160GB Hard Drive,
They are new item.
Enter Item Code = 160GB HDD, system will check and verify if this is a new item.
If yes, you will be prompted:
Fig. 29
If you decide to accept it, click “Yes”.
Enter Item Description = Seagate 160GB HDD.
Step 3 Enter Qty = 10 and select “PC” from drop down. (PC is the UOM Code for Pieces,
To verify this, you can launch Settings > Item > UOM). Finally, click “Chronos
Search”. System will search a best location to store this item.
Step 4 If the location code is acceptable to you, click “Confirm” follow by “Close”.
At this stage, the following tasks have been completed:
1.
2.
New item code = 160GB HDD has been created and saved into the system.
10 pieces of 160GB HDD will be directed to the unique location. Warehouse
operator will store it accordingly.
Step 5 Data Maintenance. On-the-fly mode is the short-cut approach to add a new item into
the system and there is limitation. You still need to enter more information such as
shelf-life, max level, min level, re-order level and so on by launching Settings > Item >
Master.
Select the newly created item and click “modify”. You can add, delete or edit any field
within this newly created item. Please be reminded that item code is NOT amendable.
23
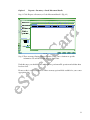
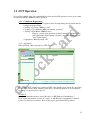
3.1 IN Operation
Once goods were received, it has to be entered to the system. This process will be handled by IN
operation.
3.1.1 Components Requirement
Prior to the launching of IN operation, the following settings must be configured.
a. Settings > Location {Where to store}
b. Settings > User Manager {who performs this operation}
c. Settings > Item Master {What to store}
However, you can create new item on-the-fly during IN operation if you
enable this feature. Path: Settings > System > Operation Setting and tick
“Auto Update Option”
Let’s recall what have been created earlier.
1. User
We have created a new user called “A” [password: Z] and only able to perform operation.
You can verify them through the path: Settings > User Manager
2. Location
There are 2 storage racks. Each rack has 5 layers. Each layer has 10 bins.
There is an overflow storage area.
Total locations: 101
You can verify them through the path: Settings > Location
3. Item
We have created a new item, item code “MS Windows Vista Business”
You can verify them through the path: Settings > Item > Master
3.1.2 Application
Path: Inventory > IN, you will see this, (Fig. 30)
Fig. 30
24
Fig. 31
The layout of IN screen is so simple! This is the default (preset) layout. If you feel the layout
of this screen is NOT suitable or NOT fit to your current operation. You can change it
according to your preference or process by customization the IN screen.
Example 1
Assume that we have received 20 copies of “MS Windows Vista Business” from local main
distributor. Every 10 copies are packed into a packing box. Hence, there are total 2 packing
boxes for 20 copies. Here are the steps to perform an IN operation:
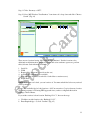
Step 1 Clicks “Inventory > IN”.
Step 2 Select “MS Windows Vista Business” from item code drop down (Fig.32)
Fig. 32
25
Step 3 Enter QTY = 10, each carton (or each pack) consists of 10 copies. (Fig. 33)
Fig. 33
Step 4 Clicks “Add Info” (Fig. 34)
Fig. 34
There are two approaches to store 2 packing boxes.
Option 1
Store them in the same location.
Enter Bin = 1, Pack/Bin = 2
26
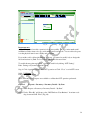
Option 2
Store them in separate locations.
Enter Bin = 2, Pack/Bin = 1
Now, assume that we choose option 2. That means we require 2 different locations for each
packing box. Please enter Bin = 2, Pack/Bin = 1 (Fig. 35)
Fig .35
Clicks “Accept”. It will return to original IN main screen.
Step 5 Clicks “Chronos Search”. Search engine will find 2 appropriate locations (Fig. 36)
Fig. 36
27
Step 6 If you feel good about the suggested locations. Clicks “Confirm”. Otherwise, you can
change it manually by Clicks “Select Loc”. After “Confirm” button is pressed. (Fig. 37)
Fig. 37
First packing box will be stored at “Racking01-L1-C1”, serial number = 1 has been generated.
Second packing box will be stored at “Racking01-L1-C10”, serial number = 2 have been
generated.
Important note:
A tag will be printed once this operation is done successfully. The tag consist much useful
information such as item code, qty, serial number and location code. You are advised to paste
it on the physical item for trace-ability and validation.
If you wish to add or delete information on the tag, you amend or modify it by re-design the
label and activate it. {Path: Tools > Label}.
To enable the auto-print tag feature, you have to enable it by ticking on the Auto print tag
after confirm at “IN Setting”.
Path: “Settings > System> Operation Setting under the IN and OUT tab (Fig. 38)
28
Fig. 38
Step 7 Click “Again” to perform new IN operation or Click “Close” to exit IN screen.
3.1.3 Validation
Path: Reports > Inventory, you will see this,
Fig. 39
There are many form of reports are available to validate the IN operation performed.
Option 1
Reports > Inventory > Inventory Details – By Item
Step 1 Click “Reports > Inventory > Inventory Details – By Item”.
29
Fig. 40
Step 2 To filter the item code, under “Filter By” pull down, select “respective item code from
item code drop down and click “Find”
Option 2
Reports > Inventory > Inventory Details – By Location
Step 1 Click “Reports > Inventory > Inventory Details – By Location” (Fig. 41)
Fig. 41
Step 2 You can filter by specific location; otherwise, all locations (NOT EMPTY) will be
displayed.
30
Option 3
Reports > Inventory > Goods Movement Details
Step 1 Click “Reports > Inventory > Goods Movement Details” (Fig. 42)
Fig. 42
Step 2 There are many filtering criteria available to help you to obtain more specific
information. We will discuss this in great details later.
Until this stage, you should be able and familiar to perform an IN operation and validate what
has been done.
However, this is only basic operation. There are many optional fields available for you to enter
appropriate data.
31
3.2 OUT Operation
If you wish to retrieve (take out) goods which have been stored by IN operation, reverse process must
be performed which is handled by OUT operation.
3.2.1 Components Requirement
Prior to the launching of OUT operation, the following settings and operation must be
configured and performed.
a. Settings > Location {Where to store}
b. Settings > User Manager {who performs this operation}
c. Settings > Item Master {What to store}
However, you can create new item on-the-fly during IN operation if you
enable this feature. Path: Settings > System > Operation Setting and tick
“Auto Update Option”
d. Operation > Main Operation > IN
3.2.2 Application
Path: Operation > Major Operation > OUT (Fig. 43)
Fig. 43
The layout of OUT screen is very simple too! This is the default (preset) layout. If you feel the
layout of this screen is NOT suitable or NOT fit to your current operation. You can change it
according to your preference or process.
Example 2
Do you still remember we have stored 20 copies of “MS Windows Vista Business”?
Now, assume that we have an order of 5 copies of “MS Windows Vista Business” which is
ready to be delivered to customer. Here are the steps to perform the OUT operation:
32
Step 1 Clicks “Inventory > OUT”.
Step 2 Select “MS Windows Vista Business” from item code’s drop down and click “Chronos
Search” (Fig. 44)
Fig. 44
There are two locations having “MS Windows Vista Business”. Besides location codes,
additional useful information displayed to enable and assist warehouse operator to perform
their job better. Such information includes:
1.
2.
3.
4.
5.
6.
Serial No
UOM
Required Qty (how many you wish to take out)
Available Qty (how many are available)
Lock Qty (how many have been hold or locked due to certain reasons)
Expiry Date
NOTE: If the items are locked, you can’t retrieve it. You must unlock first before any retrieval
can be performed.
Step 3 The Available Qty for both locations = 10. You can retrieve 5 copies from any location.
The listing sequence is following FIFO approach since you have configured this item in
Settings > Item > Master.
If you wish to retrieve it from location “Racking1-L1-C1”, here are the steps:
a. Click the row with location code “Racking1-L1-C1”.
b. Enter Required Qty = 5, click “Confirm” (Fig. 45)
33
Fig. 45
Important note:
A tag will be printed once this operation is done successfully. The tag consist much useful
information such as item code, qty, serial number and location code. You are advised to paste
it on the physical item for trace-ability and validation.
If you wish to add or delete information on the tag, you amend or modify it by re-design the
label and activate it. {Path: Tools > Label}. This will be discussed later.
To enable the auto-print tag feature, you have to enable it by ticking “OUT Setting”.
Path: “Settings > System> Operation Setting.
Step 4 Click “Again” to perform new OUT operation or Click “Close” to exit OUT screen.
3.2.3 Validation
Path: Reports > Inventory
There are many form of reports are available to validate the OUT operation performed.
Option 1
Reports > Inventory > Inventory Details – By Item
Step 1 Click “Reports > Inventory > Inventory Details – By Item”.
Step 2 Under “Filter By” pull down, select “MS Windows Vista Business” from item code
drop down and click “Find” (Fig. 46)
34
Fig. 46
As you can notice the Available Qty has reduced to 5 now!
Option 2
Reports > Inventory > Inventory Details – By Location
Step 1 Click “Reports > Inventory > Inventory Details – By Location” (Fig. 47)
Step 2 You can filter by specific location; otherwise, all locations (NOT EMPTY) will be
displayed. Select location address “Racking01-L1-C1” and click the “+” sign to append
it for more information.
Fig. 47
35
Option 3
Reports > Inventory > Goods Movement Details
Step 1 Click “Reports > Inventory > Goods Movement Details”.
Step 2 You can filter by item code = MS Windows Vista Business and serial number = 1 and
click “find” (Fig. 48)
Fig. 48
Until this stage, you should be able and familiar to perform an OUT operation and validate
what has been done.
However, this is only basic operation. There are many optional fields available for you to enter
appropriate data. This additional information may assist you later in other operations as well as
reporting.
36
3.3 LOCK Operation
In our daily operation, we may have to reserve or hold some items in the warehouse which may arise
from quality issue (product quarantine), customers have placed order or yet to be issued to production
for further actions. After the items have been locked, it can’t be retrieved through OUT operation
unless UNLOCK is performed.
This process is handled by LOCK operation.
3.3.1 Application
Path: Inventory > Lock
Example 3
At this stage, our warehouse still has 15 copies of “MS Windows Vista Business”.
Now, assume that sales department has received an order to supply 10 sets of fully-configured
PCs (include Hardware and Operating System). Therefore, we need to reserve 10 copies of
“MS Windows Vista Business”. Here are the steps to perform the LOCK operation:
Step 1 Launch LOCK operation by “Inventory > Lock”
Step 2 Select “MS Windows Vista Business” from item code drop down and click “Search”.
You will see this:
Since you need to reserve only 10 copies, tick second row where the Available Qty = 10 and
click “Lock” (Fig. 49)
Fig. 49
37
If you wish to reserve less than 10 copies, you enter your desired quantity at the Lock qty field
and click “Lock”.
Step 3 Click “Clear” to perform new LOCK operation. Otherwise, click “Close” to exit from
LOCK operation.
3.3.2 Validation
Path: Reports > Inventory > Inventory Details – By Item
Step 1 Click “Reports > Inventory > Inventory Details – By Item”.
Step 2 Under “Filter By” pull down, select “MS Windows Vista Business” from item code
drop down and click “Find” (Fig. 50)
Fig. 50
38
3.4 UNLOCK Operation
UNLOCK is the reverse process of LOCK. Any item that has been locked must be Unlocked.
Otherwise, it can’t be retrieved through OUT operation. This can be verified through OUT operation.
This is the message which will appear if UNLOCK is NOT performed (Fig. 51)
Fig. 51
As you can see the 2nd row, Lock Qty = 10 & Available Qty = 0. Hence, if you enter Required Qty =
10, system will prompt you with an error.
3.4.1 Application
Path: Inventory >Unlock
Example 4
Do you still remember that there are 10 copies of “MS Windows Vista Business” have been
locked earlier which are necessary to be installed into 10 sets of fully-configured PCs? Now,
we have to unlock them so that OUT operation can be performed. Here are the steps to perform
the UNLOCK operation:
Step 1 Launch UNLOCK operation by “Inventory> Unlock”
Step 2 Select “MS Windows Vista Business” from item code drop down and click “Search”.
Step 3 Since only 1 record and tick it. Clicks “Unlock” (Fig. 52 & Fig. 53)
39
Fig. 52
Fig. 53
Step 4 Click “Clear” to perform new UNLOCK operation. Otherwise, Click “Close” to exit
from UNLOCK screen.
40
3.4.2 Validation
Path: Reports > Inventory> Lock/Unlock Details
Step 1 Click “Reports > > Inventory > Lock/Unlock Details.
Step 2 Under “Filter By” pull down, select “MS Windows Vista Business” from item code
drop down and click “Find” (Fig. 54)
Fig. 54
41
3.5 CYCLE COUNT
Cycle Count is the validation process or comparison between Paper quantity and Physical quantity.
Paper quantity is the system quantity whereas Physical quantity is the actual quantity that sits in your
warehouse facilities.
3.5.1 Initiate Cycle Count
Path: Inventory> Cycle Count (Fig. 54)
Fig. 54
There are four options or policies available to perform cycle count activities.
Option 1
Location Code
You can select specific location address to perform cycle count activities.
Option 2
Item Code
You can select specific item code to perform cycle count activities.
Option 3
Random
You can specific how many items you wish. System will randomly choose for
you.
Option 4
Item Moving Frequency
Item moving frequency was computed by the system during your daily
operation (OUT operation). It is NOT configurable.
42
Example 5
At this stage, there are 15 copies of “MS Windows Vista Business” in warehouse facilities, to
verify this, please click “Reports > Inventory > Inventory Details – By Item” or click “Reports
> Inventory > Inventory Details – By Location”. We are about to perform cycle count to this
item, hence, option 2 is selected. Here are the steps:
Step 1 Launch CYCLE COUNT operation by click “Operation > Other Operation > Cycle
Count”
Step 2 Select “MS Windows Vista Business” from item code drop down and click “Search”
(Fig. 55)
Fig. 55
As you can see “Cycle Count Details” are divided into two groups, i.e. “Original Items” &
“Verify Items”.
Original Items consists of information that is recorded in the system for the past operations.
Verify Items are the fields need to be filled up during actual cycle count if there is any
discrepancy from Original Items is encountered.
Step 3 Clicks “Save”. A request of performing cycle count activity is initiated now with a
transaction number assigned to this request has been generated “C/Count Txn = 1” (this is a
system generated number) and the “status = Active” (Fig. 56)
43
Fig. 56
You can print it out by clicking “Print List”. Use this hard copy as reference during cycle count
(Fig. 57)
Fig. 57
Click “Clear” to issue additional request for different item code. Otherwise, click “Close” to
exit from the Cycle Count main screen.
44
3.5.2 Adjustment
Path: Inventory > Cycle Count
Step 1 After cycle count is performed and you have found that one copy of “MS Windows
Vista Business” from the location code = Racking01-L1-C1 is lost. The actual quantity
= 4 instead of 5. You must report to the system now. This process is called
“Adjustment”.
Step 2 Click “Inventory > Cycle Count”.
Step 3 Select “1” from “C/Count Txn” drop down (alternatively you can select “MS Windows
Vista Business from item code drop down) and click “Search”. This is to recall your
previous records.
Step 4 Select the appropriate row with location code = Racking01-L1-C1. Enter the QTY = 4.
All remaining fields remain blank since there is NO discrepancy. (You only need to
enter what is NOT tally). Click “Adjust”.
The actual quantity has been adjusted now and the status of the request is changed from
“Active” to “Adjusted”. (Fig. 58)
Fig. 58
Important Note:
NO reverse process or void can be performed if the status is changed (adjusted). Inventory
figures will be reflected accordingly if adjustment has been performed.
Step 5 Click “Close” to exit from Cycle Count main screen.
45
3.5.3 Validation
You can validate whether the adjustment is performed successfully by many approaches.
Option 1 Launch Reports > Inventory > Inventory Details – By Qty
Option 2 Launch Reports > Inventory > Inventory Details – By Item
Option 3 Launch Reports > Inventory > Inventory Details – By Location
Option 4 Launch Reports > Inventory > Goods Movement Details
Option 5 Launch Reports > Inventory > Cycle Count > Cycle Count Summary
Option 6 Launch Operation > Main Operation > OUT
3.6 ALERT
Alert module provides further value to inventory control processes in the form of Management by
Abnormality. It provides 6 types of alert events:
Inventory max level
Inventory min level
Inventory re-order level
Items remaining shelf-life (About-to-expire)
Locked items for number of days
Expired item & quantity
Users can set up methods of notification (IM or Email), scheduled checking and it will automatically
alert targeted recipients if criteria is met.
3.6.1 Components Requirement
Prior to the launching of Alert function, please make sure the following services must be
installed and configured:
3.6.1.1 Activate “Chronos eStockCardAlertService”
Alert scanning engine can only run on the server where your database is located.
During the installation of e-StockCard (Server), “Chronos eStockCardAlertService”
will be installed automatically; user does not require configuring manually. Anyway,
If you wish to verify whether “Chronos eStockCardAlertService” is activated or not,
here are the steps:
Step 1 Launch Start > Control Panel > Administrative Tools > Services (Fig. 59)
46
Fig. 59
Step 2 Choose the row where name = “Chronos eStockCardAlertService”.
Make sure Status = Started.
3.6.1.2 System Setting
You must configure alert scanning engine if you wish to reap benefits from Alert
module. Additionally, you may have to seek advice from your IT administrator since
this will involve configuring your organization’s e-mail server.
Path: Settings > Alert > System Setting
Step 1 Click “Settings > Alert > System Setting. (Fig. 60)
Fig. 60
47
There main screen consists of two parts which must be configured properly:
a. Alert Message Setting
Daily Scan Time
System will scan events once a day only. You can choose any time you
want to wake up your scanning engine.
Current setting = 12.40 pm
Send Alert Message to “Workstation”
If you tick this option, the alert message will be sent to your current
workstation (you must install e-StockCard Client). You can view alert event
by launching Operation > Other Operation > Alert Event.
Current setting = Enable
Send Alert Message to “Email”
If you tick this option, the alert message will be sent to the targeted
recipients where you have to specify their email addresses.
Current setting = Enable
b. Email Setting
In this section, you have to specify which email broadcaster that you wish to use.
e-StockCard scanning engine will send alert messages to email broadcaster and
the later will broadcast to targeted recipients. In summary, e-StockCard scanning
engine will NOT broadcast directly.
You may have to consult your IT administrator to configure this part properly.
The current setting and configuration belongs to Chronos Consulting Center.
For info: - once all the info have been set, the users can click on Send Test Mail to check
whether the email alert can be send or not. If the email can be received, then the setting is done
correctly otherwise please re-check back on the settings.
3.6.2 Events Setting
Path: Settings > Alert > Event Setting
In this section, you will learn to how configure an event so that it can be processed and monitor
by scanning engine. Once it is configured, system will scan and monitor it daily and report the
abnormality, if any.
48
Step 1 Click “Settings > Alert > Event Setting (Fig. 61)
Fig. 61
Step 2 Click “Add Event” (Fig. 62)
Fig. 62
49
Three are 6 types of different events available. (Event code which is NOT amendable)
Important Note
The events can be classified into 2 categories:
1. Configurable events
Marked with “ √ ”
Event Codes : E001, E002, E003, E004 & E006
E001, E002 & E003. Parameter : Item Code
E004. Parameter : Remaining shelf-life, but express in %
E006. Parameter : Number of days
2. Non-configurable event
Marked with “ X ”
Event Code : E005
As long as the item has expired, it will be displayed
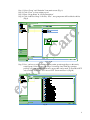
Example 6
Item code “MS Windows Vista Business” has 14 copies in warehouse which is exceeded
maximum level. (Max level can be set at Settings > Item > Master). You can verify this by
launching Reports > Inventory > Inventory Summary – By Qty (Fig. 63)
Fig. 63
Instead of manual checking and monitoring, we will resort to more efficient approach – Alert.
It will help us to monitor and control inventory levels more effectively. Here are the steps:
50
Step 1 Click “Settings > Alert > Event Setting.
Step 2 Click “Add Event”; you will be prompted to select various types of events. Choose
E001 (Inventory Level ≥ Max Level) and click “Move”. You will see this:
Fig. 64
Step 3 Click “OK”, you will see an event is added to the “Alert Events Summary”. See this:
Fig. 65
51
Step 4 You must assign this event E001 to any specific item that you want to monitor.
Select the row with “Event Code = 001” and click “Add Item”, you will see a new pop
up. You can use default options, which is “Standard” search options. Type “MS” at
Keyword field (Fig. 66)
Fig. 66
Step 5 Select “MS Windows Vista Business” from items drop down and click “Accept”.
You have successfully assigned item code = “MS Windows Vista Business” to event
E001.
Step 6 If you wish to receive any alert message through email, click “Configuration” and tick
“Send Alert Message to Email”.
Step 7 Specify email addresses who are the recipients of alert messages. Add, Edit or delete
email address will be performed under “Email To Group” sub-screen.
Click “ + ” to add email address, Click “ √ ” to save the email address.
Step 8 Activate “Alert Scanning Engine” to scan the event you just have created.
Tick “Activate” from the “Alert Events Summary” sub-screen and click “Save”,
You have completed event setting. (Fig. 67)
52
Fig. 67
3.6.3 Event Listing
3.6.3.1 Workstation mode
Path: Inventory > Alert Event (Fig. 68)
Fig. 68
53
Alert message was fired by Alert Scanning Engine and alert you that the current
inventory holding for MS Windows Vista Business is exceeded max level. You must
take proper action to stop to pile up your inventory.
3.6.3.2 Email mode
Similar alert message will be directed and sent to the target recipients (Fig. 69)
Fig. 69
3.7
STOCK TRANSFER
Stock Transfer function is to move the stock inventory from one location to another
location. For partial quantity to be transfer to their new location, the eStockCard will
generate a new serial no for traceability purposes. However, for full quantity transfer, the
serial no will remain the same.
For example, if the item A (qty: 10 pc) is at location A1 with the serial 8. If the item A is
transfer to location B for the qty of 3 pc, the new serial no, will be 8-1. The “ - “ on the
serial no will show that the stock have been partially move from their original position.
54
3.7.1
Application
.
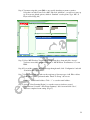
1. Path: Inventory > Stock Transfer (Fig. 70)
Fig. 70
2. Select the item either by their code, location or serial no and then click the Search button.
The item will be listed under the Original Locations screen
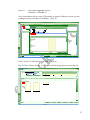
Arrow Button
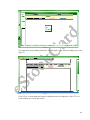
Fig. 71
3. To move the item to new location, click on the Arrow Button for the respective row.
(Fig. 71)
55
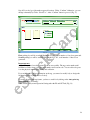
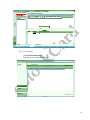
4. Once the item has been moved to the New Location screen, select the new location from
the drop down table as shown. By default all the quantity will be moved to the new
location. There are optional additional Remark (Original Location) and Reason (New
Location) to explain the purpose of the transfer
Serial Nos
Balance to Transfer
Fig. 72
4.1. From the screen above, notice that the balance to transfer shows the quantity 0 as by
default all the quantity will be transfer to the new location. The serial no show that row of
item is transfer to the new location. (Fig. 72)
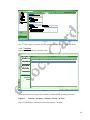
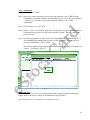
4.2 For Partial Transfer
Change the required quantity to be transfer (Fig, 73)
Change the quantity to be
transfer.
Fig. 73
56
Fig. 74
Once the quantity has been changed, a message will prompt whether you would like to split
out the quantity to 2 different locations. If click Yes, notice that the Balance to Transfer
will show the balance quantity at the old location and a new set of serial no will be
generated for the new location. (Fig. 75)
Balance show quantity
of 5 at old location
New Set of serial no for
the partial transfer at new
location
Fig. 75
5. Once either step 4.1 or 4.2 is done, click on the Save button to save the transfer details.
6. Then click on the Transfer button to transfer the item/s to new location
57
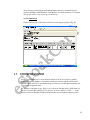
4
REPORTING
4.1 Inventory
Fig. 76
4.2 Inventory Holdings
Fig. 77
58
4.3 Cycle Count
Fig. 78
4.4 Lock & Unlock
Fig. 79
59
4.5 Alert
Fig. 80
4.6 Setting
Fig. 81
60
4.7 Others
Fig. 82
61
5 STOCK EDIT
Stock Edit is an editing screen whereas the administrator user can perform modification / adding or
deleting the stock inventory data from the current inventory or their history. It is useful if some of the
users accidently entered wrong information to the items which are being stored into the eStockCard
such as batch no, lot no, supplier name, customer name, PO no, Invoice no and etc. However please
note that information such as the eStockCard serials no, item code, item description, quantity cannot
be edited from the edit screen.
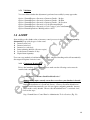
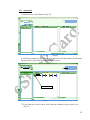
5.1 Application
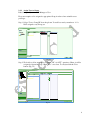
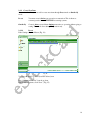
1. Path: Tools > Stock Edit > Editing (Fig. 83)
Fig. 83
2. To perform edit, the stock can be search by their location code, item code or serial nos.
3. Once selected, the item/s will be listed.
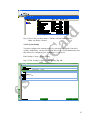
62
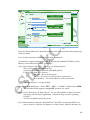
Click on this button will display the item
history details
Fig. 84
Fig. 85
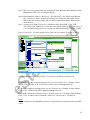
4. The column info details highlighted in yellow color can be change or add. Just enter/
delete / amend the data and then click save. (Fig. 84, Fig. 85, Fig 86 & Fig 87)
63
Add data/ delete / amend follow and then
Save it.
Fig. 86
Fig. 87
64
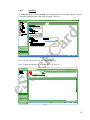
5. Once done, Click on the Confirm button. All data will be stored into the report. (Fig. 88)
After done, click Confirm
button
Fig. 88
Complete – The End
65