1
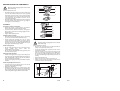
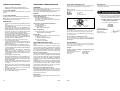
Checking the V-belt tension
Ensure the drill is unplugged from mains and the
drill is switched off
Refer to illustration below
• Open the pulley cover, loosen thumbscrew (18)
• Move the motor plate (17) backwards /forwards to
adjust the V-belt tension. The correct tension is +/- 1
cm in middle of belt as illustrated.
• After adjustment close and secure pulley cover.
ADJUSTING THE DRILL TABLE
The drill table can be adjusted for height and angle.
1 cm
To adjust height
Loosen clamp lever and move table to desired height,
tighten clamp lever to secure.
INSERT A DRILL INTO THE CHUCK
• Make sure the drill is suitable for the material you are
using, that it is sharp and the shank is in good condition.
• Tighten using the chuck key provided. Remove the
chuck key.
• Make sure the drill is secure in the chuck, if it slips
during drilling the shank will be damaged and you will
not be able to centre it in the chuck next time its used.
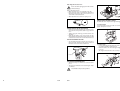
SETTING THE DEPTH STOP
• Set the drilling depth by moving the nut on the threaded part of the depth stop. The amount of travel is
indicated on the scale on front of drill head.
To adjust angle
• Loosen the hexagon headed nut (20) on the underside of table (19) with a suitable spanner.
• Rotate the table to the desired angle and tighten nut
to secure.
• The angle is indicated on the scale on clamp collar.
20
Depth stop
19
SECURING THE WORKPIECE
• Always use clamps or a drill vice to secure the workpiece.
• The slots in the drill table are for attaching the clamps
or a drill vice
21
Never hold the workpiece with your hand.
9
Ferm
Ferm
10