1
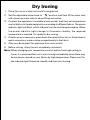
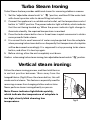
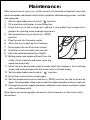
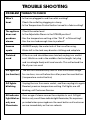
Multi-purpose iron
Model: G-896STJ-E/G-896STJ-E-M
Instruction Manual
IMPORTANT SAFEGUARDS
1. Make sure to read all the safety precautions
below and look at the illustrations before you
start using the appliance.
2. Use the appliance for its intended use only
described in this manual.
3. The appliance is intended for household use
only.
4. In order to protect against the risk of electric
short, do not immerse iron power base into
water or any other liquids.
5. Connect the appliance only to an alternating
current of the voltage specified on the rating
plate and only to an earthed socket. To avoid
a circuit overload, do not operate another
high wattage appliance in the same circuit.
6. Turn the appliance to OFF before plugging
or unplugging from outlet. Never yank cord
to disconnect from outlet; instead, grasp plug
and pull to disconnect.
7. Do not allow power cord or supply hose to
touch hot surface.
8. Unplug the appliance from main socket
before filling or empty or when not in use.
9. Do not operate the appliance with a
damaged cord or if the appliance has been
dropped or damaged. To avoid a hazard
such as the risk of electric shock, do not
disassemble the appliance, it must be taken
to a qualified serviceman or manufacturer or
its service agent for examination and repair.
Incorrect re-assembly can cause a risk of
electric shock when the iron is used.
10. Place the iron out of reach of children; close
supervision is necessary for any appliance
being used by or near children. Do not leave
the iron unattended while connected to the
supply mains.
11. During use, always place its stand on a
stable, level and horizontal surface or ironing
board.
12. Always place the iron on its stand, and do
not allow the hot soleplate touch power cord
or supply hose.
13. Burns can occur from touching hot metal
parts, hot water or steam. Use caution when
using the appliance.
14. Never use the iron facing towards people
because the steam can cause burns.
15.
The surfaces are liable to get hot during
use.
16. Never twist the supply hose during use.
17. The appliance must be used and rested on a
stable, level and horizontal surface.
18. When placing the iron on its stand, ensure
that the surface on which the stand is placed
is stable.
29. The iron is not to be used if it has been
dropped, if there are visible signs of damage
or if it is leaking.
20. The iron must not be left unattended while it
is connected to the supply mains.
21. The appliance must be rest or stocked on a
stable, level and horizontal surface.
22. This appliance can be used by children aged
from 8 years and above and persons with
reduced physical, sensory or mental
capabilities or lack of experience and
knowledge if they have been given
supervision or instruction concerning use of
the appliance in a safe way and understand
the hazards involved, children shall not play
with the appliance. cleaning and user
maintenance shall not be made by children
without supervision.
23. Keep the iron and its cord out of reach of
children less then 8 years of age when it is
energized or cooling down.
Parts and Features
1 Self-cleaning button
2 Soleplate
3 Spray Nozzle
4 Anti-calc Box
5 Adjustable Steam Knob
6 Spray Button
7 Turbo-Steam Button
8 Temperature control Button
9 Cord Guard
10 Power indicator light
9
8
7
6
5
4
3
fig.1
2
1
10
Fabric Setting Chart
Temperature
Setting
(Low)
Fabric
Synthetics,
silk,Nylon,
Arcylic,
Acetate
Iron
Instructions
Dry Ironing
on the
opposite
side of the
fabric
Shut
off
(Medium)
Wool,
Polyester
Use a press
cloth and
steam or dry
ironing on the
opposite side
of the fabric
(High)
Rayon
Cotton,
Linen
Iron while
fabric is still
damp using
steam and
spray
(Max)
Rayon
Cotton,
Linen
Steam
ironing
Fill Water Tank
Make sure that the iron is unplugged from main socket before filling water into
the water tank.
1. Set the adjustable steam knob to"
"position
(Fig.2)
2. Take anti-calc box out of the filling hole (Fig.3)
3. Using a cup, slowly pour tap water or distilled
water into the water tank as shown in Fig.4 .
Never to fill beyond the Max filling line.
fig.2
4. Replace the anti-calc box into the filling hole as
shown in Fig.5 .
5. Hold the iron in horizontal direction, and then move the iron from front to back
for about 30 seconds so that limescales in water can be purified by the ion
exchange resin in the anti-calc box.
fig.3
fig.4
fig.5
Note: When using distilled water, you can mix it with tap water in a
proportion of 50%
Steam ironing
1. Place the iron on a level, horizontal ironing board
2. Set the adjustable steam knob to "
"position, and then fill the water tank
with clean tap water refer to above filling instruction.
3. Connect the appliance to a suitable power socket, set the temperature control
button to "MAX" position. The power indicator light will blink, which indicate
that the unit is being heated up, When the power indicator light change to
illuminate steadily, the required temperature is reached. In this stage, it is
normal that a "pong" sound produced, it because that the steam switch
automatically turn on.
4. For every first use, press down the turbo steam button several times
continuously, and then press down the self-cleaning button for about 10
seconds to clean the steam chamber.
5. Set temperature control button to desired position according to different
fabrics, put the adjustable steam knob to "
" position, and then steam will
come out from steam vents of soleplate. During steaming iron, it is normal
that the power indicator light cycle from blinking to illuminate steadily. It is
because the appliance automatically heat preservation.
6. After use, turn adjustable steam knob to "
"position, disconnect the
appliance from power socket.
7. Before storing, allow the unit completely cool down.
Note: G-896STJ-E
1.For every first use, the appliance should be pre-heated for about 2 minutes.
2.During steam ironing, it is normal that steam is stopped for a short time.
Which may be caused by lower temperature of soleplate or so high steam
rate that the anti-drip system is automatically reacted.
3.When setting the temperature control button at ” ” or ”
” position,
there are no steam go out of the soleplate since the temperature of
soleplate is so low that it can not produce steam.
G-896STJ-E-M: Allow the iron resting motionlessly on the solepate or
on its heel, the unit will come into auto shut off mode, please refere to
the auto shut off function described below.
Dry Ironing
1. Place the iron on a level, horizontal ironing board
2. Set the adjustable steam knob to "
"position, and then fill the water tank
with clean tap water refer to above filling instruction.
3. Connect the appliance to suitable power socket, and then set temperature
control button to the desired position according to different fabrics. The power
indicator light will blink, which indicate that the unit being heated up, When
the power indicator light change to illuminate steadily, the required
temperature is reached. It is ready for dry ironing.
4. If water spray is necessary, press down the spray button two or three times in
quick succession, water can be sprayed evenly in the fabric.
5. After use, disconnect the appliance from main socket.
6. Before storing , allow the unit completely cool down.
Note: When changing your temperature control button from high setting to
lower, it is proposed that not to start ironing immediately since there may
be any burns caused on your fabrics by high temperature. Please wait for
the indicater light illuminate steadily and then start ironing.
Turbo Steam Ironing
Turbo Steam feature provides additional steam for removing stubborn creases.
1. Set the "adjustable steam knob" to "
"position, and then fill the water tank
with clean tap water refer to above filling instruction.
2. Connect the appliance to a suitable socket outlet, set the temperature control
button to " MAX" position. The power indicator light will blink, which indicate
that the unit being heated up, When the power indicator light change to
illuminate steadily, the required temperature is reached.
3. Press the turbo steam button two or three times in quick succession to obtain
more powerful turbo steam.
4. It is normal that a small amount of water may be ejected from the soleplate
when pressing turbo steam button so frequently that temperature of soleplate
will be decreased accordingly. It is supposed to stop pressing turbo steam
button, and allow it to heat up again.
5. Before storing, allow the unit completely cool down.
Caution: when using turbo steam ironing, turn adjustable steam knob to " " position.
Vertical steam ironing:
Follow the steam ironing process, and then hold the iron
in vertical position between 15cm away from the
hanged fabrics.(Fig 6).Press the steam button, this will
create vertical steam. This feature is especially used for
removing creases from hanging clothes and curtains.
Never perform steam ironing directly on person.
Note: Power indicator light blinks quickly,
which indicate the temperature of soleplate is
too high; slowly blink showing low
temperature.
fig.6
Auto-shut off function
G-896STJ-E: The appliance will automatically shut off if it has been successively
used for more than 60 minutes, and all illuminate light will go out. To continue
ironing, only press the temperature control button again.
G-896STJ-E-M: When the iron is stationary in horizontal position for about 30
seconds or in vertical position for about 8 minutes, the unit will auto shut off. All
indicator light turn off. Press down the reset button or allow the iron move front to
back, it will be react to original fabric setting again.
Anti-drip system:
This appliance has a safety mechanical protection which can protect water drip
from the soleplate when the temperature of steam chamber is so low that it cannot
provide steam..
Anti-calc system:
1. The anti-calc box is designed to purify hard water and reduce the build-up of
limescale which occurs during steam ironing, this will prolong the working
life of your iron.
2. The anti-calc box should be replaced with a new one after two months, in
case of using one time each day, and you can contact with manufacturer or
agency for purchasing a new one).
3. To replace the anti-calc box, take it out of the water-filling hole, and then replace
with a new one. (Fig.7)
Fig.7
Maintenance:
After several use of your iron, a little amount of limescale will be built up in the
steam chamber and steam outlet, follow up below self-cleaning process, it will be
well removed.
1. Set the adjustable steam knob to"
"position.
2. Fill water tank with water to max filling line.
3. Place the iron on the ironing rest, and put a sink under the ironing rest to
prepare for pouring water and ejecting steam.
4. Set temperature control button to "MAX"
position.
5. Plug the unit into the main socket.
6. Allow the iron to heat up for 2 minutes
7. Disconnect the iron from main socket.
8. Hold the iron horizontally over the sink.
9. Push the self-cleaning button. (Fig.8)
10. Boiling water and steam will emit from the
fig.8
outlet of the soleplate and wash away the
impurities and scale.
11. Move the iron backwards and forwards while this happens. Go on letting
steam and water escape until the water tank is virtually empty.
12. Set the adjustable steam knob to "
" position.
13. Insert the iron into main socket again.
14. Set the temperature control button to "MAX" position, Let the iron heat up
again. The remainder of the water inside the steam chamber will now vaporize.
15. Unplug from power supply and allow soleplate to cool down and wipe it clean
with a soft damp cloth.
Note: Never use scouring pads, abrasive or harsh cleaners as this may scratch
the surface.
TROUBLE SHOOTING
PROBLEM THINGS TO CHECK
Won’t
heat
• Is the iron plugged in and the outlet working?
Check the outlet by plugging in a lamp.
• Is the Temperature Control button turned to a fabric setting?
The appliance
does not
produce
steam
• Check the water level.
• Is the Adjustable Steam in the STEAM position?
• Has the temperature setting at the ”Dot 3” or Max setting?
• Has the iron had enough time to preheat?
Leaves
spots
• ALWAYS empty the water tank of the iron after using.
Water left in the tank may discolor clothing and soleplate.
Twisted
cord
• If the iron cord should become twisted, unplug iron and let
cool. Hold iron cord in the middle of entire length. Let plug
and iron dangle freely until cord uncoils. This will extend the
life of your iron cord.
All light off • The unit will automatically shut off after continuous usage
(no function) for one hour, iron will refunction after press the reset button.
( temperature control button)
All lights
blinking
• Unplug the iron from main socket, and then re-plug into again.
Reselect previous temperature setting. If all lights are still
blinking, call Customer Service.
All indicator • Over usage of steam causes the soleplate to cool. All light
light blink or blink or only one of these indicate light illuminates, No responses
only one
provided when pressingdown the reset button call customer
illuminate
servue immediately as the iron reheats.
Never dispose of your product with other
household waste. Please inform yourself about
the local rules on the separate collection of
electrical and electronic products. The correct
disposal of your old product helps prevent
potentially negative consequences on the
environment and human health.