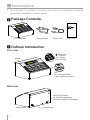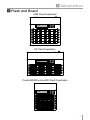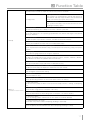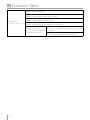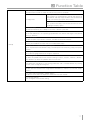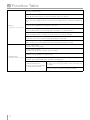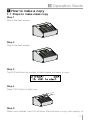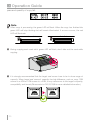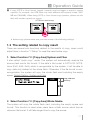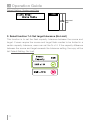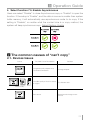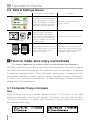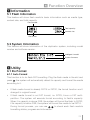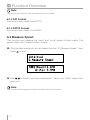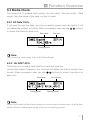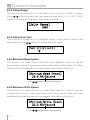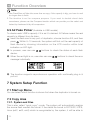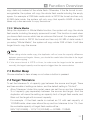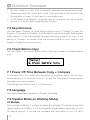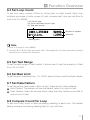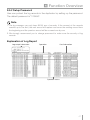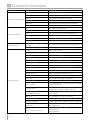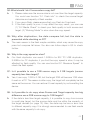
1
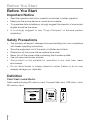
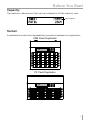
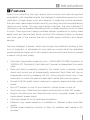
Disclaimer of Warranties
Disclaimer of Warranties
All flash duplicators are made specifically for data backup with legal authorities
from copyright owners. Any unauthorized action of copyright is strictly
prohibited, and We disclaims all warranties or representations of illegal actions
by users.
We disclaims any liability for any of losses or damages due to not be able
to perform its undertakings or provide any of the services attributable to any
events or circumstances beyond our control. Users agree and accept all
statements above as soon as purchasing our products.
This manual contains materials should be intended for personal use. All right
reserved. No part of this manual may be reproduced, transmitted or transcribed
without the expressed written permission of the manufacturer. The information
present in this manual is subject to change without prior notice.
2
Content
Disclaimer of Warranties2
Before You Start
Important Notice 4
Safety Precautions 4
1 Introduction
1Features 5
2 Package contents 7
3 Outlook Introduction 7
2 Function Table
Function Table 8
3 Operation Guide
1 How to make a copy 11
1.1 Steps to make mass copy
1.2 The setting related to copy result
1. Select function 7.2: [Copy Area] System and Files
2. Select function 7.2: [Copy Area] Whole Media
3. Select function 7.4: Set target tolerance (No Limit)
4. elect function 7.5: Enable Asynchronous
2 The common causes of "can’t copy" 14
2.1 Devices Issues
2.2 Data & Settings Issues
3 How to make sure copy correctness 16
3.1 Compare/ Copy+Compare
4
How to check flash device’s quality, speed and bad sector 17
4.1 How to check real read /write speed
4.2 How to check fake capacity
4.3 How to do flash quality check
4.4 How to check flash media ‘s content size
4 Function Overview
1 COPY 2 Compare 3 Copy + Compare 4 Capacity check 5 Information 5.1 CF Card information
5.2 System Information
6 Utility 6.1 Do Format 6.1.1 Auto Format
6.1.2 FAT Format
6.1.3 FAT32 Format
6.2 Measure Speed 6.3 Media Check 6.3.1 H3 Safe 100%
6.3.2 H5 R/W 100%
6.3.3 Setup Range
19
19
19
19
20
6.3.4 Setup Error limit
6.3.5 Minimum Read Speed
6.3.6 Minimum Write Speed
6.4 Quick Erase 6.5 Full Erase 6.6 DoD Erase 6.7 System Update 6.8 Calc. CheckSum 7 System Setup Function
7.1 Start up Menu 7.2 Copy Area 7.2.1 System and Files
7.2.2 Whole Media
7.3 Button Beep 7.4 Target Tolerance 7.5 Asynchronous 7.6 Check Before Copy 7.7 Power Off Time Between Copy + Compare 7.8 Language 7.9 CF Transfer Mode 7.10Adjust Clock(Only on Golden series)
7.11Restore Default 8 Burn-In (Only on Golden series)
8.1 Do Burn-In
8.2 Set Burn-In Time
8.3 Set Loop Count
8.4 Set Test Range
8.5 Set Bad Limit 8.6 Set Data Pattern
8.7 Compare Count Per Loop
8.8 Power Off Between Loop
9 Log Manager (Only on Golden series)
9.1 Out Today Report
9.2 Out Recent Report
9.3 Out Period date
9.4 Out all database
9.5 Advanced Function 9.5.1 Clear all Log
9.5.2 Setup Password
24
24
24
24
24
25
25
25
26
26
26
27
27
27
27
27
28
28
28
28
28
29
29
29
29
29
29
29
30
30
30
30
Explanation of Log Report 31
Maintenance Guide--Steps to replace socket 33
20
20
5 FAQ
FAQ 35
6 Model Information
Model Informatiom 38
21
22
3
Before You Start
Before You Start
Important Notice
• Read the operation instruction carefully contributes to better operation.
• Make sure the source device is correct and workable.
• To guarantee data consistency, strongly suggest the capacity of source and
targets should be the same.
• It is strongly suggest to use "Copy+Compare" to achieve perfect
duplication.
Safety Precautions
• The warranty will expire if damage is incurred resulting from non-compliance
with theses operating instructions.
• Store the equipment out of the reach of children and infants.
• Please turn off the power before replace the socket.
• Never turn off the power while processing the firmware update.
• Use only approved power sources.
• The product is only suitable for operation in dry, dust free, clean
environment.
• Do not allow liquids or foreign objects to enter. Failure to do so may
severely damage your duplicator.
Definition
Flash/Flash media/Media :
Flash media including SD memory card, Compact flash card, USB drive , micro
SD memory card.
4
Before You Start
Capacity:
The maximum data amount that can be contained in a Flash memory card.
total capacity
Socket:
A mechanical construction representing connection between two application.
USB Drive Duplicator
CF Card Duplicator
5
Before You Start
ComboSD(SD+microSD Card) Duplicator
6
1 Introduction
1 Features
Apart from inheriting the high-speed performance and well-recognized
compatibility with diversified media, the Intelligent 9 duplicators support not only
duplication of large target count and capacity to meet high-volume demands,
they also help users examine flash cards by providing the most accurate testing
results known today. Through user-friendly interface, the new Intelligent 9
duplicators can be operated standalone with no steep learning curve for users
to climb. Their ergonomic design facilitates efficient operations by letting users
easily insert and remove flash cards, and the 70%-reduced footprint compared
with their peer in the market has led to better space utilization and freight
savings.
The new Intelligent 9 Series, which have broken the traditional thinking & limit
from of duplicator, is anticipated to soon take up crucial role at the diversified
media duplication stage; and it will certainly become must-have tools for people
in search of high-end quality.
• Ultra high transmission speed up from 1.9GB/m(SD/TF/USB Duplicator) to
3.9GB/m (CF Duplicator). Each flash slot channel is independent from each
other.
• Real multi-task processing capability. No matter copy, compare, media
check and format are all independently executed. Each flash slot has an
independent control processing unit. So, during asynchronous copy, it can
use button to check the status of each flash media status and progress.
• Powerful H3/H5 quality check machine for capacity, speed and flash quality
check.
• Not a PC system, no risk of virus infection. Instant power on and off.
• One-touch copy. Real time information will be shown on the LCD screen.
• Support Synchronous and Asynchronous copy/ compare/ erase/ format/
media check/ speed check.
• Ultra high speed bit for bit hardware comparison.
• Different copy speed selection is available for different quality level flash
media.
• Special speed selection function to filter out qualified flash media in QC
process.
7
1 Introduction
• Burn-In test & Log Report function are built in for advanced industrial
application.(Available in Golden series)
2 Package Contents
Flash Duplicator
Power Adapter
Power Cord
User Guide
3 Outlook Introduction
Front side
▲ / Backward
▼ / Forward
OK / Confirm
ESC / Escape
Source
LED
Red: Operation Failed
Green: Operation Success
Back side
USB Type B Socket
For Advanced application
(Available in Golden & Red Series)
Power Switch
8
Power Supply
1 Introduction
4 Flash and Board
USB Drive Duplicator
CF Card Duplicator
ComboSD(SD+microSD Card) Duplicator
9
2 Function Table
1 USB Drive Duplicator
Function
Function
1. Copy
Data only or whole media duplication
2. Compare
Bit-by-Bit comparison between the source and all other copied flash medias.
3. Copy + Compare
To make a copy first and then compare the copied flash media with the source
immediately after the copy has finished.
4. Capacity Check
To check real capacity of the flash.
5.1 USB Info
This feature will show flash’s information of data; file format, content size, and capacity.
5. Information
5.2 System Info
This feature will show information of the duplicator system, including machine model
number and software version.
6.1.1 Auto Format
6.1 Do Format
6.1.2 FAT Format
To Execute flash FAT 16/32 Format media to be FAT16.
format.
6.1.3 FAT32 Format
Format media to be FAT32.
6.2 Measure Speed
This function can measure the flash read and write speed. This function will damage the
format and content.
6.3.1 H3 Safe 100%
To check the quality of flash by reading it. This safe
check will not delete flash content and format.
6.3.2 H5 RW 100%
To check flash’s quality by reading & writing the flash.
This function will delete content and format.
6.3.3 Setup Range
To set the checking area of flash from 1% to 100%.
6.3 Media check
6. Utility
6.3.4 Set ErrorLimit
To set the % of tolerance range of error when checking
the flash.
6.3.5 Minimum Read Speed
To set the minimum read speed criteria for H3/H5
checking.
6.3.6 Minimum Write Speed
To set the minimum write speed criteria for H3/H5
checking.
6.4 Quick Erase
To erase the content of flash media. It will keep the FAT format.
6.5 Full Erase
To completely bit by bit erase data of flash including format and content, but it takes
more time.
6.6 DoD Erase
Erase flash three times complying with USA Department of Defense (DoD) standard.
6.7 System Update
System firmware update via the flash media.
6.8 Calc. CheckSum
Calculate the CheckSum number of the flash media in source port.
6.9 A2 Fake Picker
To check if an USB flash contain fake capacity
10
2 Function Table
7.1 Start-up Menu
To select which function is shown first when the system is turned on.
7.2 Copy Area
7.2.1 System and Files
The system can automatically analyze the format of
source data and only copy the data area.(Available for
FAT16, 32/ NTFS/ Linux (ext2, ext3, ext4) ).
7.2.2 Whole Media
The system will copy the whole content of flash
including the empty space.
7.3 Button Beep
To choose whether to hear a beep or not when a button is pressed.
7.4 Target Tolerance
To set the tolerance % of capacity gap between the source and target. The default
setting is "No limit".
7.5 Asynchronous
"Enable" to open Asynchronous function, "Disable" to close the function.
7. Setup
7.6 Check Before Copy
To set if you would like to check the Flash media before copy.
7.7 Power Off Time Between Copy+Compare
To set the power-off time between Copy and Compare when executing "Copy+Compare"
function.
7.8 Language
Set system language interface i.e. English, Japanese.
7.9 Working Mode
To select the speed of data transmission among "Fastest", "Faster", "Normal”, Slower",
and "Slowest" to select the speed of data transmission.
7.10 Set HDD Mode
Set if you would like to copy USB HDD or USB devices only.
7.11 Adjust Clock (Available in Golden Series)
To adjust the time clock of duplicator showed on the LCD monitor.
7.12 Restore Default
Back to original manufacturer setting.
8.1 Do Burn-In
To start the Burn-In test.
8.2 Set Burn-In Time
To set up how long the Burn-In test last for (from 30mins to 30days).
8.3 Set Loop Count
To set how many loops of Burn-In test (Each test loop contains a writing & comparing
test).
8.Burn-In
(Available in Golden Series)
8.4 Set Test Range
To set the test range of flash card (from 1 to 100%).
8.5 Set Bad Limit
To set the error tolerance when doing Burn-In test(from 1 to 10000 sectors).
8.6 Set Data Pattern
To set the writing pattern used in burn-in test. (Auto or customer defined).
8.7 Compare Count Per Loop
To set how many times of data comparing (reading) in each loop.
8.8 Power Off Between Loop
To set the power-off time between each data comparing (reading) in a loop.
11
2 Function Table
9.1 Out Today Report
To output today’s log records.
9.2 Out Recent Report
To output the log records in recent 1day to 28 days.
9.3 Out Period date
To output the log records in a specific date.
9 Log Manager
(Available in Golden Series) 9.4 Out all database
To output all the log records which are kept in the duplicator.
9.5.1 Clear all Log
To clean out the log records after entering the
9.5Advanced Function
To clean out the log records password.
and setup the password.
9.5.2 Setup Password
To set up the password for cleaning log records.
12
2 Function Table
2 CF Card Duplicator
Function
Function
1. Copy
Data only or whole media duplication.
2. Compare
Bit-by-Bit comparison between the source and all other copied flash medias.
3. Copy + Compare
To make a copy first and then compare the copied flash media with the source
immediately after the copy has finished.
4. Capacity Check
To check real capacity of the flash.
5.1 CF Card Info
This feature will show flash’s information of data; file format, content size, and capacity.
5. Information
5.2 System Info
This feature will show information of the duplicator system, including machine model
number and software version.
6.1.1 Auto Format
6.1 Do Format
6.1.2 FAT Format
To Execute flash FAT 16/32 Format media to be FAT16.
format.
6.1.3 FAT32 Format
Format media to be FAT32.
6.2 Measure Speed
This function can measure the flash read and write speed. This function will damage the
format and content.
6.3.1 H3 Safe 100%
To check the quality of flash by reading it. This safe
check will not delete flash content and format.
6.3.2 H5 RW 100%
To check flash’s quality by reading & writing the flash.
This function will delete content and format.
6.3.3 Setup Range
To set the checking area of flash from 1% to 100%.
6.3 Media check
6. Utility
6.3.4 Set ErrorLimit
To set the % of tolerance range of error when checking
the flash.
6.3.5 Minimum Read Speed
To set the minimum read speed criteria for H3/H5
checking.
6.3.6 Minimum Write Speed
To set the minimum write speed criteria for H3/H5
checking.
6.4 Quick Erase
To erase the content of flash media. It will keep the FAT format.
6.5 Full Erase
To completely bit by bit erase data of flash including format and content, but it takes
more time.
6.6 DoD Erase
Erase flash three times complying with USA Department of Defense (DoD) standard.
6.7 System Update
System firmware update via the flash media.
6.8 Calc. CheckSum
Calculate the CheckSum number of the flash media in source port.
13
2 Function Table
7.1 Start-up Menu
To select which function is shown first when the system is turned on.
7.2 Copy Area
7.2.1 System and Files
The system can automatically analyze the format of
source data and only copy the data area.(Available for
FAT16, 32/ NTFS/ Linux (ext2, ext3, ext4) ).
7.2.2 Whole Media
The system will copy the whole content of flash
including the empty space.
7.3 Button Beep
To choose whether to hear a beep or not when a button is pressed.
7.4 Target Tolerance
To set the tolerance % of capacity gap between the source and target. The default
setting is "No limit".
7. Setup
7.5 Asynchronous
"Enable" to open Asynchronous function, "Disable" to close the function.
7.6 Check Before Copy
To set if you would like to check the Flash media before copy.
7.7 Power Off Time Between Copy+Compare
To set the power-off time between Copy and Compare when executing "Copy+Compare"
function.
7.8 Language
Set system language interface i.e. English, Japanese.
7.9 CF Transfer Mode
To select the speed of data transmission among PIO Mode 4,MDMA Mode 2, UDMA
Mode 0~4.
7.10 Adjust Clock (Available in Golden Series)
To adjust the time clock of duplicator showed on the LCD monitor.
7.11 Restore Default
Back to original manufacturer setting.
8.1 Burn-In (Copy+Comp)
To do the Burn-In test on flash targets by continually copying & comparing data of
source.
8.2 Burn-In (Auto Data)
To do the Burn-In test on flash targets by system automatically.
8.3 Set Burn-In Time
To set up how long the Burn-In test last for (from 30mins to 30days).
8.Burn-In
(Available in Golden Series)
8.4 Set Loop Count
To set how many loops of Burn-In test (Each test loop contains a writing & comparing
test).
8.5 Set Test Range
To set the test range of flash card (from 1 to 100%).
8.6 Set Bad Limit
To set the error tolerance when doing Burn-In test(from 1 to 10000 sectors).
8.7 Set Data Pattern
To set the writing pattern used in burn-in test. (Auto or customer defined)
8.8 Compare Count Per Loop
To set how many times of data comparing (reading) in each loop.
8.9 Power Off Between Loop
To set the power-off time between each data comparing (reading) in a loop.
14
2 Function Table
9.1 Out Today Report
To output today’s log records.
9.2 Out Recent Report
To output the log records in recent 1day to 28 days.
9.3 Out Period date
To output the log records in a specific date.
9 Log Manager
(Available in Golden Series) 9.4 Out all database
To output all the log records which are kept in the duplicator.
9.5.1 Clear all Log
To clean out the log records after entering the
9.5Advanced Function
To clean out the log records password.
and setup the password.
9.5.2 Setup Password
To set up the password for cleaning log records.
15
2 Function Table
3 ComboSD(SD/microSD) Duplicator
Function
Function
1. Copy
Data only or whole media duplication.
2. Compare
Bit-by-Bit comparison between the source and all other copied flash medias.
3. Copy + Compare
To make a copy first and then compare the copied flash media with the source
immediately after the copy has finished.
4. Capacity Check
To check real capacity of the flash.
5.1 SD Card Info
This feature will show flash’s information of data; file format, content size, and capacity.
5. Information
5.2 System Info
This feature will show information of the duplicator system, including machine model
number and software version.
6.1.1 Auto Format
6.1 Do Format
6.1.2 FAT Format
To Execute flash FAT 16/32 Format media to be FAT16.
format.
6.1.3 FAT32 Format
Format media to be FAT32.
6.2 Measure Speed
This function can measure the flash read and write speed. This function will damage the
format and content.
6.3.1 H3 Safe 100%
To check the quality of flash by reading it. This safe
check will not delete flash content and format.
6.3.2 H5 RW 100%
To check flash’s quality by reading & writing the flash.
This function will delete content and format.
6.3.3 Setup Range
To set the checking area of flash from 1% to 100%.
6.3 Media check
6. Utility
6.3.4 Set ErrorLimit
To set the % of tolerance range of error when checking
the flash.
6.3.5 Minimum Read Speed
To set the minimum read speed criteria for H3/H5
checking.
6.3.6 Minimum Write Speed
To set the minimum write speed criteria for H3/H5
checking.
6.4 Quick Erase
To erase the content of flash media. It will keep the FAT format.
6.5 Full Erase
To completely bit by bit erase data of flash including format and content, but it takes
more time.
6.6 DoD Erase
Erase flash three times complying with USA Department of Defense (DoD) standard.
6.7 System Update
System firmware update via the flash media.
6.8 Calc. CheckSum
Calculate the CheckSum number of the flash media in source port.
6.9 A2 Fake Picker
To check if an SD/MS flash card contain fake capacity
16
2 Function Table
7.1 Start-up Menu
To select which function is shown first when the system is turned on.
7.2 Copy Area
7.2.1 System and Files
The system can automatically analyze the format of
source data and only copy the data area.(Available for
FAT16, 32/ NTFS/ Linux (ext2, ext3, ext4) ).
7.2.2 Whole Media
The system will copy the whole content of flash
including the empty space.
7.3 Button Beep
To choose whether to hear a beep or not when a button is pressed.
7.4 Target Tolerance
To set the tolerance % of capacity gap between the source and target. The default
setting is "No limit".
7.5 Asynchronous
"Enable" to open Asynchronous function, "Disable" to close the function.
7. Setup
7.6 Check Before Copy
To set if you would like to check the Flash media before copy.
7.7 Power Off Time Between Copy+Compare
To set the power-off time between Copy and Compare when executing "Copy+Compare"
function.
7.8 Language
Set system language interface i.e. English, Japanese.
7.9 Working Mode
To select the speed of data transmission among "Fastest", "Faster", "Normal”, Slower",
and "Slowest" to select the speed of data transmission.
7.10 Check WP Switch
The duplicator will detect if the writing-protection tab is locked before any writing
mission, such as copy or writing test.
7.11 Purge Before Copy
To clean out data and format of target device detailed first, and then run into the “Copy”
process.
7.12 Adjust Clock (Available in Golden Series)
To adjust the time clock of duplicator showed on the LCD monitor.
7.13 Restore Default
Back to original manufacturer setting.
17
2 Function Table
8.1 Do Burn-In
To start the Burn-In test.
8.2 Set Burn-In Time
To set up how long the Burn-In test last for (from 30mins to 30days).
8.3 Set Loop Count
To set how many loops of Burn-In test (Each test loop contains a writing & comparing
test).
8.Burn-In
(Available in Golden Series)
8.4 Set Test Range
To set the test range of flash card (from 1 to 100%).
8.5 Set Bad Limit
To set the error tolerance when doing Burn-In test(from 1 to 10000 sectors).
8.6 Set Data Pattern
To set the writing pattern used in burn-in test. (Auto or customer defined)
8.7 Compare Count Per Loop
To set how many times of data comparing (reading) in each loop.
8.8 Power Off Between Loop
To set the power-off time between each data comparing (reading) in a loop.
9.1 Out Today Report
To output today’s log records.
9.2 Out Recent Report
To output the log records in recent 1day to 28 days.
9.3 Out Period date
To output the log records in a specific date.
9 Log Manager
(Available in Golden Series) 9.4 Out all database
To output all the log records which are kept in the duplicator.
9.5.1 Clear all Log
To clean out the log records after entering the
9.5Advanced Function
To clean out the log records password.
and setup the password.
9.5.2 Setup Password
To set up the password for cleaning log records.
18
3 Operation Guide
1 How to make a copy
1.1 Steps to make mass copy
Step 1
Plug-in the flash source.
Step 2
Plug-in the flash targets.
Step 3
The LCD will show the number of flash targets and ready to copy.
Step 4
Press "OK" button to start copy.
Step 5
When copy finished, the LCD will show the total time of copy, and quantity of
19
3 Operation Guide
pass and quantity of copy fail.
Note
1 When copy is processing, the green LED will flash. When the copy has finished the
green LED will stop flashing but will remain illuminated. If an error occurs, the red
LED will illuminate.
Green: OK
Red: Failure
2 During copying each card slot's green LED will flash, don't take out the card while
copying.
3 It is strongly recommended that the target and source have to be in close range of
capacity. When target and source’s capacity has big difference, such as copy 1GB
source to a 4GB or 1GB source to a 2GB, it may cause error to the target’s capacity,
compatibility and format.(Please refer to FAQ Q7/Q8 for more detailed information )
2GB
20
2GB
3 Operation Guide
4 If copy NTFS or Linux format, targets' capacity must be bigger or equal to source
capacity. For example, two 2GB flash may have different real capacity inside (1920
MB and 1990MB). When doing NTFS or Linux format copy process, please use the
flash with smaller capacity as source.
NTFS/Linux format copy
2GB
1GB
* Before copy, please make sure you have aware of the following settings.
1.2 The setting related to copy result
There are several sub-functions related to the results of copy, users could
adjust them in function "7.Setup" to meet the need before copy.
1. Select function 7.2: [Copy Area] System and Files
It also called "quick copy" mode. The system will automatically analyze the
source flash card’s file format. If the data's file format is FAT16/32, NTFS,
Linux (Ext2, Ext3, Ext4) which is recognizable by the system, it will be able to
copy data only instead of the whole flash. Otherwise, if the file format is nonrecognizable, the system will copy the whole flash card including the empty
space. Default Setting- System and Files
Copy 2GB data
area only
2GB
8GB
2. Select function 7.2: [Copy Area] Whole Media
The system will copy the whole flash card, including the empty space and
format. This function is used when users have a flash source which has an
unknown file format. It will take longer time to copy the source.
21
3 Operation Guide
Default Setting- System and Files
2GB
Copy total
8GB 8GB
3. Select function 7.4: Set target tolerance (No Limit)
This function is to set the flash capacity tolerance between the source and
target. If users require the source and target flash medias to be limited in a
certain capacity tolerance, users can set the % of it. If the capacity difference
between the source and target exceeds the tolerance setting, the copy will be
fail. Default Setting- No Limit
22
3 Operation Guide
4. Select function 7.5: Enable Asynchronous
Users can select "Disable" to close Asynchronous copy or "Enable" to open the
function. If the setup is "Enable", and the data in source is smaller than system
buffer memory, it will automatically use asynchronous mode to do copy. If the
setting is "Disable", no matter what the content size is or copy method, the
system will keep synchronous copy. Default Setting- Enable
2 The common causes of “can’t copy”
2.1. Devices Issues
Cause
Adapter
Possible Cause Description
Solution
Using bad quality adapter may
cause bad connection.
Change adapter.
Unstable quality of flash in source
or targets.
Try different flash.
Bad source.
Remake and change a new
source.
-- Good Quality --
-- Bad Source --
23
3 Operation Guide
2.2. Data & Settings Issues
Cause
-- Good Quality --
Possible Cause Description
Solution
The capacity difference between
source and target out of range
setup. For example, "7.4Target
Tolerance" setup will lead to the
limitation of capacity difference.
Check if 7.4 “Target Tolerance”
setup is correct.
Data in source is out of target
capacity range. For example,
2GB(1980MB in real capacity)
source copy to 2GB(1920MB), if
data in the source is located out
beyond 1920MB, then it will not
be able to copy .
Check and Rearrange the source.
When coping NTFS/Linux format
copy, target capacity must equal
or one 1 MB larger than the
capacity of source.
If the flash is NTF or Linux format,
when using "Only Data Area" copy
mode ,the target has to be equal
or bigger than the source .
3 How to make sure copy correctness
( *It is strongly suggested to use compare function to assure the copied data correctness. )
Our flash duplicators provide the most rigorous comparison functions to assure
our clients with best duplications. To make sure copy correctness, it is required
to execute compare function. This is the most rigorous way to make sure copy
correctness. Besides compare function, there is another function “Checksum”
to check copy and source consistency. To take advantage of these functions,
please follow the steps below:
3.1 Compare/ Copy+Compare
Step
After finishing the copy process, Select function "2.Compare" to do data
checking between source and targets. Or users can choose function
"3.Copy+Compare" to make the duplicator doing data comparison
automatically after copy.
24
3 Operation Guide
These two functions will double check the contained data after copy through
the strictest hardware bit by bit comparison. It can highly increase the security
of data accuracy.
Note
Before executing Function "3.Copy + Compare", it is suggested that users could select
function "7.7 Power Off Time Between Copy+Compare" to set the time gap of power
supply between copy and compare for it could prevent from any data loss problem of
unstable flash.
4How to check flash device’s quality, speed
and bad sector
Our flash duplicator is not only made for duplicating but also it has powerful
flash device diagnostic tools to detect flash quality, or allows many checking
ability such as real capacity and speed. It is very important to own high quality
flash devices, and Our flash duplicator can help users to achieve the goal.
4.1 How to check real read /write speed
Step
Select function "6.2Measure Speed" to measure the "read" and "write" speed
of flash media. The speed check won’t delete content or data. Users can use
buttons to see flash media exact "Read" and “Write” speed from each
port.
25
3 Operation Guide
4.2 How to check fake capacity
Step
Select function "4. Capacity check" to check the real capacity of flash media.
System will use Green/Red LED to show the check result. Users can use
button to check the status of each slot.
This function can support asynchronous operation. Users can continuously
plug flash media in and out without pushing any buttons.
4.3 How to do flash quality check
Step1
Select function "6.3.3 Setup Range" to set up the check area from 1% to
100%.
Step2
Select function "6.3.4 Setup Err limit" to set the % of error tolerance before
executing checking mode.
Step3
Select function "6.3.1 H3 Safe 100%" or "6.3.2 H5 R/W 100%" to analyze flash
quality. And users can use
button to check the status of each slot.
Note
"H3 Safe" will read through the flash, and shows reading speed and bad sector. It will not
26
3 Operation Guide
delete the content or format.
"H5 R/W" will check flash quality by reading and writing the whole flash. Therefore, it will
delete the flash’s content and format.
4.4 How to check flash media ‘s content size
Step
Select function "5.1 Flash Info", it show flash media's basic information such as
media type, content size, and total capacity And users can use
button to
check the status of each slot.
27
4 Function Overview
1 Copy
There are two kinds of copy mode for "Asynchronous" and "Synchronous"
Copy. The system will check the content size of the source. If the source
content size is less than system’s buffer memory, it will automatically start
asynchronous copying. If the source content size is larger than the system’s
buffer memory, it will copy by synchronous mode.
2 Compare
Compare function is to double check data correctness of target data. The
operation is the same as copy.
3 Copy + Compare
This function will make sure if the data is correctly copied, and it will
automatically run the compare function after the copy.
4 Capacity Check
This function can check the real capacity of flash media.
❶ Plug the flash media into slot and select function "4.Capacity Check", then
press . About 2~3 seconds, the system will find out its exact capacity
and if it can work.
❷ System will show the checking result by Green/Red LED light.
button to check the status of each slot.
❸ You can use
❹ This function supports asynchronous operation, you can continuously plug
in and pull out flash media without push any buttons.
Green light: Correct size
Red light: Error size
Note
1.To protect source data, the system will not do capacity check on the master device.
2.When the Red light illuminates (Error) you can use
28
to check the error information.
4 Function Overview
5 Information
5.1 Flash Information
This feature will show flash media's basic information such as media type,
content size, and total capacity.
Port Number
Total capacity
Content size
File Format
5.2 System Information
This feature will show information of the duplicator system, including model
number and software version.
Intelligent 9 model
System firmware
6 Utility
6.1 Do Format
6.1.1 Auto Format
This function is to do flash FAT formatting. Plug the flash media in the slot and
press , the system will automatically detect its capacity and format the media
according to it.
• If flash media format is already FAT16 or FAT32, the format function won’t
change it is original format.
• If flash media format is not FAT format, i.e. NTFS, Linux or FAT multipartition. The system will execute format according to flash’s capacity.
When it is capacity is above 2GB, the system will format the flash to FAT32,
if its capacity is below 2GB, the system will format the media to be FAT16.
During format process, you can use
to check each flash media’s
formatting status, progress and information.
29
4 Function Overview
Note
The source port (port#1) will not execute any formatting.
6.1.2 FAT Format
Format any flash media to be FAT16.
6.1.3 FAT32 Format
Format any flash media to be FAT32.
6.2 Measure Speed
This function can measure the “read” and “write” speed of flash media. The
speed check won’t delete content or data.
❶ Plug the flash media into slot and select function “6.1Measure Speed” ,then
press
to start.
buttons to see flash media exact “Read” and “Write” speed from
❷Use
each port.
Note
The function will change the content of data and format of flash.
30
4 Function Overview
6.3 Media Check
The function is to analyze flash quality. You can setup "Normal mode", "Safe
mode", also the range of the flash you like to check.
6.3.1 H3 Safe 100%
It will read through the flash, and shows reading speed and bad sector it will
not delete the content or format. When processed, user can use
buttons
to check the status for each port.
Bad sector
Test area
Reading speed
Note
You can set the check range % by "6.3.3 Setup Range".
6.3.2 H5 R/W 100%
This function is to check flash quality by read and write the
whole flash media. Therefore, this function will delete the flash’s content and
format. When processed, user can use
buttons to check the status for
each port.
Bad sector
Writing speed
Test capacity
Reading speed
Note
Data in flash media will be erased during the normal mode of media check. And the flash
media will be formatted automatically in the end of checking process.
31
4 Function Overview
6.3.3 Setup Range
This function is to set the % of the flash which you like to check its quality.
Using
button to setup the flash examine area from 1% to 100%. 100%
means to check the whole flash, it will take more time.
6.3.4 Setup Error limit
This function is to set the % of tolerance range of error when checking the
flash. User can use
button to set the errorlimit value.
6.3.5 Minimum Read Speed
This function is a useful function for flash media selection. User can set the
an expected minimum read speed value when doing media check, and flash
medias without reaching the minimum speed value will be picked out.
Use
button to adjust the speed limit
6.3.6 Minimum Write Speed
This function is a useful function for flash media selection. User can set the
an expected minimum write speed value when doing media check, and flash
medias without reaching the minimum speed value will be picked out.
Use
32
button to adjust the speed limit
4 Function Overview
6.4 Quick Erase
This function will erase flash’s data, and it will keep the format if the original
format of flash is FAT16/32. User can use
button to check each flash
media’s erasing status, progress and information.
Note
Quick erase function can only erase the flash which is FAT 16/32 format.
6.5 Full Erase
It will completely erase the whole flash media, including format and content.
Therefore full erase will take more time. During the process, you can use
to
escape the erase process, but the original format and content can’t be read
any more.
6.6 DoD Erase
This is to comply with the U.S.A. Department of Defense (DoD 5220) standard
to fully erase the flash three times bit by bit to guarantee the data was deleted.
It will damage the data in flash, please make sure you have backup all
important data before using this function.
6.7 System Update
This is to update the system’s firmware version. Please save an un-zipped
update file to your flash media (please don’t put it in a folder). Select function
6.7 system update, and press , it will automatically start system updating.
When finished, please turn off the system for 5 seconds and then turn on
again. The new version of firmware will have been uploaded.
6.8 Calc. CheckSum
This function will calculate the CheckSum number of the flash media plugged
in the source port. The CheckSum calculate area will based on the "copy area"
you set. If you set "Data only", CheckSum will calculate data area only; if you
set "Whole media", the CheckSum number will be calculated based on the
whole size of flash media. Be aware that even two flash medias have the same
data, if the capacity has any difference, their CheckSum value will be different.
33
4 Function Overview
Note
1.The CheckSum will take the same time as copy, if the capacity is big, you have to wait
for longer time to finish.
2.The function is not for compare purpose. If you want to double check data
correctness, please use the Compare function which can provide you the safest and
fastest by hardware bit by bit comparison.
6.9 A2 Fake Picker (Available in USB models)
To checks each USB's capacity if it is as it's claimed. A2 failure means the real
capacity is different from its claim.
❶ Insert the flash card in any port of duplicator; choose function 6.9, and then
press . Within 5~10 seconds, the system will find out the real capacity of
flash device by showing information on the LCD monitor within brief
indication on LED light.
buttons to check the status of each flash
❷ In process, user can use
device.
buttons to check the error
❸ When the red light is on, user also can use
message individually.
❹ The function supports asynchronous operation with continually plug-in &
pull out.
7 System Setup Function
7.1 Start up Menu
You can select which function is shown first when the duplicator is turned on.
7.2 Copy Area
7.2.1. System and Files
This is also called "quick copy" mode. The system will automatically analyze
the source flash media’s file format. If the data’s file format is FAT16/32, NTFS,
Linux (ext2, ext3, ext4) which is recognizable by the system, it will be able to
34
4 Function Overview
copy data only instead of the whole flash. Otherwise, if the file format is nonrecognizable, the system will copy the whole flash media including the empty
space. For example a 2GB flash media which is FAT32 file format and has only
50 MB data inside, the system will only copy that specific 50MB of data, it
takes only a few seconds to copy the source.
7.2.2. Whole Media
Setup the duplicator in Whole Media function, the system will copy the whole
flash media, including the empty space and format. This function is used when
you have a flash source which has an unknown file format. For example a 2GB
flash media which is FAT32 file format and has only 50 MB of data inside, if
you setup "Whole Media", the system will copy whole 2GB of flash. It will take
longer time to copy the source.
Note
1. When doing whole media copy, the duplicator will not care the capacity difference
between source and targets. Hence, you should be careful about the data in the target
devices after copying.
2. If the source format is NTFS or Linux, to make sure the target could be operated
normally, the target capacity must be equal or bigger than the source device.
7.3 Button Beep
Choose whether to hear a beep or not when a button is pressed.
7.4 Target Tolerance
To set the tolerance % of capacity gap between the source and target. There
are three models of settings as below, and the default setting is "No limit".
• Allow Tolerance: Under this model, users can set the up and low tolerance
% of capacity gap separately between the source and target. And the
duplicator will views the setting as capacity limit of target flash media, and
filters out the target with incorrect capacity.
For example : If the flash media is marked as 1G with real capacity of
1000MB inside, when user allows the up and low tolerance to be 1 %, then
the workable capacity of target flash media will be :
99%*1G(1024MB) ~ 101%*1G(1024MB) => 922MB~1126MB.
35
4 Function Overview
• No limit: there is no any limit on capacity between the source and target.
Please be noted that, under this model, if the data size in the source is over
the capacity of target, it might lead to incomplete copy.
• 100% Same: The capacity of targets has to be exactly the same as the
source, or it will not able to execute any function.
7.5 Asynchronous
You can select "Disable" to close Asynchronous copy or "Enable" to open the
function. If the setup is "Enable", and the data in source is smaller than system
buffer memory, it will automatically use asynchronous mode to do copy. If the
setting is "Disable", no matter what the content size is or copy method, the
system will keep synchronous copy.
7.6 Check Before Copy
You can select if you would like to check if the flash media is workable before
copy.
7.7 Power Off Time Between Copy + Compare
To prevent from any data loss because of unstable flash, we strongly
recommend you to follow function 7.7 to set the time gap of power supply
between copy and compare.
The time gap can be set from 0 to 15 seconds.
7.8 Language
Set system language interface i.e. English, Japanese.
7.9 Transfer Mode (or Working Mode)
CF Models:
The working mode has 6 options to select the suitable CF transfer mode: The
default setting is UDMA4, it will automatically adjust speed according to your
CF card is support. If you are not confident with the quality of your CF card,
36
4 Function Overview
you can manually reduce the transfer speed.
• UDMA Mode 3
• UDMA Mode 4
SD/TF & USB Models
The working mode has 5 options to select the transmission speed:
• Slowest Mode
• Slower Mode
• Normal Mode
• Faster Mode
• Fastest Mode
Please make sure your flash media has good quality and support faster mode.
If you are not confident on the flash quality or you find a high failure rate on
copy or compare. It is recommended to slow down the working mode. The
factory default setting is “Normal Mode”.
7.10 Check WP Switch (Available in ComboSD models)
Users can choose "Do Check" or "Do Not Check" to detect if the SD card is
on writing protection. Under "Do Check" mode, the duplicator will detect if the
writing-protection tab is locked before any writing mission, such as copy or
writing test (Capacity Check, Measure Speed and H5 RW Check).
7.10 Set HDD Mode (Available in USB models)
To copy USB HDD, you could select "Active Mode" to do your job. Or, if you
just want to do copy USB devices but not USB HDD, you could select "Inactive
mode".
Note
Please select correct to do your job for USB HDD is different from USB flash device.
Actually, a USB HDD not only requires for bigger power current than a USB flash stick,
but also, HDD’s file format is not the same as flash device’s format. It is very likely to
make mistake to copy a HDD using a normal USB duplicator.
37
4 Function Overview
7.11 Purge Before Copy (Available in ComboSD models)
With this setting, the duplicator will clean out the content and format of target
devices, and then start the copy process.
Note
This function will change the format and data of flash.
7.12 Adjust Clock (Available in Golden series)
To adjust the clock of duplicator showed on the LCD monitor.
7.13 Restore Default
Return back to factory setting.
8. Burn-In (Available in Golden series)
The Burn-In is the most important process for flash manufactures. The
process of Burn-In test contains three steps: data writing, power off and data
comparing (reading). Users can set writing loop, compare loop, power off time
and also writing pattern as their wish.
8.1 Burn-In(Copy+Comp)
To do the Burn-In test on flash targets by continually copying & comparing data
of source.
8.2 Burn-In(Auto Data)
To do the Burn-In test which is executed continuously loops of write, power off,
and data compare by system automatically.
8.3 Set Burn-In Time
User can set how long the Burn-In test last for. The range of Burn-In time starts
from 30mins to 30dayrs.
38
4 Function Overview
8.4 Set Loop Count
To set how many circles of Burn-In writing test on flash media .Each loop
contains a process of write, power off, and compare test. User can set Burn-In
loop from 0 to 99999.
L35: The 35th loop
R3: The 3rd compare in the 35th lppo
E0: Total error quantity
Total burn-in capacity
Processed
Working status
Note
1.Loop 0 is equal to Loop 99999.
2.Function 8.2 & 8.3 conflict with each other. The duplicator will follow the latest setting if
user set both of these two functions.
8.5 Set Test Range
To set the test range of flash media. It allows user to test the capacity of flash
from 1% to 100%.
8.6 Set Bad Limit
To set the error tolerance from 1 to 10000 sectors when check the flash media.
8.7 Set Data Pattern
To set the writing value used in Burn-In test. There are two data patterns:
❶ Auto Pattern: The system will use the default value to do burn-in test.
❷ User Defined: User can choose which value that they he/she would like to
use on burn-in test.
8.8 Compare Count Per Loop
To set how many loops of data comparing (reading) in each loop. The default
setting contains comparing (reading) test for only one time.
39
4 Function Overview
8.9 Power Off Between Loop
To set the time gap of power supply between each data comparing (reading) in
a loop. The time gap can be set from 0 to 15 seconds.
9. Log Manager (Available in Golden series)
The log manager is an excellent management tool for operation control
purpose. It can record all the details of duplication operation and targets so as
flash information. As a result, the log manager can not only achieve production
yield rate analysis report, but also, it can become a good management
reporting system.
9.1 Out Today Report
After inserting a flash media into master interface, user can output today’s log
records in it, and then take out to read the records on PC.
9.2 Out Recent Report
After inserting a flash media into master interface, user can output the log
records in recent 28 days in it, and then take out to read the records on PC.
9.3 Out Period date
After inserting a flash media device into master interface, user can output the
log records in a specific date, and then take out to read the records on PC.
9.4 Out all database
After inserting a flash media into master interface, user can output all the log
records which are kept in the duplicator in it, and then take out to read the
records on PC.
9.5 Advanced Function
9.5.1 Clear all Log
After entering the password, user can clean out all the log records in the
duplicator.
40
4 Function Overview
9.5.2 Setup Password
User can protect the log records in the duplicator by setting up the password.
The default password is "123456".
Note
1.The log manager can only keep 30000 pcs of records. If the amount of the records
reaches up to the limit, the new record will replace and cover the existing record from
the beginning and the previous record will be covered one by one.
2.We strongly recommend you to change password to make sure the security of log
records.
Explanation of Log Report
Log output information
Operation
Card information
Operation status
41
4 Function Overview
Information Type
Log Output Information
Operation Records
Card Information
Operation Status
42
Item
Description
Print Date
The output date of log report
Model
The model information of duplicator
F/W Ver
The version of duplicator firmware
Machine ID
The ID number of duplicator
Start No
The beginning log record in the log report
End No
The last log record in the log report
No.
The number of log record
Date-Time
The time of each operation result
Port
The specific interface of each operation
Result
The final status of each operation
Function
The function executed by user
Run Time
The time of each operation process
Target Information Capacity
(Sector)
The capacity information of each target devices
Model, Version, Serial No
The detailed information of flash devices
COPY
Synchronous Copy.
Copy
Asynchronous Copy.
COMPARE
Synchronous Compare.
Compare
Asynchronous Compare.
COPY+COMPARE
Synchronous Copy & Compare.
Copy+Compare
Asynchronous Copy & Compare.
CAPACITY CHECK
To do capacity inspection of flash media.
FORMAT AUTO
To format the flash media automatically.
FORMAT FAT16
To format the flash media as FAT16.
FORMAT FAT32
To format the flash media as FAT32.
H3 TEST
To execute H3 reading test.
H5 TEST
To execute H5 reading & writing test.
QUICK ERASE
To erase the content of flash media.
FULL ERASE
To completely erase data of flash including
format and content.
DOD ERASE
To erase flash three times complying with USA
Department of Defense (DoD) standard.
A2 FAKE PICKER
(USB/SD/MSD Only)
To check if an SD/TF(MS) flash card contain
fake capacity.
BURN IN
To do durability teat on flash media.
(DATA,XXXXMB)
(Data Only Copy, Capacity of Data).
(Whole,XXXXMB)
(Wholemedia Copy, Capacity of Source Device).
(10%)
R:18.3M/S
(The percentage of inspection)
Reading Speed.
(15%)
W:11.7M/S R:21.7M/S
(The percentage of inspection)
Writing Speed
Reading Speed
4 Function Overview
Maintenance Guide--Steps to replace socket
1. Turn off the power
Attention: For you safety, please
4. Take the old socket out
turn off the power before
replacing the socket or doing any
inspection.
Power off
Power on
5. Replace new socket and
connect to the controller
firmly.
2. Prepare a flat screwdriver,
or use your hand to take off
the screw of cover.
Attention: Because of slippery
indentation on the crew, please
be careful when taking off screw
by flat screwdriver.
6. Insert the CF cards into the
socket first, and use the
cover to adjust the location
of sockets and make them
horizontally. It will help to lay
the cover back.
3. Take off the cover of socket
7. Screw up the cover.
43
5 FAQ
Q1: What is the difference between our flash duplicator and PC based
duplicator?
A: There are four main differences between Our flash duplicator and PC
based duplicator:
1. Multi-task processing capability: Our flash duplicator can copy flash
media independently at the same time during the copy or check
process, on the other hand, even though PC has more powerful
CPU, but it will has difficulty to handle too many flash medias to copy
simultaneously.
2. No risk of virus infection: Our flash duplicator is an embedded system,
it only copies whatever is on the source. When the system is turned
off, nothing will be left in the system. Hence, there will not be any risk
of virus infection.
3. No mistake of copying wrong files: Our flash duplicator can achieve
100% duplication directly from source to all targets.
4. Instant system on and off: There is no need to wait for system boot up
or shut down while using Our flash duplicator. It is definitely easy and
fast.
Q2: Can the flash duplicator copy any kind of file format, i.e. NTFS?
A: Our flash duplicator supports the most common formats such as, FAT
16/32, NTFS, Linux (ext2, ext3, ext4)...etc. In addition, if you want to copy
other formats, you can use the “Whole Area” (function 7.2.2) to copy
whole flash media; it doesn’t care about the format and will copy the
entire flash media.
Q3: How do we know the data is correct after copy?
A: Run "Compare" function to double ensure the correctness of copied data.
44
5 FAQ
Q4: What should I do if I encounter a copy fail?
A: 1. Please make sure the source size is not over than the target capacity.
You could use function "5.1 Flash info" to check the source/target
data size and capacity of flash medias.
2. If you use a Flash, please ensure that your Flash isn’t bad card.
3. If the flash quality is poor, it may affect the copy result, you can use
(1) "6.2 Media Check" to check your flash quality in both source and
target. (2) "Working Mode" to slow down the copy speed.
Q5: Why after duplication, the data compare fail, but the data is
presented while checking on PC?
A: The main reason is the flash maybe unstable, which may cause the copy
pass but compare fail issue. You also can follow steps in Q3 to check
further.
Q6: Why is the copy speed so slow?
A: Our flash duplicator can reach 1.9GB/m for SD/ TF/ USB duplicator,
3.9GB/m for CF duplicator, if you find the copy speed is slow, it may be
affected by flash quality. You can use function”6.1 Measure Speed” to
check the flash speed.
Q7: Is it possible to use a 1GB source copy to 2 GB targets (source
capacity less than target)?
A: Yes, it can copy 1 GB to 2 GB, but the target 2GB will become 1GB when
it read on a PC. The reason is after copy, the target will completely be the
same as the source. You can restore it's real capacity by re-formatting the
device.
Q8. Is it possible to do copy when Source and Target capacity has big
difference use a 2GB source copy to 1GB targets?
A: If the data is less than target capacity, it is possible to copy from source
to small size target, but the source data must be within the capacity of
the target devices (i.e. page 13). Also, the data may be loss or error due
to different capacity copy. It is strongly recommended to use flash media
with the same capacity to do copy.
45
5 FAQ
❶ If Source capacity is SMALLER than the target, for example 1GB to
2GB:
Example:
Copy OK
Warning:
The target 2GB will become 1GB
when it read on PC. You can only
restore its 2GB capacity by
reformatting
the device.
Note
When target and source’s capacity has big difference, such as 1GB to 4GB
or 1GB to 2GB, there is a possibility to cause error to the target’s capacity,
compatibility and format. It is strongly recommended that target and source
have to be in close range of capacity
❷ If source capacity is LARGER than the target, for example 2GB copy
to 1GB:
▶ there are two results as shown in illustrations 1 and 2
2.1.When a content is within the target flash media’s capacity.
Copy OK
Because the data is within
the 1GB area.
46
5 FAQ
2.2.When the content is located beyond the target flash media’s
capacity.
Copy Fail
Because the data is outside
of the 1GB area.
Note
The copy will fail because the data was stored beyond the 1GB area. The
duplicator will copy whatever the data is, it won’t change the data’s location.
47
6 Model Information
USB Duplicator
Model (UB XXX)
910
920
930
940
950
960
970
980
9120
Target
1:9
1:19
1:29
1:39
1:49
1:59
1:69
1:79
1:119
Operation
Stand Alone
Support media
USB Drive / USB HDD
LED
LED (Green/Red) on each slot
Power Supply
12V adaptor
Button
Humidity
Temperature
4 buttons
Working
20%~80%
Storage
5%~95%
Working
0ºC~75ºC
Storage
-20ºC~85ºC
CF Duplicator
Model
CF 908
CF 916
CF 924
CF 932
CF 940
CF 960
CF 980
CF 9120
Target
1:7
1:15
1:23
1:31
1:39
1:59
1:79
1:119
Operation
Stand Alone
Support media
Compact Flash Card
LED
LED (Green/Red) on each slot
Power Supply
12V adaptor
Button
Humidity
Temperature
4 buttons
Working
20%~80%
Storage
5%~95%
Working
0ºC~75ºC
Storage
-20ºC~85ºC
Combo(SD+microSD) Duplicator
Model (Combo XXX)
908
916
924
932
940
948
964
980
9120
Target
1:7
1:15
1:23
1:31
1:39
1:47
1:63
1:79
1:119
Operation
Stand Alone
Support media
SD/ SDHC/ MMC/microSD Card
LED
LED (Green/Red) on each slot
Power Supply
12V adaptor
Button
Humidity
Temperature
4 buttons
Working
20%~80%
Storage
5%~95%
Working
0ºC~75ºC
Storage
-20ºC~85ºC
The product spec will be subjected to change without further notice.
48