1
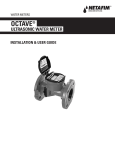
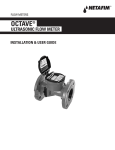
WATER METERS ‘M’ SERIES WATER METERS INSTALLATION, OPERATION AND MAINTENANCE GUIDE METAL ‘M’ SERIES WATER METER PLASTIC ‘M’ SERIES WATER METER NETAFIM USA 5470 E. Home Ave. Fresno, CA 93727 CS 888 638 2346 F 800 695 4753 www.netafimusa.com 82000-013370 04/12 INTRODUCTION ‘M’ SERIES WATER METERS INDUSTRY’S SMALLEST WATER METERS Netafim USA’s ‘M’ Series Water Meters are used as sub-meters for residential or commercial applications and the industry’s smallest multi-jet water meter. The multi-jet principle assures an equally distributed load on the impeller minimizing wear and maintaining accuracy. These meters offer the best cost and performance, long-life flow measurement instruments. Wide clearances in the measuring chamber and negligible area of contact between static and moving parts are the main reasons for the high reliability of this design even in hard water. FEATURES: Only one moving part - the impeller - in contact with the water for minimum wear and utmost reliability Magnetically driven sealed registers with stainless steel/composite encapsulated and guaranteed against fogging due to moisture Very accurate over a wide range of flows for flexible and efficient water management Sealed Register Pulse Reed Switch TamperProof Tab Impeller Measuring Chamber Inlet Side Basket Filter SPECIFICATIONS AVAILABLE SIZES MAXIMUM WORKING PRESSURE MAXIMUM LIQUID TEMPERATURE BODY MATERIAL - METAL BODY MATERIAL - PLASTIC CONNECTIONS 3/4” AND 1” 140 PSI UP TO 122° F CORROSION-PROOF COPPER ALLOY COMPOSITE MALE PIPE THREAD DIMENSIONS AND WEIGHT SIZE/BODY 3/4” PLASTIC 3/4” METAL 1” PLASTIC 1” METAL LENGTH 11 1/4” 11 1/4” 14 3/4“ 14 3/4” WIDTH 3 3/4“ 3 3/4” 4 1/4“ 4 1/4” HEIGHT WEIGHT 4 1/4” 1.3 lbs. 4 1/4” 5.0 lbs. 4 1/4“ 2.4 lbs. 4 1/4” 7.2 lbs. PERFORMANCE DATA SIZE 3/4” 1” LOWEST FLOW LOWEST FLOW NOMINAL FLOW MAXIMUM FLOW WITHIN ± 5% WITHIN ± 2% WITHIN ± 2% WITHIN ± 2% ACCURACY ACCURACY ACCURACY ACCURACY 0.2 GPM 0.9 GPM 11 GPM 14 GPM 0.3 GPM 1.2 GPM 15.4 GPM 20 GPM ‘M’ SERIES WATER METERS • 3 INTRODUCTION ‘M’ SERIES WATER METERS INDUSTRY’S SMALLEST WATER METERS Netafim USA’s ‘M’ Series Water Meters are used as sub-meters for residential or commercial applications and the industry’s smallest multi-jet water meter. The multi-jet principle assures an equally distributed load on the impeller minimizing wear and maintaining accuracy. These meters offer the best cost and performance, long-life flow measurement instruments. Wide clearances in the measuring chamber and negligible area of contact between static and moving parts are the main reasons for the high reliability of this design even in hard water. FEATURES: Only one moving part - the impeller - in contact with the water for minimum wear and utmost reliability Magnetically driven sealed registers with stainless steel/composite encapsulated and guaranteed against fogging due to moisture Very accurate over a wide range of flows for flexible and efficient water management Sealed Register Pulse Reed Switch TamperProof Tab Impeller Measuring Chamber Inlet Side Basket Filter SPECIFICATIONS AVAILABLE SIZES MAXIMUM WORKING PRESSURE MAXIMUM LIQUID TEMPERATURE BODY MATERIAL - METAL BODY MATERIAL - PLASTIC CONNECTIONS 3/4” AND 1” 140 PSI UP TO 122° F CORROSION-PROOF COPPER ALLOY COMPOSITE MALE PIPE THREAD DIMENSIONS AND WEIGHT SIZE/BODY 3/4” PLASTIC 3/4” METAL 1” PLASTIC 1” METAL LENGTH 11 1/4” 11 1/4” 14 3/4“ 14 3/4” WIDTH 3 3/4“ 3 3/4” 4 1/4“ 4 1/4” HEIGHT WEIGHT 4 1/4” 1.3 lbs. 4 1/4” 5.0 lbs. 4 1/4“ 2.4 lbs. 4 1/4” 7.2 lbs. PERFORMANCE DATA SIZE 3/4” 1” LOWEST FLOW LOWEST FLOW NOMINAL FLOW MAXIMUM FLOW WITHIN ± 5% WITHIN ± 2% WITHIN ± 2% WITHIN ± 2% ACCURACY ACCURACY ACCURACY ACCURACY 0.2 GPM 0.9 GPM 11 GPM 14 GPM 0.3 GPM 1.2 GPM 15.4 GPM 20 GPM ‘M’ SERIES WATER METERS • 3 REGISTERS READING A REGISTER REED SWITCH REGISTER READING A REGISTER The Reed Switch Register is a dry contact or simple switch closure for communicating with control and monitoring equipment. Registers are interchangeable and easily replaced with common tools. They are removable even when the meter is operating. A leak indicator in the center of the dial registers the lowest flow through the meter. Flows are totalled in U.S. Gallons and each dial face indicates the multiplication factor. Magnetic coupling activates the reed switch creating a pulsed output. Dry contact uses very little electric power. Calculates volume related functions such as data recorders or simple counters. Maximum contact current is 50mA and maximum contact voltage is 48VDC. Red Wire = Positive Black Wire Black Wire = Negative Red Wire The Total Flow for a Water Meter register is calculated by adding the readings from the Totalizer and the three fractional dials. The three fractional dials measure quantities smaller than the totalizer reading and are continuously turning while calculating the flow. The Photo Diode Register has a photo coupler sensor that provides pulse output for communicating with control and monitoring equipment. Registers are interchangeable and easily replaced with common tools. They are removable even when the meter is operating. Flows are totalled in U.S. Gallons and each dial face indicates the multiplication factor. A sensor combines an IR light source and a light sensitive diode in one package. Signals are created when the light beam created by the IR light is interrupted by a rotating element. Requires a constant supply of DC power. Minimum contact current is 15mA to a maximum of 25mA DC through a resistor and maximum voltage is 28VDC. Yellow Wire = Positive (20-30mA through a resistor) Transparent Wire = Output (open collector, max. load 2mA) Bare Wire = Ground RECOMMENDED RESISTOR VALUES RESISTOR VALUE - Ω RESISTOR VALUE - W 4 5 6 180 220 0.25 0.25 • ‘M’ SERIES WATER METERS 9 12 24 330 470 1,000 0.25 0.5 1.0 Note: Correct polarity of the leads should be checked carefully to prevent damage of the sensor. Register will not function properly if the register lid is not closed during operation. Totalizer Reading FRACTIONAL DIAL # 1: Each number (1-9) on the dial is multiplied by 10 to reach U.S.G. One complete revolution of this dial = 10 U.S.G. FRACTIONAL DIAL # 2: Each number (1-9) on the dial is multiplied by 1 to reach U.S.G. One complete revolution of this dial = 1 U.S.G. Reed Switch Only FRACTIONAL DIAL # 3: Each number (1-9) on the dial is multiplied by 0.1 to reach U.S.G. One complete revolution of this dial = 0.1 U.S.G. NOTE: Always refer to the controller manufacturer’s instructions for proper installation and connection requirements. PHOTO DIODE REGISTER VOLTAGE › TOTALIZER READING: Rotates sequentially for each 100 U.S.G. (U.S. Gallons) calculated Number displayed is multiplied by 100 to reach total U.S.G. Totalizer Reading Fractional Dial #1 Fractional Dial #3 Fractional Dial #2 CALCULATING THE TOTAL FLOW FOR THIS REGISTER Totalizer Reading: 0 Fractional Dial # 1: 7 Fractional Dial # 2: 5 Fractional Dial # 3: 7 0 x 100 = 0 7 x 10 = 70 5x1=5 7 x 0.1 = .7 CALCULATION: Add Totalizer Reading and all Fractional Dial Readings 5V A-2 m C X 2 VD MA 25 )- E: C pn G D (n OLTA mA T 5 U V 2 TP AX. AX OU M M T: D AEN UN 5m AR RO 1 SP G IN AN D: -M TR IEL LOW H S YEL 5 Fractional Dial #3 Fractional Dial #1 Fractional Dial #2 Transparent Wire Yellow Wire 0 + 70 + 5 + .7 = 75.7 U.S.G. 75.7 U.S. Gallons is the Current Total Flow NOTE: If a number is partially visible on the totalizer, always default to the lower of the 2 numbers when calculating flow. If a fractional dial is pointing between numbers, always default to the lower of the 2 numbers. REGISTER SPECIFICATIONS Bare Wire V 25 A2m C VD MAX 25 )- E: pn AG A DC LT m 25 (n UT VO TP AX. AX OU M - M T: A EN ND m AR OU 15 SP GR IN AN : -M TR IELD OW SH YELL 5 REGISTER TOTALIZER METER SIZE VOLUME UNIT PULSE OUTPUT (GALLONS/PULSE) POINTER RESOLUTION - POINTER 1 POINTER RESOLUTION - POINTER 2 POINTER RESOLUTION - POINTER 3 GALLON 3/4” AND 1“ GALLON X 10 0.1 x 0.01 GALLON x 0.1 GALLON x 1.0 GALLON GALLON 3/4” AND 1“ GALLON X 100 1.0 x 0.10 GALLON x 1.0 GALLON x 10 GALLON ‘M’ SERIES WATER METERS • 5 REGISTERS READING A REGISTER REED SWITCH REGISTER READING A REGISTER The Reed Switch Register is a dry contact or simple switch closure for communicating with control and monitoring equipment. Registers are interchangeable and easily replaced with common tools. They are removable even when the meter is operating. A leak indicator in the center of the dial registers the lowest flow through the meter. Flows are totalled in U.S. Gallons and each dial face indicates the multiplication factor. Magnetic coupling activates the reed switch creating a pulsed output. Dry contact uses very little electric power. Calculates volume related functions such as data recorders or simple counters. Maximum contact current is 50mA and maximum contact voltage is 48VDC. Red Wire = Positive Black Wire Black Wire = Negative Red Wire The Total Flow for a Water Meter register is calculated by adding the readings from the Totalizer and the three fractional dials. The three fractional dials measure quantities smaller than the totalizer reading and are continuously turning while calculating the flow. The Photo Diode Register has a photo coupler sensor that provides pulse output for communicating with control and monitoring equipment. Registers are interchangeable and easily replaced with common tools. They are removable even when the meter is operating. Flows are totalled in U.S. Gallons and each dial face indicates the multiplication factor. A sensor combines an IR light source and a light sensitive diode in one package. Signals are created when the light beam created by the IR light is interrupted by a rotating element. Requires a constant supply of DC power. Minimum contact current is 15mA to a maximum of 25mA DC through a resistor and maximum voltage is 28VDC. Yellow Wire = Positive (20-30mA through a resistor) Transparent Wire = Output (open collector, max. load 2mA) Bare Wire = Ground RECOMMENDED RESISTOR VALUES RESISTOR VALUE - Ω RESISTOR VALUE - W 4 5 6 180 220 0.25 0.25 • ‘M’ SERIES WATER METERS 9 12 24 330 470 1,000 0.25 0.5 1.0 Note: Correct polarity of the leads should be checked carefully to prevent damage of the sensor. Register will not function properly if the register lid is not closed during operation. Totalizer Reading FRACTIONAL DIAL # 1: Each number (1-9) on the dial is multiplied by 10 to reach U.S.G. One complete revolution of this dial = 10 U.S.G. FRACTIONAL DIAL # 2: Each number (1-9) on the dial is multiplied by 1 to reach U.S.G. One complete revolution of this dial = 1 U.S.G. Reed Switch Only FRACTIONAL DIAL # 3: Each number (1-9) on the dial is multiplied by 0.1 to reach U.S.G. One complete revolution of this dial = 0.1 U.S.G. NOTE: Always refer to the controller manufacturer’s instructions for proper installation and connection requirements. PHOTO DIODE REGISTER VOLTAGE › TOTALIZER READING: Rotates sequentially for each 100 U.S.G. (U.S. Gallons) calculated Number displayed is multiplied by 100 to reach total U.S.G. Totalizer Reading Fractional Dial #1 Fractional Dial #3 Fractional Dial #2 CALCULATING THE TOTAL FLOW FOR THIS REGISTER Totalizer Reading: 0 Fractional Dial # 1: 7 Fractional Dial # 2: 5 Fractional Dial # 3: 7 0 x 100 = 0 7 x 10 = 70 5x1=5 7 x 0.1 = .7 CALCULATION: Add Totalizer Reading and all Fractional Dial Readings 5V A-2 m C X 2 VD MA 25 )- E: C pn G D (n OLTA mA T 5 U V 2 TP AX. AX OU M M T: D AEN UN 5m AR RO 1 SP G IN AN D: -M TR IEL LOW H S YEL 5 Fractional Dial #3 Fractional Dial #1 Fractional Dial #2 Transparent Wire Yellow Wire 0 + 70 + 5 + .7 = 75.7 U.S.G. 75.7 U.S. Gallons is the Current Total Flow NOTE: If a number is partially visible on the totalizer, always default to the lower of the 2 numbers when calculating flow. If a fractional dial is pointing between numbers, always default to the lower of the 2 numbers. REGISTER SPECIFICATIONS Bare Wire V 25 A2m C VD MAX 25 )- E: pn AG A DC LT m 25 (n UT VO TP AX. AX OU M - M T: A EN ND m AR OU 15 SP GR IN AN : -M TR IELD OW SH YELL 5 REGISTER TOTALIZER METER SIZE VOLUME UNIT PULSE OUTPUT (GALLONS/PULSE) POINTER RESOLUTION - POINTER 1 POINTER RESOLUTION - POINTER 2 POINTER RESOLUTION - POINTER 3 GALLON 3/4” AND 1“ GALLON X 10 0.1 x 0.01 GALLON x 0.1 GALLON x 1.0 GALLON GALLON 3/4” AND 1“ GALLON X 100 1.0 x 0.10 GALLON x 1.0 GALLON x 10 GALLON ‘M’ SERIES WATER METERS • 5 INSTALLATION MAINTENANCE INSTALLATION REQUIREMENTS MAINTENANCE REQUIREMENTS 1. Correct direction of flow is indicated on the water meter body (see Figure 1). 2. Dial face must be horizontal and facing upwards (see Figure 2). 3. Register lid must be in the closed position during normal operation (see Figure 3). 4. There are no straight pipe installation requirements. If possible 5” of straight pipe upstream (before the meter) and 2” of straight pipe downstream (after the meter) is recommended to achieve the best performance and accuracy. 5. Prior to water meter installation, the pipeline should be thoroughly flushed. 6. The water meter must be installed so that the pipe will be full of water at all times during metering. 7. Installation of a Continuous Acting Air Vent before the water meter is highly recommended to eliminate air and ensure accurate flow readings (see Figure 4). For additional details on air vent options and installation requirements, refer to the Netafim USA Landscape & Turf Catalog. 1. Inlet side basket filter should be removed and cleaned every 90 days or as needed based on the water quality at the site (see Figure 5). 2. Inlet side basket filter must remain in place during normal operation in order to avoid debris entering and clogging the metering chamber. 3. Teflon tape should be used on pipe fittings and connections as needed to prevent leaks. ↑ ↑ FIGURE 1 Direction of flow indicated on body WARNING: Units must not be subjected to system ‘blow out’ using compressed air. Subjecting the water meter to this procedure will result in product failure and the resulting damage is not covered under warranty. It is recommended that the water meter be installed in systems or portions of systems that will gravity drain for winterization only. If the unit is installed in a system which will be winterized with compressed air, please do one of the following: Install manual ball valves on each side of the water meter to isolate the water meter from the system blow out procedure. Close the manual ball valve on one side of the water meter, perform the blow out procedure and then open the manual ball valve. Repeat process on the other side. Remove the water meter before the blow out procedure and replace it with a section of PVC/Polyethylene tubing. When the blow out procedure is complete, reinstall the water meter. FIGURE 2 Dial face upwards Water Meter Continuous Acting Air Vent low rF te Wa FIGURE 3 Register lid closed 1. Pry the tamper-proof tab upward using a screwdriver. 2. Loosen and unscrew the brass or plastic closing ring and cap assembly that secures the register. Lift off the closing ring and cap assembly. Lift out the register from it’s sealed compartment making note of the position for any spacers and o-rings. 3. To install, place the register into the sealed compartment (including spacers and o-rings) and place the closing ring and cap assembly on top of the register. Tighten the closing ring by twisting until secure. • ‘M’ SERIES WATER METERS FIGURE 5 Cleaning Inlet Side Basket Filter FIGURE 4 Air vent installation REGISTER REMOVAL AND INSTALLATION 6 Inlet Side Basket Filter ‘M’ SERIES WATER METER WARRANTY Netafim ‘M’ Series Water Meters are individually tested, calibrated and inspected to ensure they meet the highest quality standards and the testing documents are included with each meter. They also have the industry’s longest warranty. WARRANTY METERING COMPONENTS (REGISTER & METERING ASSEMBLY) 3 YEARS METER BODY 5 YEARS ‘M’ SERIES WATER METERS • 7 INSTALLATION MAINTENANCE INSTALLATION REQUIREMENTS MAINTENANCE REQUIREMENTS 1. Correct direction of flow is indicated on the water meter body (see Figure 1). 2. Dial face must be horizontal and facing upwards (see Figure 2). 3. Register lid must be in the closed position during normal operation (see Figure 3). 4. There are no straight pipe installation requirements. If possible 5” of straight pipe upstream (before the meter) and 2” of straight pipe downstream (after the meter) is recommended to achieve the best performance and accuracy. 5. Prior to water meter installation, the pipeline should be thoroughly flushed. 6. The water meter must be installed so that the pipe will be full of water at all times during metering. 7. Installation of a Continuous Acting Air Vent before the water meter is highly recommended to eliminate air and ensure accurate flow readings (see Figure 4). For additional details on air vent options and installation requirements, refer to the Netafim USA Landscape & Turf Catalog. 1. Inlet side basket filter should be removed and cleaned every 90 days or as needed based on the water quality at the site (see Figure 5). 2. Inlet side basket filter must remain in place during normal operation in order to avoid debris entering and clogging the metering chamber. 3. Teflon tape should be used on pipe fittings and connections as needed to prevent leaks. ↑ ↑ FIGURE 1 Direction of flow indicated on body WARNING: Units must not be subjected to system ‘blow out’ using compressed air. Subjecting the water meter to this procedure will result in product failure and the resulting damage is not covered under warranty. It is recommended that the water meter be installed in systems or portions of systems that will gravity drain for winterization only. If the unit is installed in a system which will be winterized with compressed air, please do one of the following: Install manual ball valves on each side of the water meter to isolate the water meter from the system blow out procedure. Close the manual ball valve on one side of the water meter, perform the blow out procedure and then open the manual ball valve. Repeat process on the other side. Remove the water meter before the blow out procedure and replace it with a section of PVC/Polyethylene tubing. When the blow out procedure is complete, reinstall the water meter. FIGURE 2 Dial face upwards Water Meter Continuous Acting Air Vent low rF te Wa FIGURE 3 Register lid closed 1. Pry the tamper-proof tab upward using a screwdriver. 2. Loosen and unscrew the brass or plastic closing ring and cap assembly that secures the register. Lift off the closing ring and cap assembly. Lift out the register from it’s sealed compartment making note of the position for any spacers and o-rings. 3. To install, place the register into the sealed compartment (including spacers and o-rings) and place the closing ring and cap assembly on top of the register. Tighten the closing ring by twisting until secure. • ‘M’ SERIES WATER METERS FIGURE 5 Cleaning Inlet Side Basket Filter FIGURE 4 Air vent installation REGISTER REMOVAL AND INSTALLATION 6 Inlet Side Basket Filter ‘M’ SERIES WATER METER WARRANTY Netafim ‘M’ Series Water Meters are individually tested, calibrated and inspected to ensure they meet the highest quality standards and the testing documents are included with each meter. They also have the industry’s longest warranty. WARRANTY METERING COMPONENTS (REGISTER & METERING ASSEMBLY) 3 YEARS METER BODY 5 YEARS ‘M’ SERIES WATER METERS • 7 WATER METERS ‘M’ SERIES WATER METERS INSTALLATION, OPERATION AND MAINTENANCE GUIDE METAL ‘M’ SERIES WATER METER PLASTIC ‘M’ SERIES WATER METER NETAFIM USA 5470 E. Home Ave. Fresno, CA 93727 CS 888 638 2346 F 800 695 4753 www.netafimusa.com 82000-013370 04/12