1
OASIS Sailing Club (OSC)
MATE'S & SKIPPER'S
MANUAL
Standard Operating Procedure (SOP)
MALCOLM READ, EDITOR & TRAINING OFFICER
DAN KARMON, CO-EDITOR
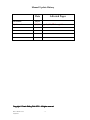
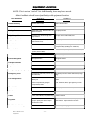
Manual Update History
Date
1st release
2/1/11
Update release
3/28/11
Affected Pages
pp: 3, 6, 56, 77 through 81
Copyright © Oasis Sailing Club 2010 - All rights reserved
Mate’s Manual 5th Ed
02/01/2011
.- 2 -
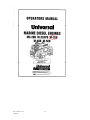
OASIS SAILING CLUB
Mate's & Skipper's Manual
Fifth Edition, December 2010
Oasis Sailing Club’s Mate’s Manual has been the cornerstone of the club’s Mate
Candidate’s (MC)Training Program. It evolved as the club has changed its inventory
of boats, and as the complexity of these boats and growth of the club necessitated a
single place where Mates and Skippers can find information.
The manual began as a collection of Harold Sharp’s personal notes and drawings of
the specific names, locations and uses of lines and rigging of OASIS II, a Newport 30,
and the operation of her equipment. He titled these OASIS II NOTES.
NOTES With the
encouragement of then-Commodore John Byerlein and the approval of the Board of
Directors, Harold printed hard copies for Club members, focusing on Skippers, Mates
and Mate-Candidates, to provide guidelines for operating the club’s boats and as a
reference manual. That notebook became the 1st edition, entitled OASIS II MATE’S
MANUAL.
An expanded 2nd edition of OASIS II MATE’S MANUAL was published by Harold
Sharp to meet the need for additional information, and was also available on the OSC
website. A 3rd edition became necessary when the Club acquired OASIS III, another
Newport 30. That edition was titled OASIS SAILING CLUB MATE’S MANUAL and
was edited by then-Training Officer Frank Reinhart.
A 4th edition of OASIS SAILING CLUB MATE’S MANUAL was needed with the
acquisition of OASIS IV, a Hunter 326, and retiring OASIS II. It incorporated
Seaworthy Training sessions into the Mate Candidate’s program with training in
Anchoring, Boat Systems, Man/Crew Overboard, and Docking that are not normally
covered during the normal day sails. It was also edited by Frank Reinhart.
This 5th edition of OASIS SAILING CLUB MATE’S & SKIPPER'S MANUAL is
necessitated by the acquisition of OASIS V, a Catalina 34 Mk II. Much of the data
included was compiled and edited by Mate Dan Karmon. In addition to being the Mate
Candidate’s “sign-off” manual, it includes information about the Skipper-Candidate’s
program, and general information and Standard Operating Procedures (SOPs) for
both Mates and Skippers. It also includes an overview of the club’s Assessment &
Enhancement (A&E) Program adopted in early 2010 to maximize the club’s goal of
‘safe sailing”. To ensure that skills are current, all OSC Skippers and Mates must
successfully complete an “on water” A&E review every 2 years. To ensure that you
are viewing the most up-to-date version of various documents, this manual
occasionally provides a brief overview of a program or procedure and refers you to the
OSC website for the most recent version.
We hope this OSC Mate’s & Skipper’s Manual assists all that use it to enhance sailing
skills and to enjoy camaraderie while sailing together.
Malcolm Read,
Training Officer
Mate’s Manual 5th Ed
02/01/2011
.- 3 -
Table of Contents
Mate & Skipper Candidate Programs
8
Introduction
9
Mate Checklist Items for OASIS-IV and V
The Fleet: OASISOASIS-IV & OASISOASIS-V
20
Boat Statistics
21
Interior and Cockpit Layout (Drawing)
22
Equipment Location
24
OASIS-IV Equipment Location (Drawing)
25
OASIS-V Equipment Location (Drawing)
26
Rigging - An example (Drawing)
27
Parts of the sail (Drawing)
Boat Handling
29
Preamble
30
Preparing the Boat for Sailing
33
Getting Under Way
36
Raising the Sails
37
Underway
38
Points of Sail
39
Reefing the Mainsail
40
Furling the Jib
40
Lowering the Mainsail
41
Returning to the Dock
44
Securing the Boat at the Dock
Mate’s Manual 5th Ed
02/01/2011
.- 4 -
Programs,
Programs, Rules & SOPs (STANDARD OPERATING PROCEDURES)
47
Club Governance
47
Assessment & Enhancement (A&E) Program SOP
49
Mate-Candidate Promotion SOP
50
Rules of the Road
51
Seaworthy Training Program
52
Skipper-Candidate’s Program SOP
53
Skipper Emeritus Program
53
Slip Exiting Procedure
54
VHF Radio and Channels
Appendices
Appendices (and updates)
updates) can be found on the
OSC Website under Training
http://oasissailing.scyaweb.org/ or Google “Oasis Sailing Club”
A hard copy of this manual, including appendices, is available on each boat
OASISOASIS-IV
57
APPENDIX A: OASIS-IV ENGINE
58
APPENDIX B: OASIS-IV ENGINE CONTROL PANEL
59
APPENDIX C: OASIS-IV SEACOCK & THRU-HULL FITTING S
60
APPENDIX D: OASIS-IV ELECTRICAL PANELS
63
APPENDIX E: OASIS-IV GPS
Mate’s Manual 5th Ed
02/01/2011
.- 5 -
OASISOASIS-V
65
APPENDIX A: OASIS-V ENGINE
67
APPENDIX B: OASIS-V ENGINE CONTROL PANEL
68
APPENDIX C: OASIS-V THRU-HULL LOCATIONS
69
APPENDIX D: OASIS-V ELECTRICAL CONTROL PANELS
74
APPENDIX E: OASIS-V AUTOPILOT
76
APPENDIX F: OASIS-V CHART PLOTTER
Please see the Update Supplement with release date: 3/28/11
82
APPENDIX G: OASIS-V OTHER INSTRUMENTS
XX
APPENDIX H: OASIS-V SUMP PUMP OPERATION
Please see the Update Supplement with release date: 3/28/11
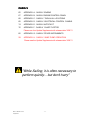
"While Sailing, it is often necessary to
perform quickly... but don't hurry"
Mate’s Manual 5th Ed
02/01/2011
.- 6 -
Mate & Skipper
Candidate Programs
Mate’s Manual 5th Ed
02/01/2011
.- 7 -
INTRODUCTION
The Oasis Sailing Club (OSC) has established an enviable record for both enjoyment and safety
in its operation while having extremely high boat utilization. To ensure maximum availability of
the boats to all members whenever possible, we invite and encourage interested members who
have had prior sailing experience and who are physically capable of completing all check-off
items to obtain OSC’s designation of Mate or Skipper. To this end, the club has an ongoing
program to develop and designate candidates as OSC “Mates” and “Skippers”. Each candidate
must be certified and voted on by OSC’s Board of Directors. While not all Mate Candidates
become Mates, and not all Mates become Skippers, no one becomes an OSC Skipper unless
he/she was first a Mate. Hence, the Mate Candidates represent the future of our club.
Mate Candidate (MC) Program
The prime responsibility of the Mate is to support the Skipper and act in the Skipper’s place if the
Skipper is unable to perform his/her duties. In times of emergency the Mate must have the skills
to sail the boat and to organize and direct the crew in whatever tasks are required to overcome
the emergency. Therefore, in addition to the objective criteria outlined in the Mate checklist, all
Mate Candidates are evaluated concerning subjective criteria including but not limited to the
ability to organize and lead under all weather and sea conditions. Thus, qualification in
Seamanship and Sailing play a major role in OSC’s designation as a “Mate”. The Mate Checklist
provides the candidate a guide to obtaining OASIS-IV and V knowledge with emphasis on
operating our boat(s), sailing skills, safety features, and boat systems.
Under the guidance of a Mentoring Skipper, the candidate demonstrates, over a period of time,
knowledge of the rules of the road, sailing ability, and boat handling skills, as well as general
seamanship. As experience is gained and verified, the candidate is ‘signed off’ in the manual's
"check list" by a Mentoring or other OSC Skipper. This manual provides a step-by-step guide
and the items requiring sign-off as prerequisite to becoming a Mate. Additionally, volunteer
Skippers periodically deliver Seaworthy Training Sessions covering items not normally
experienced during routine day sails, including: Anchoring, Boat systems, Crew Overboard,
Docking/Undocking & Figure “8”, Heave-To, and Quick Stop. In addition, prior to program
completion the candidate must successfully complete the Assessment and Enhancement (A&E)
evaluation as described in this manual. Mate Candidates report progress for posting on MC
Summary sheet distributed to all Skippers and MCs, those who make no progress or do not
report any progress towards their Mate certification in any full calendar year become ‘inactive’.
Skipper Candidate (SC) Program
To become a Skipper, in addition to first becoming a Mate, one must possess and demonstrate
additional sailing skills as well as leadership skills since OSC Skippers are also members of the
club’s Board of Directors. The first step is to obtain a mentoring-Skipper to mentor, guide and
potentially recommend the Mate to become an OSC Skipper. The mentoring-Skipper
(coordinated with the Candidate) will seek out three (3) additional Skippers to form a 4-person
“SC Mentor Team” (chaired by the mentoring-Skipper). Each of the four agrees to sail with the
SC a minimum of three (3) times with the candidate performing as “Skipper-Of-The-Day”, and,
based on the candidate’s performance as “Skipper-of-the-day”, complete an individual
evaluation covering all “Skipper Attributes” in the Skipper Attribute Pyramid. (Refer to SkipperCandidate Program in the Rules, Programs and SOP section of this manual). Prior to program
completion the candidate must successfully complete the Assessment and Enhancement (A&E)
evaluation as described in this manual.
Mate’s Manual 5th Ed
02/01/2011
.- 8 -
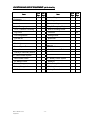
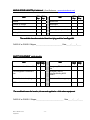
Mate Checklist Items for OASIS-IV and V
The Table below shows which checklist items must be completed on “both boats” or on “Either
Boat". Primary differences between the two boats are listed.
Checklist Item
Both
Boats
Either
Boat
Primary Differences
Location & use of Equipment
√
Many items
Preparing to Sail & Leaving the
Dock
√
Boat steering
transmission & throttle, size &
momentum &
boarding.
Getting under Sail
√
Traveler, winch locations
Sailing in the Harbor
√
Sailing at Sea
√
√
Returning to the dock &
Securing the Boat
Boat size & momentum,
Transmission & throttle.
Disembarking
√
Navigating in Harbor and at Sea
Communications
√
Marlin Spike & Knots
√
√
Safety equipment
Reefing main sail
GPS Models
VHF Location
VHF Models
Emergency Tillers
Anchoring. Fire Extinguishers
Varies√
Varies√
Varies√
Varies√
Seaworthy Training
A&E Evaluation REQUIRED
MATE QUALIFYING CHECKLIST
Mate Candidate:
_________________________________________
Mentoring Skipper:
______________________________________
Date Began:
Date Promoted to Mate:
Mate’s Manual 5th Ed
02/01/2011
________/_______/________
________/_______/________
_______/________/_________
.- 9 -
LOCATION AND USE OF EQUIPMENT: (BOTH BOATS)
Item
O-IV O-V
Skpr Skpr
Item
Keys, Lock & Lock
Combination
Boat’s Papers & Manuals
Ship’s Log
Charts
Maintenance Log
Safety & Emergency
Equipment
PFDs, Cushions & LifeSling
Safety & Emergency Equip.
(cont.)
Built-in Boarding Ladder
American Flag
Fog Horns
Jacklines
Fire Extinguishers
Bailing Bucket
First Aid Kit
Boat Hook
Flares
Net
Flash Lights
Tiller Handle & Radar
Reflector
Bosun’s Chair
Tools & Spare Parts
Spare Lines
Safety Harness & Tether
Primary & Secondary Anchor
AC - Shore Power System
Shore Power Cable
DC - Battery Power System
AC Master Switch
Batteries
Battery Charger
Main Battery Switch
Battery Charge Indicator
DC Amp Meter
AC Outlets
Battery Test Indicator
Mate’s Manual 5th Ed
02/01/2011
O-IV O-V
Skpr Skpr
.- 10 -
N/A
Item
O-IV O-V
Skpr Skpr
Electrical Panel & Switches
Item
O-IV O-V
Skpr Skpr
Boat Lights
AC Switches
Running Lights
DC Switches
Steaming Light
DC Outlet
Flood Light
Masthead Light
Standing Rigging
Running Rigging
Sailing Instruments
Engine Instruments
Binnacle & Compass
Fuel Gauge
GPS / Radar
Tachometer/Engine RPM
Depth Finder
Temperature
N/A
Knot Meter
Oil Pressure
N/A
Wind Direction/Speed
Alarms
Plumbing System
Engine System
Head /Holding Tank Pump
out
Ignition Key Switch/Button
Galley & Head Sinks
Pre-heat
Galley Sink Thru Hull Drain
Water Filter
Head Sink Thru Hull Drain
Fuel Filter
Fresh Water Pump
Oil Dip Stick
Electric Bilge Pump
Coolant Level Check
N/A
N/A
Manual Bilge Pump &
Handle
Stove Gimbal Catch
The candidate knows the location, the use and application of the above equipment.
OASIS-IV
Skipper______________________________ Date_____/_____/_____
OASIS-V
Skipper_______________________________Date_____/_____/_____
Mate’s Manual 5th Ed
02/01/2011
.- 11 -
PREPARING TO SAIL AND LEAVING THE DOCK (BOTH BOATS)
Item
O-IV
Skpr
O -V
Skpr
Item
Boat External Visual inspection
Shore Power
Lifeline or Stern - Safe Boarding
Log
Cabin Access
Preparing running rigging
Cabin Visual Inspection
Tides and weather
Check levels: Fuel, fresh water and
waste water
Report to skipper
O-IV
Skpr
Engine filters
Check Bilge
Starting Engine
Stowage of Personal Gear
Check water at exhaust pipe
Cockpit Cushions
Check gauges
American Flag
Fenders
Companionway Cover Stowage
Remove Mooring/dock Lines
Binnacle, Hatch, Instrument
Covers
Secure Lifelines
Depart safety in reverse
The Candidate has demonstrated his / her ability to prepare to sail and un
un--dock.
OASIS-IV
Skipper______________________________ Date_____/_____/_____
OASIS-V
Skipper_______________________________Date_____/_____/_____
Mate’s Manual 5th Ed
02/01/2011
.- 12 -
O -V
Skpr
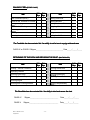
GETTING UNDER SAIL (BOTH BOATS)
Item
O-IV
Skpr
O -V
Skpr
Item
Remove Shore lines
Unfurl Genoa/Jib
Undocking
Trim Genoa/Jib
Remove & Stow Sail Cover &
Gaskets
Use of Winches
Raise Mainsail
Use of Boomvang
Trim Mainsail
Use of Preventers
Set Traveler
Use of reefing lines
O-IV
Skpr
O -V
Skpr
Shutting Engine Down
The Candidate has demonstrated his / her ability to get under sail
OASIS-IV
Skipper______________________________ Date_____/_____/_____
OASIS-V
Skipper_______________________________ Date_____/_____/_____
SAILING
SAILING IN THE HARBOR (EITHER BOAT)
Item
O-IV
Skpr
O -V
Skpr
Item
Rights-of-way Under Power
Buoys and Channel Markers
Rights-of–way Under Sail
Channels
Speed Limit in Harbor
Fueling, approach & docking
Accounting for Low Tides
Pump-Out Station
Traffic handling
Passing Ferry Route
Sailing to Windward
Clearing Jetties
Running before the Wind
Reaction in Emergencies
O-IV O-V
Skpr Skpr
Horn Signals under power
The Candidate has demonstrated his / her ability to operate safely in the harbor.
OASIS-IV or OASIS-V Skipper___________________________ Date_____/_____/_____
Mate’s Manual 5th Ed
02/01/2011
.- 13 -
SAILING AT SEA (EITHER
(EITHER BOAT)
Item
O-IV
Skpr
O -V
Skpr
Item
Crew Overboard (MOB )
Procedures
Points of Sail, Selection of Course
Reefing Genoa/Jib
Sailing in Varying Winds and
Seas
Close Hauled, Beating
Finding Harbor on Return
Reaching (Close, Beam, Broad
Reach)
Running
Tacking
Lowering the mainsail
Furling the Jib/Genoa
O-IV
Skpr
O -V
Skpr
Reefing Mainsail
Assigning Watches
Jibing
The Candidate has demonstrated his / her ability to sail at
seas.
at sea in varying winds and seas
OASIS-IV or OASIS-V Skipper_____________________________ Date_____/_____/_____
RETURNING TO THE DOCK AND SECURING THE BOAT (BOATH BOATS)
Item
O-IV
Skpr
O -V
Skpr
Docking - Various Conditions
Item
O-IV
Skpr
O -V
Skpr
Securing Sheets and
Halyards
Deploying Fenders
Securing Dock Lines
Securing Binnacle by
Covering
Attaching Shore Power
Returning Gear to Proper location.
Securing Engine
Securing and Covering Mainsail
Locking Companionway
Hatch
The Candidate has demonstrated his / her ability to dock and secure the boat.
OASIS-IV
OASIS-V
Skipper______________________________
Date_____/_____/_____
Skipper_______________________________ Date_____/_____/_____
Mate’s Manual 5th Ed
02/01/2011
.- 14 -
NAVIGATING IN THE HARBOR AND AT SEA (EITHER BOAT)
Item
O-IV O-V
Skpr Skpr
Item
Compass
Radar **
GPS
Charts
Knot Meter
Local Landmarks
Depth Meter
Buoys and Channel Markers
O-IV
Skpr
O -V
Skpr
N/A
Wind Direction/Speed
Auto Pilot
N/A
Tide Tables & Indicators
Use of Coast Pilot/Light List
Shipping Lanes, Location
** See SAILING IN THE FOG in the BASIC SAFETY RULES Section
hiss / her ability to navigate the boat to and from the harbor.
The Candidate has demonstrated hi
OASIS-IV or OASIS-V Skipper____________________________ Date_____/_____/_____
COMMUNICATIONS (EITHER BOAT)
Item
O-IV O-V
Skpr Skpr
Item
“Emergency” Use of VHF Radio
Use of Pistol and Flares
Routine Use of VHF Radio
Using Boat’s Lights
O-IV
Skpr
O -V
Skpr
Using Sound Signals
Use of Inverted Flag
The Candidate has an understanding of how to communicate under varying conditions.
OASIS-IV or OASIS-V Skipper____________________________ Date_____/_____/_____
Mate’s Manual 5th Ed
02/01/2011
.- 15 -
MARLIN SPIKE & KNOTS (EITHER BOAT)
BOAT (Good Reference: www.animatedknots.com)
Item
O-IV O-V
Skpr Skpr
Item
Bowline
Square knot
Bowline on a Bight
Sheet Bend
Cleat hitch
Anchor Bend
Clove Hitch
Figure eight (stopper Knot)
O-IV
Skpr
O -V
Skpr
Rolling Hitch
The candidate has demonstrated basic knot
knot tying
tying and line handling skills.
OASIS-IV or OASIS-V Skipper____________________________ Date_____/_____/_____
SAFETY EQUIPMENT (BOTH BOATS)
Item
O-IV O-V
Skpr Skpr
Item
First Aid, Location & Use of Kit
Emergency Tiller Location &
Use
Fire Extinguisher Locations &
Use
Emergency Use of
Halyards,Hauling MOB
aboard
Thru-hull holes/valves/plugs
Whom to call in emergency
O-IV
Skpr
O -V
Skpr
PFD-location and use
The candidate knows the location, the use and application of the above equipment.
OASIS-IV or OASIS-V Skipper_____________________________ Date_____/_____/_____
Mate’s Manual 5th Ed
02/01/2011
.- 16 -
SEAWORTHY TRAINING
Type
Training
Skipper
Docking and
Undocking
Anchoring & Prop
Walk Turning
Crew Overboard
(MOB)
Figure 8, Heave-To
& Quick Stop
Boat Systems
Mate’s Manual 5th Ed
02/01/2011
.- 17 -
Training
Date
Successfully
completed
Yes / No
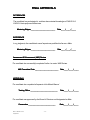
FINAL APPROVALS
DIFFERENCES
The candidate has participated in, and has demonstrated knowledge of OASIS-IV &
OASIS-V boat equipment differences.
Mentoring Skipper__________________________
Date_____/_____/_____
EXPERIENCE
In my judgment, the candidate’s overall experience qualifies him/her as a Mate.
Mentoring Skipper__________________________
Date_____/_____/_____
Date_____/_____/_____
Assessment & Enhancement (A&E) Review
The candidate has successfully completed his/her ‘on water’ A&E Review.
A&E Committee Chair _________________________ Date_____/_____/_____
APPROVALS
The candidate has completed all aspects of the Mate’s Manual
Training Officer _____________________________
Date_____/_____/_____
The candidate was approved by the Board of Directors and designated as Mate
Commodore _____________________________
Mate’s Manual 5th Ed
02/01/2011
.- 18 -
Date_____/_____/_____
Date_____/_____/_____
The fleet:
OASIS-IV & OASIS-V
Mate’s Manual 5th Ed
02/01/2011
.- 19 -
BOAT STATISTICS
OASIS - IV
OASIS - V
Model
2003 Hunter 326 Sloop
2007 Catalina 34 Mark II
(C34II), sloop
Registration Number
1140463
(Federally documented boat)
1194829
(Document #)
Hull Number
Number
HUN32303D203
CTYC1768H607
Sail Number
None
56720
Overall Length (LOA)
31’ 9”
35' 8"
Length at Waterline
(LWL)
28’ 3”
29' 10"
Extreme Beam
10'10"
11' 9"
Draft at bottom of keel
5'10"
5' 7" (Fin Keel)
Displacement
8500 lbs.
11,950 lbs
Ballast in keel
keel
3200 lbs.
Jib - Roller-furled
Main - Full battens, double
reef
5,000 lbs
Sails
Total Sail Area
Engine
Fuel Tank & Range
540 sq. ft.
Yanmar Diesel, 2 Cylinder, 18
hp.
25 Gal.
80 hours & about 400 miles
range on a full tank
Jib - Roller-furled
Main - Full battens, single reef
Standard rig
231 sq ft main; 528 sq ft Total
Universal M35B Diesel, 4 Cy.
35hp
25gal
31hrs & about 215 nm
@ 2200rpm on a tank of fuel
Forward 25gal
Aft
42gal
Water Tank
50 gal.
Hull Speed
6.50+ kts
Mast
45’ 8” deck to masthead
7.3 kts
43' 4.5" ft deck to head. Std
mast
Boom
12’ Aluminum
12’ Aluminum
Anchor System
Standard Manual
Electric Windlass
Mate’s Manual 5th Ed
02/01/2011
.- 20 -
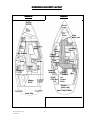
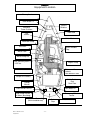
INTERIOR & COCKPIT LAYOUT
OASIS--IV
OASIS
OASIS--V
OASIS
Anchor
Locker
Vee
Berth
Port
Settee
25gal
water tank
Starboard
Berth
Table
18 gal
holding tank
Nav
Station
Head &
Shower
Galley
Entry
Ladder
25 gal
Fuel tank
Seat
Aft
Double
Berth
42 gal
water tank
Swim step &Ladder
Mate’s Manual 5th Ed
02/01/2011
.- 21 -
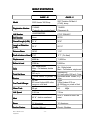
EQUIPMENT LOCATION
NOTE: This is not an "end-all" list. Additionally, items may have moved.
Mate Candidate should ensure familiarity with equipment location
OASIS--IV
OASIS
EQUIPMENT
OASIS--V
OASIS
Anchor-Primary
Anchor Chain Locker
Anchor Chain Locker
Anchor-Second
Cockpit Locker, Aft, Port
Not Available
Bailing Bucket
Swim deck Locker, Starboard Also: Aft
Berth at entrance
Cockpit port locker
Bilge Pump-Manual
Cockpit Locker, Starboard @ swimstep entrance
Cockpit, close to swim ladder, Port
Bilge Pump-Handle
Cockpit Locker, Starboard (on inner
side of locker cover)
Cockpit aft port locker under catbird seat (in bag)
Boat Hook
Cabin shelf starboard
Head (strap inside doorway)
Companionway (handing from handhold)
Boson’s Chair
Vee Berth Locker, Starboard (None at
present, need to obtain)
Not Available. (None at present, need to obtain)
Binoculars
Cabin, Above Settee, Port
Cabin, shelf , port
Charts-Navigation
Navigation Station
Navigation Station
Cockpit Cushions
Vee Berth
Vee Berth
Depth Sounder
Helm Mounted
Helm Mounted
Emergency Light (red/green)
Vee Berth Locker, Starboard
Not Available
Emergency Tiller
Cockpit Deck starboard (remove cover.
aft of binnacle)
Cockpit aft port locker under catbird seat (in large
bag)
Fire Extinguishers
1 Aft Berth, 1 above Nav table. 1 Vee
Berth, port
1 in Vee Berth above Port locker 1 in cockpit Port
locker
Above Companionway (Engine
Compartment) Stairs
1 aft , starboard, berth, upper right as you enter
First Aid Kit
Head
Head (compartment under mirror)
Fish Net
Vee Berth
Vee Berth
Flares
Cabin, Above Berth, Port (ORION bag)
Cabin, Port shelf
Fog Horn
Plastic horn at Helm Station; Refill
pump in spare parts cabinet. Spare
metal horn in cabin
Plastic horn at Helm Station; Refill pump in spare
parts cabinet. . Spare metal horn in cabin
Foul Weather Clothing
Aft Master Berth, Locker
2 In cabin, port hanging locker
Mate’s Manual 5th Ed
02/01/2011
.- 22 -
OASIS--IV
OASIS
EQUIPMENT
OASIS--V
OASIS
GPS
Helm Mount
Helm Mounted
Horseshoe Life Ring
None
Stern Portside
Instrument Covers, including
Binnacle, Hatch, Bimini window Covers & main sail
V Berth
Cockpit Port Locker
Inverter / Charger
Charger: Cabin, Under Settee, Port (w/
Batteries). No Inverter
Inverter: under starboard settee under mid
cushion. Charger: Under galley sink on left side
of cabinet
Jacklines
Installed on deck
Cockpit aft port locker under catbird seat (in small
bag). Not currently installed
Knot Meter
Helm Mounted
Helm Mounted
Life Jackets
Vee Berth, Hanging Locker, Port
Vee Berth: shelf (4), port locker (4); Cockpit large
port locker (3); Aft Stateroom starboard locker (4)
Life Sling
Stern Pulpit, Starboard (under catbird
seat)
Stern Portside
Lines-Extra
Cockpit Locker, Starboard
Cockpit large port locker
Manual pump
State Rm floor locker
Head, in cabinet under sink
Manuals
Cabin, Above Settee, Port
Cabin, cabinet above Settee, Port
PDF Cushions
Vee Berth
Vee Berth
Radar Reflector
Vee berth, locker, starboard
Installed above mid-spreader on Port and
Starboard
Radio-VHF
Nav Station
Nav Station & Helm Mounted slaved hand-held
unit
Safety Harness
Vee Berth Locker, Starboard
Not available (need to buy)
Spare Parts
Vee Berth starboard cabinet
In cabin, port locker drawer (between Head and
Nav)
Spotlight (night sailing aid)
To be installed
Cabin, Port shelve
Thru-Hull Plugs
With Each Thru-Hull Seacock. extra
plugs Under Settee, Forward, Starboard
With Each Thru-Hull Seacock.
Tool Box
Cockpit Locker, Starboard –Small T.B.
Under Settee, Starboard, Forward –
Large T.B.
Cockpit, port locker
Volt Meter
Cabin, Under Settee, Starboard,
Forward (in blue-top box))
Not Available
Winch Handles
Cabin, starboard shelf
Cabin, starboard shelf
Wind Direction/Speed
Helm mounted
Helm mounted (direction & speed).
Top of mast wind vane
Mate’s Manual 5th Ed
02/01/2011
.- 23 -
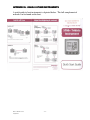
OASISOASIS-IV
Equipment Location
Primary Anchor
Fresh Water Fill
Life Jackets
Spare Parts
Throw Cushions
Safety Harnesses
& Tethers
Manuals
Flare Kit
Large Tool Kit
Boat Hook
Flashlights
Flag
VHF Radio
Boat Papers & Charts
Bilge & Pump
AC & DC Breaker
Panel & Battery
Switch
Foul Weather Gear
Emergency Tiller
Spare Lines
Radar Reflector
Bilge Pump Handle
Small Tool Kit
Fire Extinguisher
Second Anchor
Instrument Covers
Engine Panel
Starter Switches
Alarm Indicator
Diesel Fuel Cutoff
Diesel Fuel Fill
Shore Power Connect
Manual Bilge Pump
swim
step
Holding Tank
Pumpout
Rudder Post
Macerator Pump
Mate’s Manual 5th Ed
02/01/2011
.- 24 -
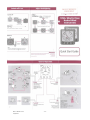
OASISOASIS-V
Equipment Location
Primary Anchor
Deck Water Fill
Electric
Windlass
Vee Berth
Throw Cushions
Boat hook
Life
Jackets
Water Tank
Macerator Pump
Flare Gun
Winch Handles
Flag
Waste Tank
Waste Pump Out
Nav/ electrical panels
/ VHF etc.
Bilge & Pump
Diesel Fuel Tank
Stateroom Life
Jackets
Foul Weather Gear
Cockpit Life Jackets
Cabin Rudder
Post
Deck Plate
Cockpit
Manual
Deck Diesel Fuel Fill.
Deck Water Fill
Bilge Pump-Handle
In locker (black bag)
Emergency Tiller in
Locker
Shoreline Power IN
(Behind catbird seat)
Mate’s Manual 5th Ed
02/01/2011
Swim
Step
.- 25 -
Water Tank
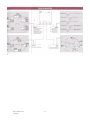
RIGGING
An Example
Headstay
Upper Shroud
Backstay
Spreader
Lower
Shrouds
Batten
Furler
Outhaul
Lower
Reefing Line
Starboard
Preventer
Main Sheet
Traveler
Boom Vang
Main Halyard
Starboard Jib Sheet
Jib Furling Line
Backstay
Adjustment
Mate’s Manual 5th Ed
02/01/2011
.- 26 -
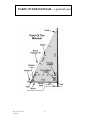
PARTS OF THE MAINSAIL- a general case
Mate’s Manual 5th Ed
02/01/2011
.- 27 -
Boat Handling
Mate’s Manual 5th Ed
02/01/2011
.- 28 -
Preamble
NOTE: The following instructions are presented to help Mate Candidates work through
the many steps it takes to sail a boat safely and comfortably. While some of the steps are
required, others are subject to skipper and crew preferences and should be considered as
guidance rather than requirements. Your skipper will identify those that are requirements.
Additionally, this manual is not a text-Book. It is mostly to highlight and give the
Candidate a top view and to facilitate the training process. Mate Candidates are
encouraged to read other material and to ask questions. Skippers and Mates are happy
to instruct and help. This will also help both Skippers and Mates to retain and sharpen
their skills. The more familiar you are with all aspects of the equipment and sailing the
safer we are.
NOTE:
When performing your Mate duties remember to report to the skipper :
(a) What you did
(b) Any observations
(c) Yet to be completed prior to departure
Before you leave home:
Check on tide conditions and marine weather forecast
Some resources:
• Local paper
• Web Sites
http://tbone.biol.sc.edu/tide/sites_uswest.html
http://www.nws.noaa.gov/
http://www.wunderground.com/MAR/AN/150.html
https://www.sailflow.com/
http://www.talesofbalboa.com/weathereye/index.html
Mate’s Manual 5th Ed
02/01/2011
.- 29 -
PREPARING THE BOAT FOR SAILING
I
Boat Visual Inspection:
Inspection
Walk around the boat
o
o
o
o
o
o
o
o
II
Inspect for damage (Hull, equipment, rigging etc.)
Standing and running rigging undamaged and in place
Life-Lines secure
Dock step in place
Anchor secured
Shore lines in place
Shore power is hooked up
Fenders in place to protect hull
Boarding
Crew members should hand over to on board crew or place aboard all
carry-on to have both hands free for boarding.
o OASIS-IV – Use aft swim deck to board from the port side (ensure
swim step is down & lifeline is released.
o OASIS-V - Use the Dock Step on starboard & ensure the two
starboard lifelines are released.
III
Cockpit , Cabin & Deck Preparation
Remove the COMPANIONWAY HATCH Canvas-Cover & Stow (O-V only)
Unlock, remove padlock and remove the COMPANIONWAY HATCH
PANELS & stow:
o OASIS-IV - Starboard cockpit locker in canvas envelope.
o OASIS-V- At companionway portside wall, lock hasp facing out.
Stow the PADLOCK in the Nav station desk
Remove all covers (Instrument covers, winch covers, Bimini cover & Bimini
window-cover, Companion way cover & sail cover and stow:
o OASIS-IV - In cockpit starboard locker
o OASIS-V- In cockpit port locker
Mount FLAG in the bracket on the Stern Pulpit.
Verify that the PORTHOLE in the head is open.
Check the LOGS for boat equipment condition and operation information
and respond to situations, as needed.
Mate’s Manual 5th Ed
02/01/2011
.- 30 -
IV
Gear Retrieval and Stowage
Get all COCKPIT CUSHIONS from the cabin and place in the cockpit.
Put one PDF CUSHION per person in the cockpit.
Put two WINCH HANDLES, one in each holder in Cockpit.
Stow all PERSONAL GEAR.
o OASIS-IV: Use cabin starboard and port settees
o OASIS-V: Use aft cabin or Vee Berth (DO NOT place of leather settees)
V
Engine, Electrical and System Preparation
Check helm by turning wheel end-to-end
Verify that the boat was left with AC ON: (verify at NAV panel, Reading
lamps, BATTERY CHARGER RECTIFIER light or heater fan.)
Rotate the BATTERY SWITCH from "OFF" to:
o "1" or "2" or "Both" (Skipper instructions) If on "BOTH" while starting
and running the engine, turn the BATTERY SWITCH to "1"
1" or "2"
2" after
the engine is turned OFF
NOTE: When switching from one battery to another go through the "BOTH"
position (not the "OFF")
Verify that the required breakers are ON
Check Battery status
Check consumable Status
o On O-IV: Confirm Fuel, Waste & Fresh Water on control panel meter.
o On O-V: Check fuel gauge (Check log for fresh water last fill & holding
tank emptying dates)
VHF: Verify it is ON & set to Channel 16. Check volume and squelch setting
Check bilge
o Verify that Bilge switch set on automatic and panel breaker is "ON"
o Verify & operate bilge pump operation manually, remove excess water
o Check for Oil or Diesel in the water (Report to Skipper)
Mate’s Manual 5th Ed
02/01/2011
.- 31 -
Engine
o
o
o
o
o
o
o
o
Visual inspection
Check oil
Check transmission fluid level
Check coolant level
Check alternator belt tension
Raw water intake valve open
Check fuel level
Inspect / clean sea-water strainer (O-IV)
OASIS-V: Retrieve engine-key from Nav station & place in "engine starter"
Verify that helm instruments and engine- panel gauges are ON (turn GPS ON)
Unplug the SHORE POWER cable and flake it on the dock.
NOTE:
NOTE Some Skippers might prefer to leave shore power ON while starting engine
VI
Sails and Rigging Preparation
Remove sail ties & stow below (O-IV). Leave several on (O-V) since it has no
lazy jacks to hold sail in place.
Line Preparation
o Release the Main Halyard from its cleat or rope clutch and check that it
is ready for main hoisting and place halyard on appropriate winch.
Release Main Sheet from its cleat or rope clutch and check that it is ready for
sail setting.
Ensure that Boomvang clutch is open and line is free
Ensure that the Traveler is centered
OASIS-IV: Ensure that Preventer Lines are un-cleated
Prepare the Furling Line (un-cleat and un-flake)
OASIS-IV: Ensure that both Reef Lines are released and plenty of slack line is
flaked on deck at the foot of the mast.
OASIS-V: Ensure that the Reef Line is released
Retrieve the Starboard and Port JIB SHEETs. Ensure they are free and ready
to be wrapped around the appropriate winches.
Mate’s Manual 5th Ed
02/01/2011
.- 32 -
GETTING UNDER WAY
I
At the Dock
Check the SAILING SCHEDULE to be sure that all crew members are
aboard or accounted for. Place a checkmark beside the name of each
person sailing. Cross out those who were listed but have cancelled their
sail and indicate “NS” for no-shows. Write in names not on the list.
o NOTE: This is generally done by the skipper
Ensure that all loose GEAR is safely stowed below.
Instruct all Guests on SAFETY PROCEDURES, location of life vests, fire
extinguishers and use of the HEAD.
II
OASISOASIS-IV - Starting the Engine
Ensure that engine raw water pickup seacock is open & filter is clean
Ensure that the engine fuel cutoff plunger is pushed completely in.
Place single-lever control in neutral position (12 o’clock)
o NOTE: OASIS-IV has a single-lever to control both gear (forward &
reverse) and acceleration. While in neutral, when pushed in, the
‘button’ on the lever acts as a clutch to disengage the transmission
when you want to increase engine RPM while remaining in neutral.
The button/clutch automatically pops out to re-engage the gearshift
when the lever is returned to the neutral position.
Engine Control Panel: Pull out the “key switch” to the “ON” position
Engine Control Panel: Press the starter button and hold until engine starts,
then release. Press the starter button for no longer than 5 seconds
continuously
Allow cold engine to warm up a minimum of 5 minutes
Check that the lube oil pressure warning light and the engine overheat
alarm lamp go "OFF" above 1000 rpm (they are located on the Engine
Control Panel). If not, stop engine immediately using the fuel cutoff pull
lever.
Visually confirm that sea water (engine cooling) is indeed circulating
Mate’s Manual 5th Ed
02/01/2011
.- 33 -
III
OASISOASIS-V - Starting the Engine
Ensure that engine raw water pickup seacock is open & filter is clean
Ensure that the engine fuel cutoff plunger is pushed completely in.
Place gear-lever in neutral and throttle lever at slow limit (idle)
Engine "ON" sequence:
o When starting cold- turn the key all the way - this activates the
engine glow-plug (preheating). When starting cold engine wait for
10 beeps/seconds.
o NOTE: preheat not needed if not a cold start
o Press the starter button to start engine. Hold until engine starts,
then release both the starter button and key (the starter key will
"spring back" to the ON position). Press the starter button for no
longer than 5 seconds continuously. As you release the key the
alarm (beeping) should stop.
o NOTE: DO NOT turn the key to the OFF position.
If alarm persist turn engine OFF
Check the engine gauges for proper operation (RPM / Temp / Volts / Fuel /
warning lights)
Allow cold engine to warm up a minimum of 5 minutes
IV
Turn On Instruments
Instruments should now be enabled (when you activated the electrical
breakers). Verify that the instruments are on and functioning. Ensure GPS
/ Chartplotter is "ON" and set to desired Page and Waypoint.
GPS / Chartplotter requires an instrument TURN-ON (the other
instruments do not).
Ensure VHF Radio is "ON" and is set to CH16 with volume and squelch
adjusted.
o OASIS-V is equipped with a portable VHF hand-held unit at the
helm to communicate and set CH, Volume etc. Leave VHF handset
plugged in at all times during AND after sailing to minimize
connector damage.
Mate’s Manual 5th Ed
02/01/2011
.- 34 -
V
Cast Off Mooring Lines
Cast off BOW LINES and SPRING LINES (as applicable). Leave all lines
on dock (they remain cleated and at preset length)
Leave fenders in place while undocking and to be removed later. When
underway remove all FENDERS from the lifelines and stow them on the cabin
FLOOR in Vee Berth . Some skippers may want to remove fenders before
undocking.
O-IV: Raise the helmsman’s seat and secure the stern lifeline
Ensure that Port and Starboard LIFELINES are secured
Cast off STERN LINES. Confirm with the Skipper before removing
Verify that the boat is free of all lines and shore power before confirming
"all clear". Ensure that all crew members are ready.
VI
Leaving the Slip (Undocking)
Docking (see later) and undocking are highly susceptible to mishap. Wind,
space
current and confined spac
e require full attention to boat handling and requires
O--IV and O
O--V handle
crew's full attention. The points below are general since O
differently.
Post a crew with boat hook on deck as a lookout and to fend off (recognize
that fending off a 4 to 6-ton boat under power may not be possible).
Post a crew at the stern to watch out for traffic, which might pose a danger to
the exiting boat.
Slowly motor in reverse out of the slip, turn to port when it is clear that the bow
will clear the starboard side of the slip, continue to back out of the slip channel
in reverse until you reach the main channel.
While motoring in reverse out of the slip channel ensure boat is ‘straight” (and
parallel) in the channel. Attain ample speed to maintain steerage and "coast"
(especially on O-V) the last 10-20 yards to the end of the slip channel by
shifting to neutral and be ready to change direction by shifting into FORWARD
and accelerating in case another boat unexpectedly enters the slip channel or
traverses the slip channel entrance.
When clear of traffic, shift into reverse and exit the slip channel turning to
starboard into the main marina channel.
Leave yourself plenty of room in the main marina channel, slow down and,
when you are “straight (and parallel) in the main channel, shift into forward
gear and proceed bow first out through the main marina channel to the turning
basin in the main harbor channel.
Mate’s Manual 5th Ed
02/01/2011
.- 35 -
A qualified Skipper must be positioned next to all inexperienced
“take
helmspersons when docking & undocking to be ready to “t
ake the helm” on a
moment’s notice if necessary.
OASIS-V is 2 tons, 50% heavier than O-IV and has a much larger
engine. Consequently, the momentum of O-V is significantly greater than
O-IV so she readily “coasts” considerable distances in neutral. This makes
the Docking and Undocking very different from O-IV and requires attention
to speed control. GO SLOW, and practice, practice and practice.
RAISING THE SAILS
I
Preparation
With the boat under way and under power turn her directly into the wind,
slow down and maintain just enough speed for steerage.
II
Setting the Mainsail
Remove all remaining SAIL TIES and stow below.
Center the TRAVELER and cleat it down with both Cam Cleats.
Ease the MAIN SHEET and BOOM VANG.
Be sure that the REEFING LINE(s) slack is in place and will run free
Release PREVENTERS from their Cleats. (O-IV: two lines. O-V: one line)
Haul in the MAIN HALYARD to raise the MAIN SAIL. Take at least two
clockwise turns around the Starboard Winch and secure it.
A crew member standing at the Mast, hauling down on the Halyard
(jumping the line or sweating the line) will make this task easier.
o NOTE: OASIS-IV is equipped with a Lazy Jack. Very often battens
get caught by the Lazy Jack lines and interfere with raising the
main. (1) Have a person station to watch the battens and call a halt
when caught. It will require lowering the main and repeating the
action. (2) Keeping the boat directly into the wind ensuring main
"wind neutrality” is key.
Complete raising the main using the starboard winch to ensure
appropriate tension on the sail’s luff.
Ensure that the mainsail HALYARD clutch is fully engaged and it is safe to
take the line off the winch.
Remove the line from the winch, flake and stow it.
Mate’s Manual 5th Ed
02/01/2011
.- 36 -
Take the MAIN SHEET, place two wraps on the appropriate winch. Trim
the Main as required and secure the line.
III
Unfurling the Jib
Ensure that the JIB FURLING LINE is un-cleated and free. As the Jib is
unfurled maintain enough drag/ tension on the line to ensure that the line
is not tangled as it winds on furler.
Ensure that the Windward JIB SHEET is free.
Place the Leeward JIB SHEET on the appropriate winch (2-3 turns), haul it
in to unfurl the jib.
Trim and secure the JIB SHEET.
Cleat down the JIB FURLING LINE and stow the line.
UNDERWAY
Trim the mainsail using the MAIN SHEET and TRAVELER.
Secure the PREVENTERS when warranted
Prepare to shut down the ENGINE. Ensure that gear is in neutral and
throttle is at idle speed (NOTE the difference between O-IV and O-V)
OASIS-IV: Pull the black handle of the FUEL CUTOFF VALVE all the way
up until the engine stops dieseling. Push down the FUEL CUTOFF VALVE
to engine operating position after engine has stopped. Then, push the
starter switch on the engine control panel ‘in’ to silence the alarm ("OFF"
position).
OASIS-V: Pull the red handle of the FUEL CUTOFF VALVE all the way up
until the engine stops dieseling. Push down the FUEL CUTOFF VALVE to
engine operating position after engine has stopped. Leave key “On”.
(Turning key “Off” will shut down engine gauges).
Switch the MAIN BATTERY SWITCH to another setting. For example,
from ALL or Both to 2. Leave the Switch on 2 while under sail (consult the
Skipper).
Never turn the battery switch while the engine is running
Mate’s Manual 5th Ed
02/01/2011
.- 37 -
POINTS OF SAIL
It is important to know the points of sail. The terminology is commonly used and you
should be familiar and fluent: (a) what they are (b) how to set the sails for each point
of sail.
Mate’s Manual 5th Ed
02/01/2011
.- 38 -
REEFING THE MAINSAIL
I
Preparation
NOTE: When Possible reef in the slip or, reef in the harbor.
Center the Traveler cleat it down.
Tighten the MAIN SHEET to prevent the boom from swinging either to port
or starboard.
Turn the boat into the wind.
II
Reefing Position (good ref: http://www.sailingusa.info/weather_and_reefing.htm)
http://www.sailingusa.info/weather_and_reefing.htm
NOTE: Both O-IV and O-V employ a Single Line reefing system
NOTE: at the time of publication, O-IV has two (2) reefing lines with line
clutches
on starboard and port. O-V has one (1) reefing line with line
clutch on starboard
Boon Vang: Loosened
MAIN HALYARD: If main is up, lower the main to allow for reefing
otherwise, raise the main partially to allow reefing. Remember to secure
the halyard around a winch.
REEFING LINE: With the 1st or 2nd Reefing Line on the winch haul in until
both the reefing cringle forming the new tack (next to the mast) AND the
leach cringle forming the new clew are tightened. It is important to form a
tight and well secured "new main-sail foot".
Lock the Reefing Line in the appropriate Rope Clutch
Tighten the main HALYARD until the Luff is taut. Secure its Rope Clutch.
Trim the MAIN SHEET and secure the sheet (O-IV clutch; V Cleat on O-V).
Mate’s Manual 5th Ed
02/01/2011
.- 39 -
FURLING THE JIB
I
Preparation
Turn the boat towards the wind keeping a little wind in the sail.
Un-cleat the FURLING LINE.
Throw off both JIB SHEETS, but keep enough drag on the JIB
SHEETS to maintain a smooth wrap around the Headstay as the
sail is furled.
II
Furl and Secure the Jib
Jib
Haul in the FURLING LINE using the Self-Tailing Winch if
necessary.
Ensure that there are 1 to 2 JIB SHEET wraps around the furled
JIB
Cleat down the FURLING LINE.
Secure and store both JIB SHEETS (It’s a good idea to secure the
jib sheets on a winch in case someone on deck grabs them for a
hand-hold)
LOWERING THE MAINSAIL
I
Preparation
Release PREVENTERS from their Cleats.
Center the TRAVELER and cleat it on both ends.
Haul in the MAIN SHEET to center the Boom, but leave enough slack to
raise the Boom slightly. Cleat it down.
Release the Rope Clutch and ease the BOOM VANG.
Close the COMPANIONWAY TOP HATCH (do NOT step on O-IV hatch)
Turn (and keep) the boat directly into the wind
Mate’s Manual 5th Ed
02/01/2011
.- 40 -
II
Lowering and Securing the Mainsail
The Line Handler eases the MAIN HALYARD from the cockpit. If weather
conditions permit two Sail Handlers up on the deck handle the flaking of
the sail; pull down on the luff of the sail (at the mast) and pull the leech of
the sail aft (further down at the boom) while flaking the sail. When done
place 3 to 4 gaskets to secure the flaked sail around the boom.
If wind or other conditions do not allow safe sail - flaking while sailing,
the sail will be lowered but flaking and tying will be completed in the slip.
Pick up reefing line(s) slack
At the slip, complete mainsail stowage with the sail cover.
RETURNING TO THE DOCK
I
Preparation
Make sure all loose gear is safely stowed below.
Verify that the Depth Gauge and the Knot Meter are operating and monitor
them closely, especially the depth gauge at low tide.
Post a crewmember on deck with a boat hook ready to fend off, if needed.
(Recognize that fending off a 4-6 ton boat under power may not be
possible).
OASIS-IV: Lower the aft Lifeline and the helmsman’s seat in preparation
to carefully step off the aft swim deck onto the dock.
OASIS-V- release starboard Lifelines in preparation to carefully step off
the boat onto the dock.
FENDERS:
o OASIS-IV: Skipper preference which fenders to put in place.
o OASIS-V: Place flat fenders on Port and Starboard
Mate’s Manual 5th Ed
02/01/2011
.- 41 -
II
Docking
Docking and undocking are highly susceptible to mishap (see "Leaving
the Slip (Undocking)", above.
Turn into the slip channel from the marina channel and proceed slowly.
Bring the boat, in a gentle "arc" slowly into the slip, preferably in neutral
gear and shift into reverse if necessary to slow and stop the boat inside the
slip. Remember: the boat turns at its “pivot point” NOT at its bow or stern.
Avoid striking either side of the slip
Position the boat’s port stern next to the dock to enable a crew member to
safely step off onto the dock.
OASIS-V weighs 6 tons, or 2 tons (50%) heavier than O-IV (at 4 tons).
Consequently, the momentum of O-V is significantly greater than O-IV
requiring far more distance to ‘stop’ and/or to reverse her direction. O-V
“coasts” considerable distances in neutral. For example, at a speed of 1.2 to
1.5 knots when entering the slip channel to dock, she will easily ‘coast’, with
ample steerage, in neutral, all the way to the slip. She will slow to 0.5 to 0.7
knot when you make your turn into the actual slip. Given her added
momentum, this is generally plenty of speed and it enables you to stop and/or
reverse direction if necessary. If slightly more speed is required to maintain
steerage, simply shift into forward for 2-4 seconds with the throttle at ‘slow’,
then shift back into neutral. This momentum, and her additional length and
width makes docking and undocking O-V very different from O-IV. These
require attention to going slow! Practice motoring in reverse using the yellow
“Q” buoy between (Balboa/Collins and Harbor Islands) as your ‘target’.
Practice and practice.
III
Mooring Lines
After a crew steps off the boat onto the dock:
First attach the Bow Lines (Port and Starboards) to the Bow Cleats and
advise the helmsperson “bow lines are on”.
Attach Port Spring Line to boat cleat
Hand the Port and Starboard Stern Lines to the helmsman. He/she will
attach to the boat stern cleats.
Complete FENDER installation. Place them on the lower Lifelines near
the widest part of the boat.
Mate’s Manual 5th Ed
02/01/2011
.- 42 -
IV
Engine and Electrical
Caution: Before turning engine "OFF" verify that the lines and boat are
secure
OASIS-IV: Ensure that the single- lever gear/ throttle lever is in the neutral
(12 o’clock) position which idles the engine speed/RPM.
o Pull the T-Handle of the FUEL CUTOFF VALVE all the way up until
the engine stops dieseling. After the engine stops push the THandle back down. Now push IN the “Key Switch” to the "OFF"
position (O-IV has NO ignition key).
OASIS-V: Ensure that the gear lever is in neutral and the throttle lever is
at the extreme idle position.
o Pull the red T-Handle of the FUEL CUTOFF VALVE all the way up
until the engine stops dieseling. After the engine stops push the THandle back down. Turn the starter key to off, remove the key and
stow in the Nav Station.
Shore Power - Carefully connect shoreline AC power. Always wrap the
incoming cable around an upper stanchion or another easily visible frame.
Ensure ample cable slack so the boat electrical connector is not pulled or
strained.
NOTE: Exercise caution to avoid damage to the AC connector. Do not
drop the plug or cable in water.
Mate’s Manual 5th Ed
02/01/2011
.- 43 -
SECURING THE BOAT AT
AT THE DOCK
I
Stowage of Gear
Remove all PERSONAL GEAR and place it on the dock.
Remove all TRASH and dispose of it in the Dumpster on the dock.
Remove the COCKPIT & PFD CUSHIONS, ensure they are dry and stow
in Vee Berth IF DAMP, PLACE ON CABIN FLOOR.
Retrieve and install the INSTRUMENT, WINCH, BINNACLE HELM & Sail
COVERS.
Remove the FLAG from the stern rail and stow it on the shelf above the
starboard berth.
Remove the WINCH HANDLES and stow them on the Shelf above the
Starboard Bunk.
II
Passenger Disembarking
Passengers should have both hands free when stepping off the boat onto
the dock. Any passenger who feels hesitant about stepping off the boat to
the dock should be offered assistance by a crewmember.
III
In the Cabin
If neither rain nor fog is expected, open the PORTHOLE in the Head.
IV
Engine and Electrical
BATTERY SWITCH: After engine is stopped - Rotate the switch to "OFF"
position
Verify that AC Main Panel Switch is "ON" ( switch light is ON)
Ensure Bilge Pump switch on "Auto"
Verify that the 110 V (AC) READING LAMP is operating and that a
BATTERY CHARGER Rectifier Light is "ON".
Remove the PADLOCK from the Nav station desk hang it the
companionway sliding cover.
Place ignition key in the Nav station desk (O-V).
O--IV and O
O--V BREAKER (SWITCH) SETTINGS
NOTE APPENDICES FOR O
Mate’s Manual 5th Ed
02/01/2011
.- 44 -
V
Cleaning & Securing the Boat
Boat
The Mate shall verify that the cabin, head and galley are clean. Mate to
ensure that all garbage and dirt are collected for removal. Some dirt might
need some cleaning and scrubbing. Place new plastic bag in the trashcan
The Skipper shall fill out the LOG.
Install the Companionway HATCH COVERS and lock the PADLOCK.
Secure all canvas covers in place
Step ashore. For safety and courtesy, the Mate shall remain on board until
the Skipper has left the boat. Verify that all LIFELINES and MOORING
LINES are attached. (NOTE: O-IV Swim Step remains down)
HOSE DOWN THE BOAT after every sailing to remove saltwater residue
and aircraft jet fuel residue (our slips are under a flight path). Use the dock
hose to wash down the hull, railings & decks to remove dirt and residue.
Be courteous to other OSC members, LEAVE THE BOAT IN THE SAME
CONDITION FOR THE NEXT USER AS YOU WANT IT LEFT FOR YOU.
Before leaving: Step back (do not fall in the water), take a good look at the
boat, rigging etc.
GOOD JOB!
Mate’s Manual 5th Ed
02/01/2011
.- 45 -
Programs, Rules & SOPs
(STANDARD OPERATING PROCEDURES)
Mate’s Manual 5th Ed
02/01/2011
.- 46 -
CLUB GOVERNANCE
OSC is governed by its Constitution, By-Laws and Standard Operating Procedures
(SOPs). Constitutional revisions or new articles require a 2/3's vote membership
present at a General Membership Meeting, changes or additions to the By-Laws
require a 2/3's majority vote of the directors present at a Director's Meeting. New
SOPs require a majority vote of directors present at a Director's Meeting while minor
SOP changes are made by individuals or committees responsible for administering
relevant SOPs. See Constitution, By-Laws and SOPs for current details.
ASSESSMENT & ENHANCEMENT
ENHANCEMENT (A&E) PROGRAM SOP
SOP
Note: A brief overview of the A&E Program is shown below. For complete
complete details and
the upup-toto-date version of this program, please refer to the OSC website
http://oasissailing.scyaweb.org/ and click on “A&E" Program.
The Assessment and Enhancement (A&E) program is designed to
encourage each OSC Skipper and Mate to maintain their skills through
periodic assessment of performance. The objective is SAFE SAILING with
NO ACCIDENTS or INJURIES.
To address insurance and liability concerns, each Skipper/Mate will be
certified by the Club in functions specified in the A&E Form and required to
take steps to enhance their skills in areas where scores are substandard.
The A&E Form is used to assess Skippers/Mates at all 4 Stages of the A&E
Program described below. See the OSC website for details.
o Stage 1 - Voluntary Collaborative Assessments Of Skipper’s/Mate’s
Functions & Tasks by peers and crewmembers as constructive
criticism.
o Stage 2 – Required Periodic Assessment Of Each Skipper’s/Mate’s
Functions & Tasks, once every 2 years.
o Stage 3 – Required Enhancement Of A Skipper’s/Mate’s Specific
Functions & Tasks, due to a “NO PASS” score on 4 or more of the
Functions and Tasks on the A&E Form.
o Stage 4 – Required Formal Evaluation Of Skipper’s/Mate’s Functions
And Tasks, due to Incidents or Personal Complaints being filed.
Mate’s Manual 5th Ed
02/01/2011
.- 47 -
Description and Responsibilities of the A&E Committee
o The Assessment and Enhancement Committee (A&E) reviews
Skipper’s or Mate’s performance based upon information contained
in one or more of the following input documents:
•
A mentor-sponsored nomination for promotion to Mate or Skipper
(State 2)
•
A periodic A&E Assessment (State 2)
•
A Board required Enhancement (State 3)
•
A Personal Complaint filed against a member (Stage 4)
Composition Of The Committee
The A&E Committee is comprised of 3 randomly-selected Skippers who will
serve a one-year term and may include one independent (outside) professional.
The A&E Committee may appoint others (if possible, former A&E Committee
members or the alternate member will be used) to conduct periodic
Skipper/Mate Assessments based upon workload. See the OSC website for
details.
Immediate Temporary Suspension Of Certification
When the Committee or the Commodore determines an incident to be Major
and/or when a Skipper or Mate fails to successfully complete their A&E Review,
the Commodore may immediately declare a suspension of his/her certification,
or restriction on that certification. See the OSC website for details.
Incident Reports
Report
Any OSC member may originate and sign an Incident Report. The Skipper,
Mate, Helmsman and other crewmembers who are present when an incident
occurs should, and may be required to, provide their perspective of the incident
by submitting an Incident Report. See the OSC website for details.
A&E Committee Recommendations after investigating Incident Reports and/or
Personal Complaints
The A&E Committee delivers its findings with its recommendations to the
Commodore who will submit it to the Board of Directors at its next scheduled or
special meeting. The Directors present either accept the A&E Committee's
recommendations, or overrule it with a 2/3’s majority vote and must provide
specific substitute actions to be taken, also approved by a 2/3’s majority vote.
Absent a 2/3’s majority vote of Directors present on both the overrule and on
the specific substitute actions, the A&E Committee's recommendations stand.
Considerations – See the OSC website for details.
Mate’s Manual 5th Ed
02/01/2011
.- 48 -
Mandatory Performance Enhancement Actions/Training
See the OSC website for details.
Oversight
The Vice Commodore will oversee the A&E Program day-to-day to ensure that
all procedures are being followed in a timely manner, and ensure that the
Commodore is fully informed.
A&E Review Form
See the OSC website for details and the "on water" A&E evaluation Form.
MATEMATE-CANDIDATE’S PROMOTION
PROMOTION SOP
Nomination And Voting Process
For Promotion Of Mate-Candidate To OSC Mate
I.
Once a Mate Candidate has completed the Mate Candidate’s section of this
manual and had the Differences, Experience, Assessment & Enhancement
Review properly signed off and approved, the candidate’s Mentoring Skipper may
submit a written nomination to the Commodore for promotion to OSC Mate.
II. The Commodore will introduce the nomination at a closed session of the
Directors Meeting and, after discussion and a second to the motion to promote,
call for a vote.
III. If a majority of Directors vote in favor, the Mate Candidate is promoted to OSC
Mate, and so advised.
Mate’s Manual 5th Ed
02/01/2011
.- 49 -
RULES OF THE ROAD
I
All Boats:
A moving boat gives way to a stopped boat.
An overtaking boat gives way to the boat being passed.
A pleasure boat gives way to large ships.
A power boat gives way to a sail boat.
Exceptions: A sail boat gives way to vessels restricted in their ability to
maneuver (ship
ships,
s, ferries, tugboats with tows, fishing boats with nets & lines out,
etc.)
II
Boats Under Power:
Both boats give way when meeting head-on. Passing Port-to-Port is preferred
Boat on port side gives way to boat on starboard side when power boats
cross.
III
Boats Under Sail:
Boat on port tack gives way to boat on starboard tack.
The windward boat gives way to the leeward boat when both boats are on the
same tack.
HORN SIGNALS
1 blast
=
“I am turning to starboard”.
2 blasts= “I am turning to port”.
3 blasts= “I am backing down up”.
5blasts = " In doubt, Danger"
Sailboat in FOG - One Prolonged blast followed by two short blasts Repeat
every 2 minutes. (1 Prolonged when under power)
CHANNEL BUOYS AND MARKERS
MARKERS (ENTERING THE HARBOR)
Rule #1 – Red- Right-Returning
Right Side – Red, Even Numbers, Triangle (Nun)
Left Side - Green, Odd Numbers, Square (Can)
Mid Channel - Red & White or Black & White (may be lettered)
Mate’s Manual 5th Ed
02/01/2011
.- 50 -
SAILING IN FOG
Position Crew Member on bow for lookout
Raise radar deflector on burgee halyard (OASIS-IV)
Turn "ON" running lights
Turn "ON" steaming lights, if motoring
Use GPS map page and way points page for location of Buoys,
jetty and harbor markers
Follow rules of horn signals
NOTE: Use of radar is recommended under fog conditions
(O-V). Requires a trained operator and should not be
attempted otherwise.
SEAWORTHY TRAINING PROGRAM
PROGRAM
Note: A brief overview of the Seaworthy Training Program is shown below. For
complete details and the up-to-date version of this program, please refer to the OSC
website and click on “A&E Program".
The following Seaworthy Training sessions cover skills that may not be encountered
in daily sailing, and compliment the Club’s Assessment & Enhancement (A&E)
Program and ensure that Mate Candidates are fully trained to fulfill their responsibility,
they are:
Anchoring & Prop Walk Turning
o The proper procedures for anchoring are reviewed in addition to
actual practice of dropping & hauling up the anchor, ensuring correct
scope is used, etc. Appling "Prop Walk" to 360 degree turn is
explained and demonstrated
Boat Systems
o A thorough overview of boat systems is conducted on-board each of
the Club’s vessels including engine, electronics, hydraulics, and
communications.
Mate’s Manual 5th Ed
02/01/2011
.- 51 -
Crew Overboard (COB/MOB)
o Participants do actual simulations of crew overboard search &
rescue situations, maneuvering the boat back to the COB, and
hauling the COB back aboard ship.
Docking/Undocking
o Participants are drilled in actual docking & undocking the Club’s
sailboats at boat slips.
Figure “8”, Heave-To, and Quick Stop
o Participants practice sailing a "pre-planned” Figure 8 by determining wind
direction so that the maneuvers includes 2 tacks and 2 gibes. Also,
putting the boat into a Heave-To to “park” the boat, and execute a QuickStop.
Boat Handling, Motoring in Close-in Quarters
o Participants simulate maneuvering the boat in slip channel by practicing
around buoys, especially motoring in reverse as if in close quarters.
Seaworthy Training Sessions are usually scheduled quarterly.
SKIPPER CANDIDATE’S PROGRAM SOP
Nomination And Voting Process
For Promotion Of Skipper-Candidate To OSC Skipper
Note: A brief overview of the Skipper Candidate’s (SC) Program is shown below. For
complete details and the up-to-date version of this program and the Skipper Candidate’s
Evaluation Form please refer to the OSC website under “Skipper - Candidate Program"
1. To become a Skipper-candidate an OSC Mate must obtain a mentoring-Skipper
to mentor, guide and potentially recommend the Mate to become an OSC
Skipper.
a. The mentoring-Skipper will seek out three (3) additional Skippers to form a
4-person “SC Mentor Team”, with each of the four agreeing to sail with the
SC at least 4 times as “Skipper of the Day". See the OSC website for
details.
Mate’s Manual 5th Ed
02/01/2011
.- 52 -
2. The candidate should sail, as "Skipper of the Day", with as many active skippers
as possible .
3. A minimum of three out of the 4-member SC Mentor Team (75%) must be in
favor of nominating the SC for promotion to Skipper. When the mentoringSkipper feels the candidate has performed successfully the Mentor Team will
jointly review the SC’s: (1) sailing progress, and results of the A&E review, (2)
Skipper Attribute Evaluation Forms, and (3) vote on whether to nominate
candidate to become a Skipper. See the OSC website for details.
4. The Commodore will conduct the vote by secret ballot in closed confidential
Executive Session and if 75% of those Directors present vote in favor, the
Commodore will announce the promotion at the regular meeting.
5. Skipper Attribute Evaluation Form : See the OSC website for the Form.
SKIPPER EMERITUS PROGRAM
PROGRAM
Seniors comprise the majority of Oasis Sailing Club members. In recognition that a
Skipper's sailing skills may remain sharp while his/her response or reaction times may
slow as a natural part of aging, the club has developed a program that maximizes
respect and ensures safe sailing. This voluntary program enables Skippers
to request their status be changed from Skipper to Skipper Emeritus. The Skipper
Emeritus program allows Skippers to retain their Skipper voting rights, Directorship
and to attend all Skipper/Director meetings.
This position is identical to that of Skipper, except that the Skipper Emeritus can only
skipper a boat if another Skipper is aboard. And, the Skipper Emeritus cannot take the
helm unless seaward of the jetty or if an immanent emergency requires it.
A Skipper who voluntarily assumed the status of Skipper Emeritus may submit a
written request that the Board of Directors shall restore the Skipper to full Skipper
status. Prior to reconsideration by the board, the Skipper Emeritus shall successfully
complete all of the requirements that the board may direct. In it’s sole discretion, the
board may approve the request and the Skipper shall act only within the parameters
that the board may establish. See OSC Constitution and By-Laws for complete and
current details.
SLIP EXIT PROCEDURE
The following motion was passed at the Director’s Meeting in October 2010. “The Club
recommends that both Club boats be taken out from the dock stern first, but it is the
Skipper’s prerogative to take a boat out stern first or bow first”.
Mate’s Manual 5th Ed
02/01/2011
.- 53 -
VHF RADIO AND CHANNELS
CHANNELS
VHF Radiotelephone (156(156-162 MHz) - Used for voice communications with other ships
and coast stations over short distances.
Channel 16
For distress, emergency, safety and initial vessel contact messages ONLY. The intent
here is to have the recreational boater make contact on channel 16 and then move to
one of the other recreational channels thus clearing channel 16 of some of its traffic.
Never use channel 16 for a radio check.
Channel 9
Is designated by the FCC as the Recreational Calling Channel for use by noncommercial boaters.
Channels 68, 69, 71, 72 and 78A.
For non-emergency calls, once contact has been made on channel 9 or 16, switch to
one of these "working channels. Also use these channels for your radio checks.
Channels 3, 21, 23, 61, 64, 81, 82 and 83
Can not be lawfully used by the general public in U.S.A waters.
Mayday calls
Used only when there is immediate danger of loss of property or life and loss of
communication. In other words, if you are sinking, or see another vessel sinking, or
someone on board is seriously injured, you issue a "Mayday" call.
Otherwise use the "Pan Pan" call. (If possible, obtain your location from the GPS)
Hailing (or Raising)
Other than being in standby, Channel 16 is for hailing and distress purposes. So make
your initial hailing call clear and short!
The correct hailing procedure is to state one to three times in succession the name of
the boat or station you are calling, followed once or twice by the name of your boat,
then "Over." Any additional words are unnecessary and incorrect procedure. Once
your party replies, you instruct him/her to switch to a working channel like 68 or 69 and
clear channel 16.
Mate’s Manual 5th Ed
02/01/2011
.- 54 -
Oasis Sailing Club
Corona del Mar, California
www.OasisSailing.SCYAweb.org
Mate’s Manual 5th Ed
02/01/2011
.- 55 -
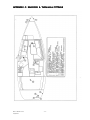
Appendices
OASISOASIS-IV
57
APPENDIX A: OASIS-IV ENGINE
58
APPENDIX B: OASIS-IV ENGINE CONTROL PANEL
59
APPENDIX C: OASIS-IV SEACOCK & THRU-HULL FITTING S
60
APPENDIX D: OASIS-IV ELECTRICAL PANELS
63
APPENDIX E: OASIS-IV GPS
OASISOASIS-V
65
APPENDIX A: OASIS-V ENGINE
67
APPENDIX B: OASIS-V ENGINE CONTROL PANEL
68
APPENDIX C: OASIS-V THRU-HULL LOCATIONS
69
APPENDIX D: OASIS-V ELECTRICAL CONTROL PANELS
74
APPENDIX E: OASIS-V AUTOPILOT
76
APPENDIX F: OASIS-V CHART PLOTTER
Please see the Update Supplement with release date: 3/2811
82
APPENDIX G: OASIS-V OTHER INSTRUMENTS
XX
APPENDIX H: OASIS-V SUMP PUMP OPERATION
Please see the Update Supplement dated 3/28/11
Mate’s Manual 5th Ed
02/01/2011
.- 56 -
OASIS-IV
APPENDIX A - OASISOASIS-IV ENGINE
It is critical that sea water is continuously passing through our engine system for
cooling purposes. To check this a device has been installed that makes it very easy to
see if the water is flowing. This device is installed in the 5/8 inch water hose between
the heat exchanger and where it enters the exhaust system. It is close to the rear top
of the engine and it is a passive device and in no way effects the flow of water. The
transparent bowl has two little floating cubes that “dance” when the water is flowing. In
this position in the system you can easily observe the cooling water after it has gone
through the heat exchanger. Proof positive that all components are OK.
Mate’s Manual 5th Ed
02/01/2011
.- 57 -
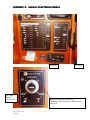
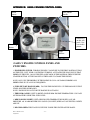
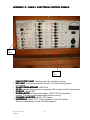
APPENDIX B:
B: OASISOASIS-IV ENGINE CONTROL PANEL
1
3
4
5
ENGINE CONTROL PANEL LIGHTS AND
SWITCHES.
1. TACHOMETER.
2. SIX LIGHTS AT TOP. LEFT THREE ARE INOPERATIVE, IGNORE.
FOURTH- ENGINE OVERHEATING. WHEN LIT, STOP ENGINE.
ENGINE
FIFTH- LOW OIL PRESSURE. WHEN LIT, STOP ENGINE.
ENGINE
SIXTH- LOW VOLTAGE AT THE BATTERY SELECTED. INVESTIGATE THE
PROBLEM.
3. ALARM BUZZER. (ROUND UNIT CENTER). THIS ALARM WILL SOUND
WHEN ANY OF THE THREE LIGHTS ARE LIT.
4. TOGGLE SWITCH. (UNDER LIGHTS). PUSH UP TO TEST THE LIGHTS IN 2. ABOVE.
5. START BUTTON. PUSH TO START THE ENGINE. DO NOT HOLD IN FOR MORE
THAN 30 SECONDS.
6. ROUND PUSH/PULL SWITCH. IMPORTANT= THIS SWITCH MUST BE OUT AT ALL
TIMES WHEN THE ENGINE IS RUNNING.
NOTE: THE STARTER WILL NOT BE ENERGIZED WHEN THIS SWITCH IS IN.
NOTE: IGNORE THE ‘OFF’ AND ‘ON’ WRITING ADJACENT TO THIS SWITCH.
Mate’s Manual 5th Ed
02/01/2011
.- 58 -
6
APPENDIX C:
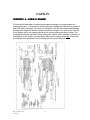
C: SEACOCK & THRUTHRU-HULL FITTINGS
FITTINGS
Mate’s Manual 5th Ed
02/01/2011
.- 59 -
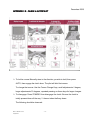
APPENDIX D:
D: OASISOASIS-IV ELECTRICAL PANELS
DC Panel
DC Main
Breaker
(Leave ON)
Mate’s Manual 5th Ed
02/01/2011
AC Panel
Battery Switch Panel at floor level
Under chart table, mounted on Port Settee at
floor level
.- 60 -
D.C. MAIN POWER
1. Turn Battery Switch (located under the Nav Station) to an “ON” position ("1",
"2" or "BOTH")
2. Then turn “ON” the “D.C. Main” Breaker on the D.C. side of Main Distribution
Panel (See below)
3. Battery connects to D.C. side of Main Distribution Panel
4. If no power, check Reset on the Battery Switch Panel.
OASIS-IV DC CONTROL PANEL.
A. THE LEFT SIDE OF DC PANEL. TOP TO BOTTOM.
1. DC MAIN. LEAVE ON ALWAYS. WHEN THIS LIGHT IS LIT IT WILL
INDICATE THAT THE MAIN BATTERY SWITCH IS ON. WHEN OFF, IT
INDICATES BATTERY SWITCH IS OFF.
2. PANEL LIGHTS. DISABLED, LEAVE OFF.
3. CABIN LIGHTS. LEAVE ON.
4. LP GAS. ON ONLY WHEN USING PROPANE STOVE. OFF FOR ALL OTHER
TIMES.
5. TANK INDICATOR. LEAVE ON.
6. WATER PUMP. LEAVE ON. TURN OFF IF ANY PLUMBING IS LEAKING.
7. SUMP PUMP. LEAVE OFF. TURN ON IF SHOWER IS BEING USED.
8. STEREO. LEAVE OFF. TURN ON FOR FM/CD PLAYER.
9. MACERATOR. LEAVE OFF. TOGGLE ON TO PUMP THE HOLDING TANK.
10. BILGE PUMP. LEAVE ON. TOGGLE TO MANUALLY RUN BILGE PUMP.
B. THE RIGHT/MIDDLE SIDE OF DC PANEL. TOP TO BOTTOM.
1. TOP THREE LIGHT SWITCHES. THESE ARE FOR NIGHT SAILING. AS
REQUIRED FOR NIGHT/FOG.
2. INSTRUMENTS. LEAVE ON.
3. VHF RADIO. LEAVE ON.
Mate’s Manual 5th Ed
02/01/2011
.- 61 -
C. THE FAR RIGHT SIDE OF DC PANEL. MIDDLE TO BOTTOM.
1. DC VOLTAGE INDICATOR. USE MAIN BATTERY SWITCH TO
READ 1 OR 2.
2. CD ALARM RESET. TO RESET THE CARBON DIOXIDE ALARM
UNIT.
3. TWO 12VDC AUXILIARY OUTLETS AND RESET BUTTON.
OASIS-IV AC CONTROL PANEL.
A.C. Main
Outlets
Microwave
Batt Charger
Water Heater
Provides A.C. voltage to A.C. side of Panel
Provides A.C power to the boat’s outlets
Supplies power to outlet behind Microwave
Provides power to Battery Charger
Supplies power to Electric Water Heater
Leave ON
Leave ON
Leave ON
TANK SYSTEM MONITOR. (LOWER RIGHT)
USE UP AND DOWN ARROWS TO VIEW THE FOLLOWING:
1. DIESEL FUEL LEVEL. (TO BE CALIBRATED WHEN FUEL TANK IS
EMPTY)
2. FRESH WATER LEVEL
3. HOLDING TANK LEVEL.
Mate’s Manual 5th Ed
02/01/2011
.- 62 -
APPENDIX
APPENDIX E:
E: OASISOASIS-IV GPS
Garmin GPS 545 is the one we currently use.
Feel free to get the manual (GPSMAP 400/500 series) off the internet to
study the instrument operation:
http://www8.garmin.com/manuals/GPSMAP431_431s_OwnersManual-US-_EN_.pdf
The "quick Reference" (see below) can be found at:
http://www8.garmin.com/manuals/GPSMAP421_421s_QuickReferenceGuide_EN_.pdf
Mate’s Manual 5th Ed
02/01/2011
.- 63 -
Mate’s Manual 5th Ed
02/01/2011
.- 64 -
OASIS-V
APPENDIX A:
A: OASISOASIS-V ENGINE
Mate’s Manual 5th Ed
02/01/2011
.- 65 -
Mate’s Manual 5th Ed
02/01/2011
.- 66 -
APPENDIX B:
B: OASISOASIS-V ENGINE CONTROL PANEL
Alarm
buzzer
Fuel shutoff
handle
Starter Key
on this side
panel. Not
seen in this
picture
Starter
Button
Bilge
Blower
OASIS-V ENGINE CONTROL PANEL AND
SWITCHES.
1. ENGINE KEY SWITCH. TURNING THE KEY CLOCKWISE TO THE FIRST POSITION TURNS
ON THE FUEL “LIFT” PUMP. CONTINUING TURNING ACTIVATES THE GLOW PLUGS THAT
PREHEATS THE FUEL. (DO NOT EXCEED 10 SECONDS IN THIS POSITION) THEN PUSH THE
STARTER BUTTON AT THE FAR LEFT OF THE PANEL TO CRANK THE ENGINE.
NOTE: ONLY USE THE PREHEAT IF THE ENGINE IS COLD. ON WARM SUMMER DAYS
PREHEATING IS USUALLY NOT REQUIRED.
2. FUEL SHUT OFF HANDLE (RED). TO STOP THE ENGINE PULL UP THE HANDLE UNTIL IT
STOPS AND THEN PUSH DOWN.
NOTE: ENGINE WILL NOT START IF HANDLE IS NOT DOWN.
3. THE FOUR GAUGES. LEFT TO RIGHT= ENGINE RPM- ENGINE TEMPERATURE- VOLTAGE
OF THE BATTERY SELECTED- FUEL LEVEL.
4. RED WARNING LIGHTS. LEFT= HIGH WATER TEMPERATURE. RIGHT= LOW OIL
PRESSURE. AN ALARM BUZZER WILL SOUND (TOP LEFT) WHEN ANY OF THE TWO LIGHTS
ARE LIT.
5. BILGE BLOWER. THIS TOGGLE SWITCH IS UNDER THE CENTER OF THE PANEL
Mate’s Manual 5th Ed
02/01/2011
.- 67 -
APPENDIX C:
C: OASISOASIS-V THRUTHRU-HULL LOCATIONS
Mate’s Manual 5th Ed
02/01/2011
.- 68 -
APPENDIX D:
D: OASISOASIS-V ELECTRICAL
ELECTRICAL CONTROL PANELS
AC
Panel
DC
Panel
PUSH TO TEST LAMPLAMP Checks to see if the red light is working.
RED LIGHTLIGHT Indicates reversed AC polarity. If lit, follow warning posted
on the panel.
30 AMP POWER BREAKERBREAKER LEAVE ON.
AC ONON Indicates if shore power is connected. Will not light with AC inverter power.
OUTLETSOUTLETS LEAVE "ON".
WATER HEATERHEATER AC fresh water heater. LEAVE "OFF" except when
needed. The water is also heated when engine is running
CHARGER / INVERTERINVERTER- LEAVE "ON" always.
INVERTER ININ LEAVE "ON". (This energizes AC cabin AC outletsallows our cabin heater to come ON when needed)
Mate’s Manual 5th Ed
02/01/2011
.- 69 -
12V DC SERVICE PANEL (CENTER, TOP TO BOTTOM).
LIGHTINGLIGHTING- (Top six), cabin lights- LEAVE "ON", other lights turn on only
as needed for night and or fog.
AUX. SYSSYS- Refrigeration LEAVE "ON", other 3, turn on only as needed.
NAV/COMMNAV/COMM- All 4 LEAVE "ON".
PUMPSPUMPS- Water pressure and bilge pump LEAVE "ON". Shower drain
pump and macerator LEAVE "OFF" except when needed.
NOTE: when the bilge pump is running the red light is lit.
12V DC SERVICE PANEL (RIGHT, TOP TO BOTTOM).
DC VOLT METERMETER- Shows battery condition of either battery.
BATT TESTTEST- Toggles between the 2 batteries. NOTE: This meter is
always connected to the batteries regardless of ANY main battery switch
settings.
12V OUTLETOUTLET- Convenience outlet. (cigarette lighter type socket).
BILGE OPERATION MODEMODE- Toggle switch- LEAVE ON "AUTO" at all
times except when the manual side is pushed to override the float switch.
NOTE: This bilge pump is always connected to the batteries regardless of
ANY main battery switch settings. (But breaker must be ON)
Mate’s Manual 5th Ed
02/01/2011
.- 70 -
OASIS-V MAIN BATTERY SWITCHES. (Located
under chart table on the settee sidewall)
Mate’s Manual 5th Ed
02/01/2011
.- 71 -
MAIN BATTERY SELECT- (Left in upper picture).
POSITIONS CLOCKWISE FROM TOP: OFF, 2, BOTH,1.
NOTE: "OFF" POSITION IS AT THE TOP WHICH IS OPPOSITE TO THE
O-IV SWITCH. WHEN "OFF" THERE IS NO DC SUPPLY TO THE DC
SERVICE PANEL.
PROCEDURE: START ON 1 (RESERVE). CRUISE ON 2
(ACTIVE). WHEN LEAVING THE BOAT TURN THIS SWITCH
"OFF". (THIS PROCEDUER IS SUBJECT TO SKIPPER
DECISSION)
NEVER TURN THIS SWITCH TO "OFF" WHEN ENGINE IS
RUNNING.
CIRCUIT BREAKERSBREAKERS (in center between two rotary switches).
1. DISTRIBUTION PANEL CIRCUIT BREAKER. LEAVE "ON" AT ALL TIMES.
2. ANCHOR WINDLASS CIRCUIT BREAKER. LEAVE "OFF" EXCEPT WHEN
USING THE WINDLASS.
ENGINE DC POWERPOWER (bottom picture). LEAVE "ON" AT ALL TIMES.
THIS SUPPLIES DC POWER TO THE ENGINE CONTROL PANEL,
THE FUEL PUMP AND STARTER.
NEVER TURN THIS SWITCH TO "OFF" WHEN ENGINE IS RUNNING
Mate’s Manual 5th Ed
02/01/2011
.- 72 -
BEFORE LEAVING OASIS-V
PROPER SWITCH SETTINGS
SWITCHES UNDER NAV. STATION
1. Main Battery dial- Rotary switch on Left
-- OFF (Straight Up)
2. Engine DC Power – Rotary Switch on Right
-- ON
3. Distribution Panel Breaker – Center top
-- ON
4. Anchor Windlass Breaker – Center bottom
-- OFF (Switch to
(Switch to right)
left)
SHORE
POWER
CONNECTED
AC PANEL
1. Shore Power Breaker (AC Switch)
-- ON (Green Light ON)
2. OUTLETS
-- ON
3. WATER HEATER
-- OFF
4. CHARGER / INVERTER
-- ON
4. INVERTER IN
-- ON
LEAVE
BILGE
SWITCH ON
“AUTO”
DC PANEL
Bilge Pump Breaker (right column, bottom)
-- ON
All Other Breakers
-- OFF
Mate’s Manual 5th Ed
02/01/2011
.- 73 -
December 2010
APPENDIX E:
E: OASISOASIS-V AUTOPILOT
To hold a course: Manually steer to the direction you wish to hold, then press
AUTO, then engage the clutch lever. The pilot will hold that course.
To change that course: Use the Course Change Keys, small adjustments=1 degree,
larger adjustments=10 degrees, repeated pressing on these keys for larger changes.
To disengage: Press STANDBY then disengage the clutch. Be sure the clutch is
totally pressed down all the way ! It has an indent half way down.
The following should be observed:
Mate’s Manual 5th Ed
02/01/2011
.- 74 -
Do not put yyour
our arm through the steering wheel while the pilot is engaged.
Do not manually force the wheel when the pilot is engaged
Do not use in heavy weather sailing.
Make sure the gray metal post on the binnacle is in the hole in the pilot's ring
Mate’s Manual 5th Ed
02/01/2011
.- 75 -
APPENDIX F:
F: OASISOASIS-V CHARTPLOTTER
On O-V we have a Raymarine C - Series Display (C-80) combining
GPS and Radar functions.
Feel free to get the manual off the internet to study the instrument
operation.
The user manual can be found on the boat or on line at:
http://www.raymarine.com/ProductDetail.aspx?SITE=1&SECTION=2&PAGE=19
21&PRODUCT=4307
Mate’s Manual 5th Ed
02/01/2011
.- 76 -
Oasis-V GPS (C-80) Display Operation
Use this description with the C-80 Operating Guide
with a combination of Buttons on the right side of
seeC-80
the display
Updateoperates
Supplement
PleaseThe
the display
and3/2
buttons at the bottom of the display referred to as Soft Keys.
with release
date:
28/11
3/the
Each Button is a different function and produces a different set of Soft Keys
appropriate to that Button. Refer to Card No, 1 & 2.
NOTE: CARD is a term used by the C-80 Operating Guide
Use the following procedure to set up the C-80 for sailing:
o Push the Power Button at the lower left of the screen to activate. Press
the OK Button at the prompt on the screen.
o Press and hold the Page Button to display the Page Set options. Use the
Trackpad Button to select the Page Set you want. In most cases this will
be the top line labeled Chart. Refer to Card No. 3.
o Press the Page Button again but do not hold it in. The Soft Keys will
give you a choice of five pages you can select. The center page of the set
splits the screen to show the chart and the course data and is probably the
most appropriate for most of our applications.
o The Active Window on the screen will be bordered in red. You can
change the Active Window by pressing the Active Button until you get
to the window you want. You can then make this window full screen by
pressing and holding the Active Button. To return to the multiple
windows view, press the Active Button but do not hold it in.
o Move to the Data window with the Active Button. The Soft Keys will
give you a choice of Navigation, Waypoint, Route, Fishing or Sailing
Panels. Select the Navigation Soft Key.
o To adjust the display lighting, Press the Power On Button and toggle the
Soft Key to the day or night setting and press the OK Button. Note that
when you set this, it will not reset when the unit is turned off. If it is set
Mate’s Manual 5th Ed
02/01/2011
.- 77 -
for night mode in the evening, it will need to be reset to day mode to
bring the light back up.
Setting Waypoints Procedure:
o Press the WPTS/MOB Button one time only. If you press it twice you
will set a waypoint at the boat location. Select the Go to Waypoints
Option Soft Key. Highlight the required waypoint from the list with the
Trackpad Button. Refer to Card No. 8.
o Press the Go To Waypoint Soft Key. The waypoint will be highlighted
and there will be a dotted line on the chart between the waypoint and the
boat and appropriate data in relation to the waypoint will be displayed on
the Data window.
o To stop navigation to a waypoint, press the WPTS Button once and press
the GoTo… Soft Key and then the Stop GoTo Soft Key.
December 2010
DELETING UNNECESSARY CARDS IN THE C80 OPERATING GUIDE.
As the Chart Plotter is designed for many different marine situations around the
World, many of those features are not required or necessary for our unique
situation in Southern Californian.
Example: If you are navigating in the Pacific Northwest, many East Coast areas
and the Great Lakes areas it is sometimes very important that you plan a very
strict Course (Route) with multiple waypoints to follow. This is to avoid
obstacles such as reefs, rocks, small islands, wrecks and also to change
directions multiple times, Etc.
Please see Card 5’s chart as an example.
WE DO NOT HAVE ANY OF THE ABOVE WHILE NAVIGATING IN OUR LOCAL
WATERS.
As you all know, when you leave the Newport Jetties you are deep water with
no fixed obstacles to your destination. You only need two Waypoints, one to go
to and one to return. Example: Dana Point Buoy, Catalina Island needs only one
Waypoint; but going to Alamitos Bay usually needs one interim Waypoint.
Return will always be the Newport Beach Buoy Waypoint.
Mate’s Manual 5th Ed
02/01/2011
.- 78 -
However, for coastal navigation using the Chart and/or Radar does not require any
Waypoints. The active destination Waypoint does show on both screens, this is
helpful.
Therefore: I suggest that to simplify the learning process you should discard the
following Cards from the Operating Guide:
CARDS RELATED TO COURSE AND ROUTES.
Discard 5, 6, 7, 9, and hold 14. (See note below)
OTHER CARDS THAT DO NOT APPLY TO OUR C80.
Discard 4, 13, 15, 16, and 17.
SO KEEP CARDS.
1, 2, 3, 8, 10, and 11.
NOTE: If you set a waypoint as the “Active” waypoint, some information on Card
14 could be used.
Otherwise you can use the dotted line on the chart to steer to the active waypoint.
This is the suggested method.
December 15, 2010
Mate’s Manual 5th Ed
02/01/2011
.- 79 -
Oasis V RADAR (C-80) Display Operation
Please see the Update Supplement
with release date: 3/28/11
3/28/11
Use this description with the accompanying C-80 Operating Guide
The C-80 Radar display operates with a combination of Buttons on the right side
of the display and the buttons at the bottom of the display referred to as Soft Keys.
Each Button is a different function and produces a different set of Soft Keys
appropriate to that Button. Refer to Card No, 1 & 2.
Use the following procedure to set up the C-80 for sailing with Radar:
o Push the Power Button at the lower left of the screen to activate. Press the
OK Button at the prompt on the screen.
o Press and hold the Page Button to display the Page Set options. Use the
Trackpad Button to select the Chart/Radar Page Set. Press the OK Button.
Refer to Card No. 3.
o Press the Page Button again but do not hold it in. The Soft Keys will give
you a choice of five pages you can select. Select he center page of the set
that splits the screen to show the chart and the radar.
o The Active Window on the screen will be bordered in red. Change the
Active Window to the Radar screen by pressing the Active Button until it is
bordered in red.
o Push the Power Button at the lower left of the screen and select the Scanner
Soft Key and toggle to On and toggle to Radar TX (transmit).
o There will be a delay until the radar is operational.
o When the radar is operational, press the OK Button. Make the chart window
active. Press the Presentation Soft Key, select the Chart Mode and
Orientation Soft Key and the Chart Sync Soft Key. Toggle to RDR. Refer
to Card No. 11.
Mate’s Manual 5th Ed
02/01/2011
.- 80 -
o To overlay radar on the chart, make the chart window active, press the
Presentation Soft Key and select the Chart Layers Soft Key. Select the
Radar Overlay Soft Key and toggle to ON. This will overlay the radar on
the chart. To make the overlay window full screen, press and hold the Active
Button. To return to a split screen view press, but do not hold, the Active
Button.
o Use the Range Button to zoom in and zoom out. The Range will show at
the left top of the radar screen in nautical miles. The dimension of the Range
Rings will show at the right side in nautical miles. Refer to Card No. 10.
Updated 1/22/11
Mate’s Manual 5th Ed
02/01/2011
.- 81 -
APPENDIX G:
G: OASISOASIS-V OTHER INSTRUMENTS
A quick guide to boat instruments is depicted below. The full complement of
manuals can be found on the boat.
Mate’s Manual 5th Ed
02/01/2011
.- 82 -
Mate’s Manual 5th Ed
02/01/2011
.- 83 -
Mate’s Manual 5th Ed
02/01/2011
.- 84 -
Oasis Sailing Club
Corona del Mar, California
www.OasisSailing.SCYAweb.org
Mate’s Manual 5th Ed
02/01/2011
.- 85 -