1
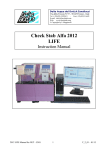
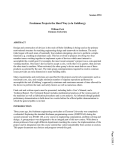
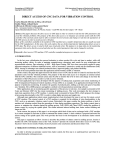
Proceedings of COBEM 2007
Copyright © 2007 by ABCM
19th International Congress of Mechanical Engineering
November 5-9, 2007, Brasília, DF
HEAT EXCHANGER LAB CLASS:
TEST RING AND OPERATIONAL PROCEDURE
Paulo Cesar da Costa Pinheiro, [email protected], [email protected]
Departamento de Engenharia Mecânica da UFMG
Av. Antonio Carlos 6627
31270-901 Belo Horizonte, MG
Abstract. The aim of the lab class is to identify and to apply the theoretical concepts acquired in classroom into the
industrial practice. The most common thermal equipment used in the industry is the heat exchanger. This paper
describes the construction of a heat exchanger test ring and presents an operational procedure and some academic
results. A double pipe type heat exchanger was constructed with copper pipes, and installed in the metallic rack, with
all the others devices: heater, thermocouples, control valves and digital thermometer. A software for HP48
programmable calculator was also developed to simulate the heat exchanger test ring.
Keywords: Heat Exchanger, Lab Class, Teaching Aid, Engineering Education
1. INTRODUCTION
The classes of Mechanical Engineering course are normally carried through of the traditional form: expositive
classes and problems resolution. At the end of the course, the student doesn't have engineering project feeling and work
experience. The main objective of the laboratory class is identify theoretical concepts learned in classroom and applies
then to real practices. The application of laboratory classes, allows the construction of professional skills, develops the
scientific and professional spirit, and sediments theoretical concepts.
Aiming at these objectives, this paper describes the construction of a heat exchangers test ring, shows a laboratory
class guide and its didactic results. The heat exchanger is maybe the main thermal equipment utilized in the industry.
This laboratory class is part of the Thermal Laboratory course (EMA-103), of the Engineering Mechanics course of
Universidade Federal de Minas Gerais UFMG.
2. THE TEST RING
For the test-ring was chosen a double pipe type heat exchanger. This type has easy construction, easy mathematical
modeling and easy visualization. Two double pipes heat exchangers has been joined by a curved tube, forming a hairpin
configuration. The hairpin double pipe exchanger is extremely useful, because it can be assembled in any pipe fitting
shop form standard parts and provides inexpensive heat-transfer surface.
The industrial hairpin exchangers are normally assembled with iron pipes and iron hydraulic connections [Kern].
To make the assemble construction more ease, the test ring exchanger was constructed with copper pipes with 1m
length and diameter 25 mm and 12 mm (1'' and 1/2''). The 12 mm (1/2'' internal) pipes had been placed inside of the 25
mm (1'' external) pipes and placed and fixed by tees and return reads, brazed with oxyacetylene weld. In this
configuration, one fluid flows inside the 12 mm (1/2") pipe and the other fluid inside the annular space.
Table 1. Heat Exchanger Material List.
Material
Unit
25 mm (1") copper tube
m
12 mm (1/2") copper tube
m
Reductions
Pc
12 mm (1/2") cooper courbe
Pc
25 mm (1") cooper tee
Pc
Quantity
3
3
6
2
2
It was constructed a metallic rack (figure 1) with 12 mm (1") steel angle L, welded with coated electrode. The
exchanger was installed inside the rack, fixed for U type cramps with support rubber. In the interior of rack had been
installed all the auxiliary devices: digital thermometer, thermocouples, electric heater, valves, connections. These
devices are located in such a way that no part of the set is outside of rack. The rack supports all devices and assures its
physical integrity. By security the hydraulically connections had been located in the rack at opposing side of electronic
equipment.
Figure 1. The Rack with the Heat Exchanger and Accessories.
One Euro Control TC-904 digital thermometer was installed inside a metallic box, and this box inside of rack, in
order to protect it of leakage. This digital thermometer has a selector key that allows the reading of 4 thermocouples.
The 4 thermocouples had been installed in the fluid inputs and outputs. Two globe valves control the fluid flows. A
direct electric heater (4250 W) heats the cold water in order to simulate the hot fluid (figure 2).
Figure 2. Rack Details and thermometer installation.
The water feeding is carried through by PVC reinforced tubing connected by NPT male tube adapter in the control
valves. The PVC tubing that drain the water for the sewer are connected in NPT male tube adapter installed in the
exchanger outputs. This fast connection permits easily change of countercurrent to concurrent (parallel) exchanger flow
as showed in figure 3.
TI-3
TI-2
MEDIDOR DE
TEMPERATURA
TROCADOR DE CALOR
TI-1
TI-4
VALVULAS 1 e 2
AQUECEDOR
ENTRADA DE
AGUA
SAIDA DE
AGUA
Figure 3. Test Ring Diagram.
Hydraulically tests had allowed in order to verify the valves and heater good operation, and verify welds and unions
and checking then for leaks. Operational tests had allowed in order verifying the correct operation of the test ring and
determination of operational parameters.
Proceedings of COBEM 2007
Copyright © 2007 by ABCM
19th International Congress of Mechanical Engineering
November 5-9, 2007, Brasília, DF
Table 2. Materials for the Rack and Accessories.
Materials
Unit
m
25 mm (1") Steel L angle
Pc
1/4" x 5/16" U Clamp
Pc
Thermopar
Pc
Euro Control TC904 Electronic Thermometer
Pc
110V/4300W Electric Heater
Pc
1/2" globe Valve
Pc
12 mm (1/2") PVC adapter
Pc
12 mm (1/2") PVC courbe
Pc
12 mm (1/2") cooper Tee
m
12 mm (1/2") PVC reinforced tubing
m
5 mm double wire
m
1 mm double wire
Pc
Sindal type electric connector
Pc
NPT male pipe adapter
cm2
Rubber for fixation
Quantity
4
5
4
1
1
2
1
1
1
6
4
1
1
4
200
3. OPERATIONAL TESTS
They had been carried through a series of operational tests in order to verify the test ring capability, the presence of
leakage and to determine the exchanger operational parameters. It was verified that the electric heater only worked at
high flows, being necessary to modify the heater mechanism so that it functioned at low flows, in order to get bigger
temperatures.
From these tests, a guide was written for the heat exchangers practical class (annex 1), with the operational
methodology and results to be obtained.
4. SOFTWARE
A heat exchanger simulation software for HP48 calculators was developed, in order to compare the obtained
experimental data against the theoretical predictions.
The reason to develop software for HP48 calculator is that a large majority of the students has assess to this type of
calculator. Therefore, the students can use this software during the laboratory class and make in class the heat
exchanger computational simulation. This simulation aid the laboratory class, first, it allows the student to predict their
results that will be obtained with the experiment, correcting the assembly and operation errors. Moreover, the use of the
calculator allows to the manipulation of a huge data amount and allows the use of more sophisticated statistical tools.
During the laboratory class, the student follows the sequence of steps of the experiment guide and chooses and it adjusts
the controlled variables of the experiment.
The software requires 9 kb of memory RAM for storage and more 2,8 kb for its execution. The size of the table of
water properties in the software is 2.1 kb. The execution time is of approximately 35 seconds. This software is being
developed by change the water property table for property equations, in order to become the software small and its
faster execution. The input and output water temperatures obtained by the software reproduce with good agreement the
values obtained in the test ring.
Software with its manual and the laboratory class guide had been put in the homepage of the Thermal Laboratory
class (EMA-103) for download. (http://www.demec.ufmg.br/disciplinas/ema103/praticas/pratTC.htm)
5. LAB DATA SHEET AND REPORT
The students are requested to write a report of the activities developed in the laboratory class. In order to teach
the students, who the report presentation is so important when the information contained them, the evaluation is based
on form and in the content technician. Clarity and logic are as well as important how grammatical and vocabulary. The
criteria used in the report evaluation are presented in table 3. A rubber stamp with the data of table 3 is stamped on the
report, where is placed the points.
The following topics will have to be mandatory in the reports:
a) Bibliographic revision
b) Equipment and materials
c) Methodology and procedures
d) Results and conclusions
e) Bibliography.
Table 3. Criteria Used in the Evaluation of the Reports
Technical Criteria
%
Points
Form Criteria
%
Precision
10%
Form
10%
Effort
10%
Procedure
10%
Completeness
10%
Coherence
10%
Order, cleanness
10%
Originality
10%
Timeless
10%
Grammar and Orthography 10%
TOTAL
100%
Points
6. CONCLUSIONS
The Heat Exchanger test ring for laboratory class has functioned perfectly throughout the last 6 years, and
throughout this period it showed to be an equipment that contributes sufficiently in the process of learning of the
students. The interaction theoretical class + practical class + mathematical simulation creates foundations for a setting
of the knowledge and stimulates the curiosity of the students.
As this laboratory class are doe only one time each semester, before the construction of this test ring, it was
necessary to find the equipment in the store room, to install and to test the equipment, and after the class disassembling
and returns them it the store room. Many times the necessary equipment for the laboratory class were installed in a
research project, having been necessary a procedure for the request of the equipment, removed of the initial place,
assembly and tests, dismount and re-assembly in the research. With the construction of this test ring, now all the
equipment belongs to the test ring and the test ring is always ready to use. The rack protects the physical integrity of the
equipment and makes it difficult its withdrawal for other places. To start up the test ring operation is now more easy and
fast.
The software developed simulates with sufficient precision the heat exchanger performance and the values obtained
in the laboratory class. It is recommended to the students during the writing of the report, who make use of others heat
exchangers design softwares, in order to compare the obtained results.
The pedagogical results had been excellent, verifying an students enthusiasm, development of critical thinking,
“feeling”, practical skills, work of group, questioning the lesson learn and knowledge fixation. In face of the results
obtained with this test ring, we are being developed other test rings (solar energy, evaporative cooling, fins and
combustion), based in the same philosophy.
7. REFERENCES
BEJAN, Adrian. Transferência de Calor; Editora Edgard Blücher Ltda; Rio de Janeiro, RJ, 1994, 540p.
COFFIN, Chris. An Easy Course in Using and Programming the HP 48G/GX; Corvallis USA, Grapevine Publications
Inc, 1993, 300p. ISBN: 0-931011-41-8
KERN, Donald Q.. Processos de Transmissão de Calor; Editora Guanabara Dois; Rio de Janeiro, RJ, 1982, 455p.
MOREIRA, Anderson Juarez; RIBAS, Luciano da Silva. Curso de Programação HP48G/GX. Curitiba, CEFET-PR,
Dept. Eng. Industrial, 62p.
PINHEIRO, Paulo César da Costa e KOURY, Ricardo Nicolau Nassar. A Estrutura de um Artigo Científico em
Engenharia. In: XXII Congresso Brasileiro de Ensino de Engenharia (COBENGE-94), 24-27 Outubro 1994, Porto
Alegre, Anais... Porto Alegre: ABENGE, Associação Brasileira de Ensino de Engenharia, 1994, p.464-469.
PINHEIRO, Paulo César da Costa. Calculadoras Programáveis: uma Ferramenta Computacional Para o Ensino de
Engenharia. IN: XXXV Congresso Brasileiro de Educação em Engenharia COBENGE 2007, 10-13 de Setembro de
2007, Curitiba, Pr, Anais... Curitiba, Centro Universitário Positivo UnicenP, 2007, cod 463, sessão 1G08, 8p (CDROM)
PINHEIRO, P. C. C.; RAAD, T. J.. Use of Programmable Calculator for Engineering Teaching. In: ICECE
International Conference on Engineering and Computer Education, 1999, Rio de Janeiro. Anais of... Rio de Janeiro:
IEEE The Institute of Electrical and Electronics Engineers (Section RJ), 1999. v. 1.
5. RESPONSIBILITY NOTICE
The author is the only responsible for the printed material included in this paper.
Proceedings of COBEM 2007
Copyright © 2007 by ABCM
19th International Congress of Mechanical Engineering
November 5-9, 2007, Brasília, DF
Annex 1. Heat Exchanger Laboratory Class Operational Procedure
HEAT EXCHANGER LABORATORY CLASS OPERATIONAL PROCEDURE
UFMG
Mechanical Engineering Course
Responsible: Prof. Paulo Cesar da Costa Pinheiro
MATERIALS
Heat Exchanger Test Ring
01
110V Electricity point
01
Water point
01
Prática EMA103-01TC
Heat Exchanger Laboratory Class - EMA103
Date 01/May/1998
1000 mL Becker
Chronometer
Software for HP48 Software User's Manual
01
01
01
PROCEDURE
01) Connect the test ring to water point.
02) Connect the test ring to drainage.
03) Connect PVC tubing hoses in order to establish a countercurrent regimen (hot water in inner pipe).
04) Open the cold water tap and adjust the flow.
05) Verify and repair the leaks.
06) Turn off the electric heater.
07) Connect the test ring to 110V (MAKE ATTENTION).
08) Verify the temperatures meter and thermocouples operation. Press the keys to read the thermocouples 1 to 4.
# 1: hot water input temperature.
# 2: cold water input temperature.
# 3: hot water output temperature.
# 4: cold water output temperature.
09) Read the input cold water temperature.
10) Set the hot water valve to obtain a flow of near 0,05 kg/s. Verify and repair the leaks.
11) Turn on the electric heat (medium power) and verify its correct operation.
12) Change the cold water flow (minimum, maximum and media). Wait the steady flow. Measure the flow and
input and output temperature of hot and cold water. The low flow is near 0,01 kg/s, and high 0,13 kg/s. Due the
water flow fluctuation, it's necessary take more than 3 flow measurements and calculate the average flow.
13) Repeat all the procedure for the concurrent flow (hot water is always in inner pipe).
14) After the experiment, turn off the instrumentation, the electricity and water flow.
15) Empty heat exchanger water.
16) Turn off the lamps before leaving laboratory room.
MATERIAL UTILIZATION
01) Take cares with equipment and instrumentation, because this has fragile components.
02) Proceed the assembly in order to make the measurements easy.
03) Verify the correct electricity point (110V).
04) Put the PVC tubing in correct direction to avoid splash water in digital thermometer.
RESULTS
01) Write all tests results (temperature and flow).
02) Plot graphs Temperature x flow.
03) Calculate the exchanger output temperature by NUT method. Consider 1" and 1/2" fine wall pipes.
04) Compare the experimental results with the calculated results. Analyze the differences and make the
uncertainties analysis.
05) Calculate the thermal losses and the exchanger thermal efficiency.
06) Write all the difficulties found in this test. Suggestions for the development of this class will be welcome.
07) Conclusions: What are you learned in that laboratory class that it wasn't in the book, or wasn't learn in
classroom, that you need discover (create, imagine, guess etc.), to obtain the final result?
Executor:
Supervisor:
Bibliography:
[1] HOLMAN J.P. Experimental Methods for Engineers. McGraw-Hill, New York, 1994, 616p.
[2] INCROPERA F.P.; DE WITT D.P. Fundamentals of Heat and Mass Transfer. John Willey & Sons, New York, 3ºed,
1990. 970p.
[3] KERN, Donald Q. Process Heat Transfert. McGraw-Hill Kogakusha, Tóquio, 1950, 871p.
This home-page was reviewed at 26/Mars/2007
Annex 2. Heat Exchanger Software User's Manual.
This HP-48 calculator software compute the heat exchanger output temperatures by the effectiveness (NUT)
method.
1) Install the software in the calculator
2) Find the folder EXCH
3) Press the RUN key to start the software.
1st Window: Heat Exchanger Input Data:
Input hot water temperature (°C).
Input cold water temperature (°C).
Hot water flow (kg/s).
Cold water flow (kg/s).
To change the data, move the cursor to the data that want change. Type the new value and to pressure OK.
2nd Pop-Up Window: Heat Exchanger Flow Type: countercurrent or concurrent.
Select the heat exchanger flow type. Press OK.
Press OK to start the software
3rd Window: Calculation Results:
Output hot water temperature (°C).
Output cold water temperature (°C).
Press any key to finish the software.
4) Press the RUN key to restart the software.
How to install the software in the Calculator
1) Connect the calculator to the computer serial port (1 or 2)
2) Install the Kermit software in the computer. (http://www.columbia.edu/kermit/)
3) Set the connection port (SET PORT 1)
4) Set the speed connection to 9600 Baud (SET BAUD 9600)
5) Send the file to the calculator (SEND EXCH.TXT)
6) Open the Calculator Kermit protocol [left-shift] [I/O] - > [Transfer.]
7) Receive the file {RECV}
8) Close the Calculator Kermit Protocol {OK}