1
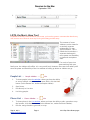
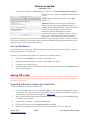
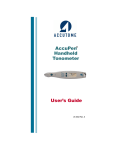
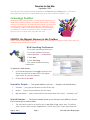
Reunion for the Mac
September 2013
Note: The main text of this instruction is lifted from the Reunion User’s Manual, the “?”icon at the
bottom left corner of any View. I have added a few of my own words here and there. - pb
Genealogy Toolbox
Reunion provides a perfect toolbox for creating and organizing your
family history database. Build your database with edit lists, use dragn-drop as a screwdriver to re-connect the stray sheep, or grap the saw
to export just the right branch of the family tree. The right tools in
your genealogy toolbox will make the difference between hanging
your relatives on a hook on the back of a door, or lining up your
ancestors, all color coded, neatly arrayed in the closet.
SEARCH, the Biggest Hammer in the Toolbox
Need to find something? Use Search. Need to find a boy named Sue? Use Search. Need to know who was
in Sharp County, Arkansas? Use Search.
Web Searching Preferences
To set web-searching preferences...
1.From the menubar at the top,
choose Reunion -> Preferences.
2.Click Web.
3.Click Searching.
This opens the Web Searching
Preferences...
To perform a web search...
1.
Click the Person menu button for anyone in the
family view (the little triangle icon in the upperright corner of a person's button).
2.
Choose Search the Web.
Search for People -
The People sidebar is a list of........People! It can be filtered by:
1.
Surname - Just type the Surname into the Search bar.
2.
Names - Type a comma and then the first name
3.
Married Names - enter a dash before the married name, first name: “-kennedy, rose”
Search Sources -
The Sources sidebar allows you to find text in any field of a Source.
Find a source type or citation detail.
1.
The most basic search is to look for text in any field of any source type. To perform
such a search, make sure the Type button is set to "Any Type." Then, type some text
Sep 13, 2013
[email protected]
Page 1!
2013 Sep Class Notes.pages
Reunion for the Mac
September 2013
into the search box and press the Return key. The list will show only the source records
that contain the search text. To show all sources, click the little "X" button in the search
box to clear the search box.
2.
By number, #xx
3.
Source Usage with Details - Sources >
Pages
4.
Multimedia attached to a Source - look at the far right hand column of the listing for
sources that have multimedia attached.
Search the Manual -
> Source Usage Report > Open with
The Manual is your best friend and the easiest way to hit the nail
is to use this feature often.
1.
A Shortcut - One of Reunion's many letter key shortcuts includes typing ? and search
words. For example, rather than first opening the manual window, just type ?leap year
and press Return.
2.
Search Field is not case sensitive. You can use one word, two words or a phrase.
3.
Navigating the Manual Pages
Use the Back and Forward buttons, just as you would in your web browser, to
navigate between manual pages.
The Contents button takes you back to the manual Contents page. You can also
choose Help -> Contents.
The History button, in the bottom bar, will show a list of recent pages you've
visited in the manual, including search results pages.
The Top button, in the bottom bar, will scroll the current manual page to the top.
For quick access to key pages in the manual, use the Bookmarks button on the
manual toolbar.
•
To add the current page to the list of bookmarks, click the Bookmarks button
and choose Add Bookmark.
•
4.
To edit the bookmarks, click the Bookmarks button and choose Edit
Bookmarks.
Manual Font Size - By default, the manual uses the Lucida Grande font, size 12. To
experiment with different font sizes in the manual, choose Manual -> Make Text
Bigger or Manual -> Make Text Smaller.
Search and Find
- Use the Find sidebar feature to sort your database for just the
information you need.
1.
Empty Fields - Keep in mind that the what-to-look-for box can be empty. I.e.,
searches for empty or null fields is supported. For example, if you wanted to get a list of
people with no burial place, you could set up the condition below. Notice that the whatto-look-for box is empty.
Sep 13, 2013
[email protected]
Page 2!
2013 Sep Class Notes.pages
Reunion for the Mac
September 2013
2.
Non-Empty Fields - If you want to get a list of people who have a burial place entry,
you could set up the condition below. Notice that the what-to-look-for box is empty.
LISTS, the Must-Have Tool
In addition to the lists on the left side of your screen, you have the option to customize the data the way
YOU want to see it. There are even ways to do quick editing and data entry.
The content of some
sidebars can be viewed in
an entirely separate
window with it's own
special features. This is
called the List window, a
separate window with
more power and flexibility
to view and manipulate
data.
For much of your time
spent working with your
family tree, the sidebar will suffice. It's a very useful tool. However, there are times when you'll
want the power and flexibility of the List window to boldly go where no sidebar can go.
People List -
People sidebar ->
List
1.
To show people in the List window, where you have the ability
to set up multiple columns to show more fields, click the List
button (in the bottom bar, under the People sidebar).
2.
Save Preset.
3.
Edit directly in List view.
4.
List living people.
Places List -
Places sidebar ->
List
1.
To show places in the List window, where you have the ability to edit, geocode or map
the location, click the List button (in the bottom bar, under the Places sidebar).
2.
Edit list, merge locations, geocode, or map.
Sep 13, 2013
[email protected]
Page 3!
2013 Sep Class Notes.pages
Reunion for the Mac
September 2013
3.
In Places sidebar, select location, click Usage
Source List -
Sources sidebar ->
List
1.
To show a specific Source in the List window, Search or select.
2.
To copy the text of a Source
Click the Source Tools button in the bottom bar.
Select Copy Text of Source from the Source Tools window.
Contact List -
The Contacts sidebar will give you a list of people for whom you have
entered an address, phone number email or website.
Re-Connecting, Tighten Down the Links
In addition to the lists on the left side of your screen, you have the option to customize the data the way
YOU want to see it. There are even ways to do quick editing and data entry.
Multimedia Links
Once multimedia files are linked to people, families, or source records, the multimedia files can
be moved and renamed in the Finder and Reunion will automatically keep
track of the files. Thus you may reorganize and/or rename multimedia files
in the Finder and Reunion will maintain the links to the files. I.e., you won't
be breaking links to pictures if you reorganize or rename your picture files
in the Finder and you don't need to manually relink pictures or tell Reunion
where they've gone.
Drag a picture file from the Finder or a thumbnail from iPhoto (version 6 or
newer) or any image in your web browser and drop it onto any person
button (husband, wife, children, or parents) or the marriage field in the
family view. Don't "drop" the file (release the mouse button) until the target
person's button is highlighted.
You can specify different folders for Reunion to search through when it
can't find a multimedia file. Reunion will search the entire contents of these
folders (including subfolders) before giving up and changing the thumbnail to a generic icon
with a red question mark (as described above).
To specify the folders to be searched when a multimedia item is missing...
•
•
Choose Reunion -> Preferences.
Click the Multimedia Files button.
You'll see two lists...
Sep 13, 2013
[email protected]
Page 4!
2013 Sep Class Notes.pages
Reunion for the Mac
September 2013
•
The top list is where you want Reunion to search - the multimedia search locations.
•The bottom list is where you don't want Reunion to
search.
•Add folders to either list by clicking the Add
button (+).
•Remove folders from either list by selecting a
folder path and clicking the Remove button (-).
Always search iPhoto Library - check this button
if you store genealogical images in iPhoto.
Otherwise, leave it unchecked to prevent
unnecessary searches of iPhoto libraries. As time
goes by, we are seeing iPhoto libraries growing
immensely — which greatly increases the time
required for searching. So, if you don't use iPhoto for genealogical pictures, it's better to leave
this button unchecked. The button should remain unchecked unless previously linked media
files are being moved into the iPhoto library.
Are You My Mother?
The simplest way to remove or "unlink" a person from the wrong family (or spouse) is to drag
the person to Reunion's Clipboard.
Similarly, if you need to move parents or spouses to a different family...
1.
make sure that Clipboard is selected in the Sidebar list
2.
drag the misplaced parent or spouse to the Clipboard sidebar
3.
navigate to the correct family
4.
drag the people out of the Clipboard sidebar, dropping them where they should appear
in the correct family.
Sawing Off a Limb
Need to give your cousin only your Mom’s half of your database? Want to donate the research you have
done on the Horn family to the local genealogy society? You need a saw. Export just the right branch of
the family and send it on.
Exporting a Branch or Subset of a Family File
To export a branch or subset of a family file...
1.
First, selectively mark records, by selecting Mark in the navbar. Many different subsets
of the family file can be marked automatically, such as relatives of somebody, ancestors
of somebody, descendants of a couple, etc. Learn more.
2.
After you're finished marking the people you need to export, be sure that Family View
is selected in the navbar.
3.
Choose File -> Export -> Reunion Family File.
4.
Configure the window so that Marked people is enabled.
5.
Make choices regarding the inclusion of multimedia items, sources, and logs.
Sep 13, 2013
[email protected]
Page 5!
2013 Sep Class Notes.pages
Reunion for the Mac
September 2013
6.
Click Export.
Exporting Just My Relatives
Let's say you have a family file (A) that contains your relatives and your spouse's relatives, and
you want to copy your relatives into a separate family file (B) for use on the same Mac. Shown
below is the two-step process of marking your relatives and then exporting them into a new
family file.
Step 1
Step 2
Marking Your Relatives
1.
1.
2.
3.
4.
5.
6.
Open family file A and navigate to your
record.
Select Mark in the navbar.
Using the Who button in the Mark panel,
choose All Relatives.
Using the "of" button, choose your name if
it's not already appearing.
Click the Mark button.
Select Family View in the navbar.
2.
3.
4.
Exporting Your Relatives
Choose File -> Export ->
Reunion Family File.
Check the Marked people button.
Include All sources, All
multimedia. Do not check the
button "Copy multimedia files..."
Click Export. Name and save the
new family file which will only
contain your relatives.
Add/Search Logs
Logs can be a great way to keep reminders of what you need to look up
the next time you are in a particular library, or at a county courthouse,
or how many different spellings there are of a particular name,
Doughty, Daughty, Dowty, Dowtry, etc. Create a new Log for a surname
or a To-Do List, or a style sheet, or counties, or libraries. When the
information gets overwhelming, just use the search feature.
Finding Text in a Log
You can find text in a log by clicking the Find button (see illustration above), pressing
Command+F, or choosing Edit -> Find -> Find. Then enter the text you'd like to find in the
Find on This Page window and press Return/Enter or click the Next button.
Sep 13, 2013
[email protected]
Page 6!
2013 Sep Class Notes.pages