1
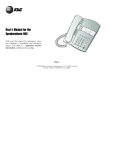
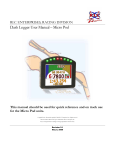
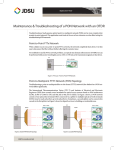
Orchid Telecom DX900 User Guide Congratulations on your purchase of the Orchid DX900 business feature phone. This business phone has been ergonomically designed to suit professional office requirements. This telephone performs all basic functions supported by your service provider. It works with all analogue PBX switching systems The caller ID memory and phone book provide a great convenience to manage your phone calls. The User Guide describes the installation procedures and features. Index Accessories & Content 2 Installation 2 Wall Mounting 3 Features 3 Function Buttons 5 Main Menu Settings 7 Setting Up 8 - Language 8 - Local Area Code 8 - Date & Time 8 - Recall 9 - LCD Contrast 9 - Pulse/Tone Dialling 9 - Baby Call 10 - Exit Menu 10 - Message Waiting 10 Using the Orchid DX900 11 - Pre-Dialling 11 - Headset 11 - Volume Control 11 - Speaker Phone 12 - Mute 12 - Redial 12 - Pause 13 1 - Recall 13 One and Two-Touch Memories 13 Caller ID 15 - To Review Calls 15 - To Make Calls From Caller ID 15 - To Delete Caller ID’s 16 Phone Book Memories 16 - to Add Contacts 17 - Search 18 - Edit 18 Automatic Call Timer 19 Accessories & Content The following items are included in this package of the Orchid DX900 Analogue Business Feature Phone :- Phone base unit with handset - 2 x Line cords - Instruction Guide - 3 x AA Batteries Installation 1) 2) 3) Insert one end of the curly handset cord into the socket on the handset and the other end into the socket on the LEFT hand side of the base unit (next to the telephone cradle). Insert the 3 x AA Batteries into the base battery compartment. Insert the line cord into the socket marked LINE on the rear 2 4) of the base unit. Wall Mounting - Fit the desk/wall bracket to the 4 slots on the underside of the telephone, next to the battery compartment, with “wall” facing upwards. - Directly beneath the hook switch push down on the latch and pivot up. - Drill 2 holes vertically 88mm apart on the wall where you wish to locate the phone and insert the screws. Tighten the screws so that the phone slots in place and fits snugly. - Note – take care not to drill through holes or elctrical cable. Features 1. Speakerphone 2. Large LCD Display (8.5cm x 4cm) 3. Headset Socket (2.5mm) 4. Desktop or wall Mountable 5. 70 Incoming Caller ID Memories 6. 70 Phone Book Memories 7. 16 Last Dialed Number Memories 8. 8 One Touch Memories and 10 Two Touch Memories 9. 16 Digit Alphanumeric display 10. 32 Digit Memory / Redial 11. FSK/DTMF dual system compatible 12. 12 Language Options 13. Local Area Code Setting 14. Time, Date,Month and Day setting 15. Recall Settings 16. Tone / Pulse setting 17. PABX code setting 18. LCD contrast setting- 5 levels 19. Mute with LED indication 20. Electronic Ringer Hi-Lo-off 21. Message Waiting – Line Reversal and 100v 22. Pre Dial Function 3 23. Call Back Function 24. Total Calls and New Calls Display 25. Pause -3.6 Sec 26. Volume control for Headset / Handset / Speaker – 4 levels 27. Automatic call timer 28. Hearing Aid Compatible 29. 3 x AA Batteries 30. 1 x 3m Line Cord 31. 3M Extended Handset cord 32. CE & RoHs Compatible 4 Function Buttons Function Buttons Description 8 One touch memories (24 Digits maximum). M1 – M8 can store and dial frequently called number.s Please refer to the user guide section ‘One touch memories’ Using the SHIFT key up to 10 two touch SHIFT memories can be stored into the 10 key pad buttons 1 – 0 To scroll up/down when browsing selection To review the dialled numbers. Press this button then use keys to browse. To Delete an entry or a record in the memory. DELETE Press and hold the button for more than 3 seconds, you can delete all records of the incoming or outgoing calls. ENTER To enter the telephone set up menu. Dial the numbers in predial mode 70 Contact Name and Numbers can be stored (Phone Book) 5 To accept a call or to make a call. In On Hook mode, with headset connected, if you press this button to take or make a call using (Headset / Speaker) a headset. If you want to use the Speaker phone, disconnect the headset. 4 levels for receiver volume control for (Receive volume) Headset, Handset and Speaker Phone – Low – Normal – Medium - High Press this button to Mute the Microphone. To Mute release mute, press the button again. There is a visual indicator (LED) when in MUTE mode The last dialed number (upto 32 Digits) will be retained in the redial memory. To recall a PAUSE/REDIAL dialed number simply lift the handset and press the redial button. This button can also be used to add a pause (Pause time is 3.6 sec) when storing a PBX access code into memories. Recall, also known as Flash, used to transfer calls between extensions or to use network RECALL services. Used to store the 8 one touch memories STORE And the 10 two touch memories 6 Main menu settings Press and hold the “ENTER” button for 4 sec (on-hook or off hook) the LCD displays “OPTIONS MENU ”. The following is the key sequence when pressing the “∆ (Up)” button. Menu Default OPTIONS MENU ∆∇ SET LANGUAGE ENGLISH LOCAL AREA CODE --- SET TIME/DATE 12:00 AM 1/01 SET FLASH TIME 100Ms LCD CONTRAST 3 SET TONE/PULSE TONE SET PBX CODE Not applicable for EU countries BABY CALL OFF EXIT OPTIONS Press the ENTER Button to go to the submenu, then press the ∆(Up) or ∇(Down) to scroll. Press the ENTER button to save and return back or press the RECALL button to exit. 7 Setting Up 1. Setting language - Press and hold the ENTER Button for 4 sec.(On hook or Off hook) : OPTION MENU ∆ ∇ - The LCD will show - Press ∆(Up) button - The LCD will show - Press ENTER to enter in to the menu - Use ∆(Up) or ∇(Down) button to select the language - Then ENTER button to confirm and set the language : SET LANGUAGE 2. Setting local area code - Press and hold the ENTER button for 4 sec.(On hook or Off hook) : OPTION MENU ∆ ∇ - The LCD will show - Using ∆(Up) or ∇(Down) button go to “LOCAL AREA CODE MENU” - Press ENTER button to enter in to the menu The LCD will show : AREA CODE - - - - Use ∆(Up) or ∇(Down) button to set the area code digit by - digit, pressing ENTER to select - Then ENTER button to confirm and set the area code. 3. Setting time & date NB: if connected to a PABX system, some systems automatically set date and time – please refer to the PABX user guide. - Press and hold the ENTER button for 4 sec.(On hook or Off hook) : OPTION MENU ∆ ∇ - The LCD will show - Using ∆(Up) or ∇(Down) button go to “SET TIME/DATE” - Press ENTER to enter the menu - The LCD will show - Use ∆(Up) or ∇(Down) button to adjust the correct hour / : TIME/DATE Minute / Month / Day at the top of the LCD - Then ENTER button to confirm and set the time and 8 date. 4. Setting RECALL (flash) time - Press and hold the ENTER button for 4 sec.(On hook or Off hook) : OPTION MENU ∆ ∇ - The LCD will show - Using ∆(Up) or ∇(Down) button go to “SET FLASH TIME” - Press ENTER to enter the menu - The LCD will show - Use ∆(Up) or ∇(Down) button to select the required flash : FLASH 300MS, timing - Then ENTER button to confirm and set the flash time. Note:You have 4 options to choose from –100Ms, 300Ms, 600Ms, 1000Ms The UK standard being 100Ms 5. Setting LCD contrast - Press and hold the ENTER button for 4 sec.(On hook or Off hook) : OPTION MENU ∆ ∇ - The LCD will show - Using ∆(Up) or ∇(Down) button go to “LCD CONTRAST” - Press ENTER to enter the menu - The LCD will show - Use ∆(Up) or ∇(Down) button to select the required LCD : CONTRAST 3, contrast level - Then ENTER button to confirm and set the LCD contrast level. 6. Setting Pulse/Tone dialing mode The DX900 is factory set for TONE Dialling. Should you need PULSE dialling proceed as follows: - Press and hold the ENTER button for 4 sec.(On hook or Off hook) : OPTION MENU ∆ ∇ - The LCD will show - Using ∆(Up) or ∇(Down) button go to “SET TONE/PULSE” - Press ENTER to enter the menu - The LCD will show - Use ∆(Up) or ∇(Down) button to select the required dialing : TONE, 9 mode. - Then ENTER button to confirm and set the dialling mode. 7. Setting Baby Call ( Emergency call) When baby Call is switched on, the phone will automatically dial the baby call number when anybutton is pressed. - Press and hold the ENTER button for 4 sec.(On or Off hook) - The LCD will show - Using ∆(Up) or ∇(Down) button go to “SET BABY CALL” - Press ENTER to enter in to the menu - The LCD will show - Use ∆(Up) or ∇(Down) button to set the emergency call. - The LCD will show - Press ENTER to enter in to the menu - Enter the number - Then ENTER button to confirm and set the mode. : OPTION MENU ∆ ∇ : BABY CALL OFF, : BABY CALL ON 8. Exit menu Select the ”EXIT OPTION” then press the ENTER button to exit. 9. Message waiting There are 2 types of Message waiting used by large PBX phone systems and there are 2 Message waiting LED’s on your telephone, one for each type: Type 1 .High Voltage ( 100v ) . To alert you that a message is waiting the system applies a high Voltage to your extension, this will light the LED above the message waiting symbol.This LED is also used to Flash on incoming calls , this is a useful feature if you need to turn the ringer Off but still need a visual indication that the phone is ringing Type 2 . Line reversal . To alert you that a message is waiting the system reverses the polarity of your extension connection to the system and lights the LED under the message waiting symbol.If your system uses this type of message waiting slide the Message Waiting located on the rear of the phone to the ON position. Check with your supplier to confirm the type of message waiting used by your PBX 10 Using The Orchid DX900 To make a call using handset, Pick the handset and wait for the dial tone. Then, dial the desired telephone number. To end a call, put the handset back to the cradle of the base unit, or push the hook switch. Pre-dialling In On-hook enter the phone number to be called, then press the ENTER button to dial out the number. Operation with headset Connect the headset to the 2.5mm headset socket on the right side of the phone. Press the button, to make and receive calls. Press button again to end the call. Note : You can switch to handset operation by simply picking up the handset. RRe Receiver Volume control There are 4 levels of receiver volume controls to set volume to suit you. This key is used to set the volume for Handset, Headset and Speaker. . level ▂ ▂ ▄ ▄ ▆ ▆ █ █ (Maximum) rd ▂ ▂ ▄ ▄ ▆ ▆ 4 level 3 level 2 The LCD display th nd st level 1 level ▂ ▂ ▄ ▄ ▂ ▂ (Minimum) The volume control can be adjusted during the conversation. Simply 11 press volume control until you get the right level for you. Speaker Phone This Orchid DX900 Business Phone has a “Speaker phone” feature. Before going to the speaker mode, ensure the headset is disconneted. In on-hook press the button, wait for the dial tone. Then, dial the desired number. To end a call, press the button again. Note : You can switch to handset operation by simply picking up the handset. Mute function For a private conversation or to consult a collegue, while you are on a call, Press the MUTE button and the word mute will be on the LCD. in Mute mode, your voice cannot be heard by your caller or called party. But you can hear your caller / called party. To release the mute, press the MUTE button again. Your caller / called party can hear you after this. Redial function The last dialed number will be (32 digits maximum) kept in the redial memory. To dial the number in on-hook - Press REDIAL button - The dialed number will be displayed in the LCD - Press ENTER button to dial the number 12 Pause function This is useful when the phone is connected behind the PABX. - Go to off-hook - Dial the PBX access number (Normally 9) - Then press REDIAL button - Dial the caller number. Recall (Flash) This is used to transfer the calls between extensions when the phone is connected behind a PBX. Consult your technical team or service provider, if you have difficlty in transferring calls, as the flash timing of the PBX and the phone have to be matched. The RECALL function is also used for Network Services. One and Two Touch Memories One and two touch memories provide you with the easiest way to make a call to a frequently used number. The maximum 24 digits can be stored in each one or two-touch memory buttons. To store a number into a one-touch memory button - Press the STORE button In On-Hook or Off-Hook mode - Dial the number to be stored - Press the desired memory location. M1 to M8 To make a call from the one-touch memory In on-hook Mode - Press M1 to M8 - Then press ENTER button to dial out In off-hook - Press M1 to M8 button to dial out the number 13 To store a number into a two-touch memory button 10 memories can be stroed into the 10 key pad buttons 1-0 - Press the STORE button in On-Hook mode - Dial the number to be stored - Press the SHIFT key followed by the desired memory location 1 – 0 To make a call from a two-touch memory In on-hook Mode - Press the SHIFT key then - Then press ENTER button to dial out the location key 1 – 0 In off-hook - Press the SHIFT key then the location key 1 – 0 To store an incoming number on the caller ID list - In on- hook or off-hook - Press ∆ (up) or ∇ (down) button to select the number - Press “STORE” button - The display will show : XXXXXXX STORE - Select the desired memory location M1 to M8 NUMBER To store an outgoing call number - In on- hook or off-hook - Press - Press ∆ (up) or ∇ (down) button to select the number - Press “Store” button - The display will show : XXXXXXX STORE - Select the desired memory location M1 to M8 button NUMBER To store a number during a conversation - Press “Store” button - The display will show : --------- STORE - Select the memory location M1 to M8 NUMBER 14 Caller ID This phone is equipped with Caller ID display and will record caller’s phone numbers. Caller ID feature will function only if your telphone line has this facility. For details, please consult your Technical team or phone service provider. If the number cannot be transmitted, the display will show the text “–E—“ (error in Caller ID signal). You can keep upto 70 incoming call numbers in the Caller ID memory. When the memory is full, the oldest record will be deleted and replaced by the new one. 1. To review the incoming calls - In on-hook or off-hook - Press ∆ (up) / ∇ (down) END OF LIST When there are new calls, the number of new calls will be displayed in the “NEW XX”. This icon will continue to show untill the new calls have been reviewed. To review the outgoing calls - In on-hook or off-hook (out) button Press Then press ∆ (up) / ∇ (down) END OF LIST - Quick viewing Press and hold ∆ (up) / ∇ (down) buttons for 3sec, then the call log will be shown for every 0.5sec and will stop after you release the key. - ToIn on-hook 2. make a call from the Caller ID memory - Press ∆ (up) / ∇ (down) buttons to select the number 15 - Press ENTER to dial out the number To make a call from the dialed out memory The last 26 numbers dialled and the length of the call can be displayed and dialled. (out) button - In on-hook, Press - Then - Press ENTER to dial out the number press ∆ (up) / ∇ (down) buttons to select the number 3. To delete a record from the Caller ID memory - Press ∆ (up) / ∇ (down) buttons to select the number - Press the DELETE button - The display will show : XXXXXX DELETE CALL? - Press the DELETE button to delete the number. To delete a record from the dialed out memory (out) button - Press - Press ∆ (up) / ∇ (down) buttons to select the number - Press the DELETE button - The display will show : XXXXXX DELETE? - Press the DELETE button to delete the number. To delete all records Press and hold the DELETE button for more than 3 sec. - The LCD will show : DELETE ALL CALLS? - Press the DELETE button 4. Phone book Memory You can store 70 contacts name and numbers in the phone book memory 16 To add a contact in phone book - In on-hook or off-hook - Press - The display will show : SEARCH - Press ∆ (up) / ∇ (down) buttons to select ADD - Press - Enter the contact Name using alpha numeric buttons (phone book) button ADD (phone book) button (phone book) button - Press - Enter the contact Number using number buttons - Press (phone book) button to confirm To add the incoming call into phone book - In on-hook or off-hook - Press ∆ (up) / ∇ (down) buttons to select the number (phone book) button - Press - Enter the contact Name using alpha numeric buttons (phone book) button - Press - Confirm the number - Press (phone book) button To add the outgoing call into phone book (out) button - Press - Press ∆ (up) / ∇ (down) buttons to select the number (phone book) button - Press - Enter the contact Name using alpha numeric buttons (phone book) button - Press - Confirm the number - Press (phone book) button Press the DELETE button to delete the current wrong letter or digit. Press the RECALL button to return back 17 Search function (phone book) button - Press - Press ∆ (up) / ∇ (down) buttons to select the SEARCH function (phone book) button - Press - Press ∆ (up) / ∇ (down) buttons to select the contact Quick search function (phone book) button - Press - Press ∆ (up) / ∇ (down) buttons to select the SEARCH function (phone book) button - Press - Press and hold the ∆ (up) / ∇ (down) buttons for 3 sec, then the record will be showed for every 0.5sec and will stop after you release the key. Edit function (phone book) button - Press - Press ∆ (up) / ∇ (down) buttons to select SEARCH function - Press - Press ∆ (up) / ∇ (down) buttons to select contact - Press (phone book) button (phone book) button - Edit the name - Press - Edit the name using alpha numeric buttons - Press (phone book) button (phone book) button - Edit the number using number buttons - Press - Press RECALL to exit. (phone book) button 18 5. Automatic call timer During a conversation, the LCD displays “00-00”.The timer will start 6 sec later. The LCD will keep displaying the conversation time for 3sec after the call ends. . 19