1
I N F O R M AT I O N
THE APPLE MACINTOSH IN A STRAND WORLD
a guide to using Macintosh computers with Strand lighting consoles
Version 1.0
May 2003
CONTENTS
Introduction . . . . . . . . . . . . . . . . . . . . . . . . . . . . . . . . . . . 2
What’s Needed To Make This Work . . . . . . . . . . . . . . . . . . . 2
Installing VirtualPC . . . . . . . . . . . . . . . . . . . . . . . . . . . . . . 2
Creating Multiple Virtual PCs . . . . . . . . . . . . . . . . . . . . . . . 3
Installing the Strand Off-Line Editor . . . . . . . . . . . . . . . . . . 7
Installing a Strand Remote Console . . . . . . . . . . . . . . . . . . 14
Installing the Strand Node Software . . . . . . . . . . . . . . . . . . 19
Installing WYSIWYG and Using It With A Strand Network . . . 25
Saving Shows Directly To Your Macintosh . . . . . . . . . . . . . . 34
Printing Shows From Your Macintosh . . . . . . . . . . . . . . . . . 36
Connecting to Wired Networks. . . . . . . . . . . . . . . . . . . . . . 38
Connecting to Wireless Networks . . . . . . . . . . . . . . . . . . . . 39
Console Software Requirements. . . . . . . . . . . . . . . . . . . . . 40
Console Configuration . . . . . . . . . . . . . . . . . . . . . . . . . . . 41
Numbers of Remote Consoles and Nodes . . . . . . . . . . . . . . 42
Consoles with Server Software . . . . . . . . . . . . . . . . . . . . . . 44
Consoles with Reporter Software . . . . . . . . . . . . . . . . . . . . 44
Further Information . . . . . . . . . . . . . . . . . . . . . . . . . . . . . 46
Keyboard Equivalents for Console Keys. . . . . . . . . . . . . . . . 47
A Note On This Document
This document is designed to assist owners of Apple Macintosh computers who wish to take advantage of the Mac’s ability
to link to Strand consoles via ethernet and to run Strand’s off-line editor software via VirtualPC. Because it is aimed at
Macintosh users who may not be familiar with PCs, DOS or command-line style operating systems it describes the various
set-up procedures in a step-by-step manner with screenshots to show you exactly what to do - this means that it is quite a
long document, but you should not allow yourself to be intimidated by that!
The steps described are those required to configure the software with a standard Virtual PC installation. However, you should
note that if you have customised your VirtualPC set-up or use it to run other software, screens may appear slightly different
from those shown in the images in this document, and slightly different commands may be required (if, for example, you
have different directories in your VirtualPC). However, in these cases it is assumed that you have enough working knowledge
of DOS to ammend the instructions in this document to suit your system set-up.
As with all work involving installing new software on computers, it is recommended that you back up all important files before
carrying out any of the work described in this document.
Instructions to be typed in DOS are denoted by
this font
Instructions relating to console keys follow the usual Strand conventions:
[console keys]
{softkeys}
Version
Strand Lighting Information Document: The Apple Macintosh in a Strand World
RH. Version 1.0. English. Console Software 2.6d. May 2003
Strand Lighting: www.strandlighting.com
Please send comments or corrections to [email protected]
Strand, 520i, 530i, 550i and ShowNet are trademarks of Strand Lighting.
Apple, AirPort, AppleTalk, iBook, Mac, Macintosh, PowerBook are trademarks of Apple Computer, Inc; Connectix, the Connectix logo, Connectix VirtualPC are trademarks of Connectix Corporation; Miscrosoft, Windows,
MS-DOS are trademarks of Microsoft Corporation; Cast Software, WYSIWYG are trademarks of Cast Lighting Limited. All other trademarks are acknowledged.
Page 1
THE APPLE MACINTOSH IN A STRAND WORLD
Apple Macintosh computers can now make very useful adjuncts to
Strand 300- or 500- series lighting consoles. By loading the appropriate
software, Macintoshes can be used as:
- off-line editors, allowing shows to be prepared or analysed away from the
theatre; shows can be taken from the off-line editor to a console or viceversa. If using the Macintosh as a remote console as described below,
shows can be saved directly from a console to the Mac and loaded
directly from the Mac to a console.
- remote consoles, allowing full or limited access to all of the functions of
a Strand-controlled lighting system independently of the main console.
Used in this way, a lighting designer can view channel levels in their own
chosen display format, independently of the actions of the show programmer using the main console
- remote nodes, allowing the Mac to show the same display as Strand’s SN
video nodes, which will be the same display as seen by the console programmer.
- WYSIWYG systems, allowing WYSIWYG to show a ‘virtual’ display of
what the lighting system is doing, either modelling what the lights are
currently doing or giving a blind preview of what they will be doing in a
specified cue.
For remote, node and WYSIWYG use, the connection between the console and the Macintosh computer can either be by RJ45 Cat-5 Ethernet
cable or, if the appropriate hardware is available, via a wireless Ethernet
network (IEE802.11b/‘WiFi’/AirPort). Wireless networking can use the
same base station as a Strand iPaq wireless handheld remote; however,
connecting a Macintosh to a console wirelessly does not require the console to have the Strand WiFi application installed.
What’s Needed To Make This Work
- An Apple Macintosh computer with a G3 or G4 processor running
Macintosh System 8.6, 9.x or X, with at least 4Gb of hard disk space
available (less for VirtualPC 4) and with at least 128Mb of RAM and a
CD-ROM drive for software installation. G4 Mac recommended for use
with WYSIWYG.
- VirtualPC for Macintosh, version 4 or later (version 5 or 6 required for
use with Mac OS X). Note that only the PC-DOS version of VirtualPC is
required for use with the Strand software; you will only need a Windows
version of VirtualPC (Windows 98 or later) if you are planning to use
WYSIWYG. VirtualPC is available from Macintosh software dealers or
directly from Connectix, www.connectix.com.
- Strand Lighting’s off-line editor (OLE) software, version 2.4 or later - the
latest software (2.6d at the time of writing) is recommended. For connecting to a console, the software should be the same version as is
installed on the console. If you wish to connect your Mac as a network
video node, you will also need Strand’s Node software (caution: read the
instructions on page 19 before installing the node software.....) This
Page 2
software can be downloaded from Strand Lighting’s website,
www.strandlighting.com
To connect to consoles, the Mac will need to have an Ethernet connector fitted, which all recent Macs do. You’ll then need:
- A Strand 300-, 400- or 500- Series console running GeniusPro/Light
Palette software version 2.5 or later with the Networker application software installed, and with an Ethernet connector.
- Standard 10BaseT (RJ45-style/Cat-5) Ethernet cabling and hub, for a
wired network.
For wireless use, you will also require an IEE802.11b wireless ethernet
base station connected to your console, and an IEE802.11b network
card for your Macintosh. Apple’s Airport cards are the most common
IEE802.11b wireless network cards, but other suitable cards are available for older Macs that can’t accept Airport cards.
Installing VirtualPC
VirtualPC is a software package which emulates one or more PCs on a
Macintosh. A VirtualPC ‘virtual machine’ consists of a virtual computer
together with a virtual hard drive.
To install VirtualPC, follow the VirtualPC instructions. At some point during the installation you will be asked which operating system you plan
on using with a hard drive - specify DOS. You will also be asked whether
you want the drive to be ‘dynamically expanding’ or ‘fixed size’.
VirtualPC 4 would sometimes not function correctly with Strand’s software installers if the ‘dynamically expanding’ option was selected; if you
are using VirtualPC 4 you should choose ‘fixed size’ and pick an appropriate size for the hard drive according to the free disk space available.
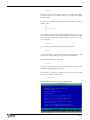
VirtualPC should now have created one virtual machine with a hard drive
- the virtual machine is probably called PC DOS unless you have given
it a different name. If you cannot see this virtual PC, select Virtual PC
List from VirtualPC’s Window menu
Page 3
Creating Multiple Virtual PCs
If you are planning to use the Strand off-line editor and use your
Macintosh to connect to consoles as a remote, node or with WYSIWYG,
we would recommend creating separate virtual PCs with separate hard
drives for each of the off-line editor, the Remote software, the Node software and WYSIWYG. Having each in their own virtual machine means
that you will be able to use them simultaneously, if required.
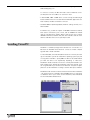
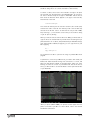
A VirtualPC virtual hard drive is actually just a file on your Macintosh’s
hard drive and will appear as shown in Mac OS9 (left) or OS X (right).
In VirtualPC 4 and VirtualPC 5, you can create two further hard drives
by locating the virtual hard drive file (usually in the VirtualPC application folder) and making two copies of it. You can then rename them to
make it clear which is which - for example, ‘Remote_Drive’ for the hard
drive which will contain the Remote software, ‘Node_Drive’ for the hard
drive which will contain the Node software.
In VirtualPC 6, the file format has changed to make it compatible with
both Macintosh OS 9 and OS X. You will find that if you try to copy these
in OS9, you will not be able to rename the new file. The simplest way to
make duplicate hard drives is to re-start your Macintosh in OS X and
duplicate and re-name the hard-drive files. You can then switch back to
OS 9 if you prefer working in that operating system. You will see that in
OS 9, the VirtualPC 6 hard drive image files have names ending with
‘.vhdp’.
WYSIWYG requires a hard drive containing Microsoft Windows 98 or
later - you should follow VirtualPC’s instructions for creating such a hard
drive.
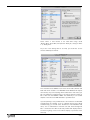
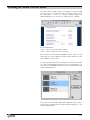
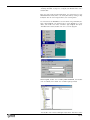
Having created multiple hard drives, you now have to create multiple virtual PCs. In VirtualPC’s VirtualPC List, select New...
In the PC Setup Assistant, select ‘Duplicate an existing PC’
Page 4
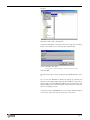
Select the PC to duplicate (normally the PC DOS PC), then give it a new
name. We would suggest ‘Remote_PC’ for the PC to be used for Remote
software and ‘Node_PC’ for the PC to be used for the Node software.
Allow VirtualPC to create this new PC, and repeat as required.
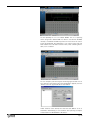
You then have to tell each virtual PC to use its own hard drive. In the
VirtualPC List, select ‘Remote_PC’ then chose ‘Settings...’
Page 5
Select ‘Drive 1’ then browse to the hard drive image called
‘Remote_Drive’. Press ‘OK’, then repeat for ‘Node_PC’, setting it’s ‘Drive
1’ to ‘Node_Drive’.
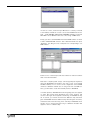
As you are in the Settings box for each PC, you should also set the
amount of Memory the PC has.
This should be at least 64Mb for each of the off-line editor, Remote and
Node PCs. A PC created to run WYSIWYG under Windows will require
more memory. If you are installing off-line editor version 2.6 or later, you
will see performance improvements in the off-line editor by setting its
PC to have more than 64Mb of RAM. The maximum you can set will
depend on the amount of RAM available in your Macintosh.
If you are planning to use your Macintosh to run more than one VirtualPC
simulatenously (for example, to run as a Remote Console and a Node
simultaneously), you should select ‘Preferences’ from VirtualPC’s Edit
menu, click on ‘PC Behavior’ and make sure that ‘Pause background
PCs’ is unselected. This will ensure that your Mac will display information from a lighting console in the various displays on your Mac simultaneously.
Page 6
Installing the Strand Off-Line Editor
The off-line editor software allows you to prepare or edit shows away
from the console. You will need to obtain the relevant software, usually
by downloading it from the Strand Lighting website at
www.strandlighting.com - then click on ‘support’ then on ‘software’.
You should download:
- ci.exe
which is the off-line editor software
- hc.exe
which contains the console help files.
Both of these files are listed under ‘430-550 consoles’. There is no separate listing for console software and off-line editor software since the
same software is used for both.
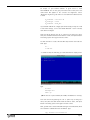
You now have to get these files into VirtualPC. To achieve this, VirtualPC
can ‘share’ a folder between the Mac and one or more virtual PCs. To do
this, start up your ‘PC DOS’ PC by selecting it in the Virtual PC List window then hitting Start Up
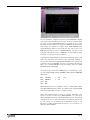
You should see a new window appear with a DOS PC screen inside it.
Now go back to the Virtual PC List window and press ‘Settings...’, then
selected Shared Folders
Page 7
Press ‘Share Folder...’, then create or pick a suitable folder. It may be
convenient to locate this folder on your Mac’s desktop so that it is easy
to find. Set its drive letter to Z:, and tick ‘Share every time’.
The ‘Z:’ part means that the shared folder appears as a pretend hard
drive called ‘Z:’ within VirtualPC. ‘Share every time’ means that this will
be set-up every time you start this Virtual PC so that you don’t have to
re-visit these settings. Once you have ticked this press ‘Share’.
Now switch back to the PC DOS window, and type
copy z:ci.exe c:
copy z:hc.exe c:
This will copy the two files from the shared folder into the virtual PC’s
hard drive.
Now type
ci
This ‘unpacks’ the installation files.
Page 8
Now type
crccheck
which will check that the software has been downloaded correctly - it
should report ‘[5] files checked’. If this is not the case, the file may not
have been downloaded correctly; you should not proceed with the installation but should download a fresh copy of the file.
Then type
ciinstal
Which will start the off-line editor installation. This will ask you a number of questions:
Type ‘o’ for off-line editor.
Type ‘g’ for the Genius Pro off-line editor (for European console users) or
‘l’ for the Light Palette off-line editor (for American console users).
Page 9
The software is now asking which directory to store the off-line editor in.
A PC directory is the equivalent of a Macintosh folder. The default is a
directory called ‘geniusp’ or ‘lightp’ depending software version. You
may want to specify a different directory name particularly if, for example, you are planning to install different versions of the off-line editor;
names can consist of up to eight characters then, optionally, a ‘.’ and a
further three characters. For example, if you are installing software version 2.6d you might want to specify a directory called ‘c:\2.6d’.
The software is now asking which directory it should store showfiles in,
by default. Just press return to accept its suggestion (since even if using
different versions of the off-line editor, you will probably want all of your
showfiles to be stored in the same place).
The software will then run through the Licence Terms and Conditions.
When it has finished press ‘y’ to confirm that you accept them.
Page 10
The off-line editor software will now be installed.
When it has finished, repeat the procedure with the help files. Type
cd ..
hc
The software may report that some files already exist; this is because
some of the file names created by the help installer are the same as
those already created by the off-line editor installer. Just reply ‘y’ in each
case. Once this is complete type
crccheck
to check the files, as before. Then type
hcinstal
to install the help system. Answer the questions as before. Specify the
same directory as you specified for the off-line editor software (ie.
c:\2.6d if following the example above).
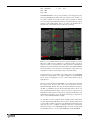
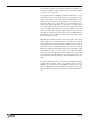
To run the off-line editor, you will have to change to the correct directory if you are not already there, then run the off-line editor software. You
can tell which directory you’re in by looking to the left of the flashing
cursor:
The installers will leave you in the correct directory (in this case, 2.6d),
so you can run the off-line editor by just typing
geniusp
(if you selected the GeniusPro off-line editor software)
or
lightp
(if you selected the Light Palette off-line editor software)
When you start the PC DOS Virtual PC, you will not be in the correct
directory, so in that case you would have to type
cd 2.6d
(or cd directory name) to change to the correct directory
geniusp
or
lightp
(to start the off-line editor software).
You are then in the off-line editor. Keyboard equivalents to the console
keys can be found in the console user manual, or at the end of this document.
Page 11
To return to DOS you must ‘shut down’ as you would when you finished
using a console. The keyboard equivalents are ctrl-F12 then F2 for
SHUT DOWN.
If you are using a PowerBook laptop, you may have to hold down a ‘FN’
key to make your function keys operate as function keys.
WARNING:
When you are using a Shared Folder in VirtualPC, it will appear as the
‘Z:’ drive in the Archive screen within the off-line editor. The simplest
way to save and load files would appear to be to select this Z: drive from
within the off-oine editor. However, problems have been noted with some
Macintosh/VirtualPC combinations whereby files saved or loaded in this
way become corrupt, and will therefore not load into another console
properly.
We would recommend saving to and loading from the ‘C:’ drive from the
off-line editor archive screen.
To move files from the C: drive to the Z: drive (from which they can be
accessed from the Macintosh, and so transferred by email or to a floppy
drive), exit from the Off-Line editor into DOS. Then type
cd ..
cd shows
to change to the directory holding the show files. You can then copy a
file from the Z: drive to the C: drive (the Mac to the PC) by typing
copy z:showname.ssf c:
or from the C: drive to the Z: drive (the PC to the Mac) by typing
copy showname.ssf z:
‘showname’ is the eight-letter filename for the showfile, which can be
seen on the right-hand side of the Archive screen on the console or the
off-line editor
Page 12
If the name is not known, a list of filenames can be produced by typing
dir
The name together with the date and time listings can then be used to
determine which is the correct file.
Once you have exited from the Strand software, you can close your
VirtualPC window by clicking in the top left-hand corner of the title bar.
You wll be asked whether you wish to ‘Save PC’s State’ or ‘Turn Off PC’.
‘Save PC’s State’ is equivalent to putting a Macintosh to sleep - when
you next start that VirtualPC it will start in exactly the same place. ‘Turn
Off PC’ is equivalent to shutting a Macintosh down - the next time you
start that VirtualPC it will have to start up (which will take a few seconds
longer) and will then start from a ‘fresh’ condition.
We would recommend always exiting from the Strand software and
selecting ‘Turn Off PC’. If you choose ‘Save PC’s State’ then when you
next turn on that VirtualPC it’s internal clock will be out-of-sync with the
Mac’s clock (and so with real time). This may lead to confusion as to
when different versions of a showfile had been saved. ‘Turning off’ the
PC then re-starting it ensures that its follows the correct time.
Page 13
Installing a Strand Remote Console
Running the Strand software configured as a remote console allows you
to use your Macintosh running VirtualPC as a fully-functional console in
a Strand network. This means that you can configure all of your screen
displays independently of the main consoles, and control the rig and run
or edit cues exactly as you would from the main console (unless limited
by the use of channel or playback partitioning or via the Server software).
The software used as a Remote Console is actually the same software as
used for the Off-Line Editor, only configured differently, plus Strand’s
‘Networker’ software which allows consoles to connect to a network.
From www.strandlighting.com you should download:
- ci.exe
which is the console software (unless you have already down
loaded it as part of installing the off-line editor as described
above)
- cn.exe
which contains the Strand Networker software.
Follow the instructions in ‘Installing the Strand Off-Line Editor’ (page 7)
for setting up a Shared Folder for the ‘Remote_PC’ PC in Virtual PC.
Then, in the Remote_PC window, type:
copy z:ci.exe c:
copy z:cn.exe c:
This will copy the two files from the shared folder into the virtual PC’s
hard drive.
You should then follow the instructions for installing the Off-Line Editor
software above, up to the point where the off-line editor software is
installed.
Then, instead of installing the help files, you need to install the
Networker software. Type
cd ..
cn
The software may report that some files already exist; this is because
some of the file names created by the Networker installer are the same
as those already created by the off-line editor installer. Just reply ‘y’ in
each case, then type
crccheck
to check that the software has downloaded correctly, then
cninstal
to start the installation of the Network software. Answer the questions as
before. Specify the same directory as you specified for the off-line editor software.
The installer will leave you in the correct directory (in this case, 2.6d).
You now have to configure your remote console to allow it to work with
the rest of your Strand network.
Page 14
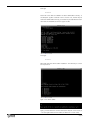
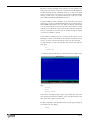
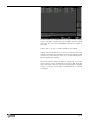
Type
e 220node.cfg
‘e’ stands for edit; this will allow you to edit the node configuration file.
You will have to pick a suitable node address for your remote console this number must be unique on your Strand network. A good choice is
often 192.168.0.99. You can also give your remote console a name; this
is the name which will appear on the console’s net diagnostics screen.
‘Mac’ might be a good name. So scroll down and then edit these lines
to read:
nodeaddr = 192.168.0.99
nodetype = IOFTP
hostname = Mac
If your Strand network has a highly-specialised setup you may also need
to edit other settings, such as the TCP/IP Netmask - but if in doubt,
leave them unchanged.
Save this file by pressing the ‘alt’ or ‘option’ key to bring up a menu,
then press the down arrow and move down to ‘Save’, then press Return.
Then bring up the menu again and select ‘Exit’.
The Strand software is now configured and ready to talk to the network.
However, you first have to configure VirtualPC to communicate with a
network.
First, go to the Edit menu and select ‘VirtualPC Preferences’ (this option
appears under different menus in VirtualPC 4 and 5, and in VirtualPC 6
for OS X)
Page 15
Select the ‘Virtual Switch’ option. If you are connecting to the network
via a cable to the connector in the back of your Macintosh, select
‘Ethernet built-in’. If you are connecting wirelessly, select ‘Airport’.
While here, select ‘PC Behaviour’ and ensure that ‘Pause Background
PCs’ is not selected, to allow your Remote Console to run alongside other
VirtualPCs. Then press ‘OK’ to close that window.
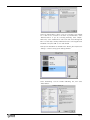
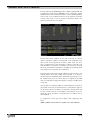
Now open the ‘VirtualPC List’ window. Select ‘Remote_PC’ and press the
‘Settings...’ button to bring up the Settings window
Select ‘Networking’. Tick the ‘Enable networking’ box, then select
‘Virtual Switch’
Page 16
Then press ‘OK’ to close that window.
Now click in to your Remote_PC window again. You can now start the
remote console: depending on whether you installed the Genius Pro or
Light Palette software, type
neton
geniusp remote
or
lightp remote
(if you have just started up your Remote_PC, you will first have to type
cd 2.6d
to change to the correct directory.)
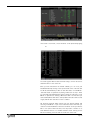
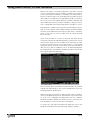
If you are connected to a Strand network, you should see a list of consoles on the network. To connect to a console, select its number and
press Return.
After a few moments, you will see the console screens on your Mac’s
screen, and should be able to control channels, playbacks and displays
using the usual off-line editor keys.
If you can’t see any consoles listed, check that you are connected to the
Page 17
network (ie. the network cable is connected to the rear of your
Macintosh, or that your Airport card is turned on if using a wireless network), and check that the console on the network has the NET Networker
software installed and has networking turned on in its Console Setup
screen. If the Mac has connected to a console but the displays appear
strange, you will have to set your Remote Console to just use one display: USER SETUP (CTRL-F9)>Number Screens 1.
To return to DOS you must ‘shut down’ as you would when you had finished using a console. The keyboard equivalents are ctrl-F12 then F2 for
SHUT DOWN. Alternatively, just close down the Remote_PC window:
since all of the show data is stored on the main console there is no harm
in doing this. You will want to select ‘Turn off PC’ rather than ‘Save PC’s
state’ to ensure that the next time you use the Remote PC, its network
connections re-establish correctly.
It is possible to simplify the process of starting up the remote console
by making a ‘remote’ command which will initialise and start the remote
console. To do this, exit from the remote console into dos, then type
You will now have to create a file that will setup and run the node software. Type
cd ..
e remote.bat
‘e’ stands for edit; this will bring up a text editor with an empty screen
Type
cd 2.6d
neton
geniusp remote
Then save this file by pressing the ‘option’ key to bring up a menu, then
press the down arrow and move down to ‘Save’, then press Return. Then
bring up the menu again and select ‘Exit’.
You will now be able to start your Mac remote console by just starting up
your Remote_PC, then typing
remote
Page 18
Installing the Strand Node Software
Running the Strand node software allows your Mac to show the same display as Strand’s SN video nodes, which will be the same display as seen
on the main console. This can be useful because (for example) it allows
you to see a cue in preview by asking the console operator to switch to
preview rather than having to manually switch to the preview display
yourself, as you would have to do if using a Remote Console window. Of
course, in VirtualPC the Remote Console and Node windows can be open
simultaneously, giving you the best of both worlds!
WARNING:
Read and follow these instructions carefully. Installing the node software
is slightly different from installing the console software, since it is
designed to run on a Strand SN node. Failure to follow the instructions
may lead to the installer deleting your VirtualPC hard drive, or leaving
your Node VirtualPC in a state where it will not start up correctly.
Note that if you are installing this onto a ‘real’ PC you should ensure that
your hard drive has a directory called ‘DOS’, “WINDOWS’, WINNT’,
WIN95’, ‘WIN98’ or ‘WIN2000’ on it, otherwise the installation software
will assume it is installing on a node and wipe your entire hard drive!!
Your ‘Node_PC’ in VirtualPC has a ‘DOS’ directory and so will be fine.
From www.strandlighting.com you should download:
- sn.exe
which is the node software
- cn.exe
which is the networker software (unless you have already
downloaded it while installing the off-line editor as
described above)
Follow the instructions in ‘Installing the Strand Off-Line Editor’ (page 7)
for setting up a Shared Folder for the ‘Node_PC’ PC in Virtual PC. Then,
in the Node_PC window, type:
copy autoexec.bat autoexec.old
copy config.sys config.old
This will copy the VirtualPC’s set-up information. Then type
mkdir strand
cd strand
copy z:sn.exe c:
This will copy the file from the shared folder into the virtual PC’s hard
drive.
Now type
sn
This ‘unpacks’ the installation files.
Then type
crccheck
which will check that the files have been downloaded correctly. If this
gives an error, you should download a fresh copy of the software.
Page 19
Now type
sninstal
Which will start installing the node software. You will be asked whether
you agree to the licence conditions - press ‘y’ to confirm. The software
will then install.
You now have to install a network driver to allow VirtualPC to connect to
the Mac. Type
cd ..
copy z:cn.exe c:
cn
The software may report that some files already exist; this is because
some of the file names created by the Networker installer are the same
as those already created by the Node installer. Just reply ‘y’ in each
case. Then type
crccheck
to check that the software has downloaded correctly, then
cninstal
to install the software. You will be asked for the ‘target platform’ - type
‘O’ for off-line editor. Then type ‘g’ for a GeniusPro installation
When asked for a directory name, type
c:\220os
since this is the directory that the node software installs itself into. The
Networker software will then install itself.
You now have to configure your remote console to allow it to work with
the rest of your Strand network. Type
e 220node.cfg
which will allow you to edit the node configuration file.
Page 20
You will have to pick a suitable address for your node - this number must
be unique on your Strand network. A good choice is often
192.168.0.89. You can also give your remote node a name; this is the
name which will appear on the console’s net diagnostics screen.
‘Node_Mac’ might be a good name. So scroll down then edit these lines
to read:
my_nodeaddr = 192.168.0.89
my_nodetype = sn100
my_nodename = Node_Mac
If you Strand network has a highly-specialised setup you may also need
to edit other settings, such as the TCP/IP Netmask - but if in doubt,
leave them unchanged.
Save this file by pressing the ‘alt’ or ‘option’ key to bring up a menu,
then press the down arrow and move down to ‘Save’, then press Return.
Then bring up the menu again and select ‘Exit’.
You will now have to create a file that will setup and run the node software. Type
cd ..
e node.bat
‘e’ stands for edit; this will bring up a text editor with an empty screen
Type
cd 220os
dc21x4pk 0x7e
220sn /pc
[NOTE: there IS a space between pk and 0x, and between sn and /pc]
Then save this file by pressing the ‘alt’ or ‘option’ key to bring up a
menu, then press the down arrow and move down to ‘Save’, then press
Return. Then bring up the menu again and select ‘Exit’.
Next, you will have to restore VirtualPC settings for this Virtual PC, which
the installation software will have over-written. Type
copy autoexec.old autoexec.bat
Page 21
and type ‘y’ when asked whether you want to overwrite the existing file.
Then type
copy config.old config.sys
and type ‘y’ when asked whether you want to overwrite the existing file.
Finally, you have to alter the VirtualPC’s settings slightly. Type
e autoexec.bat
which will edit this configuration file.
Delete the lines
fshare.exe
mouse.com
then save the file and exit the editor program.
The Strand software is now configured and ready to talk to the network.
However, you first have to configure VirtualPC to communicate with a
network.
First, go to the Edit menu and select ‘VirtualPC Preferences’ (this option
appears under different menus in VirtualPC 4 and 5, and in VirtualPC 6
for OS X).
Select the ‘Virtual Switch’ option. If you are connecting to the network
via a cable connected to your Macintosh, select ‘Ethernet built-in’. If you
are connecting wirelessly, select ‘Airport’. While here, select ‘PC
Behaviour’ and ensure that ‘Pause Background PCs’ is not selected, to
allow your Node to run alongside other VirtualPCs. Then press ‘OK’ to
close that window.
Now open the ‘VirtualPC List’ window. Select ‘Node_PC’ and press the
‘Settings...’ button to bring up the Settings window
Page 22
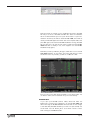
Select ‘Networking’. Tick the ‘Enable networking’ box, then select
‘Virtual Switch’
Then press ‘OK’ to close that window.
Now click in to your Node_PC window again. You can now start the
remote console: type
node
This should start the Node software. After a few moments you should see
one of the screens from the main console appear. Pressing the ‘1’ and
‘2’ keys allows you to toggle between the console’s two screens (or more,
if the console has more than two screens).
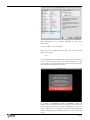
If a message ‘No Dmx/Network Activity - DMX Output Suppressed’
appears in red, it means that the node can’t find a console on the network or hasn’t been properly connected to the network. If all the connections appear correct, check that the console has the NET Networker
software installed and has networking turned on in its Console Setup
screen.
Page 23
If your screen just shows a number at the top, it means that a console
has been found but that console does not have its ‘Network Video’ option
turned on: [REPORT] {ADV SETUP} {CONSOLE SETUP}, then set ‘Net
Video Slot’ to 1.
When you have finished using the Node window, simply close the
Node_PC window. You will be asked whether you want to ‘Save PC’s
State’ (akin to putting a Macintosh to sleep) or ‘Turn off PC’ (akin to
shutting a Macintosh down). You should chose ‘Turn off PC’ to ensure
that the next time you use the node its network connections are properly re-established.
Page 24
Installing WYSIWYG and Using It With A Strand Network
Using Cast Lighting’s WYSIWYG allows your Macintosh to show you a
‘virtual’ representation of what your lighting rig is doing, either alongside
or instead of the numeric channel data available by using your Mac as a
remote console or as a node. WYSIWYG can listen to the Strand ShowNet
network to either show you what the lights are doing ‘live’ or, using the
console’s DMX-Preview setting, to have a ‘virtual preview’ of cues.
WYSIWYG runs under Windows 98 or later, and you will therefore need
to have a Virtual PC running Windows 98 or later installed. Connectix
sell ‘Operating System Packs’ that allow you to easily add new operating systems to existing VirtualPC installations, or you could buy a version
of VirtualPC with Windows 98 to begin with, adding PC-DOS if necessary. Or, if you already own a copy of Windows 98 or later, you can install
that into an existing VirtualPC setup, subject to Microsoft’s licensing
agreement.
Having set-up a new VirtualPC running a suitable version of Windows,
you can then purchase WYSIWYG and install it as per Cast Lighting’s
instructions.
To operate, WYSIWYG requires a USB ‘dongle’ to be connected. You may
find that if the dongle is connected to the USB port of your Mac before
you open the Windows VirtualPC, it will not be recognised by WYSIWYG.
The solution is simply to remove then replace the dongle, then re-run
WYSIWYG.
To allow WYSIWYG to listen to a Strand ShowNet network, a small network driver must be installed. This driver, called ‘lxstrand.dll’, is included with the ‘cn’ network installation software. If you have installed either
the Remote or Node software as described above, you will already have
this drive, otherwise download the ‘cn’ software from the Strand website.
You will need to copy the driver to your Windows VirtualPC. To do this:
Open your Remote_PC.
Move to the Strand directory by typing
cd 2.6d
Copy the driver to your shared folder by typing
copy lxstrand.dll z:
Close your Remote_PC
Open your Windows PC
Locate the Z: drive, which is the shared folder drive by default (this can
usually be found by double clicking on ‘My Computer’ then double clicking on ‘Shared Folder (Z:)’ to see the contents of the Z: drive)
Page 25
If you do not appear to have a Z: drive, follow the instructions under
‘Installing VirtualPC’ on page 7 to configure your Windows PC to use a
shared folder.
Once you have found the lxstrand.dll driver, you should move it to the
WYSIWYG Drivers folder, which can usually be found by clicking on ‘My
Computer’ then ‘C:’ then ‘Program Files’, then scrolling down.
You now need to tell WYSIWYG to use this driver using a Windows program called ‘RegEdit’. The quickest way to locate RegEdit is to click
‘Start’, then ‘Find>’ then ‘Files or Folders’. Type ‘RegEdit’ then press
‘Find Now’. Once found, double click on it to run the program.
Within RegEdit, double click on HKEY_LOCAL MACHINE, then double
click on Software, then double click on CAST Lighting Limited
Then double click on Protocol Manager and, from the ‘Edit’ menu select
Page 26
‘New Key’. A new folder will appear; give it a name by typing ‘Strand
Shownet’.
Now select ‘Edit > New > String Value’
A new entry will appear on the right of the screen. Type ‘File’ then press
Return. Then double-click on ‘File’ top open a new window
In the ‘Value data’ area, type
c:\Program Files\WYSIWYG Drivers\LxStrand.dll
then press ‘OK’.
Then press the small ‘x’ at the top-right of the RegEdit window to close
it.
You can now run WYSIWYG to draw your lighting rig, following the
instructions provided by CAST Lighting. Once drawn, you will have to
patch your rig so that the DMX start addresses for the moving lights and
dimmer addresses for conventional lights correspond to those in the softpatch in the lighting console.
In the ‘Data’ section of WYSIWYG, click on the ‘Patch’ tab at the bottom
of the screen, then the ‘Patch’ bar on the left of the screen
Page 27
You will probably see an icon entitled ‘EDMX’. This is for patching
show’s using ETC’s network DMX. You want to use Strand’s ShowNet
instead, so hold down the CTRL key and click in this area of the screen.
A pop-up window will offer ‘New Patch’ as an option. Select that and,
when asked for the new Patch Universe name, enter something memorable, such as ‘Strand’
You can now patch your various lights and moving lights: double click on
each and select the ‘Fixture’ tab in the window which appears, then the
‘Control’ tab in the right-hand side of that window.
Under ‘Universe’ select Strand, then enter the start address as set on
that fixture. Alternatively you can follow the other patching techniques
as described in the WYSIWYG documentation.
Page 28
Once the rig has been patched, you need to get WYSIWYG to listen to
the Strand network. To do this will first involve configuring Windows, so
save your WYSIWYG file and exit into Windows. There press Start then
select Settings> Control Panel.
Now double click on the Network control panel
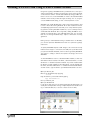
Select the TCP/IP-> Intel 21041 based Ethernet controller, then press
Properties. Click on ‘Specify an IP Address, then enter an IP address
which is not used by any other equipment on your Strand network.
192.168.000.100 is often a good choice. Also enter the subnet mask,
which will usually be 255.255.255.0
Press ‘OK’ then ‘OK’ again.
Page 29
You now have to configure the Windows VirtualPC correctly. Shut down
Windows (Start>Shutdown) then close the Windows PC Window. Then
from the VirtualPC list select the Windows PC then press ‘Settings...’
Select ‘Networking’ and ensure that ‘Enable Networking’ is ticked and
that ‘Virtual Switch’ is selected.
Then press ‘OK’. You may also have to go to the VirtualPC Preferences
box, as described on page 15, to select whether you are using a wired or
wireless connection to the Strand network.
Note that if you use the Windows VirtualPC to run other Windows software which accesses the Internet, you may have to toggle these
VirtualPC and Windows settings between connecting WYSIWYG to a
Strand network and using your other software.
Now start the Windows VirtualPC again, and run WYSIWYG. Open your
file then switch to LIVE mode.
If you now select ‘Live’ then ‘Device Manager’, you will be able to insert
a ‘Strand ShowNet’ network: press ‘New’ then select Networks then
Manufacturer then Strand Lighting then Strand ShowNet and press
‘Insert’.
You should now be able to select ‘Strand ShowNet’, then press the
‘Connect’ button. This should make WYSIWYG start listening to the data
being transmitted on the Strand network.
Page 30
If it fails to connect, ensure that your Macintosh is correctly connected
to the network, and that the console is set to transmit DMX over the network - under [REPORT] {ADV SETUP} {CONSOLE SETUP}, ensure that
NET DMX is set to OUTPUT and to the correct range of DMX values.
Finally, you have to tell WYSIWYG which Strand DMX universe to match
to which WYSIWYG DMX universe. Select Strand Shownet then press
‘Properties’. This will give a list of 36 ports each corresponding to one
DMX universe.
Double click on a relevant port and select ‘Strand’ to make it follow the
data on the Strand network.
Note that in complex system set-ups, some thought may be required to
match the WYSIWYG Port number to the correct ‘slots’ on the Strand
ShowNet network, since a console can be configured to send out DMX
universes to different network slots. If using more than one DMX universe, you will need to create more Strand patches in WYSIWYG.
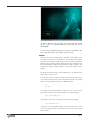
In normal operation, WYSIWYG will show the lighting state as it appears
on stage, with moving lights displaying their correct positions and
colours. If the lights do not appear to be moving on WYSIWYG as they
are in real life, you should check that the addresses they have been
given in WYSIWYG match the addresses they have been given in real life,
and that the units have been hung in the same way in WYSIWYG and in
real-life, since a unit that has been hung in a different orientation will
appear to move in a different way.
Page 31
It is also possible to configure the system to allow WYSIWYG to display
cues that are being previewed on the console. To do this, you must make
use of the console’s DMX PREVIEW option. In normal use, the console
will always send the current ‘live’ state out as DMX data to the dimmers,
moving lights etc, and this is normally correct. DMX PREVIEW works
slightly differently. When you are in LIVE, the ‘live’ state is sent out as
DMX data, but when you are in a PREVIEW display, the state you are
looking at in preview is sent out as DMX data - in other words the lights
follow the cue you are looking at in preview.
This behaviour would normally be wrong (-you’d prefer the lights to stay
where they were while you looked at cues in preview). However, it
becomes very useful when combined with WYSIWYG, since it allows you
to preview cues using WYSIWYG. The trick is to send the same data out
twice, once in normal ‘DMX OUT’ mode to the lights, and once in ‘DMX
PREVIEW’ mode to WYSIWYG.
If you were using one universe of DMX data, you could therefore configure your network DMX settings ([REPORT] {ADV SETUP} {CONSOLE
SETUP}) as:
Net1
Net2
Net3
Net4
PREVIEW
DMX OUT
OFF
OFF
1
1
512
512
513
1
WYSIWYG would then be configured to listen to network DMX outputs
513-1024 (WYSIWYG port 2) while any network nodes outputting DMX
data would output DMX channels 1 to 1024 correctly.
When using multiple remote consoles in a system, Net1-Net4 correspond to consoles 1-4 when set to DMX PREVIEW - so in the set-up
above, WYSIWYG would show cues previewed by console 1, which would
normally be the ‘real’ console in the system. If you want to preview cues
you are looking at on your Macintosh on WYSIWYG running on your
Macintosh, your Mac would normally be console 2, so you’d have to configure the network DMX as:
Page 32
Net1
Net2
Net3
Net4
DMX OUT
PREVIEW
OFF
OFF
1
1
512
512
1
513
With DMX PREVIEW in use, it is also possible to set moving lights in preview using WYSIWYG. By default this isn’t possible as the channel control wheel, trackball and rotary encoders aren’t available in preview
(since the wheel and trackball are used for scrolling through the cuelist).
However, under USER SETUP there is an option called ‘Wheel CC In
Preview’ that controls what these encoders do in Preview.
When it is set to ‘OFF’ they are used for scrolling through the cuelist.
When set to ‘ON’ they are available for controlling lanterns, exactly as
they are in LIVE. To scroll through the cuelist you have to hold down the
SHIFT key then move the wheel or trackball. When set to SHIFT+WHEEL
the inverse applies - the controllers scroll through the cuelist unless you
hold SHIFT, in which case they will control a selected lantern.
Using this function, it is possible to check and correct cues in WYSIWYG
before they actually appear on the stage in addition to using WYSIWYG
just to check or pre-program cues ‘live’ - with or without the real rig of
lights present.
When you have finished using WYSIWYG, you should leave the program
by selecing ‘Exit’ from its ‘File’ menu. You should then close the
Windows VirtualPC window, selecting ‘Shut down Windows’ then pressing ‘OK’. In VirtualPC 6 you will be presented with options about ‘carrying forward undoable changes’; these allow you to recover lost or
deleted files under certain circumstances, and you should refer to the
VirtualPC documentation for more details. Normally you will want to
select ‘carry forward undoable changes’.
It is possible to select ‘Save PC’s state’ instead of ‘Turn off PC’ without first shutting down Windows. This is akin to putting a Macintosh
to sleep and can make it quicker to get Windows up-and-running the
next time you use it. However, re-starting a PC with a saved state
sometimes results in the WYSIWYG dongle not being recognised by
the VirtualPC and so is not recommended when using WYSIWYG.
Page 33
Saving Shows Directly To Your Macintosh
When you are using a console with a Macintosh connected as a remote
console, you may want to save the showfile to your Macintosh as well as
to the console’s built-in hard drive - for example, as an extra backup or
because you want to work on the show away from the theatre (using the
off-line editor in your Macintosh) overnight.With your Mac connected to
the console, you can save showfiles directly to your Mac’s hard drive, and
load showfiles directly from your Mac’s hard drive, saving the need to
save to a floppy disk then load the floppy disk into your Mac or console.
Note that prior to software version 2.6d, this functionality was only possible on consoles with the Server software installed. The Server software
still offers some additional functionality (see page 44 for a summary),
but all consoles that can connect to a Macintosh can now save and load
files in this way.
If you connect your Mac to a console as a Remote, then select Archive
on the Mac (ctrl-F8 is the keyboard equivalent), you will see the console
archive screen but will also see an additional ‘C:’ drive with the name
you gave to your Mac’s remote console setup next to it - if you followed
the Remove Console set-up in this document exactly this name will be
‘Mac’ and so you will see “(\\Mac\C:)” This is the Virtual PC hard drive
for your Remote_PC - the hard drive called Remote_Drive if you followed
the set-up procedure described earlier.
You can now save files to and load files from this hard drive as you would
normally save and load files to the console’s hard drive (F3 is the keyboard equivalent for ‘Browse Files’).
While this provides a useful way of making backup copies of showfiles,
it does not immediately allow you to open these files in your off-line editor, since in the configuration described above that uses a different
Virtual PC hard drive. However, this problem is easy to overcome since
each VirtualPC can connect to more than one hard drive.
To achieve this, shut down your Remote_PC Virtual PC. Then in the
Virtual PC List window, select the Remove_PC and press ‘Settings.’
Page 34
Now select ‘Drive 2’ and then click on ‘Hard Drive document’. VirtualPC
will ask you to select a VirtualPC hard drive file. Select the hard drive
file for the Virtual PC that you use for your off-line editor - if you’ve followed this document, this will be called ‘PC DOS 2000’, which will be
inside your VirtualPC application folder. Select this and press ‘OK’, then
press ‘OK’ again (note that if the PC DOS VirtualPC is running, VirtualPC
will not allow you to do this because it will consider that the PC DOS
2000 hard drive is already in use; if this happens close the PC DOS
VirtualPC and try again).
Now when you start your Remote_PC again, it will have access to the PC
DOS 2000 hard drive, as its D: drive. This means that when you select
the Archive screen on your Mac, you will see a ‘\\Mac\ D:’ drive.
Files you save to this drive will be available to your off-line editor. You
can work on them, then re-load them into your console directly.
IMPORTANT NOTE:
If you open your PC DOS (off-line editor) Virtual PC while the
Remote_PC is running and configured to use the PC DOS 2000 hard
drive in this way, the PC DOS VirtualPC will not be able to save changes
to this hard drive (VirtualPC will warn you of this as it opens the PC). You
should either close the Remote_PC or set its Drive 2 back to ‘None’
while running the PC DOS VirtualPC.
Page 35
cue data in this way, a more efficient method might be to use Strand’s
ShowPort utility, which can convert show data to other formats).
To extract a cuelist, select ‘Cues’ and a suitable cue range to be printed, but make sure ‘Print Channels’ and ‘Add Attributes’ are not selected. Then in Printer Setup set the Type to ASCII OUT and the Port fo
FILE. Note the filename which appears to the right of the word file,
which will be in the form
c:\shows\name.prn
This shows the directory the file has been stored in (the ‘\shows’ part)
and then the name of the file. The directory used is the last directory
selected in the Archive screen. To make the file easy to find in DOS,
keep selecting ‘[..]’ in the Archive screen until you are shown as being
in just ‘C:’ prior to printing.
When you next exit exit the off-line editor into DOS, you will be able to
copy the file to the shared folder of your Macintosh. Assuming that you
printed the file to ‘C:’ as above, and provided that your VirtualPC settings
have shared folders enabled (see page 8), you can copy the file to your
Mac by typing
cd ..
copy name.prn z:
You should then be able to open the file using any suitable Macintosh
program.
To print from a console via your Macintosh, you need to have either your
Remote PC and/or Node PC running and connected to a console, and
with your USB Printer enabled as described above. When you select
Printing on either the console or your Remote PC and set the Port to
LPT1, you will be able to set the Net Node to either your Remote Mac
or your Node Mac.
When you press {PRINT SHOW}, the printout should appear from the
printer connected to your Mac. For more details, refer to the relevant
VirtualPC documentation.
Page 37
Connecting to Wired Networks
Connecting your Macintosh to a wired Ethernet network involves the use
of a ‘Cat-5’ ethernet cable, which uses RJ45 connectors which resemble oversized American telephone connectors. There are, however, two
types of cable:
- a standard cable. This is used when connecting a number of items of
equipment together through an ethernet ‘hub’ or ‘switch’ - a device that
looks like an ‘splitter’. In a theatre a hub might have one cable going to
each of the console, the backup console and one or more Strand network
nodes. Some hubs have a port labelled ‘uplink’ which is used to connect
the hub on to another hub. To connect your Macintosh to a hub, use a
standard cable and connect it to any of the ports on the hub apart from
the uplink port (-on some hubs the uplink port can be switched between
normal and uplink use; in this case you can use the uplink port as long
as you set it to ‘normal’).
- a crossover cable. This is used when your are only connecting two
devices together - for example, your Macintosh to a stand-alone console;
it is so-called because two of the wires are reverse-wired at one end of
the cable. A standard cable won’t work in this situation. Conversely, you
can’t use a crossover cable to connect your Macintosh to a hub (unless
you are connecting to the uplink port on a hub).
Apple has confused the issue slightly with their latest laptops, from the
15“ Titanium PowerBook G4 onwards. These can connect directly to
another device using a standard ethernet cable where you would normally have to use a crossover cable. Unfortunately if you do try to use a
crossover cable in this situation, as you would expect to, things won’t
work!
In general, wired ethernet connections are reliable. If you experience
problems you should first check that you are using the correct type of
cable, and that it is plugged correctly (ie. not into an uplink port on a
hub). You should then check that the connectors are pushed fully and
securely home - a common problem is for the clip on the top of the connector to become damaged and for the cable not to remain fully seated
in the connector.
If you experience a very slow or unreliable connection, particularly when
using a long cable run, it is likely to be because the cable is damaged
in some way. You should replace the cable at the earliest opportunity.
Strand’s ShowNet can co-exist with other network data, such as Apple’s
Appletalk. It is therefore possible to set-up one network that carries
lighting data between the consoles, nodes and Macintoshes as well as
other data (such as shared files and printer data) between Macs and
printers. However, this is not recommended in show-critical applications
since the bandwidth available for the lighting data may become constricted without warning by other network traffic.
Further information about ethernet and Strand ShowNet can be found in
the Shownet Design Guide, which can be downloaded from the Support>
Tutorials section of the Strand website, www.strandlighting.com.
Page 38
Connecting to Wireless Networks
Late-model G3 PowerBooks, second-generation iBooks and all G4
Powerbooks can be fitted with an Airport card - Airport being Apple’s
brand name for the industry standard ‘WiFi’ IEE802.11b wireless ethernet protocol. Airport-equipped Macs can communicate with any
IEE802.11b wireless device.
Strand ShowNet network data can be sent and received wirelessly by
adding any of the commonly available IEE802.11b base stations to a
Strand ShowNet network. Some theatres already have this kind of base
station on their network as they are also used by the Strand iPaq handheld remote control. In a set-up with just one lighting console, the wireless base station can be connected to the console’s network port using
a crossover cable. In more complex installations it can be connected to
a spare port on a network hub. Data will then be transmitted exactly as
for a wired network - in other words, network DMX data and video data
will be sent as per the Network DMX and Net Video Slot settings in the
CONSOLE SETUP screen. The WiFi application software is not needed
for this - it is only needed if the iPaq remote is to be used.
With a Mac running VirtualPC set to use Airport (by selecting Airport
under the ‘Virtual Switch’ setting of VirtualPC’s Preferences), all of the
functions described - node, remote PC and WYSIWYG - can take place
wirelessly.
You just need to make sure that the Mac has an Airport card installed,
and that it is switched on (select the Airport control panel and press
‘Turn Airport On’)
Page 39
With Airport on, you should be able to see a signal strength meter showing the wireless network. If other wireless networks are available in the
building (for example, an office network) you can select which network
to join from this control panel.
The operating speed of an IEE802.11b network is dependent on its signal strength. In areas of low signal strength you may experience slowdowns in the response of the node, remote and WYSIWYG PCs - in the
Remote_PC if commands are not appearing as you type them it is
because the Mac is losing contact with the console. Care with the positioning of the wireless base station can help with this - perhaps locating
it on stage instead of in the control room to ensure coverage under a balcony, for example. Alternative antenna are often available for the base
stations to improve signal strength. However, Strand do not recommend
using WiFi for carrying ‘show critical’ data, such as the DMX data from
the lighting console to the dimmer, unless the link can be proven to work
prior to being used in a show.
Older Macintosh PowerBooks (first and second generation G3s and all
earlier models) do not contain the internal slot required for an Airport
card. However, those models that include a PCMCIA Card slot can be fitted with a Wireless PC card to add wireless network functionality. Not all
Wireless PC cards are compatible with Macintoshes, but those made by
Compaq (as supplied by Strand with the iPaq remote) and Orinoco (and
others where the card is actually based on the chipset from Agere
Systems) do function. Suitable Mac driver software and control panels
can be obtained from www.proxim.com; these will appear as their relevant brand name rather than AirPort in the VirtualPC Preferences window.
The latest PowerBooks (from the 12” and 17” G4 PowerBooks onwards)
include Airport Extreme cards; this is Apple’s brand name for
IEE802.11g, a faster version of the IEE802.11b standard. These cards
remain compatible with existing IEE802.11b networks, but the entire
wireless network will operate at the speed of the slowest transmitter in
use.
Page 40
Console Software Requirements
For a Strand console to support network activity, it must have the
Networker application program installed. You can tell whether a console
has Networker installed by pressing [REPORT].
If ‘NET’ appears next to ‘Applications’ in the ‘Configuration’ section of
the screen, the Networker application is installed. If it is not installed it
can be purchased from Strand Lighting.
Note that very early consoles did not have a network card installed as
standard. In addition, a network card is not a standard feature of 300series consoles.
Note also that a Main console must be present in the system if DMX output is required. In particular, this means that you cannot use WYSIWYG
to visualise the lighting from the off-line editor software.
Console Configuration
For Network data to be available, it must be enabled in the Main console. These settings are found under REPORT > ADV SETUP > CONSOLE SETUP.
For all activity, ‘Networker’ must be turned ON. If the console does not
Page 41
have the Networker application installed, this setting will not be available. If the console does have the Networker software installed but this
option is still not available, the ‘cn‘ software has not been installed on
the console.
For network nodes and Macintoshes used as Nodes to display video, ‘Net
Video Slot’ must be set to a number. This number can be between 1 and
9; for a system with one Main console it will generally be set to ‘1’.
To send DMX data over the network, it must be enabled and the console
told which data to send over the network. The simplest configuration is
to send as many DMX ports as are being used over the network. For
example:
NET1
NET2
NET3
NET4
DMX OUT
OFF
OFF
OFF
1
2048
1
will send the first four universes of DMX out over the network. Network
DMX configurations will vary when multiple Main consoles are used on
the same network, or when using DMX PREVIEW with multiple consoles
- see page 32.
Numbers of Remote Consoles and Nodes
Different Strand consoles can support different numbers of remote consoles, up to a maximum of four remote consoles:
- Standard 300-Series consoles cannot support remote consoles.
- 310-Series consoles can support one backup console plus one remote
console.
- ‘Non-i’ 400- and 500-Series consoles can support one backup console
plus one remote console (note that not all 430 consoles have a network
card installed).
- ‘i’ 500-Series consoles can support a backup console plus up to four
remote consoles.
A Macintosh configured as a remote console counts as one of these consoles, so for each 500i Main console in your system you may also have
one Backup console and then four further Remote consoles, Remote
Macintoshes, Remote PCs or any combination thereof.
A system may have any number of nodes.
You can keep track of the devices currently connected to your network
by pressing [REPORT] then {DIAG} then {NET DIAG}.
Page 42
This will display a list of network devices currently connected, including
consoles and nodes, complete with their IP address and their network
name. Note that any connected WYSIWYG systems will not appear on
this screen.
A device that is “on line” is currently available on the network.
A device that is listed but shown as “off line” has been active on the
network at some point since the Main console was last switched on, but
has since lost contact with the console (ie. it has been switched off or
disconnected from the network).
Link status indicates whether the device is ‘talking back’ to the main
console. Remote consoles should show a link status of ‘OK’. Nodes will
show a link status of ‘No Link’ unless they are talking back to the Main
console in some way - most usually if a handheld remote is connected
to the Node.
Page 43
Consoles with Server Software
Consoles that have the SERVER application software installed (SVR next
to ‘Applications’ after pressing [REPORT]) can be configured to support
different remote users as well as just remote consoles, allowing different
users to have access to different functions in the system (for example,
to allow certain users to look at cues but not edit them). Refer to the
Server documentation for more details.
Consoles with Server software can also save show files to a remote
‘Server’ computer in addition to saving them on the hard drive of the
main console. If such systems do not have a central server, it is possible to configure them so that a Macintosh computer connected to the
network appears as the Server, so allowing you to save files to, and load
files from, the Virtual PC hard drive on your Macintosh directly, rather
than having to first copy them onto a floppy disk.
Note that from software version 2.6d onwards, this functionality is also
possible without the Server software being installed, or, if Server is
installed, with the standard file server and the Macintosh being accessible simultaneously. This also means that the configuration described
here is not required. See page 34 for details of saving to your Macintosh
in this way.
If you do wish to configure your Mac as a Strand fileserver, you must set
up your Mac to function as a Remote Console, as described on page 15.
You must then note the IP address you assigned to this Macintosh and
set your console to use this as the address of the fileserver. If you followed the set-up procedure as described, this IP address will be
192.168.0.99.
To configure the console, you need to edit its node configuration file.
Press:
[MORE] {NOTES DISP} {LOAD FILE} {CONF FILES} {NET CONFIG}
Page 44
Then scroll down and set the File server IP address to be the same as
the IP address of your Macintosh Remote Console:
file_server_addr = 192.168.0.99
Then press {SAVE FILE}.
The changes will not take effect until the next time you switch your console on. However, once you have done that then the next time you have
your Mac connected to the console and have the Remove Console software running on your Macintosh, when you go to the [ARCHIVE] display
on the console you will see the VirtualPC hard drive on your Macintosh,
which you can select for saving and loading files exactly as you would for
This will, for example, allow you to quickly transfer a showfile from the
console onto your Mac for later editing in the off-line editor, then allow
you to quickly load that edited file back into the console without having
to use floppy disks. See page 34 for information on moving files from the
Remove PC to the off-line editor and back.
Consoles with Reporter Software
Macs connected to consoles running the Reporter (‘REP’) software, and
used with SLD or other suitable fault-reporting dimmers will indicate
dimmer faults in the same way that the console does: channel numbers
with a fault logged will turn red, and details of the fault will be shown
in the Dimmer Log screen, accessible by pressing [REPORT] {DIMMER
LOG}, the keyboard equivalents of which are ctrl-F12 then F4.
For further information, see the Reporter user manual.
Page 45
Further Information
Strand Lighting: www.strandlighting.com
The latest console software and user manuals can be downloaded from
the website, which also includes many technical documents covering
console operation and ShowNet network design and set-up.
Strand Lighting publish a quarterly newsletter which includes tips on
using 300- and 500-series consoles. The newsletter is published in PDF
format; to subscribe, send email to [email protected]
Earlier issues can be downloaded from the support>newsletter section of
the website.
Apple: www.apple.com
Apple’s website contains a comprehensive, fully searchable technical
support section.
Cast Lighting/WYSIWYG: www.castlighting.com
WYSIWYG On-Line Forum: www.lightnetwork.com
Connectix: www.connectix.com
Wireless Networking for older Macs: www.proxim.com
Page 46
Keyboard Equivalents of Console Keys
When using the Macintosh as an off-line editor or remote console, you
will have to use the Mac’s keyboard instead of the console keys. The keyboard equivalents for the principal console keys are as follows; fuller
information can be found in the console’s manual. Some utilities, such
as QuickKeys, modify the behaviour of some keys. If the keys do not
seem to be doing the right thing, turn any such utilities off.
Channel Keypad
Channel . . . . . . . . . . . numbers
Cue
. . . . . . . . . . . C or c
Cue Part. . . . . . . . . . . P
Group
...........G
Submaster . . . . . . . . . S
FX
...........F
Dimmer . . . . . . . . . . . D
Console Shift Key . . . . s
Recording Keypad
Record . . . . . . . . . . . R
Update . . . . . . . . . . . U
Time
...........T
Rec Time . . . . . . . . . . :
Rec Sub . . . . . . . . . . . ;
Rec Mode . . . . . . . . . . J
Q-Only/Track . . . . . . . . Q
Channel Control
Next
...........N
Last
...........L
Thru
...........>
ThruOn . . . . . . . . . . . <
or s-> (shift-THRU on a console)
*
. . . . . . . . . . . return or enter
+
...........+
-
...........-
@
. . . . . . . . . . . @ or *
@ATT/Attrib . . . . . . . . A
@RANGE . . . . . . . . . . s-@
On
...........O
Full
. . . . . . . . . . . Ctrl-F
Off
. . . . . . . . . . . Ctrl-O
or
@@
or **
Rem-Dim . . . . . . . . . . I
Page 47
Undo
...........Z
Clr
. . . . . . . . . . . delete
User
...........!
Wheel-up . . . . . . . . . . Home
Wheel-Down . . . . . . . . End
Effects Playbacks
Fx Dir
. . . . . . . . . . . alt-9
Fx Sel
. . . . . . . . . . . alt-8
Fx Type . . . . . . . . . . . alt-7
Fx Time/Fx Rate. . . . . . alt-6
Fx Pause . . . . . . . . . . alt-5
Fx Load . . . . . . . . . . . alt-4
Fx Stop . . . . . . . . . . . alt-3
Fx Go
. . . . . . . . . . . alt-2
Fx Step . . . . . . . . . . . alt-1
Fx Go/Stop . . . . . . . . . alt-0
Display Select
More
. . . . . . . . . . . alt-R
Preview . . . . . . . . . . . ctrl-F2
Sub
. . . . . . . . . . . ctrl-F3
Live
. . . . . . . . . . . ctrl-F4
Group
. . . . . . . . . . . ctrl-F5
Patch
. . . . . . . . . . . ctrl-F6
FX
. . . . . . . . . . . ctrl-F7
Archive . . . . . . . . . . . ctrl-F8
Setup
. . . . . . . . . . . ctrl-F9
Macro
. . . . . . . . . . . ctrl-F10
Profile
. . . . . . . . . . . ctrl-F11
Report . . . . . . . . . . . ctrl-F12
Help
. . . . . . . . . . . ctrl-F1 or ?
Page Up . . . . . . . . . . . Page Up
Page Down . . . . . . . . . Page Down
Last Screen . . . . . . . . Space
Step through displays . . esc
(note: if using a PowerBook or iBook laptop, you may need to hold down
the ‘fn’ key to access the function keys so, for example. ‘Setup’ would
become ctrl-fn-F9. This depends on how your Keyboard control panel is
configured).
Page 48
Other
Time
...........T
Wait
...........W
Delay
...........E
Profile
...........p
Text
. . . . . . . . . . . Tab
PB
. . . . . . . . . . . alt-P
Goto
...........Y
Hold
...........H
(s-H for Unhold)
Update . . . . . . . . . . . U
Sub Page . . . . . . . . . . K
Bump Mode . . . . . . . . V
Stop/Blackout . . . . . . . B
Macro
...........M
Shift
...........s
P Keys
P1-P7
. . . . . . . . . . . ctrl-Q/W/E/R/T/Y/U
Playback
Go
PB1
...........g
PB2
ctrl-G
Load
...........x
X
Stop Back. . . . . . . . . . k
alt-k
Cut
...........u
alt-U
Mode
. . . . . . . . . . . ctrl-A
ctrl-B
Rate
...........r
o
Shift Functions
Macro 1-9 . . . . . . . . . s-1 - s-9
Repeat Last Command . s-return
Swap Screens . . . . . . . s-space (if set to more than 1 screen)
Update Cue . . . . . . . . s-c
Update Group . . . . . . . s-G
Reload playback . . . . . s-x (PB1), s-X (PB2)
Misc Other
Console LCD screens . . alt-esc (toggles display)
Page 49