1
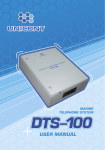
ECE 477 Digital Systems Senior Design Project Spring 2007 Homework 13: User Manual Due: Monday, April 30, at 5:00 PM Team Code Name: _______________Digi-Spi_____________________ Group No. ___1__ NOTE: This is one of the last sections needed to finish the Final Report. This homework will count for 4% of each team member’s grade, and therefore all team members should participate equally in completing it. The User Manual should be about 5 pages in length (one page per bullet). User Manual Outline: Brief (marketing-style) product description Product illustration annotated with callouts for each control/display Product setup instructions Product use instructions Product troubleshooting instructions Evaluation: Component/Criterion Score Multiplier Product description 0 1 2 3 4 5 6 7 8 9 10 X2 Product illustration with callouts 0 1 2 3 4 5 6 7 8 9 10 X2 Product setup instructions 0 1 2 3 4 5 6 7 8 9 10 X2 Product use instructions 0 1 2 3 4 5 6 7 8 9 10 X2 Product troubleshooting instructions 0 1 2 3 4 5 6 7 8 9 10 X2 TOTAL -1- Points ECE 477 Digital Systems Senior Design Project Spring 2007 Table of Contents DigiSpi Intelligent Recording Device..............................................................................................3 Package Contents .............................................................................................................................4 Functionality Overview ...................................................................................................................4 Controls and Interface Overview .....................................................................................................4 Front View .................................................................................................................................. 4 Setup and Quick Start Guide............................................................................................................5 Day-To-Day Use..............................................................................................................................6 Accessing the hidden control panel ............................................................................................ 6 Setting the noise threshold for speech detection......................................................................... 6 Connecting a Microphone........................................................................................................... 7 Connecting a Headphones/Speakers for Reviewing Audio ........................................................ 7 Recording Audio......................................................................................................................... 7 Playing back audio...................................................................................................................... 7 Inserting an SD Card................................................................................................................... 7 Cellular Phone Setup................................................................................................................... 7 Cell Phone Connection Indicator ................................................................................................ 7 Troubleshooting ...............................................................................................................................8 Legal Warning .................................................................................................................................9 -2- ECE 477 Digital Systems Senior Design Project Spring 2007 DigiSpi Intelligent Recording Device Congratulations on purchasing one of the most sophisticated security devices on the market today. The DigiSpi Intelligent Recording Device might look and function like a stylish and trendy lamp, but in reality it is a state-of-the-art surveillance system. The DigiSpi discreetly captures and records any speech using a clever digital signal processing algorithm. The recording is saved to a SD Card (included) allowing hours of uninterrupted surveillance. The DigiSpi also allows the easy playback of the recorded audio with the push of a button. Additionally, remote monitoring is enabled through cell phone connectivity (Cell phone service not included. Maintaining a contract with a GSM wireless carrier is the responsibility of the user.) Simply dial the number assigned to your DigiSpi, and you can eaves drop on a conversation from anywhere in the world! -3- ECE 477 Digital Systems Senior Design Project Package Contents Please check and insure your package includes all of the following components: • Lamp Base • Lamp Shade • SD – Card • Compact Fluorescent Light Bulb Functionality Overview The DigiSpi provides sophisticated functionality in an easy to use design! • • • • • Discrete, high-quality speech recording Adjustable noise threshold detection Advanced speech detection algorithm Easy playback of recorded audio Cellular connectivity for remote monitoring. Controls and Interface Overview Front View A B C D I E F G H -4- Spring 2007 ECE 477 Digital Systems Senior Design Project Spring 2007 Figure 1.1 DigiSpi Operator Interface LCD Display A. Microphone Selection Indicator B. Recording/Playback State Indicator C. Cell Phone Connectivity Message D. Uptime Tracker (DD:HH::MM:SS) Phono-Jacks E. 1/8th inch Microphone Jack F. 1/8th inch Line Out Push Buttons G. Reset Button H. Play/Record Toggle Memory Card I. SD/MMC card Socket Setup and Quick Start Guide Getting started with the DigiSpi is quick and easy. Follow the next 7 steps to be recording audio in less than 5 minutes. Step1: Unpack the lamp. A variety of materials have been used to protect your DigiSpi during shipment. Please be sure to remove all extraneous material from the device to avoid dangerous fire hazards. Step 2: Attach the designer lamp shade to the lamp. Step 3: Screw the included compact fluorescent light build into the socket. Step 4: Open the hidden door on the lamp and insert the SD Card into the socket (Component I in Figure 1.1) Step 5: Attach a standard microphone to connection E in Figure 1.1 Step 6: Plug-in the lamp and watch the LCD for status updates. The LCD should briefly say: “Setting Threshold,” then proceed to the standard display. That is it. The device is now recording! To playback audio, follow the simple procedure below: Step 6: Attach standard headphones or PC Speakers to connection F in Figure 1.1 Step 7: Press the playback button (Button H in Figure 1.1) Step 8: Enjoy listening to the recoding speech! -5- ECE 477 Digital Systems Senior Design Project Spring 2007 Day-To-Day Use Accessing the hidden control panel On the outside, the device is nothing more than an inconspicuous lamp. But a hinged door allows easy access to the operator interface for the DigiSpi. Simply pull the magnetically latched door open to reveal the controls. Access door for hidden control panel Setting the noise threshold for speech detection For optimal recording, the DigiSpi will sample the ambient noise around it to set a threshold for speech detection. This calibration is done automatically at startup. To insure proper calibration, make sure a microphone is connected and everyone is quiet in the room when powering on the device. The LCD will briefly display “Setting Threshold,” indicating the calibration is taking place. -6- ECE 477 Digital Systems Senior Design Project Spring 2007 Connecting a Microphone The DigiSpi utilizes a standard 1/8th inch phono-jack for the microphone connection. Simply insert the microphone’s connector into the socket (component E in Figure 1.1). To ease the insertion and removal of the connector, try turning the plug while making the connection. Connecting a Headphones/Speakers for Reviewing Audio The DigiSpi utilizes a standard 1/8th inch phono-jack for the headphone/speaker connection. Simply insert the headphone/speaker connector into the socket (component F in Figure 1.1). To ease the insertion and removal of the connector, try turning the plug while making the connection. Recording Audio After power-up, the device will begin listening and recording if it is determined speech is present. No user interaction is required to initiate recording. This insures that the system will continue to record after a brief loss of power. If you are currently in Playback mode, you can switch the device back to listen/record mode by simply depressing the right red button (push button H in Figure 1.1) Playing back audio Audio playback is initialized with the right, red pushbutton (push button H in Figure 1.1). Toggling this button switches states between playback and record mode. Inserting an SD Card The spring-loaded SD Card slot, component I in Figure 1.1, allows easy insertion and removal of your SD memory card. Push the card gently into the slot with the contacts facing down. A small locking click indicates the card is firmly connected. Cellular Phone Setup Setup of the cell phone connectivity requires the activation of the SIM card with your GSM Carrier of choice. U.S. Cell phone carriers that provide GSM service include AT&T, T-Mobile, as well as other regional network providers. Please contact you Cellular Company of choice for their specific activation procedures. Once your cell phone is activated, simply dial the number you have been assigned to listen live to the device. Cell Phone Connection Indicator The top right corner of the LCD display (Part C in Figure 1.1) shows the connectivity status of the cell phone. “Sch” indicated the DigiSpi is looking, or searching for service. “Con” means the device is connected to the cellular network you have configured. -7- ECE 477 Digital Systems Senior Design Project Spring 2007 Troubleshooting Problem: The LCD does not turn on. Solution: Check to make sure the DigiSpi is plugged in. If it is, turn on the lamp to check that the wall outlet is in fact supplying the necessary power. Problem: There is garbage on the LCD. Solution: Reset the DigiSpi by pushing the left, black button (component G in figure 1.1). Problem: The device is recording noise that is not voiced speech. Solution: Try recalibrating the device by initiating a reset. Before resetting, make sure the microphone is securely connected and there is no talking while calibrating during the reset. Reset the DigiSpi by pushing the left, black button (component G in figure 1.1). Problem: The DigiSpi does not answer when I call it. Solution: First, make sure you have activated your cell phone service as recommended in the Day to Day operation section of this manual. Next, check the LCD on the operator interface to determine the cell phone connection status. If the connection status does not read “Con,” the DigiSpi is not getting service. Try relocating the device to get better signal strength from your wireless provider. Problem: The uptime monitor has stopped updating. Solution: Try resetting the device. Reset the DigiSpi by pushing the left, black button (component G in figure 1.1). Problem: Nothing seems to be recorded. The LCD recording status does not change from “Lis” to “Rec.” Solution: Try recalibrating the device by initiating a reset. Before resetting, make sure the microphone is securely connected and there is no talking while calibrating during the reset. Reset the DigiSpi by pushing the left, black button (component G in figure 1.1). Problem: I cannot hear anything in playback mode. Solution: Check and make sure your headphones and speakers are properly connected to the phono-jack (component F in Figure 1.1). Also, try increasing the volume on your speakers. Problem: The lamp does not turn on. Solution: Is the device plugged in? Is the light-bulb burnt out? -8- ECE 477 Digital Systems Senior Design Project Spring 2007 Legal Warning Before eavesdropping or conducting covert surveillance, please fully understand the laws of the community and country you live in. -9-