1
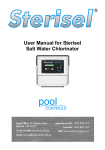
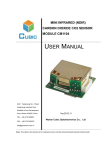
H2PRO Max by RHG Products
3-Stage RO/DI User Manual
H2PRO System Layout
New Machine Setup Procedure
1. Unpack unit and inspect for any damage that may have
occurred during shipping.
2. Any damage or missing components must be reported within
24 hours to the supplier of your system.
H2Pro Systems ship fully assembled.
3. Remove any plugs with attached tags and follow the
instructions on the tag. (Step 4) Do not turn on any pumps at this
time.
4. Thoroughly flush your carbon filter under normal tap pressure
before connecting to any other filters.
●TIP: Plugs are inserted by RHG at points which allow
carbon filters to be flushed from a short length of hose.
Point this hose in a safe direction while flushing.
(BLACK WATER!)
5. Connect loose tube in place of plugs to connect carbon/pump
outlets.
Operation Instructions
1. (Optional) Connect a length of hose* to the bypass hose to
divert waste water away from system and work area.
2. Fully open bypass waste valve.
3. Attach a garden hose to the inlet of your system.
4. Turn tap water supply on.
5. As water begins to flow out of the bypass hose, slowly close
the bypass valve all the way. Although the valve is fully closed,
water will still flow out of it. This is normal. Water will begin to
flow out of an open system outlet.
6. It will take a few minutes for all of the air to purge out of your
system. Only turn on pumps after air has been purged.
7. After the initial ‘air purge’ you will not need to purge air again
unless you replace a filter.
8. You are now fully operational.
*extension hose not included
Features and Maintenance
H2Pro Pure Water Systems come equipped with a RO Only
feature.
RO Only Option
RO filters greatly reduce water TDS without the aid of DI filters.
Under pump pressure this reduction will be greater than under tap
pressure. Windows can be washed spot free with water up to 10ppm
TDS. Non-Glass surfaces can typically be washed with water up to
40ppm TDS.
1. To run your system in RO Only Mode open the 1/2” grey valve
labeled ‘R.O.’ (red hose) and close the 1/2” grey valve labeled ‘D.I.’
(black hose). Connect your hoses to the RO Only outlet.
2. If the system is not producing water of acceptable purity in RO Only
Mode for your application switch to DI mode by closing the 1/2” grey
valve labeled ‘R.O.’ and opening the 1/2” grey valve labeled ‘D.I.’
Connect your hoses to the DEIONIZED outlet.
ALWAYS BE SURE ONE GREY
VALVE IS OPEN DURING PRODUCTION
** PREVENT TDS CREEP AND EXTEND DI LIFE **
For a few moments after RO membranes begin production, they fail to
reject the percentage of dissolved solids they are designed to. Each
time you start your system, run it in RO Only mode until your RO
membranes “warm up” and are reducing product water TDS by about
90%. If you now need to clean with pure water, switch to D.I. mode.
Filter Replacement Schedule & Procedure
Your carbon filter protects your system from damaging chlorine and
water disinfection agents. It is recommended that you change your
carbon filter cartridge every 6 months. Failure to do so will void your
warranty. Order RHG #20066-C.
Your DI filter has a limited lifespan based on the amount of dissolved
solids it is removing from the water. DI filter cartridges need to be
replaced as needed for your cleaning application.
Order RHG #20066-D.
To change your filter cartridge, first disconnect any hoses from the
elbow in the insert at the top of the filter housing. Remove the
stainless steel U-Pin. Depress the insert into the housing slightly. Pull
the insert out. Generation 3 filter plugs can be pried out using the
stainless U-Pin. Remove the spent filter cartridge and replace.
Reassemble filter housing and reconnect hoses. Flush new carbon
filter cartridge if needed.
RO membranes have a much longer service life and in the experience
of RHG may last the life of the system. However ROs are only
warrantied for factory defect and may eventually diminish in
performance or fail. If you experience a reduction in RO performance
in your H2Pro system, contact RHG directly to troubleshoot.
RO MEMBRANES SHOULD NOT BE ALLOWED TO DRY OR COLLECT
STAGNANT WATER IN THE BOTTOM OF THE MEMBRANE. THIS WILL
DIMINISH PERFORMANCE, POTENTIALLY TO THE POINT OF
FAILURE. TO PREVENT THIS, ROs SHOULD BE RUN ON A REGULAR
BASIS, AT LEAST EVERY TWO WEEKS, AFTER FIRST USE, EVEN
DURING “OFF-SEASON”.
Electric Motor Operation
H2Pro RO/DI systems come with electric pumps to boost water
production in 110v models. An on/off switch is mounted to the face of
the systems. 110v models come with a GFCI with TEST and RESET
buttons, an electric motor and pump. Simply connect to power to run
pump.
Shutdown Procedure
1. Open the bypass valve fully to flush the system and turn off the
pump.
2. Flush the system for 4 to 5 minutes at the end of the job. We
recommend that you do this while coiling up your hoses and putting
away your pole.
3. Turn off the water supply to the unit.
4. Disconnect the water supply.
It is important to always flush the system after each use. Failure to do
so will decrease the filters life.