1
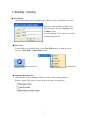
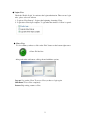
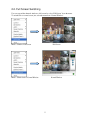
eView
Network Video Recorder
User’s Manual
Version 1.02 2010/02/09
Copyright© 2010, All rights reserved.
Contents
1. Starting / Closing..................................................................................................................1
2. Monitoring.............................................................................................................................4
2.1. Monitoring Windows Layout ......................................................................................4
2.2. Full Screen Switching................................................................................................5
2.3. Connecting Camera ..................................................................................................6
2.4. Magnify ......................................................................................................................7
2.5. Hide Monitoring .........................................................................................................8
2.6. Single Camera Setup ................................................................................................9
2.7. System Setting.........................................................................................................11
3. Recording ...........................................................................................................................13
3.1. Select Recording Cameras .....................................................................................14
3.2. Set Recording Spaces.............................................................................................16
3.3. Recording Schedule ................................................................................................17
3.4. Import Recording Files ............................................................................................18
4. Playback .............................................................................................................................19
4.1. Start / Stop Playback...............................................................................................20
4.2. Select Playback Date and Time..............................................................................20
5. Camera Grouping ..............................................................................................................21
5.1. Main Group ..............................................................................................................23
5.2. Setup Group ............................................................................................................24
5.3. Using Group.............................................................................................................25
6. Camera Permutation..........................................................................................................26
6.1. Setup Permutation...................................................................................................27
6.2. Using Permutation ...................................................................................................27
7. Miscellaneous Functions ...................................................................................................28
7.1. PTZ Camera Control ...............................................................................................28
7.2. Snapshot..................................................................................................................29
7.3. Different View – Flip, Rotate, Mirror........................................................................30
I
1. Starting / Closing
◆ First Startup
After installed eView, the first startup opens a dialog to create an authorization account.
Please key in the username in “User” field.
Type the password in both “Password” and
“Confirm” fields.
Next time running eView, you have to use this
username and password.
◆ Start eView
To start eView, you can double click on the eView NVR shortcut on desktop or from
sub-item “eView NVR” of eSurveillance menu.
eView shortcut
eView Menu
◆ Automatic Running eView
Check the item of “Auto running on Windows startup” makes running eView on
Windows startup. This option is located in the system page of setup dialog.
1
◆ Login eView
Check the “Enable Login” box activates the login authorization. There are two login
rules, please select one of them.
1. “Login at eView Start-up”: Login at the beginning of running eView.
2. “Login after eView Open complete”: Login when the window of eView is opened.
◆ Close eView
To close eView, you have to click on the “Exit” button on the bottom-right corner.
eView Exit button
After push on the exit button, a dialog showed with three options.
Log out: Log out the eView. To access eView you have to login again.
Shut Down: Close eView completely.
Return: Skip exiting, return to eView.
2
◆ eView Main Window
Open playback control panel
Open Setup dialog
Open channel layout menu
Close / Exit eView
Channel 1 to 6 are connected.
……...............
Channel 7 to 16 are disconnected.
………….……
Channel 17 to 32 are disabled.
3
2. Monitoring
2.1. Monitoring Windows Layout
First you can select a layout by “Split Mode”. It is the number of channels you want to monitor. The
eView offers several monitoring layout.
Method 1: Push “Channel Layout” button
to open the menu. See left figure.
Channel layout Button
Method 2: Right click mouse on the
eView main window to open the menu.
Select “Split Mode” to open menu.
See right figure.
4
2.2. Full Screen Switching
User can expend the channels window to full screen by select “Full Screen” from the menu.
To switch back to normal screen, just select the menu item “Normal Window”.
Menu - Switch to Full Screen
Full Screen
Menu – Switch back to Normal Window
Normal Window
5
2.3. Connecting Camera
To assign camera for every single channel, right click the mouse on the channel to be set then
select a camera from the sub menu of “Connect”.
The menu item “Scan” searches all available cameras again.
The menu item “Disconnect” cuts off the connection from current camera.
The menu item “User Define” opens a dialog let user add camera manually.
◆ Add a User-Defined Camera
Model: Select a type of cameras.
IP: Key in the IP address of camera.
Port: Both ports are changeable.
HTTP: Port for HTTP. Default is 80.
RTSP: Port for RTSP. Default is 554.
Video Codec: Codec for video
streaming. MPEG4 is current option.
Username: Username for login.
Password: Password for login.
Connect: Connect with this camera.
◆ Remove a User-Defined Camera
1. Disconnect to-be-deleted camera in eView main window. Or the delete button is disabled.
2. Open the “User Define” dialog. Select a camera from the IP list.
3. Push on the delete button beside the IP. The delete button is marked by red frame in above.
6
2.4. Magnify
Double click on one of the channel magnifies the channel to whole window.
Double click on it again goes back to original layout.
Original
Magnified
7
2.5. Hide Monitoring
The screen of every single channel can be closed without disconnected.
Click on the channel number icon
Click the channel number icon
hides the monitoring screen of the channel.
again to show the hidden channel.
Live View
Live View
Live View
Live View
Video
Hidden
8
Live View
2.6. Single Camera Setup
Click on the “Setup” icon
opens the setup dialog. Select “Camera” for configure camera.
◆ General
< OK > button: Accept the settings and close setup dialog.
<Apply> button: Accept the settings.
<Cancel> button: Skip the change and close the setup dialog.
◆ Camera Center
<All> button: Select all of the cameras.
<Browser…> button: Open camera’s web page by IE.
9
◆ Video
“Video Show” check box: Show or hide the selected camera’s video.
“Video Acceleration” check box: Accelerate the video by hardware, if hardware supports.
“De-Interlace” check box: Enable de-interlace function.
“De-blocking” check box: Eliminate blocking.
“Direction”: It has four options Normal, Image Flip, Image Rotate and Image Mirror.
“FPS”: frame per second, it reports current value is 30, 25 or 15.
“Video Fine Tune” button: open the fine tune dialog to adjust brightness, contrast, saturation, hue
and sharpness.
◆ Audio
“Audio Receive” check box: enable receiving audio.
“Audio Transmit” check box: enable transmit audio.
◆ OSD Status
This group defines the appearance of OSD icons on every channel.
“Connection” check box: show an icon on screen to indicate the status of connection.
This function has two icons to indicate connection and disconnection.
“Playback” check box: show an icon on screen in playback mode.
“Record” check box: show an icon on screen in record mode.
“Video Lost” check box: show an icon on screen to notify the video signal is lost.
“Alarm” check box: show an icon on screen if alert triggered.
Connected
Disconnected
Playback
Record
Video Lost
Alarm
◆ Login Account
This group is prepared for specify the login username and password for particular camera. To
assign it, please select a camera first then set the login account.
10
2.7. System Setting
Click on the “Setup” icon
opens the setup dialog. Select “System” for mode configuring.
◆ NVR Name
Set the name of NVR system.
◆ Snapshot
Assign the folder to store the pictures of snapshot.
11
◆ Monitor Mode
Select one of the camera modes. The available modes vary on eView version.
Camera Mode
Resolution
PAL
Max.
NTSC
D1 / 9CH / 30 FPS
D1 / 13CH /30FPS
704 x 480
704 x 480
D1 / 16CH /25 FPS
CIF / 36CH / 30 FPS
CIF / 64CH /15 FPS
352 x 288
320 x 240
Channels
FPS
9
30
13
30
16
25
36
30
64
15
◆ Enable Login
Enable / Disable login authorization. There are two available login methods.
1. “Login at eView Start-up”: Login at the beginning of running eView.
2. “Login after eView Open complete”: Login when the window of eView is opened.
◆ Default Public Login Account
Set a default login account for all cameras for the camera does not have a private login account.
◆ Others
“Auto Media Insertion” check box: Enable eView search available camera at startup.
“Clear all of Profiles” check box: Erase current camera profiles.
“Auto Running on Windows Startup” check box: Enable running eView automatically on
Windows booted.
12
3. Recording
The recording channel has a RED frame.
In the “Record” dialog starts / stops the recording.
Please refer to next section for details.
Live View
Live View
Recording
Recording
13
Live View
Live View
3.1. Select Recording Cameras
Click on the “Setup” icon
opens the setup dialog. Select “Record” for recording setup.
The <Refresh> button updates the information of connected camera. It won’t search for new ones.
The <schedule> button opens a dialog to plan the periodic recording every week.
◆ Start Recording Individually
Click mouse to select cameras, check the “Enable Record” check box to enable recording. Push
on <OK> or <Apply> button to activate the settings.
◆ Start Recording All Cameras
Push on <All> button to select all cameras; check the “Enable Record” check box to enable
recording. Push on <OK> or <Apply> button to activate the settings.
14
◆ Stop Recording
Select cameras one by one or select all by <All> button; uncheck the “Enable Record” check
box to disable recording. Push on <OK> or <Apply> button to activate the settings.
15
3.2. Set Recording Spaces
In the record setup dialog user decides if allow eView to overwrite the old recording records when
the hard drive is going to be full. Besides, user can also decide the threshold of left hard disk space
to start overwrites. If you have more than one hard drive partition, please configure all partitions
separately. Besides, the usage status of disk spaces is reported in dialog.
The “Record Path” list contains all available disks. The status of disk space is updated when select a
different “Record Path”.
1. Select the “Record Path” to save the records.
2. Check the “Enable Overwrite while space less than 10” if you want to overwrite.
[Note]: The number presents the percentage of hard disk.
3. Click on the percentage spins to adjust the starting threshold of overwriting. The valid range is
from 3% to 60%.
4. Push on <OK> or <Apply> button activates the settings.
16
3.3. Recording Schedule
In the “Record” setup dialog, push on <Schedule> button opens the “Schedule Record” dialog.
Night
Morning
Noon
Evening
Night
You can assign the weekly settings in hour. The BLUE block means recording.
1. Click on the location of hour to reserve a recording. Click again to cancel it.
2. Click on the abbreviation of week days, like MON, to set / clear the settings of whole day.
The BLUE blocks are the hours set for recording.
3. Click on <Sun>, <Mon>, <Tue>, <Wed>, <Thu>, <Fri>, <Sat> selects or exclude whole day.
4. Click on <Start> button to start the schedule function.
5. Click on <Restore> button to bring back the previous settings.
17
3.4. Import Recording Files
In the “Record” setup dialog, push on <Import…> button to import the recording files. User can
copy the files from another eVIew / NVR machine. The folder stored files is like this:
Drive:\eView\Record\YYYY\MM\DD\HH\_CC
Drive : hard disk drive, like C or D.
YYYY: year, like 2010
MM: month, like 01
DD: date, like 31
HH: hour (from 00 to 23)
CC: channel number, like 9 or 25
Example: C:\eView\Record\2010\5\31\9\_26
Channel 26, recorded in drive C:\ on May/31/2010 9 o’clock.
Please do not rename the file or eView cannot store them to correct folder.
18
4. Playback
eView playbacks the video records by itself. Click on menu “Playback Mode” to start. There is no
“Playback All” function; you have to playback every channel individually.
The frame which is in playback mode decorates with the GREEN frame.
The channel in playback mode has a GREEN frame.
The channel which has no records shows “No
Record” in playback mode.
Live View
Playback
Recording
Recording
19
Live View
(No Record)
4.1. Start / Stop Playback
Starting Playback
Right click mouse on the connected channel opens the menu left.
Select “Playback Mode” starts playback.
Stopping Playback
Right click mouse on playback mode channel opens the menu right.
Select “Live Mode” stops playback and return the live view mode.
4.2. Select Playback Date and Time
Select Playback Time
Click on menu <Playback Panel> to open the playback control panel.
Or click on playback panel icon
to open it.
24 Hr Mode
1 Hr mode
Playback panel has two modes: 24 hours and 1 hour modes. Switch the mode by the list.
Change time: Pull the bar
to change the time of recording.
Select Playback Date
Open the calendar by click on calendar icon.
The icon is located on left of the tool bar. The
days in bold font contain recording data.
Calendar Icon
20
Calendar
5. Camera Grouping
To management, user can assign several cameras to a group.
Click on the “Setup” icon
opens the setup dialog. Select “Group” for grouping setup.
Camera Center
In “Camera Center” lists all connected cameras currently.
Contains in “Camera Center”:
1. “CH.” Column: Channel number of cameras in “Camera Center” list.
2. “Name” Column: Camera name.
3. “IP” Column: Camera’s IP address.
4. “Stream” Column: MPEG4 video is the first streaming.
5. “Serial Number” Column: MAC address of camera.
21
6. “Status” Column: the connection status – connected or disconnected.
7. “Model” Column: Camera’s model.
Group
The left area lists all groups.
<New> button: To create a new group.
<Remove> button: To delete a group.
The right area lists all cameras of selected group.
<Add> button: To add camera into a group.
<Delete> button: To delete camera from a group.
<Split> button: Offers the options of channel layout.
<Save> button: To save the settings of group.
<Load> button: To restore the preliminary settings.
Contains of group columns:
1. “Pos.” Column: Position or number of the camera in group.
2. “CH.” Column: Channel number of cameras in “Camera Center” list.
3. “Name” Column: Camera name.
4. “IP” Column: Camera’s IP address.
5. “Stream” Column: MPEG4 video is the first streaming.
6. “Serial Number” Column: MAC address of camera.
7. “Model” Column: Camera’s model.
22
5.1. Main Group
The eView has a default group – “Main Group”. It is the base of all groups. All cameras must be
added into the “Main Group”. For user cannot connect or add new camera in the group setup dialog.
Main Group in Main Window
All cameras added into “Main Group” appear in the “Camera Center” list of “Group” setup dialog.
23
5.2. Setup Group
Please follow the steps below to create / setup a group.
1. Push on <New> button to create a new group. The first new group names “New”.
2. Click on the name of new created group to rename its name.
3. Push on <Split> button to select channel’s layout, like 2x2 or 1+5.
The “Pos.” column adds the numbers of selected layout.
4. Go to the “Camera Center” list to select a camera. Go back to “Group” list to select a number of
“Pos.” columns.
5. Push on <Add> button to add a new camera into the group.
6. Repeat above two steps to add all cameras.
7. Push on <Delete> button to remove a selected camera from the group.
8. Push on <Save> button to save the settings.
24
5.3. Using Group
The added groups listed in the combo box of the main window. User can switch to different group
by select group from the combo list.
The RED frame marks the GROUP list.
Close-Up of GROUP List
25
6. Camera Permutation
The permutation shows all of the groups sequentially.
Click on the “Setup” icon
opens the setup dialog. Select “Permutation” for configuring
permutation. To setup this function, user must predefine some groups. Please go to previous chapter
for how to setup a group.
On the upper part is the information of created group. In the table lists all cameras of every group.
User configures the permutation in the lower part.
◆ Permutation Configuration
The left table lists all groups of the permutation.
The right table lists all cameras of the selected group.
<Add> button: Add a group into the permutation list.
<Delete> button: Remove a group from the permutation list.
26
<Start> button: Start permutation function.
<Stop> button: Stop permutation function.
Duration: The duration of showing a specific group. Its valid range is from 10 to 600 seconds.
<Save> button: Save the settings of permutation.
<Load> button: Restore the previous settings before saving.
6.1. Setup Permutation
Please follow the steps below to configure permutation.
1. Open Permutation setup dialog.
2. Select a group from the “Group” list in upper part of the dialog.
3. Assign the “Duration” for showing this group. The duration cannot be modified after added.
4. Push on <Add> button to add a group into permutation list.
5. Repeat the steps from 1 to 3 to add all groups you want.
6. If you want to delete any group, select it first then push on <Remove> button to delete it.
7. After configuration is finished, push on <Save> button to save it.
8. Push on <OK> or <Apply> button to activate the settings.
6.2. Using Permutation
Method 1.You can start or stop the permutation function right here in the “Permutation” dialog by
push on <Start> or <Stop> button.
Method 2. The permutation option will be added into the group list in the combo box of the main
window. User can start permutation by selecting the item “Permutation Group” from the combo list.
On the contrary, user can stop permutation by select one of any other groups.
Permutation Group in Group List
27
7. Miscellaneous Functions
7.1. PTZ Camera Control
When mouse curser moves near the border of a PTZ camera, a PTZ control icon shows. Click once
to activate the function.
[Note]: This is an imaginational picture for
only one PTZ control icon shows at a time.
Move camera upward
Move camera downward
Move camera leftward
Move camera rightward
Zoom In
Zoom Out
28
7.2. Snapshot
The “Snapshot” function offers user to take a live picture. To use it, please right click the mouse on
the channel. Click on “Snapshot” in the menu.
The default folder storing captured picture is “My Documents\eView\Snapshot”. User can change
the folder in the “System” dialog.
29
7.3. Different View – Flip, Rotate, Mirror
The “Image Direction” function offers user to flip, rotate, and mirror a live video.
There are two ways to set the four options: Normal, Flip, Rotate and Mirror.
1. In the “Direction” list of the Camera Setup dialog.
2. From the “Image Direction” menu.
30
History Records
Version
Date
Comment
1.00
2009/12/16
Initial version
1.01
2009/12/22
Added “Remove User Define Camera”.
1.02
2010/02/09
New functions updated
31