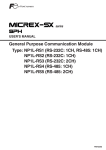
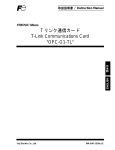
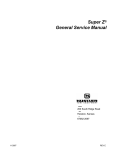
1
GP-PRO/PBIII for Windows Device/PLC CONNECTION MANUAL ADDITIONAL MANUAL Fuji Electric MICREX-SX Series Reading the GP-PRO/PBIII Device/PLC Connection Manual This document is designed as an addition to the latest GP-PRO/PBIII for Windows Device/PLC Connection manual's Fuji Electric data. When connecting a Factory Gateway unit, please substitute the words "Factory Gateway" for this document's "GP/GLC/ST". Installation This CD-ROM includes all the protocol files required by the GP/GLC to communicate with a Fuji Electric Micrex-SX Series PLC. Also, you will need to have one or more of the following software applications installed. The screen and data transfer files included in the CD-ROM must be installed in each of those applications. For information regarding installing the software, refer to that software's Operation Manual. Software Applications • GP-PRO/PBIII for Windows Ver. 7.0 • Pro-Server with Pro-Studio for Windows Ver. 4.1 *1 1) Be sure to confirm that the required software application is installed in your PC prior to starting installation. 2) Double-click the CD-ROM's "MICREXSX.exe" file to start the installation process. 3) Once the installation program starts, follow the instructions given to install the protocol files. When using Fuji Electric Micrex-SX Series PLCs, be sure to select [Others] - [FUJI MICREX-SX SERIES] for the "Device/PLC Type". *1 When using the Factory Gateway unit, GP-Web Ver. 1.0 or later or GP-Viewer Ver. 1.0 or later, be sure to select "Pro-Server with Pro-Studio for Windows" as the "Destination Folder". Chapter 2 - PLC-GP Connection 2.3 2.3 Fuji Electric Fuji Electric 2.3.1 System Structure The following describes the system structure for connecting the GP to Fuji Electric Corporation, Ltd. PLCs. Reference ! Cable Diagrams mentioned in the following tables are listed in the section titled "2.3.2 Cable Diagrams". In the LS area, 32-bit devices are not supported. Therefore, when System Area addresses are allocated to BD, DL, or W33 devices, only System Area (LS0 to LS19) addresses can be used. Other LS areas, such as the user area, etc. should not be used. Important MICREX-F Series (using Link I/F) CPU Link I/F Cable Diagram Cables GP PC I/F Module/ Generic I/F F80H, F120H, FFU-120B RS-232C RS-232C F250 PC Interface Module (Cable Diagram 1) Digital's GP410-IS00-O (5m) RS-422 (Cable Diagram 2) F70S (NC1P-S0) NC1L-RS2 (Generic Interface) *1 RS-232C (Cable Diagram 1) GP Series Digital's GP410-IS00-O (5m) *1 When expansion units are attached via a T-Link system to a main PLC unit, and more than 2 link units are attached to the expansion unit, the GP unit can be attached to only one of the link units. (Simultaneous connection to 2 link units is not possible.) Simultaneous connection to 2 link units is possible only when they are attached to the main PLC unit. GP-PRO/PBIII for Windows Device/PLC Connection Manual 2-3-1 Chapter 2 - PLC-GP Connection 2.3 Fuji Electric MICREX-F Series <T-link> (using Link I/F) CPU Link I/F Cable Diagram Cables GP PC Interface Module F80H, F120H, F250 F30, F50, F60, FFK120A-C10 F80, F81, F120 F120S, F200 FFK100A-C10 RS-232C (Cable Diagram 1) RS-232C Digital's GP410-IS00-O (5m) GP Series RS-422 (Cable Diagram 2) RS-232C (Cable Diagram 3) MICREX-F Series (FLT-ASFK) (CPU Direct Connection) CPU F80H, F250, F120H Adapter PC Loader adapter Fuji Electric's FLT-ASFK Cable Diagram RS-232C (Cable Diagram 1) Cables RS-232C Digital's GP410-IS00-O GP GP Series MICREX-SX Series CPU Link I/F Cable Diagram Cables GP/GLC PC Loader adapter NP1PS-32 NP1PS-74 Loader Connection Connector on CPU NP1PS-117 NP1PS-32R NP1L-RS1 RS-232C (Cable Diagram 5) (2m) RS-232C NP1PS-74R NP1PS-117R (Cable Diagram 6) RS-422 4-wire NP1PH-08 NP1PH-16 (Cable Diagram 7) RS-422 2-wire NP1L-RS2 Fuji Electric's NW0H-CNV + NP4HCB2 (Cable Diagram 8) RS-232C GP/GLC/ST Series, Factory Gateway (Cable Diagram 6) NP1L-RS4 RS-422 4-wire (Cable Diagram 7) RS-422 2-wire (Cable Diagram 8) 2-3-2 GP-PRO/PBIII for Windows Device/PLC Connection Manual Chapter 2 - PLC-GP Connection 2.3 Fuji Electric Connection Structure Diagram CPU Direct Connection SX Series GP/GLC CPU 9<->25Pin Conversion Fuji Electric's Conversion Adapter NW0H-CNV Half-pitch Fuji Electric's Loader Connection Cable NP4HCB2 (2m) The GP interface's 9Pin <-> 25Pin converter is not required when connecting the PLC unit to ST series units. Link Unit Connection GP/GLC/ST Series SX Series NP1L-RS1(RS-232C/RS422) NP1L-RS2(RS-232C) NP1L-RS4(RS422) User-created cable RS-232C or RS-422 D-sub 9Pin GP-PRO/PBIII for Windows Device/PLC Connection Manual 2-3-3 Chapter 2 - PLC-GP Connection 2.3 Fuji Electric FLEX-PC Series (using Link I/F) CPU Link I/F Cable Diagram Cables GP General SIO Unit/ General I/F Module NB1, NB2, NB3 NB-RS1-AC (Generic RS-232C/ 485 SIO unit) NJ-RS2 (Generic RS- NJ NS RS-232C (Cable Diagram 1) RS-232C Digital's GP410-IS00-O (5m) RS-422 (Cable Diagram 2) RS-232C Digital's GP410-IS00-O (5m) 232C SIO interface module) NJ-RS2 (Generic RS- (Cable Diagram 1) 485 SIO interface module) NS-RS1 (Generic RS- (Cable Diagram 2) 232C/485 interface module) GP Series RS-422 RS-232C RS-232C (Cable Diagram 1) Digital's GP410-IS00-O (5m) RS-422 (Cable Diagram 2) Note: Places noted as RS-422 can also use RS-485 on the PLC side. FLEX-PC Series (CPU Direct Connection) CPU NB1, NB2, NB3, NJ, NS Note: 2-3-4 Cable Diagram RS-422 (Cable Diagram 4) GP GP Series When using Digital's T-Link I/F Unit, refer to the GP-*50/70 Series T-Link I/F Unit User's Manual. GP-PRO/PBIII for Windows Device/PLC Connection Manual Chapter 2 - PLC-GP Connection 2.3.2 2.3 Fuji Electric Cable Diagrams The cable diagrams illustrated below and the cable diagrams recommended by Fuji Electric Co., Ltd. may differ; in any case, using these cables for your PLC operations will not cause any problems. Careful! ! Important Ground your PLC's FG terminal according to your country's applicable standard. For details, refer to the corresponding PLC manual. • Connect the FG line of the Shield cable to either the GP or PLC, depending on your environment. When using a connector hood and grounding the FG line, be sure to use an electrical conductor. • For the RS-232C connection, use a cable length less than 15m. • If a communications cable is used, it must be connected to the SG (signal ground). Cable Diagram 1 (RS-232C) NC Cable Diagram 2 (RS-422) Careful! Turn on the Termination Resistor switch, on the PLC side. • When using Digital's RS-422 connector terminal adapter GP070-CN10-0 GP-PRO/PBIII for Windows Device/PLC Connection Manual 2-3-5 Chapter 2 - PLC-GP Connection 2.3 Fuji Electric • When using Digital's RS-422 Cable, GP230-IS11-0 RDA SDA RDB SDB SDA RDA SDB RDB • When making your own cable connections S Note: • When making your own cable connections, we recommend using Hitachi Densen's CO-SPEV-SB(A)3P*0.5S cable. • When connecting the #9 and #10 pins in the GP Serial I/F, a termination Ω is added between RDA and RDB. resistance of 100Ω Cable Diagram 3 (RS-232C) NC CD 2-3-6 A4 A6 B1 B2 B3 B4 B5 B6 B7 B8 ER CI FG SD RD RS CS DR SG CD PLC GP-PRO/PBIII for Windows Device/PLC Connection Manual Chapter 2 - PLC-GP Connection 2.3 Fuji Electric Cable Diagram 4 (RS-422) Note: For the PLC side connector (modular-jack) you can use Hirose's TM11P-88P. The pin numbers of the modular-jack for the connection diagrams below are based on the order described in the figure at the left. • When using Digital's RS-422 connector terminal adapter GP070-CN10-0 • When using Digital's RS-422 Cable, GP230-IS11-0 • When making your own cable connections Note: When connecting the #9 and #10 pins in the GP Serial I/F, a termination Ω is added between RDA and RDB. resistance of 100Ω GP-PRO/PBIII for Windows Device/PLC Connection Manual 2-3-7 Chapter 2 - PLC-GP Connection 2.3 Fuji Electric Cable Diagram 5 (RS-232C) Commercial-type 9-Pin Male <-> 25-Pin Male Converter NW0H-CNV PLC NP4HCB2 (2m) GP 25Pin D-sub 9Pin D-sub Half-pitch NW0H-CNV PLC NP4HCB2 (2m) ST 9Pin D-sub Half-pitch D-sub 25Pin <-> D-sub 9Pin Conversion Adapter Specifications • Straight connection type • D-sub 25 pin male Lock-screw (mm) • D-sub 9 pin male Lock-nut (inch) D-sub 25pin male D-sub 9pin male Lock-screw (mm) Lock-nut (inch) Frame 1 8 3 Frame 2 20 7 6 4 5 22 3 4 5 6 7 8 9 1 2 6 cm <Adaptor: Roas Co. Model No. ZA-403> 2-3-8 GP-PRO/PBIII for Windows Device/PLC Connection Manual Chapter 2 - PLC-GP Connection 2.3 Fuji Electric Cable Diagram 6 (RS-232C) Shield GP (25P male) PLC 1 FG 1 CD 2 SD 2 RD 3 RD 3 SD 4 RS 4 ER 5 CS 5 SG 6 NC 6 DR 7 SG 7 RS 8 CD 8 CS 9 RI 20 ER (9P male) Connector Cov er 15m or less Cable Diagram 7 (RS-422, 4-wire) • Set up the PLC interface's termination resistance via the unit's dip switch. • The cable length should be 600m or less. • When using Digital's RS-422 Connector Terminal Adapter (GP070-CN10-O) GP (25P male) RDA RDB SDA SDB TERM SG FG GP070-CN10-0 Shield PLC (9P female) 2 SDA 1 SDB 9 RDA 8 RDB 5 SG 4 SDA 3 SDB 6 FG • When making your own cable 1 FG GP (25P male) 7 SG PLC 9 TERM 5 SG 10 RDA 2 SDA 16 RDB 1 SDB 11 SDA 9 RDA 15 SDB 8 RDB 18 CSB 4 SDA 19 ERB 3 SDB 21 CSA 6 FG 22 ERA GP-PRO/PBIII for Windows Device/PLC Connection Manual (9P female) Shield 2-3-9 Chapter 2 - PLC-GP Connection 2.3 Fuji Electric Cable Diagram 8 (RS-422, 2-wire) • When using Digital's RS-422 Connector Terminal Adapter (GP070-CN10-O) GP (25P male) Shield PLC (9P female) 2 SDA 1 SDB 9 RDA 8 RDB 5 SG 4 SDA 3 SDB 6 FG RDA RDB SDA SDB TERM SG FG GP070-CN10-0 • When making your own cable 1 FG 7 SG 9 TERM 10 RDA 16 RDB 11 SDA 15 SDB 18 CSB 19 ERB 21 CSA 22 ERA GP (25P male) 5 SG 2 SDA 1 SDB 9 RDA 8 RDB 4 SDA 3 SDB 6 FG PLC (9P female) Shield For ST Series units, pin numbers vary as indicated by the following table. GP Pin No. 1 7 10 11 15 16 18 19 21 22 2-3-10 GP Signal Name FG SG RDA SDA SDB RDB CSB ERB CSA ERA ST Signal Name GND RXA TXA TXB RXB CSB ERB CSA ERA ST Series Pin No. Connector Shell 5 1 3 7 2 6 9 8 4 GP-PRO/PBIII for Windows Device/PLC Connection Manual Chapter 2 - PLC-GP Connection 2.3.3 2.3 Fuji Electric Supported Devices The following describes the range of devices supported by the GP. MICREX-F Series Device Setup System Area here. Particulars Bit Address Word Address I/O Relay B0000 ~ B511F WB0000 ~ WB0511 Direct I/O --- W24.0000 ~ W24.0159 Auxilary Relay M0000 ~ M511F WM0000 ~ WM0511 *1 Keep Relay K0000 ~ K063F WK000 ~ WK063 *1 Differential Relay D0000 ~ D063F WD000 ~ WD063 *1 *4 Link Relay L0000 ~ L511F WL000 ~ WL0511 *1 Special Relay F00000 ~ F4095F WF0000 ~ WF4095 *1 *4 Announce Relay A00000 ~ A4095F WA0000 ~ WA4095 *1 *4 Timer 0.01 sec T0000 ~ T0511 --- Timer 0.1 sec T0512 ~ T1023 --- Counter C0000 ~ C0255 --- --- TR0000 ~ TR0511 --- TS0000 ~ TS0511 --- W9.000 ~ W9.511 Counter (current value) --- CR0000 ~ CR0255 Counter (setup value) --- CS0000 ~ CS0255 Data Memory --- BD0000 ~ BD4095 --- DI0000 ~ DI4095 --- SI0000 ~ SI4095 --- W30.0000 ~ W30.4094 *2 --- W31.0000 ~ W31.4094 *2 --- W32.0000 ~ W32.4094 *2 --- W33.0000 ~ W33.4094 *3 --- W34.0000 ~ W34.4094 *3 Timer 0.01 sec (current value) Timer 0.01 sec (setup value) Timer 0.1 sec (current value) File Memory *1 H/L * 1 The MSB (most significant bit) of a word device corresponds to bit 0 of the device, and the LSB (least significant bit) corresponds to bit F. E.g. When hexadecimal data 0001 is written to a Word device address (See next page) GP-PRO/PBIII for Windows Device/PLC Connection Manual 2-3-11 Chapter 2 - PLC-GP Connection 2.3 Fuji Electric (from previous page) * 2 Define and use 16 bit length data. * 3 Define and use 32 bit length data. * 4 This device cannot write. Use it only for reading. ! Important • In the LS area, 32-bit devices are not supported. Therefore, when System Area addresses are allocated to BD, DL, or W33 devices, only System Area (LS0 to LS19) addresses can be used. Other LS areas, such as the user area, etc. should not be used. • When using the GP-570VM or GP-870VM, do not allocate the System Area for BD, DI, or W33 word addresses. • Certain PLC models and versions may not be able to perform bit reading or writing. F30 .......... not possible with versions 0.9 or lower F50 .......... not possible with versions 1.4 or lower F50H ....... not possible with versions 0.7 or lower F80 .......... not possible with any version F81 .......... not possible with any version F120 ........ not possible with any version F200 ........ not possible with any version Check the information plate on the side of the PLC to find the PLC’s version information. When processing 16-bit single word data: Internally, the GP basically processes 1 word as 16 bit length data. As a result, the reading and writing of 32 bit length data devices are processed as follows: Reading Writing From 32 bit data, reads data only from the bottom 16 bits. From 32 bit data, writes data only to the bottom 16 bits, as 0 is written to the top 16 bits. E.g. When data is 12345678 hex. When processing 2 word 32-bit data: Two word addresses at bit length 16 are necessary to handle 32 bit long data, but when using a 32 bit device, only one word address needs to be specified. 2-3-12 GP-PRO/PBIII for Windows Device/PLC Connection Manual Chapter 2 - PLC-GP Connection 2.3 Fuji Electric When using a 16 bit device When using a 32 bit device FLEX-PC Series Device Setup System Area here. Bit Address Word Address Input Relay X0000 ~ X07FF WX0000 ~ WX07F Output Relay Y0000 ~ Y07FF WY0000 ~ WY07F Intemal Relay M0000 ~ M03FF WM000 ~ WM03F Extended Intemal Relay M0400 ~ M1FFF WM040 ~ WM1FF Latch Relay L0000 ~ L03FF WL000 ~ WL03F Extended Latch Relay L0400 ~ L1FFF WL040 ~ WL1FF M8000 ~ M81 FF WM800 ~ WM81F Timer T0000 ~ T03FF --- Counter C0000 ~ C01FF --- Timer (current value) --- T0000 ~ T03FF Timer (setup value) --- TS0000 ~ TS03FF Counter (current value) --- C0000 ~ C01FF Counter (setup value) --- CS0000 ~ CS01FF Data Register --- D0000 - D2FFF Special Register --- D8000 ~ D837F Link Register --- W0000 ~ W3FFF File Register --- R0000 ~ R7EFF Special Relay Particulars L/H *1 *1 * 1 Define and use 16 bit length data. Note: • Cannot read the Timer and Counter setup value. However, the write operation is possible only when the PLC is in program mode. • When the Timer and Counter setup values are written from the GP, the ladder is changed so that the setup value uses a relative reference. For this reason, be careful when the setup value for the Timer and Counter uses an indirect ladder. Normally, access is recommended for indirectly referenced devices. GP-PRO/PBIII for Windows Device/PLC Connection Manual 2-3-13 Chapter 2 - PLC-GP Connection 2.3 Fuji Electric MICREX-SX Series Setup System Area here. Description Device Bit Address Word Address Input Memory % IX 1.0.0 ~ % IX 238.3.15 % IW1.0 ~ % IW238.3 *1 Output Memory % QX 1.0.0 ~ % QX 238.3.15 % QW1.0 ~ % QW 238.3 *1 Standard Memory % MX.1.0.0 ~ % MX.1.65535.15 % MW.1.0 ~ % MW.1.65535 *2,*3, *4 % MW.1.65536 ~ % MW.1.131071 *2,*3,*4 % MX.1.65536.0 ~ % MX.1.131071.15 % MX.1..131072.0 ~ % MX.1.196607.15 % MW.1..131072 ~ % MW.1.196607 % MX.1. 196608.0 ~ % MX.1.262143.15 % MW.1. 196608 ~ % MW.1.262143 % MX.3.0.0 ~ % MX.3.32768.15 % MW.3.0 ~ % MW.3.65535 % MX.3.65536.0 ~ % MX.3.131071.15 % MW.3.65536 ~ % MW.3.131071 % MX.3..131072.0 ~ % MX.3.196607.15 % MW.3.131072 ~ % MW.3.196607 % MX.3. 196608.0 ~ % MX.3.260095.15 % MW.3. 196608 ~ % MW.3.260095 % MX.10.0.0 ~ % MX.10.512.15 % MW.10.0 ~ % MW.10.512 *2,*3, *4 *2,*3, *4 *2,*3, *4 *2,*3, *4 L/H Retain Memory System Memory *2,*3, *4 *2,*3, *4 *2,*3, *4 *2,*3, *4 *2,*3, *4 *2,*3, *4 *2,*3, *4 *2 *1 Input/Output Memory Address Designation is as shown below. • Bit Designation %IX 1.0.0 Bit No. (0 to 15) Address (Word No.) (0 to 3: 1 Unit 16 Bits) SX Bus Unit No. (1 to 238). For SX Bus Unit No. details, refer to the PLC Manual • Word Designation %IW 1.0.0 Bit No. (0 to 15) Address (Word No.) (0 to 3: 1 Unit 16 Bits) SX Bus Unit No. (1 to 238). For SX Bus Unit No. details, refer to the PLC Manual 2-3-14 GP-PRO/PBIII for Windows Device/PLC Connection Manual Chapter 2 - PLC-GP Connection 2.3 Fuji Electric *2 Standard/Retain/System Memory Address Designation is as shown below. • Bit Designation %MX .1.0 Address Memory Classification Number (1: Standard Memory, 3: Retain Memory, 10: System Memory) CPU No. (0 to 7). However, if CPU No. is 0, no data will be appended. • Word Designation %MW .1.0 Address Memory Classification Number (1: Standard Memory, 3: Retain Memory, 10: System Memory) CPU No. (0 to 7). However, if CPU No. is 0, no data will be appended. *3 Standard GP internal memory is allocated 65535 words. As a result, be sure any tags, etc. used do not span consecutive addresses. Failure to do so may cause a "Host Communication Error (02:44)" message to display. *4 Standard and Retain memory sizes can be changed. However, the total memory size is fixed. (For details, refer to your PLC Manual). The screen editor's default setting assumes the input address range is set for the maximum. GP-PRO/PBIII for Windows Device/PLC Connection Manual 2-3-15 2.3 Fuji Electric Chapter 2 - PLC-GP Connection • Standard/Retain/System Memory Address Word Designation Memory Type (%MW1, %MW3, %MW10) Address CPU No. (0 to 4) PLC Variable Designation: It is necessary to import variables when designating PLC variables. For details, refer to 56(4) Special Settings • Input/Output Memory Word Designation Memory Type (%IW, %QW) Address (Word No.) SX No. (1 to 238) 2-3-16 GP-PRO/PBIII for Windows Device/PLC Connection Manual Chapter 2 - PLC-GP Connection 2.3 Fuji Electric • Standard/Retain/System Memory Address Bit Designation Memory Type (%MX1, %MX3, %MX10) Address Bit No. (0 to 15) CPU No. (0 to 4) • Input/Output Memory Bit Designation Memory Type (%IX, %QX) Address (Word No.) Bit No. (0 to 15) SX Unit No. (1 to 238) GP-PRO/PBIII for Windows Device/PLC Connection Manual 2-3-17 2.3 Fuji Electric Chapter 2 - PLC-GP Connection The device address range availabel will vary dependingon the type of CPU used. Be sure to check the PLC manual for your unit prior to actual use. • When using PLC direct address designation, be sure the range used is the AT range designated in the ladder software program. Also, Pro-face recommends that the PLC variables used on the GP be the designated AT variables. For detailed AT range designations and set up method information, please refer to the Fuji Electric Corporation's MICREX-SX Series D300Win<Reference Manual> User Manual. When using varibles not designated by AT and changing the variables or ladder program, they must be reconverted and re-imported, then sent again via screen transfer to the GP. • When using the System Area or Read Area, be sure the range used is the AT range designated. • When a high-performance CPU is used to access the system area, be sure to use addresses starting from %MW2048. • Only Global PLC variables can be set using the Editor software. Local variables cannot be set. • When using Pro-Server, symbols must be designated and screens must be created for the devices to be accessed, then transferred to Pro-Server using Pro-Server's Import Symbol feature. For details, please refer to the Pro-Server Operation manual. 2-3-18 GP-PRO/PBIII for Windows Device/PLC Connection Manual Chapter 2 - PLC-GP Connection 2.3 Fuji Electric MICREX-SX Series Variable Conversion Program The variable conversion program "cv_micrexsx.exe" creates a conversion file that is used to import ladder program variables created with Fuji Electric Corporation's MICREX-SX Series Ladder Software "D300win" into screen creation software. This variable conversion program has the following features. 1) Using a file saved via D300win, reads out variable information and outputs the followingfiles: a) A symbol file (*.LBE) that is used by GP-PRO/PBIII's Symbol Editor for importing symbols. b) A variable file (*.VRF) that consists of conversion information (Tag settings, etc.) used by GP-PRO/PBIII to import variables. • Applicable ladder software: Fuji Electric Corporation's MICREX-SX Series Programming Support Tool D300Win Ver. 3.1 • Compatible OS types: Windows98/ Windows2000/ Windows ME/ Windows NT/Windows XP Basic Steps Prior to Using Variables Start Variable Converter Create Variable Information file See -> 1. Variable Conversion Main Screen See -> 2. Variable Conversion Screen and Symbol file Convert Symbol Names See -> 3. Symbol Name Editor Screen (Only when required) Import Symbol Files See -> 4. Import Symbol Names Screen (Standard Editor feature) Import Variable Information file Tag Settings GP-PRO/PBIII for Windows Device/PLC Connection Manual See -> 5. Import Variable Information Screen See -> 6. Tag Setting Screen 2-3-19 Chapter 2 - PLC-GP Connection 2.3 Fuji Electric 1. Variable Conversion Main Screen Start up the variable conversion program cv_micrexsx.exe.Immediately after startup, the following Variable Conversion Main Screen will appear. The cv_micrexsx.exe file is installed with the GP-PRO/PBIII C-Package. This program is installed when the default installation is performed and is contained in the following folder. C:\Program Files\Pro-face\ProPBWin Right-clicking on this section calls up the "About" screen. Variable Conversion Main Menu (1) (2) (3) (1) Variable Converter Displays the Variable Conversion screen. (See below) (2) Symbol Name Editor Displays the Symbols Name Editor screen. See -> File Update Check dialog box. (3)Exit Quits the conversion program. 2. Variable Conversion Screen This screen is used to designate files created using the D300Win Ladder Logic software, and convert those variables. Variable Conversion Main Menu (1) (2) (3) 2-3-20 (4) GP-PRO/PBIII for Windows Device/PLC Connection Manual Chapter 2 - PLC-GP Connection 2.3 Fuji Electric (1) D300win project file: Used to select the desired D300win project file (*.mwt). The path and filename of any selected D300win project will remain in the combo-box menu, up to the 10 most recent projects. Simply selecting a previously run project will place its name in this filename entry line. Also, once the path is selected, the program will automatically read the file extension ".mwt" and by default automatically insert that file in the directory path marked by "_VRF", which is used to save symbol/variable files. (2) Directory to store symbol and variable files: Designates the directory used for symbol and variable file output. Also, when the D300win project file is selected, the program will automatically read the file extension ".mwt" from the file path and by default automatically insert that file in the directory path marked by "_VRF". The following file is output to the designated location. The filename is automatically created, based on the configuration name set in the ladder software. • Symbol file (*.LBE) Symbol file created after converting variables in GP-PRO/PBIII. • Variable file (*.VRF) Variable information file required by GP-PRO/PBIII. (3) Execute Performs the conversion processing. If a previously created output file exists, the following "File Update Confirmation Dialog Box" will appear. File Update Confirmation Dialog Box Ater the conversionis completed, either the "No Change to Symbol Name" dialog box or the "Changed Symbol Name" dialog box will appear. For steps on converting variables to symbolnames, refer to step 4. Import Symbol Names Screen. No Change to Symbol Name Dialog Box GP-PRO/PBIII for Windows Device/PLC Connection Manual 2-3-21 Chapter 2 - PLC-GP Connection 2.3 Fuji Electric Symbol Name Changed Dialog Box (4) Exit Clicking this button completes all processing and returns to the Variable Conversion Main Menu. Converting Variable Names to Symbol Names When converting D300win variable names(max. 30 char.) to GP-PRO/PBIII symbol names (max. 20 char.), some variable names may be allocated to the same name symbol. In this case, use the steps below to convert variable names to symbol names. (1)When variable names are 21 characters or longer, 20 characters are taken, starting from the left-most character. (2) Check if the variable name has been previously registered as a symbol name. (3) If it has not been previously registered, that variable name is used as the symbol name. (4) If it has been previously registered as a symbol name, apply symbol names using the following steps, starting from the smallest value and continuing to the largest value, until an unregistered symbol name is found. If the largest value is reached and a symbol name has not been found, remove the variable's rightmost character and repeat the same process from step (2). Variable Name to Symbol Name Conversion Table Continuous. Continuous. No. of Var. Symbol No. of Char. No. of Char. Char. Name Type (Min.) (Max.) 2-3-22 1 to 11 12 13 1 1 1 99999999 9999999 999999 14 1 99999 15 16 17 18 19 20 1 1 1 1 None None 9999 999 99 9 None None Description Same symbol name is 10000000 or more. Same symbol name is 1000000 or more. Same symbol name is 100000 or more. Var. Name "_" Same symbol name is 10000 or more. Contin. No. Same symbol name is 1000 or more. Same symbol name is 100 or more. Same symbol name is 10 or more. Same symbol name is 2 or more. Var. Name Var. Name Same symbol name is 1 or more. No other symbol names are same. GP-PRO/PBIII for Windows Device/PLC Connection Manual Chapter 2 - PLC-GP Connection 2.3 Fuji Electric When a variable name is 30 characters long, i.e. "ABDEFGHIJKLMNOPQRSTUVWXYZ1234" and is to be converted to a symbol name, the following example table shows the conversion results. See -> 1. Variable Conversion Main Screen. Conversion Results of Conversion Table No. of Char in Var. Name 20 19 18 17 16 15 14 13 12 11 10 9 8 7 6 5 4 3 2 1 Continuous. No. of Char. (Min.) ABCDEFGHIJKLMNOPQRST ABCDEFGHIJKLMNOPQRS ABCDEFGHIJKLMNOPQR_1 ABCDEFGHIJKLMNOPQ_1 ABCDEFGHIJKLMNOP_1 ABCDEFGHIJKLMNO_1 ABCDEFGHIJKLMN_1 ABCDEFGHIJKLM_1 ABCDEFGHIJKL_1 ABCDEFGHIJK_1 ABCDEFGHIJ_1 ABCDEFGHI_1 ABCDEFGH_1 ABCDEFG_1 ABCDEF_1 ABCDE_1 ABCD_1 ABC_1 AB_1 A_1 Continuous. No. of Char. (Max.) ABCDEFGHIJKLMNOPQRST ABCDEFGHIJKLMNOPQRS ABCDEFGHIJKLMNOPQR_9 ABCDEFGHIJKLMNOPQ_99 ABCDEFGHIJKLMNOP_999 ABCDEFGHIJKLMNO_9999 ABCDEFGHIJKLMN_99999 ABCDEFGHIJKLM_999999 ABCDEFGHIJKL_9999999 ABCDEFGHIJK_99999999 ABCDEFGHIJ_99999999 ABCDEFGHI_99999999 ABCDEFGH_99999999 ABCDEFG_99999999 ABCDEF_99999999 ABCDE_99999999 ABCD_99999999 ABC_99999999 AB_99999999 A_99999999 3. Symbol Name Editor Screen When the "Symbol Name Editor" is selected, the following screen will appear. This screen is allows you to edit the symbol name information of imported symbols. Symbol Name Editor Main Screen (1) GP-PRO/PBIII for Windows Device/PLC Connection Manual 2-3-23 Chapter 2 - PLC-GP Connection 2.3 Fuji Electric (1) Edit File Selects the output file (*.VRF) created by [Variable Conversion]. The path of any selected variable file will remain in the combo-box menu, up to the 10 most recent files and can be easily selected. (2) Execute Displays the variable list screen to perform the symbol name conversion. (See below) (3) Close Quits the symbol conversion processing and returns to the Variable Conversion Main Menu. List of Variables Screen After designating the file name and clicking [Execute], the following screen will appear. (1) (2) (3) (5) (4) (6) (8) (7) (9) (1) Project Name, Configuration Name Displays the selected variable file's D300win's project and configuration names. The configuration name's default is "C_SX", and can be changed via the ladder software. (2) Resource Name, Group Name When the Resource or Group names are selected, their registered variable and symbol names will appear. 2-3-24 Resource Name: Resource names registered to the D300win project. Group Name: Group names registered to the D300win project. GP-PRO/PBIII for Windows Device/PLC Connection Manual Chapter 2 - PLC-GP Connection 2.3 Fuji Electric (3) Variable Name, Symbol Name Displays the selected variable and symbol names. (4) Variable Name Displays the variable name(s) set in the PLC ladder program. (5) Symbol Name Displays the symbol names registered in the GP Symbol Editor. (6) was assigned by Indicates the method used to set the symbol name. a) [Blank] Indicates same variable and symbol names were entered using either the variable conversion program or manually. b) converter Indicates the conversion program changed the variable name to a different symbol name. c) user Indicates the variable name was manually changed to a different symbol name. (7) Edit Clicking on the [Edit] button causes the selected variable's [Symbol Name Editor] edit screen to appear. (See -> 3. Symbol Name Editor Screen) You can also double-click on the variable name's row to call up the edit screen. (8) Save Saves the edited symbol names to the variable and symbol files. (9) Close Returns to the Symbol Name Editor screen. (See -> 3. Symbol Name Editor Screen) However, if this is clicked after symbols are edited but before the changes have been saved, the following [Variable File Save Confirmation Screen] will appear. Variable File Save Confirmation Screen GP-PRO/PBIII for Windows Device/PLC Connection Manual 2-3-25 Chapter 2 - PLC-GP Connection 2.3 Fuji Electric Symbol Name Editor Screen The Symbol Name Editor Screen is as follows. All data in this screen, except for the symbol name, is view-only and cannot be edited. Symbol Name Editor Screen (1) (2) (3) (1) Symbol Name Symbol name can be edited. (2) OK After editing the symbol name, returns to the [List of Variables]. (3) Cancel Closes this screen and returns to the previous [List of Variables] screnn, without changing symbol name data. 2-3-26 GP-PRO/PBIII for Windows Device/PLC Connection Manual Chapter 2 - PLC-GP Connection 2.3 Fuji Electric 4. Import Symbol Names Screen This Editor feature will import symbol files. Symbol Editor Importing Symbol files GP-PRO/PBIII for Windows Device/PLC Connection Manual 2-3-27 Chapter 2 - PLC-GP Connection 2.3 Fuji Electric 5. Import Variable Information Screen The "Import Variable" feature reads the file created by the variable conversion program. After this information is read, variable name information can be seen when setting up Tags. Mode Settings Screen Click the [GP Setup] screen's [Mode Settings] tab. Then, click the [Variable Import] button to call up the [Variable Import] screen. After clicking the [Variable Import] button, the following [Variable Import] screen appears. Here is where the variable file (*.VRF) is designated.Clicking [OK] changes to the [Project Confirmation] screen. (See -> Project Confirmation Screen) Variable Import Screen 2-3-28 GP-PRO/PBIII for Windows Device/PLC Connection Manual Chapter 2 - PLC-GP Connection 2.3 Fuji Electric After clicking the [GP Setup] screen's [Variable Import] button, the following [Project Confirmation] screen appears. Clicking [OK] imports the variable file, and returns to the [Mode Settings] screen. Pressing [Cancel] returns to the [Mode Settings] screen and does not import the variables. (See -> Mode Settings Screen) Project Confirmation Screen 6. Tag Setting Screen To enter Tag settings, simply click on the keypad to call up the following screen. Next, click on the keypad's [Variable (V)] button to call up the [Variable Designation Screen]. If [Variable Import] has not been performed, the [Variable (V)] button will be disabled (gray). Keypad Screen If [Variable Import] has been performed GP-PRO/PBIII for Windows Device/PLC Connection Manual If [Variable Import] has NOT been performed 2-3-29 Chapter 2 - PLC-GP Connection 2.3 Fuji Electric After the [Variable (V)] button is pressed, the following screen will appear and variables can be selected. After selecting the Resource and Group names, select the Variable name. Variable Designation Screen Imported variable information is displayed here. Information related to the selected variables is displayed here. In the Variable Designation screen, imported variables can be selected. Variable Designation Screen Imported variable information is displayed ina list, allowing you to select the desired variable. (Variable information is sorted) Character search feature is included. • Pro-face recommends using AT designation (Address designation) when setting up the communication area to communicate with a GP Series unit.If the variables are not AT designated, they will be automatically allocated by the ladder software. • Only Global PLC variables can be set using the Editor software. Local variables cannot be set. • After using the Screen Editor to import symbols, do not use the Symbol Editor to update addresses used by variables. If these addresses are updated, it will create a diference between the address settings used in the ladder software, which could in turn lead to a unit operation error. Also, if ladder software variables are updated, they must be reimported to update the variable information. 2-3-30 GP-PRO/PBIII for Windows Device/PLC Connection Manual Chapter 2 - PLC-GP Connection 2.3.4 2.3 Fuji Electric Environment Setup The following tables list Digital's recommended PLC and GP communication settings. MICREX-F Series (using PC I/F module FFU120B) GP Setup FFU120B Setup Baud Rate 19200 bps Baud Rate 19200 bps Data Length 7 bit Data Bit 7 bit Stop Bit 2 bit Stop Bit 2 bit Parity Bit Even Parity Bit Even Data Flow Control ER Control Transfer Condition None Communication Format (RS-232C) Communication Format ( RS-422) RS-232C 4-wire type -------------- Char. structure Switch --------------------------------------------------------------------------------------------------------------------------------------------------------------------------------------Unit No. MODE Switch (RS-232C) MODE Switch (RS-422) 0 (fixed) RS-485 Station # setup Switch (Oniy for RS-485) DCE/DTE Mode Transfer Process Mode CTS/RTS Control DSR/DTR Control PK Access Transfer Code Code Conversion Start Code End Code Start code 1,2 End Code 1,2 BCC -------------- 1 3 8 (lNlT) is Off 0 DCE Mode No Process Setting Normally ON Normally ON Allowed JIS Used STX ETX 0 0 None Setup this data in File Definition. Communication is not possible when using a Link I/F switch. GP-PRO/PBIII for Windows Device/PLC Connection Manual 2-3-31 Chapter 2 - PLC-GP Connection 2.3 Fuji Electric MICREX-F Series (using General Interface Module NC1L-RS2) GP Setup NC1L-RS2 Setup Baud Rate 19200 bps Baud Rate 19200 bps Data Length 8 bit Data Bit 8 bit Stop Bit 1 bit Stop Bit 1 bit Parity Bit Even Parity Bit Even Data Flow Control ER Control Transfer Condition None Communication Format (RS-232C) RS-232C MODE Switch (RS-232C) 1 Char. Structure Switch 8 (lNlT) is Off (FILE) --------------------------------------------------------------------------------------------------------------------------------------------------------------------------------------Unit No. 0 (fixed) DCE/DTE Mode Transfer Process Mode CTS/RTS Control DSR/DTR Control PK Access Transfer Codes Code Conversion Start Code End Code Start code 1,2 End Code 1,2 BCC -------------- DCE Mode No Process Setting Normally ON Normally ON Allowed JIS Used STX ETX 0 0 None Setup this data in File Definition. Communication is not possible when using a Link I/F switch. 2-3-32 GP-PRO/PBIII for Windows Device/PLC Connection Manual Chapter 2 - PLC-GP Connection 2.3 Fuji Electric MICREX-F Series (using PC I/F capsule FFK120A-C10) GP Setup FFK120A-C10 Setup Baud Rate 19200 bps Baud Rate 19200 bps Data Length 7 bit Data Bit 7 bit Stop Bit 2 bit Stop Bit 2 bit Parity Bit Even Parity Bit Even Data Flow Control ER Control Transfer Condition None Communication Format (RS-232C) Communication Format ( RS-422) RS-232C 4-wire type -------------- Char. structure Switch --------------------------------------------------------------------------------------------------------------------------------------------------------------------------------------Unit No. MODE Switch (RS-232C) MODE Switch (RS-422) 0 (fixed) RS-485 Station # setup Switch (Oniy for RS-485) DCE/DTE Mode Transfer Process Mode CTS/RTS Control DSR/DTR Control PK Access Transfer Code Code Conversion Start Code End Code Start code 1,2 End Code 1,2 BCC -------------- 1 3 8 (lNlT) is Off (FILE) 0 DCE Mode No Process Setting Normally ON Normally ON Allowed JIS Used STX ETX 0 0 None Setup this data in File Definition. Communication is not possible when using a Link I/F switch. GP-PRO/PBIII for Windows Device/PLC Connection Manual 2-3-33 Chapter 2 - PLC-GP Connection 2.3 Fuji Electric MICREX-F Series (using PC I/F capsule FFK100A-C10) GP Setup FFK100A-C10 Setup Baud Rate 9600 bps Baud Rate 9600 bps Data Length 7 bit Data Bit 7 bit Stop Bit 2 bit Stop Bit 2 bit Parity Bit Even Parity Bit Even Data Flow Control ER Control Transfer Condition None Communication Format (RS-232C) RS-232C Char. Structure Switch 8 (lNlT) is Off (FILE) --------------------------------------------------------------------------------------------------------------------------------------------------------------------------------------Unit No. 0 (fixed) DCE/DTE Mode Transfer Process Mode CTS/RTS Control DSR/DTR Control PK Access Transfer Code Code Conversion Start Code End Code Start code 1,2 End Code 1,2 BCC -------------- DCE Mode No Process Setting Normally ON Normally ON Allowed JIS Used STX ETX 0 0 None Setup this data in File Definition. Communication is not possible when using a Link I/F switch. 2-3-34 GP-PRO/PBIII for Windows Device/PLC Connection Manual Chapter 2 - PLC-GP Connection 2.3 Fuji Electric MICREX-F Series (FLT-ASFK) GP Setup Adapter Setup Baud Rate 19200 bps Baud Rate 19200 bps Data Length 8 bit Data Length 8 bit Stop Bit 1 bit Parity Bit Even Parity Bit Even Data Flow Control ER Control Transfer Condition None Communication Format RS-232C ----------- Unit No. 0 ----------- ----------- ----------- MODE LOADER This is set via the adaptor's dipswitch. There is no need to set this via the initial file. MICREX-SX Series • CPU Direct Connection GP Settings PLC Settings Baud Rate 38400 bps (Fixed) Baud Rate 38400 bps Data Length 8 bits (Fixed) Data Length 8 bits Stop Bit 1 bit (Fixed) Stop Bit 1 bit Parity Bit Even (Fixed) Parity Even Data Flow Control ER (Fixed) Communication Format (When using RS-232C) RS-232C Communication Format (When using RS-422) 4-wire Communication Format (When using RS-422) 2-wire Unit No. 0 (Fixed) GP-PRO/PBIII for Windows Device/PLC Connection Manual 2-3-35 Chapter 2 - PLC-GP Connection 2.3 Fuji Electric • When Using the Communication Module GP Settings PLC Settings Baud rate 38400 bps (Fixed) Data Length 8 bits (Fixed) Stop Bit 1 bit (Fixed) Parity Bit Even (Fixed) Data Flow Control ER (Fixed) Communication Format (When using RS-232C) RS-232C Mode Setting Switch 1 or 3 Communication Format (When using RS-422) 4-wire Mode Setting Switch 2 or 3 Communication Format (When using RS-422) 2-wire Mode Setting Switch 2 or 3 Unit No. 0 (Fixed) FLEX-PC Series (When using the Link I/F) Communication Unit, Interface Module Settings GP Settings Baud rate 19200 bps Baud rate 19200 bps Data Length 7 bit Data Length 7 bit Stop Bit 1 bit Stop Bit 1 bit Parity Bit Even Parity Bit Even Data Flow Control ER Send Status DTRon/CTSon Communication Format (When using RS-232C) RS-232C Mode Switch (When using RS-232C) 1 Communication Format (When using RS-422) 4-wire Mode Switch (When using RS-422) 3 Unit No. 1 (Fixed) Station No. 1 FLEX-PC Series (CPU Direct Connection) GP Settings 2-3-36 PLC Settings Baud Rate 19200 bps (Fixed) Data Length 8 bit (Fixed) Stop Bit 1 bit (Fixed) Parity Bit Odd (Fixed) Data Flow Control ER (Fixed) Communication Format 4-wire (Fixed) Unit No. 1 (Fixed) GP-PRO/PBIII for Windows Device/PLC Connection Manual Appendix A Fuji Electric A.1 Maximum Number of Consecutive Device Address The following lists the maximum number of consecutive addresses that can be read by each PLC. Refer to these tables to utilize Block Transfer. When the device is setup using the methods below, the Data Communication Speed declines by the number of times the device is read. • When consecutive addresses exceed the maximum data number range • When an address is designated for division • When device types are different To speed up data communication, plan the tag layout in screen units, as consecutive devices. (Includes the Alarm and Trend screens.) PLC <MICREX-F Series> Device Max. No. of Consecutive Addresses Device value) W9 Counter (current Auxilary Relay M 48 Words Keep Relay K value) CR Coutner (setup Data Memory BD Link Relay L Data Memory DI Timer (0.01 sec) T Data Memory SI 1 Word Counter C Timer 0.01 (current value) TR Timer 0.01 (setup value) TS 24 Words value) CS Differential Relay D Direct Input/Output W Addresses Timer 0.1 (current Input/Output Relay B Timer (0.1 sec) T Max. No. of Consecutive File Memory (W30) 48 Words File Memory (W31) 48 Words File Memory (W32) File Memory (W33) 24 Words GP-PRO/PBIII for Windows Device/PLC Connection Manual 24 Words File Memory (W34) Appendix-1 Appendix <MICREX-SX Series> Device Max. No. of Consecutive Addresses Input Memory Output Memory Standard Memory 243 Words Retain Memory System Memory <FLEX-PC N Series> Device Max. No. of Consecutive Addresses Device Input Relay X Data Register D Output Relay Y Special Register D Internal Relay M Link Register W Extended Internal Relay M File Register R Latch Relay L Timer (current value) T 105 Words Extended Latch Relay L Max. No. of Consecutive Addresses 105 Words Timer (setup value) TS Counter (current value) Special Relay M C Coutner (setup value) Timer T CS Counter C Inverters <Micro-Controller X Series (Model:PXR)> Device Max. No. of Consecutive Addresses Standard Feature 1 bit Terminal Feature 8 bit Control Feature 15 words Motor 1 60 words High-Level Feature 15 words Motor 2 60 words <FRENICS5000G11S, FRENICS5000P11S, FVR-E11S, FVR-C11S Series> Appendix-2 Device Max. No. of Consecutive Addresses Standard Feature Terminal Feature Control Feature Motor 1 High-Level Feature Motor 2 Option Instruction Data Monitor Data 1 Word GP-PRO/PBIII for Windows Device/PLC Connection Manual Appendix A.2 Device Codes and Address Codes Device codes and address codes are used to specify indirect addresses for the E-tags or K-tags. The word addresses of data to be displayed are coded and stored in the word address specified by the E-tags and K-tags. (Code storage is done either by the PLC, or with T-tag and K-tags) PLC <MICREX-F Series> Device Input Relay Direct I/O Auxilary Relay Bit Keep Relay Device Differential Relay Link Relay Special Relay Announce Relay Timer 0.01 sec (current value) Timer 0.01 sec (set value) Timer 0.1 sec (current value) Counter (curent value) Counter (set Word value) Device Data Memory File Memory LS Area Device Code (HEX) 8040 4840 9040 C040 D040 C840 B040 B840 Word Address Word Address Word Address Word Address Word Address Word Address Word Address Word Address TR0000~ 6080 Word Address TS0000~ 6880 Word Address W9.000~ 6480 Word Address CR0000~ 7080 Word Address CS0000~ 7880 Word Address BD0000~ DI0000~ SI0000~ W30.0000~ W31.0000~ W32.0000~ W33.0000~ W34.0000~ LS0000~ 0080 0880 0440 2040 2240 2440 2680 2880 4040 Word Address Word Address Word Address Word Address Word Address Word Address Word Address Word Address Word Address Word Address WB0000~ W24.0000~ WM0000~ WK000~ WD000~ WL000~ WF0000~ WA0000~ GP-PRO/PBIII for Windows Device/PLC Connection Manual Address Code Appendix-3 Appendix <MICREX-SX Series> Device Word Address Device Code Address Code Input Memory Output Memory %IW1.0 ~ %QW1.0 ~ %MW 1.0 ~ %MW 1.65536 ~ %MW 1.131072 ~ %MW 1.196608 ~ %MW 1.1.0 ~ %MW 1.1.65536 ~ %MW 1.1. 131072 ~ %MW 1.1. 196608 ~ %MW 2.1.0 ~ %MW 2.1.65536 ~ %MW 2.1. 131072 ~ %MW 2.1.196608 ~ %MW 3.1.0 ~ %MW 3.1.65536 ~ %MW 3.1. 131072 ~ %MW 3.1.196608 ~ %MW 4.1.0 ~ %MW 4.1.65536 ~ %MW 4.1. 131072 ~ %MW 4.1. 196608 ~ %MW 3.0 ~ %MW 3.65536 ~ %MW 3. 131072 ~ %MW 3. 196608 ~ %MW 1.3.0 ~ %MW 1.3.65536 ~ %MW 1.3. 131072 ~ %MW 1.3. 196608 ~ %MW 2.3.0 ~ %MW 2.3.65536 ~ %MW 2.3. 131072 ~ %MW 2.3.196608 ~ %MW 3.3.0 ~ %MW 3.3.65536 ~ %MW 3.3. 131072 ~ %MW 3.3. 196608 ~ %MW 4.3.0 ~ %MW 4.3.65536 ~ %MW 4.3. 131072 ~ %MW 4.3.196608 ~ 0x8000 0x8800 0x9000 0x9200 0xD000 0xD200 0x9400 0x9600 0xD400 0xD600 0x9800 0x9A00 0xD800 0xDA00 0x9C00 0x9E00 0xDC00 0xDE00 0xA000 0xA200 0xE000 0xE200 0xB000 0xF000 0x8400 0x8200 0xB200 0xF200 0x8600 0xAC00 0xB400 0xF400 0x8A00 0xAE00 0xB600 0xF600 0x8C00 0xEC00 0xB800 0xF800 0x8E00 0xEE00 Word Address Word Address Word Address Word Address Word Address Word Address Word Address Word Address Word Address Word Address Word Address Word Address Word Address Word Address Word Address Word Address Word Address Word Address Word Address Word Address Word Address Word Address Word Address Word Address Word Address Word Address Word Address Word Address Word Address Word Address Word Address Word Address Word Address Word Address Word Address Word Address Word Address Word Address Word Address Word Address Word Address Word Address Standard Memory Retain Memory Appendix-4 GP-PRO/PBIII for Windows Device/PLC Connection Manual Appendix System Memory %MW 1.0 ~ 0xC000 Word Address %MW 1.10.0 ~ 0xC200 Word Address %MW 2.10.0 ~ 0xC400 Word Address %MW 3.10.0 ~ 0xC600 Word Address %MW 4.10.0 ~ 0xC800 Word Address LS0000 ~ 0x4000 Word Address LS Area <FLEX-PC Series> Device Word Address Device Code (HEX) Address Code Input Relay WX000~ 8040 Word Address Output Relay WY000~ 8840 Word Address Internal Relay WM000~ 9040 Word Address Bit Device Extended Internal Relay WM040~ 9840 Word Address Latch Relay WL000~ C040 Word Address Extended Latch Relay WL040~ C840 Word Address Special Relay WM800~ X Timer (current value) T0000~ 6000 Word Address Timer (set value) TS0000~ 6800 Word Address Counter (current value) C0000~ 7000 Word Address Counter (set value) CS0000~ 7800 Word Address Data Register D0000~ 0040 Word Address Special Register D8000~ X Link Register W0000~ 0440 Word Address File Register R0000~ 4840 Word Address LS area LS0000~ 4040 Word Address Word Device GP-PRO/PBIII for Windows Device/PLC Connection Manual X X Appendix-5 Appendix Inverters <Micro-Controller X Series (Model:PXR)> Device 00001 ~ Device Code (HEX) 8000 10001 ~ 8200 Word Address minus 1 30001 ~ 8400 Word Address minus 1 40001 ~ 8600 Word Address minus 1 31001 ~ 8800 8A00 4000 Word Address minus 1 Word Address Bit Device Parameter Word Device 41001 ~ LS0000 ~ LS Area Address Code Cannot be set Word Address minus 1 Word Address <FRENICS5000G11S, FRENICS5000P11S, FVR-E11S, FVR-C11S Series> Word Device Device Word Address Standard Feature F00 ~ Device Code (HEX) 0 Terminal Feature E01 ~ 1000 Word Address minus 1 Control Feature C01 ~ 2000 Word Address minus 1 Motor 1 P00 ~ 3000 Word Address High-level Feature H01 ~ 5000 Word Address minus 1 Motor 2 A01 ~ o00 ~ S01 ~ M01 ~ m00 ~ LS0000 ~ 6000 7000 1200 1400 1600 4000 Word Address minus 1 Word Address Word Address minus 1 Word Address minus 1 Word Address Word Address Option Instruction Data Monitor Data Alarm Reset LS Area Appendix-6 Address Code Word Address GP-PRO/PBIII for Windows Device/PLC Connection Manual Appendix A.3 Address Conversion Table The address conversion table is shown below. Input Memory Output Memory Before Standard Memory ConveRetain Memory rsion System Memory LS After Conversion % MW1 % MW3 % MW10 % IW % QW LS : When the conversion mode is set to "Word", both word and bit devices will be converted. If the conversion mode is set to "Bit", only bit devices will be converted. GP-PRO/PBIII for Windows Device/PLC Connection Manual Appendix-7