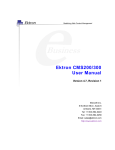
1
EKTRON USER MANUAL EDITING WEB PAGES Ektron CMS - Login ........................................................................................... 1 Quick Editing for Text ........................................................................................ 2 Open the Workarea ........................................................................................... 4 Add a New Page Component ............................................................................ 6 Edit an Existing Page Component ..................................................................... 9 Editing an Existing Content Box ...................................................................... 10 Creating a New Content Box ........................................................................... 12 Types of Links ................................................................................................. 14 Link to an External Web Page ......................................................................... 14 Link to an Internal (Roehampton) Web Page .................................................. 16 Link to an Email Address:................................................................................ 18 Link to a File:................................................................................................... 19 Types of Assets .............................................................................................. 21 Upload File Assets .......................................................................................... 22 Workflow ......................................................................................................... 24 Submit, Check-In, or Publish ........................................................................... 25 University of Roehampton May 2011 IT User Services Ektron CMS - Login 1. To access the Ektron web server open Internet Explorer and enter the following URL : http://ektron.roehampton.ac.uk/cmslogin.aspx http://ektron.roehampton.ac.uk/cmslogin.aspx 1 2 2. Click the login button in the top left corner of the page. 3 3. Enter your Roehampton username and password. 1 Quick Editing for Text 1. Open a second tab in the same browser window and go to the university’s web site. http://ektron.roehampton.ac.uk/ 1 2. In the second tab window, navigate to your web page, and a small silver bullet should appear above the text. Rest the mouse on the bullet and a sub-menu will appear, and then select the Edit in Context option. 2 2 3. A Quick Edit toolbar will appear above the text which will allow you to type new text, add bold or italic formatting, and edit hyperlinks 3 4 4. Click the Save icon on the Quick Edit toolbar to save your changes and close the Edit in Context window. 1 Note 1. If you select the Edit option from the silver bullet sub-menu, a full Edit toolbar will appear above the text. 1 2 2. After you complete your editing, click the Publish or Submit icons. 3 Open the Workarea The Ektron workarea allows for full site navigation, changing the construction of existing pages, uploading new assets, creating (rendering) new pages, and much more. 1. On the main Logon window click the workarea button. This will open a new browser window to the Ektron CMS 400 workarea. 1 2. Click the Content tab to view and navigate to your Ektron community. 2 4 3. The navigation column allows you to find your Flexible Pages templates, Page Content boxes, and Pages Assets items. Within each of these top level directories, there is a defined folder / sub-folder structure which is repeated. This will allow you to drill down into each top level directory and find your community objects. 4 Note These folders are linked to the URL address system of our web site. Do not change or rename them. 5 Add a New Page Component 1. In the Flexible Pages or Fixed Pages directories, drill down through the folder structure to find your community, and then click on your community name to open it. 1 2. Your various page templates should appear in the main window of the workarea. 2 6 3. Click on the View Menu icon to the right of the page name. 3 4 4. Select the Edit Page option from the sub-menu. 5. A new window will open for the page with a Widget Ribbon across the top. 5 7 6. To add new components to your page, select and drag them from the Widget Ribbon and drop them on an existing column area. 6 7. Each new component will have an Edit / Delete icon. Click on the pencil icon to open a dialogue box which will allow you to construct the new component. Some text components will have the Quick Edit bullet available. 7 8 Edit an Existing Page Component 1. Click on the View Menu icon to the right of the page name. 1 2 2. Select the Edit Page option from the sub-menu. 3. In the existing component item you want to edit, click on the Quick Edit silver bullet below the Edit / Delete icon, and from the sub-menu select the Edit option. 3 9 Editing an Existing Content Box 1. Click the Content tab to view and navigate to your Ektron community. 1 2. Drill into the Page Content directory and find your community folder. 2 3 3. Click on the community name to open it in the main window of the workarea. 10 4. Click on the View Menu icon to the right of the content box name, and select Edit from the submenu. 4 5. This will open the content box with a full editing toolbar. 5 6 6. After you complete your editing, click the Publish or Submit icons. 11 Creating a New Content Box 1. Click the Content tab to view and navigate to your Ektron community. 1 2. Drill into the Page Content directory and find your community folder. 2 3 3. Click on the community name to open it in the main window of the workarea. 12 4. In the workarea main window open the New menu, and then select HTML Content. 4 5. Type a suitable name in the Title fill-in box, and add your content / text in the main fill-in box. 5 6 6. After you complete your editing, click the Publish or Submit icons. 13 Types of Links There are various types of hyperlinks that you will want on your web page: an external web page an internal (Roehampton) web page an email address a file to open or download Link to an External Web Page 1. Select the word(s) you want as the link, and then click the Hyperlink Manager icon in the editing toolbar. 1 1 14 2. The Link Manager dialogue box will appear, which by default will open to the Hyperlink tab, and the text you selected will appear in the Link Text: fill-in box. 2 2 2 3. Type (or paste) the correct web address in the URL: fill-in box, and then click the OK button. 3 15 Link to an Internal (Roehampton) Web Page 1. Select the word(s) you want as the link, and then click the Hyperlink Manager icon in the editing toolbar. 1 1 2. In the Link Manager dialogue box, click the “three-dot” (browse) button at the end of the URL: fill-in box. 2 3. Use the navigation column to drill down into your community pages. Set the filter option to Quicklinks as this will show your pages in the main window. 3 3 16 4. Select the page you want to link to, and then click the Insert icon on the toolbar. 4 4 4 5. The link path will now appear in the URL: fill-in box of the Link Manager. Click the OK button at the bottom. 5 17 Link to an Email Address: 1. If you type the email address on the page / content box, Ektron will automatically format it as a hyperlink. 1 Note 2. If you hide the email address behind a name, you will need to select the name, open the Link Manager dialogue box, and then switch to the Email tab. 2 3. Type the email address in Address: fill-in box, and then click the OK button. 3 18 Link to a File: 1. Select the word(s) you want as the link, and then click the Hyperlink Manager icon in the editing toolbar. 1 1 2. In the Link Manager dialogue box, click the “three-dot” (browse) button at the end of the URL: fill-in box. 2 3. Use the navigation column to drill down into your community assets. Set the filter option to Files as this will show your files in the main window. 3 3 19 4. Select the file you want to link to, and then click the Insert icon on the toolbar. 4 4 4 5. The link path will now appear in the URL: fill-in box of the Link Manager. Click the OK button at the bottom. 5 20 Types of Assets There are various types of assets that you will want on your web page: files images videos Note 1. In the browse dialogue box of the Link Manager, the filter will allow you to select the type of asset you want to find. 1 2. You will need to upload these assets into your community’s Pages Assets folder 2 21 Upload File Assets 1. Navigate into your community folder within the Pages Assets directory. 1 1 1 2. Select New button from the toolbar, and then the Multiple DMS Documents option from the sub-menu. 2 2 22 3. You can then drag files and folders from an open My Computer window, or you can click on the Browse for files instead link. 3 3 4 4. At the bottom of the upload box is a list of file types that Ektron will accept. 23 Workflow Workflow is an integral component of web publishing systems. All content items will be transitioned through an appropriate workflow staging before that content will be published on a live site. The following diagram illustrates a typical workflow staging sequence: 24 Submit, Check-In, and Publish 1 1. The table below provides a simple explanation to a few workflow staging button in the edit menu. Save Check In Saves the content without leaving the editor. It is a good idea to save your work frequently. Check-In will save the content to the database and exits the editor. It does not submit the content into the approval workflow. Rather, it allows you and other users to access and make changes. Submit Submit the content into the approval workflow. This action returns the new or updated content to the database and submits the content to a final editor. It will also exit the editor. Publish Publish the content will update the content in the database and publish the content to the live site. It will also exit the editor. Further Help Web Services Lawrence [email protected] Documentation Information Centre; Staff MyZone https://my.roehampton.ac.uk/information/pages/default.aspx Software Advisor Daniel Rukstelis [email protected] 25