1
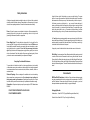
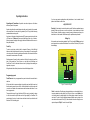
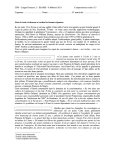
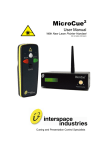
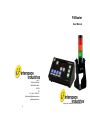
FiliBuster
User Manual
Unit 1A
126 Great North Road
Hatfield, Hertfordshire
AL9 5JN
UK
Tel: +44 (0) 1462 600101
Email: [email protected]
www.interspaceind.com
Cueing and Presentation Control Specialists
12
1
FCC Compliance Information Statement
Declaration of Conformity
Contents
This device complies with Part 15 of the FCC Rules. Operation is subject to the
following two conditions:(1) This device may not cause harmful interference, and (2)
this device must accept any interference received, including interference that may
cause undesired operation.
Introduction...................................................
3
Safety Instructions.......................................
4
Setting Up......................................................
5
General Features..........................................
6
Operating Instructions.................................
8
Programming................................................
8
Environmental..............................................
9
Declaration of Conformity...........................
10
FCC................................................................
11
Technical Support Contact..........................
11
We, Interspace Industries, have determined that the above named equipment has
been shown to comply with the applicable technical standards. Furthermore, we
warrant that each unit of equipment marketed is identical to the unit tested and found
acceptable with the standards. The records maintained continue to reflect the equipment being produced within the variation that can be expected due t quantity production and testing on a statistical basis.
Manufacturer:
Interspace Industries
Responsible Party in the Interspace Industries LLC
USA:
4650 South Butterfield Drive
Tucson AZ, 85714
Product:
FiliBuster
Authorisation Procedure: Declaration of Conformity
Equipment Supplied
1 x Filibuster Main Unit
1 x Mains Lead
For Technical Support Or Sales Enquiries:
Interspace Industries Head Office:
+44 (0) 1462 600101
Emergency Technical Support Hot Line:
+44 (0) 7976 385 046
Website:
www.interspaceind.com
2
11
DECLARATION OF CONFORMITY
We ( Interspace Industries, Unit 1a, 126 Great North Road, Hatfield, Hertfordshire,
AL9 5JN, UK) declare under our sole responsibility that the products:
FiliBuster
Big Display
Standard Display
Mini Display
Combi Lamp
( Part No’s: FILIBUSTER, CDD3i, CDD1,CDD05i, C-Lamp )
Conform to the following standards:
BS EN 60950-1:2006+A2:2013
EN 55022:2010 Radiated emission, Class B.
EN 55022:2010 Conducted emissions, Class B.
EN 61000-3-2:2006+A2:2009 Harmonic current emissions, Class D.
EN 61000-3-3:2008 Voltage changes fluctuation and flicker.
Following the provision of:
The Low Voltage Directive 73/23/EEC and
The Electromagnetic Compatibility Directive 89/336/
Introduction
FiliBuster combines clear traffic-light type signalling with a simple-to-use
timekeeping system. The intuitive control module has been designed especially for
non-technical users so that formal timekeeping can be easily managed in a wide
variety of applications.
Signalling to speakers to ensure that everything runs to time is the key to a smooth,
professional meeting and the FiliBuster silently prompts presenters when to begin
speaking (green light), when to summarise (amber light) and when to finish (red
light). Visual feedback to a timekeeper and/or the meeting chairperson can also be
provided via a variety of traffic light or numeric displays.
Designed for reliability and versatility, FiliBuster is based on AV-industry-proven
rugged design, uses readily available 3pin XLR (mic) cable connectors and the
system can be set up in just 1-2 minutes, or be permanently installed if required.
Signed:
Meeting Control Made Easy!
We hope that FiliBuster exceeds your expectations and welcome any feedback that
you have about this or any of our products.
Thank you.
Dave Humphrys, Managing Director
Interspace Industries
Unit 1A, 126 Great North Road
Hatfield, Hertfordshire
AL9 5JN
United Kingdom
The Interspace Industries Team
www.interspaceind.com
10
3
Safety Instructions
All safety and operating instructions should be read prior to first use of this product and
should be retained for further reference. Please adhere to all the warnings on this product and in these operating instructions. Please follow these instructions carefully.
Power. Only use the power source indicated on the device. Devices equipped with a
grounded plug should only be used with a grounded type outlet. In no way should
grounding be disconnected, modified or suppressed.
Power Supply Lead. To unplug the device always pull by the plug itself, not the
power supply lead. The power source outlet should always be near the FiliBuster main
unit and easily accessible. Ensure the power supply lead cannot be walked on or damaged by items placed on or against it. Do not use if the power supply lead is damaged. Using the device with a damaged power supply lead may expose you to electric
shock or other hazards. Check the condition of the power supply lead regularly. Contact
your dealer or service centre immediately for a replacement if damaged.
Keep Away From Harmful Substances
To prevent the risk of electric shock and fire, do not expose this device to rain, humidity
or intense heat sources (such as radiators or direct sunlight). Avoid using this equipment
in environments where there is excessive heat, dust, moisture, chemicals, vibration or
mechanical shock.
Using the Pause and the Reset buttons you can now adjust the time. The pause
button on its own will increment time. Holding the Reset button and the Pause button
will decrement time. Either step on every 5 seconds manually or hold for auto repeat.
Set the time you want your total time to be - say you want 3 minutes then have 3
minutes on the display and hit the Green button, the green button is now bright. Select
a time for the amber, e.g.1 minute and hit the Amber button. The amber button is now
bright. Lastly select a time for red, e.g. 10 seconds and hit the red button. It will flash
red and the display will go out to say it has been stored under that preset. Please test.
For Count Up enter programming mode the same way and ensure the Up/Dn button is
dim and the display is showing 00:00 and the green button is bright. Enter the time you
want the system to go amber and hit the amber button. Then the time you want it to go
to red where it will save that time to that preset.
At any point you can hit a direct button to take control and come out of auto mode.
Dim Setting. As environments will have different ambient lighting we have provided
a mode to set the dim level. Disconnect the unit from any power and wait 5 seconds.
Press and hold the Reset button and apply power while still holding the Reset button.
The traffic light buttons will then cycle through 4 different settings. Release the Reset
button at the desired brightness. The unit will store this and then reset it itself ready for
action!
Environmental
Slots and Openings. These are designed for ventilation and to avoid overheating.
Always ensure these openings remain clear. Do not attempt to insert anything into
these openings under any circumstances. If liquids have been spilled on, or objects
have fallen into the product it must be checked by a qualified technician before reusing.
Connections. All inputs and outputs (except for power input) are TBTS defined under
WEEE and RoHS Compliance. CountDown Touch and its associated accessories
have been manufactured and sold in accordance with the requirements of the ECEE
and RoHS directives. Please return all end-of-life items to your supplier, or your local
Interspace Industries representative directly, for appropriate disposal.
EN60950.
DO NOT OPEN SYSTEM DUE TO HIGH VOLTAGE.
Packaging Materials:
DO NOT IMMERSE IN WATER.
Cardboard box: Grade 150K/T ‘B’ (Single Walled Corrugated- Brown Kraft)
Protective Foam: Grade HLB 22 Grey Foam (High Load Bearing)
4
9
Operating Instructions
Unpacking and Connections. Unpack the main unit and place on a flat surface
within easy reach of the operator.
Unpack and position the remote displays where they can be viewed by the presenter
and connect them to the main unit using standard 3-pin XLR (mic) cables observing
maximum distance and any splits.
Apply power to the main unit using the universal IEC power connector input on the back
of the main unit. Filibuster will power up with the display, flash a row of dashes—
Minus signs across the display before going to blank and the buttons will all come on to
their preset dim levels.
Count Up
To start a count up time—similar to that of a stopwatch. Press any of the traffic light
buttons and the time will start and in the colour you have selected. You can change the
colour at any point in this mode by selecting another button of that colour while the time
increments to a maximum time of 95 minutes.
Selecting pause will cause the time in numbers to flash with a minus sign and then
back to the paused time. This will show as a quick flash with CombiLamp and
CombiTower. So that it is indicated on these colour only displays that something has
happened, as in pause.
If you have any queries regarding these safety instructions or how to maintain the unit
please do not hesitate to contact us on:
+44(0) 1462 600 101
Servicing. Do not attempt to service this product yourself. Should an unauthorised person
attempt to either open the covers or service our products, it may invalidate your Limited
Factory Warranty. In addition, opening or removing covers and screws may expose you to
electric shocks or other hazards. Refer all servicing to a qualified service personnel.
Setting Up
All connections can be made using standard 3-pin XLR (mic) cables. FiliBuster can be set
up and operated over a combined total distance of no more than 100 meters (300’) from the
remote displays.
Speaker
Chairperson
03:15
Hitting the reset button will stop the count and return all the displays to blank.
Programming a preset.
Count Down has to be pre-programmed to a preset as it needs to know what time to
start from.
Hit the reset button to ensure everything is cleared then push and hold the reset and
then the preset you want to store a time to. Hold both buttons for about 5 seconds until
you see a row of dashes on the numeric screen and then release the buttons. You are
now in program mode.
The green button is now lit to say it will start at 00:00 for count up. (see later) to change
to count down select the Up/Dn button and it will glow brightly for CountDown. The
green button will go out, as it needs to know what time to start from, and the time will
also show 30:00 as a starting point.
8
Figure 1 Connections Diagram
Note: A combination of CombiLamps and numeric displays can be used with the system using standard mic cable splitter (3-pin XLR type), such as our own Splixler product, thereby allowing for multiple displays, for instance displays located on more than
one lectern. The sum of the total distance between all displays and an output on the
main unit should not exceed 100m (300’), further than this or more than 2 displays on an
output will require a CDSplit, 1 in and 4 out active Splitter.
5
General Features
Count Up or Down. The system can be programmed to run a timer that counts up
or down. Maximum time is 95 minutes.
Specifications:
Power
100-240VAC
Count Below Zero. The system will continue counting below zero when in
countdown up to a maximum of –9:55
Signals
2xXLR out carrying data and 12V
Colour Changes. The system can be programmed to change the colour of the
remote display at pre-determined times during a timer preset. This provides a means
of emphasising elapsed or remaining times. The remote displays can change from
green to amber to red for remaining times. Selecting the Direct buttons during a preset
will remove the automatic time changes to manual or direct control.
Presets. 4 preset buttons allow times to be stored in both count up and count down
mode. The presets must be used for count down modes. The button marked Up/Dn
will glow when in count down mode and is only selectable in program mode.
Dimensions mm (inch)
DxWxH
110 (4 ¼”)x165 (6 ½”)x185(2¼”)
Weight
880g(31oz)
Note XLR cable is not supplied as standard.
Note: The twin LED colon between the hours and minutes digits on the remote
displays is coloured red when the digits are either amber or green, and green when
the digits turn red.
Combi-Lamp and Combi-Tower. In addition to the numerical remote displays, tricoloured ‘Intelligent Lamps’ can be used to simply display the colour changes to
further emphasise the stages of the elapsed or remaining time. The lamps will change
colour in the same way as the numerical remote displays, according to the
programming of the Preset that is running.
Pause Mode. The unit can be paused at any time using the Pause button. This is
AC Power in
XLR Outputs for
Numeric Displays
seen as a quick flash on both the remote displays and/or Combi-Lamps/Towers to
show the time has been paused.
6
7