1
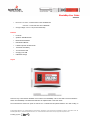
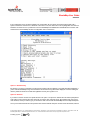
KinetaMap User Guide
2009.04.01
Overview
KinetaMap is a combination of technologies that allow data logging and transmission of GPS location and
accelerometer data. Kinesiology is a growing field of research where human movement and motion can be analyzed
for various applications. KinetaMap has the ability to capture things like pedestrian gait, vehicle braking, or package
handling. The logs give you GPS location and the raw acceleration readings - it's up to you to decipher what they
mean!
KinetaMap comes with basic firmware that currently supports acceleration and GPS logging. Flip the power switch
and GPS will be logged once per second, and accelerometer readings (X,Y and Z axis) will be logged at up to 100
Hz. We designed KinetaMap to be as flexible and hackable as possible. It has the LPC2148 USB bootloader built-in
which allows updates to the firmware easily and quickly over USB.
KinetaMap contains 1GB of flash that will last for weeks of continuous logging. It attaches to a computer over USB
and shows up on any operating system as a flash drive. Quickly move files onto or off the KinetaMap without having
to remove the flash card. All log files are comma separated text files for easy parsing with Excel, Octave, MatLab, or
your favorite data analysis package.
KinetaMap includes a Bluetooth module that supports SPP (serial port profile). This allows a computer to wirelessly
connect to and download the log files. With a range of 100m, a computer is capable of querying a KinetaMap located
within a vehicle outside. A computer may also wirelessly modify the configuration and settings internally saved within
KinetaMap. KinetaMap has also been tested with Bluetooth and Google Maps enabled phones. KinetaMap allows
precise location and map directions on your phone!
Specifications
•
Dimensions: 3.7x2.5x1.1”(28x63x94mm)
•
Weight: 3.6oz(103g)
•
Battery: 3.7V 1100mAH LiPo Battery
•
Current Draw: 140mA-Bluetooth Active
110mA-Bluetooth Inactive
4mA-Sleep Mode
© 2009 SparkFun Electronics, Inc. All Rights Reserved. Product features, specifications, system requirements and availability are subject to change without notice.
KinetaMap (GPS-08275) is a trademark of SparkFun Electronics, Inc. All other trademarks contained herein are the property of their respective owners.
KinetaMap_UG_090401
1
KinetaMap User Guide
2009.04.01
•
Run Time: 7.5 hours – Continuous Run Time with Bluetooth
~10 hours – Continuous Run with no Bluetooth
•
Charge Voltage: 3.7V to 7.0V (5V Recommended)
Features
•
LPC2148
•
SparkFun USB Bootloader
•
RN41 Bluetooth Module
•
EM-408 GPS Module
•
LIS302 Triple Axis Accelerometer
•
1100 mAH LiPo Battery
•
Tri-Color Status LED
•
Charging over USB
•
USB Mass Storage
Layout
There are only 3 main features available on the exterior of the KinetaMap. The tri-color LED is used to indicate the
status of the KinetaMap. The default LED statuses are explained later in this User Guide.
The rocker switch is used to turn power on and off. The '-' indicates the 'ON' position while the 'O' is OFF. Finally, on
© 2009 SparkFun Electronics, Inc. All Rights Reserved. Product features, specifications, system requirements and availability are subject to change without notice.
KinetaMap (GPS-08275) is a trademark of SparkFun Electronics, Inc. All other trademarks contained herein are the property of their respective owners.
KinetaMap_UG_090401
2
KinetaMap User Guide
2009.04.01
the side of the device is the miniUSB connector. Plugging a USB cable into a powered KinetaMap from a computer
will open a Mass Storage Device. The Mass Storage Device allows access to the log files and configuration file, as
well as provides the ability to load custom firmware.
Using the KinetaMap Default Firmware
While SparkFun encourages it's customers to create and modify custom code to load onto the KinetaMap, we've also
created a new and robust default firmware version that should be able to meet the needs of many applications. This
section of the User Guide will describe the new firmware (version 1.2) and give an overview of the flow of the
firmware.
Quick Start
If you don't really care how the firmware works, and you just want to get going, well, this section is for you! To get the
device working out of the box all you need to do is flip the switch to “ON!” By default all of the bluetooth functions are
disabled. The device will begin logging to two files: a data file which contains the accelerometer readings, battery
voltage readings and GGA GPS data; and a NMEA data which logs the unedited GGA GPS messages. The
accelerometer and battery readings will be logged at 10Hz, and the GPS messages will be logged no faster than 1
Hz. Invalid GPS messages will not be logged. The accelerometer will be set to 2G mode. WAAS will be enabled on
the GPS module.
Data will be logged to each file until either the device is turned off, the device runs out of battery power, or a USB
cable is plugged in from a computer. To retrieve the data files from the device plug a USB cable into the device from
a computer(with the power to the KinetaMap turned on). This will open a Mass Storage Device. The log files are
located on this drive and can be downloaded to your hard drive.
You may also open the config.txt file to edit the configuration parameters. Just save your changes on the SD card,
and don't alter the file name. The edited parameters will be loaded the next time you turn the KinetaMap on. Don't
worry about corrupting the configuration file, a corrupted config file will be detected by the firmware and handled.
Power-up Sequence
Turn the KinetaMap on by flipping the rocker switch to the '-' position. Once the device is powered it will go through
the startup sequence. First the KinetaMap will load the configuration settings from the config file (config.txt which is
located on the SD card). The firmware checks to see if the config file exists. If the file is not on the card then a config
file with default parameters is loaded. If the firmware finds the config file, then the file is read and the parameters are
loaded. However, if the firmware reads the config file and detects that invalid settings have been saved, or if the file is
not in the correct firmware, than the existing config file is deleted and a new one with default parameters is created.
While the KinetaMap is loading the parameters, the tri-color LED on the front of the KinetaMap will be solid GREEN.
More information on the config file and it's parameters will be discussed in the Configuration File section of this user
guide.
After the parameters are loaded on the KinetaMap, the initialization process takes place. The initialization process
largely depends on the loaded parameters. If gps logging or communication is enabled than the GPS module is
initialized with the proper parameters; if neither of these options are selected then the GPS module is left off. The
Bluetooth module is only turned on and initialized if the “config_menu” setting or the “send_gps_to_bt” parameters
are enabled. The accelerometer is initialized to the selected range, and then the firmware configures the internal
timer for readings based on the accel_frequency parameter. The Real Time Clock, used to timestamp each log, is
initialized to 00:00:00. Once a valid GPS reading has been logged, the RTC is updated to the current time indicated
in the GPS message; the time is only updated to GPS time if a GPS function is enabled though. While the KinetaMap
is initializing the peripherals, the tri-color LED on the front of the KinetaMap will be solid Blue. (Note: More information
on the parameters and how they affect the initialization can be found in the Configuration File section of this user
guide.)
© 2009 SparkFun Electronics, Inc. All Rights Reserved. Product features, specifications, system requirements and availability are subject to change without notice.
KinetaMap (GPS-08275) is a trademark of SparkFun Electronics, Inc. All other trademarks contained herein are the property of their respective owners.
KinetaMap_UG_090401
3
KinetaMap User Guide
2009.04.01
Parameter Name
Default Value
config_menu
0(Off)
log_gps
1(On)
log_accel
1(On)
send_gps_to_bt
0(Off)
log_batt
1(On)
log_nmea
1(On)
enable_waas
1(On)
full_scale_accel
0(Off)
enable_rmc
0(Off)
enable_gga
1(On)
accel_frequency
10(Hz)
After the peripherals are initialized the device is almost ready to start it's main routine. Before it can begin, though, it
needs to create files to log too if logging is enabled. There are two files that are created in the default settings: the
data file and the NMEA file. If any type of logging is enabled than a data file is created. The data file consists of the
time, the acceleration values, the battery voltage, and some basic GPS information. Also, if NMEA logging is enabled,
an NMEA file is created. The NMEA file saves the unaltered GPS messages from the EM408 module. All of the data
logged by the KinetaMap will be logged to these two files. The KinetaMap will create a new set of files each time the
device is turned on.
The names of the created files follow a specific format. The data files are all named “KinetaMapXXX.csv,” where XXX
is replaced by an integer between 0 and 255. When the KinetaMap creates a file, it will start with the name
“KinetaMap000.csv.” If this file already exists, then the KinetaMap will increment the number following “KinetaMap.” It
will do this until if finds a filename that doesn't exist yet.
The NMEA files follow the same type of system. All of the NMEA files are named “KinetaMapNMEAXXX.csv,” where
XXX is replaced by an integer between 0 and 255. There are two things you should be aware of when accessing the
files. The first is that the newest files won't necessarily be the ones with the highest number. Let's assume that you've
run the KinetaMap 4 times, there would be 8 files on the SD card; one pair of files for each time the KinetaMap was
run (assuming your logging both NMEA and data files). The files would be numbered '000' to '003.' Now if you delete
the '000' files then the next time the KinetaMap is run, it will create file '000' again.
The other thing to be aware of is that the file numbers for the data file and the NMEA file might not match each other.
If you've turned the NMEA logging off and created several data files, then you turn the NMEA logging back on, the file
numbers for the NMEA files will be several numbers behind the file numbers for the data files.
Logging Scheme
After finishing the startup procedure the KinetaMap will go into the main logging routine, unless the default
parameters have been changed to enable the configuration menu. If the configuration menu has been enabled, the
device must receive a command via bluetooth to start logging. This will be covered in depth in the Configuration
Menu section of this user guide.
© 2009 SparkFun Electronics, Inc. All Rights Reserved. Product features, specifications, system requirements and availability are subject to change without notice.
KinetaMap (GPS-08275) is a trademark of SparkFun Electronics, Inc. All other trademarks contained herein are the property of their respective owners.
KinetaMap_UG_090401
4
KinetaMap User Guide
2009.04.01
The main logging routine will continue running until either the KinetaMap is turned off, the battery dies or a USB cable
is plugged into the device from a computer (or any powered port). The logging routine is drastically affected by the
system parameters, however it should be relatively easy to understand how the system parameters affect the logging
scheme.
The routine will be continually checking for incoming messages from the GPS module. The GPS module will be
sending either or both GGA and RMC messages depending on the enable_gga and enable_rmc parameters. GPS
messages are received at 1 Hz intervals. By default, only the GGA messages are enabled. The GPS messages are
loaded into two places; the coordinates, along with the altitude if it's a GGA message, are saved to the data file. The
entire message is saved directly to the NMEA file.
The routine will also read the accelerometer and battery voltage at the rate defined in the accel_frequency parameter.
If the frequency is greater than 1 Hz, there will be more accelerometer readings than GPS messages. This will be
reflected in the log file by blank spots in the log. Each log in the data file consists of a timestamp, the accelerometer
readings, the battery voltage and the GPS data. GPS data will only be received when valid GPS messages are
received from the GPS module. If there is not valid fix, or if the message was corrupted, the GPS data will not be
logged. If one of these fields has been disabled in the configuration file, or if there is no new data for the field, the field
will be blank for the given log. Every time data is saved to the data file, the tri-color LED will blink; the LED will blink
Blue if data has been saved but there wasn't any valid GPS data saved. If valid GPS data is saved, the LED will blink
Green. The LED should blink at roughly 1 Hz.
All of the data in the logging sequence is saved to the data file and the NMEA file as long as the parameters are
enabled properly. Only one set of files is used for the entire session. A session is only ended if power is no longer
provided to the KinetaMap, or if a USB cable is plugged into the device from a powered port.
LED Behavior
Below is a table which explains the behavior of the tri-color LED on the KinetaMap while using the default firmware.
Function
LED Status
Charging
RED
Loading System Parameters GREEN
Initialization/Waiting for
Bluetooth Connection
Logging Data
Valid GPS Fix)
Logging Data
GPS Fix)
BLUE
(No
Blinking BLUE
(1Hz)
(Valid
Blinking
GREEN (1Hz)
Retrieving Data from the Log Files on the SD Card
There are two ways to access the logged data which resides on the SD card. The easiest way to retrieve the data is
to plug a USB cable into the KinetaMap (with the power on) from a computer. Doing this will create a Mass Storage
Device drive on the computer. The files on the SD card will appear in this drive. These files can just be copied onto
your hard drive, or viewed directly from the SD card. You can also modify the configuration file (config.txt) from here.
© 2009 SparkFun Electronics, Inc. All Rights Reserved. Product features, specifications, system requirements and availability are subject to change without notice.
KinetaMap (GPS-08275) is a trademark of SparkFun Electronics, Inc. All other trademarks contained herein are the property of their respective owners.
KinetaMap_UG_090401
5
KinetaMap User Guide
2009.04.01
You can also view the contents of the SD card from the configuration menu. This method will be covered in detail in
the Configuration Menu section of this user guide.
If you've let the KinetaMap run a few times with the default firmware and default parameters then two types of file
should be on the SD card: a data file (KinetaMapXXX.csv) and a NMEA file (KinetaMapNMEAXXX.csv). There will be
one pair of files for each KinetaMap session. A CSV file is a 'Comma Separated Variable' file. These files can be
opened in any text editor but are specially created for easy use with spreadsheet programs like Excel and Open
Office Calc.
The data file created by KinetaMap will always have the following format, regardless of what parameters are enabled
or disabled:
UTC
0
0
1
1
170937.44
170937
170937
X Y Z
Batt Fix
2 0 -16 5014
1 0 -17 5014
2 0 -16 5014
2 0 -16 5020
Lat.
1
2
2
Lat. Dir.
4003.9 N
Long.
Long. Dir.
10512.6 W
Altitude
Type
1485 GGA
0 -16 5020
0 -16 5014
Each log consists of one row of data; if there are no values to be logged for a specific field, that field is left blank in
the log. The UTC field is the timestamp. The timestamp is initially set to 00:00:00 (HH:MM:SS); however if GPS
functions are enabled this value is updated to the current time once a valid GPS message is received. If GPS
functions are not enabled, the UTC will measure the duration of the KinetaMap session.
The X, Y and Z acceleration fields are the acceleration values retrieved from the LIS302 triple axis accelerometer.
The acceleration values can fall anywhere in the range of -127 to 127 depending on the current acceleration. The
LIS302 accelerometer has two modes: 2G mode and 8G mode. To find the G force of the accelerometer the values in
these fields must be scaled with respect to the selected mode. Instructions on how to scale these values can be
found in the data sheet of the LIS302.
The Batt. Volt field represents the current battery voltage. This reading is represented in mV. The battery voltage is
read every time the accelerometer is queried.
The next 6 fields are for GPS data and the names should explain their function. GPS data is only logged when a new
message is received; if there is no new data than the fields are left blank. Also, the altitude is only logged if GGA
messages are enabled. Altitude will not be logged when an RMC message is received. The last field in the data file is
the Type field; the Type field indicates if the GPS message received was a GGA message or an RMC message.
The NMEA file is much simpler. The only data saved to the NMEA file are the GPS messages. While the data file
contains all of the relevant data, it is not easy to use the position data in it's format. If you want to find a path, you
must use a scripting program to parse out the GPS data in order to make it meaningful. To make it easier to use the
GPS data, the KinetaMap has the option of logging data to a NMEA file. The file contains only the GPS data received
from the GPS module. This file can be directly imported to websites like GPSVisualizer
(http://www.gpsvisualizer.com) to view position data.
The Configuration File
The configuration file is used during the powerup sequence to load the system parameters for the KinetaMap. To
© 2009 SparkFun Electronics, Inc. All Rights Reserved. Product features, specifications, system requirements and availability are subject to change without notice.
KinetaMap (GPS-08275) is a trademark of SparkFun Electronics, Inc. All other trademarks contained herein are the property of their respective owners.
KinetaMap_UG_090401
6
KinetaMap User Guide
2009.04.01
access the configuration file plug a USB cable from a computer into the KinetaMap and turn the KinetaMap on. When
the Mass Storage Device drive opens on the computer you will see the configuration file in the drive. The
configuration file is named “kineta_config.txt,” and if you open the file in a text editor you will see eleven parameters.
You can also view the file from the config menu.
config_menu=0
log_gps=1
log_accel=1
send_gps_to_bt=0
log_batt=1
log_nmea=1
enable_waas=1
full_scale_accel=0
enable_rmc=0
enable_gga=1
accel_frequency(hz)=10
The parameters in the configuration file must be kept in this order with a carriage return separating each parameter.
All of the parameters except the “accel_frequency” parameter only have two options, 1 or 0. If the parameter is set to
1 than the function is enabled, if the parameter is set to 0 than the function is disabled. Don't forget, you can also
change the parameters from the Config Menu. However if you want to enable the config menu you must first do this
by directly editing the config file on the SD card.
As a side note, if the configuration file has somehow been corrupted don't worry about it. The firmware will detect a
corrupted configuration file, delete it, and create a new one with default parameters. Also, if you want to revert to the
default parameters just delete the configuration file and turn the KinetaMap on without a configuration file on the SD
card; a new one will automatically be created.
config_menu parameter (Default: 0)
The config_menu parameter enables/disables the configuration menu. If the configuration menu is enabled the
KinetaMap will not begin logging until a command is received from the bluetooth connection; so be careful enabling
this parameter. The configuration menu will allow you to manipulate the SD card, edit the system parameters, and
perform function checks on the GPS module and LIS302 accelerometer over a bluetooth connection.
If the config_menu and send_gps_to_bt parameters are both disabled, the bluetooth module will be turned off. This
will significantly improve the battery life of the KinetaMap.
log_gps parameter (Default: 1)
The log_gps parameter tells the KinetaMap if it should log GPS data or not. By default the log_gps parameter is
enabled. If the parameter is changed to 0, the KinetaMap will not save the GPS coordinates to the SD card.
log_accel parameter (Default: 1)
The log_accel parameter tells the KinetaMap if it should log the acceleration values or not. By default the log_accel
parameter is enabled. If the parameter is changed to 0, the KinetaMap will not save the acceleration values to the SD
card.
send_gps_to_bt parameter (Default: 0)
The send_gps_to_bt parameter tells the KinetaMap that it should send the NMEA messages received from the
EM-408 module to the bluetooth module. This means that if an SPP bluetooth connection has been established
© 2009 SparkFun Electronics, Inc. All Rights Reserved. Product features, specifications, system requirements and availability are subject to change without notice.
KinetaMap (GPS-08275) is a trademark of SparkFun Electronics, Inc. All other trademarks contained herein are the property of their respective owners.
KinetaMap_UG_090401
7
KinetaMap User Guide
2009.04.01
between another device and the KinetaMap, the GPS messages will be sent to the connected device (i.e. blackberry).
If the config menu is also enabled, then the GPS messages will only be transmitted once the config menu has been
exited.
If the config_menu and send_gps_to_bt parameters are both disabled, the bluetooth module will be turned off. This
will significantly improve the battery life of the KinetaMap.
log_batt parameter (Default: 1)
The log_batt parameter tells the KinetaMap if it should log the battery voltage value or not. By default the log_batt
parameter is enabled. If the parameter is changed to 0, the KinetaMap will not save the battery voltage values to the
SD card.
log_nmea parameter(Default: 1)
The log_nmea parameter tells the KinetaMap if a NMEA file should be created in the current session. If this
parameter is enabled a NMEA file will be created, and the NMEA GPS messages from the EM-408 module will be
saved directly to this file. If the parameter is disabled, a NMEA file will not be created for the session.
enable_waas parameter (Default: 1)
This parameter will enable or disable the WAAS function on the EM-408 GPS module.
full_scale_accel parameter (Default: 0)
The full_scale_accel parameter sets the range of the LIS302 accelerometer. If the parameter is set to 0, the range will
be set to 2G mode, if the parameter is set to 1, the range will be set to 8G mode.
enable_rmc parameter (Default: 0)
This parameter enables or disables RMC messages from the GPS module.
enable_gga parameter (Default: 1)
This parameter enables or disables GGA messages from the GPS module.
accel_frequency(Hz) parameter (Default: 10)
The accel_frequency parameter sets the frequency that acceleration and battery values are read. This parameter
must be an integer between 1 and 100. 100 Hz is the maximum bandwidth of the LIS302 accelerometer.
NOTE: Testing was performed using a 20 Hz read frequency. Setting the frequency to higher values should work, but
may cause adverse affects to the data file logging.
The Configuration Menu
The configuration menu allows the user to manage the SD card, perform function checks on the accelerometer and
gps module, and edit the system parameters over a bluetooth connection using the serial port protocol. Instructions
on how to connect to the device over bluetooth are provided in the Connecting over Bluetooth section of this user
guide. By default, the config_menu parameter in the configuration file is disabled. In order to enable configuration
menu you must edit the config.txt file by plugging in a USB cable to the KinetaMap with the power turned on. Then
edit the config.txt file to enable the config_menu parameter. More information on editing the configuration file can be
found in the Configuration File section of this user guide.
© 2009 SparkFun Electronics, Inc. All Rights Reserved. Product features, specifications, system requirements and availability are subject to change without notice.
KinetaMap (GPS-08275) is a trademark of SparkFun Electronics, Inc. All other trademarks contained herein are the property of their respective owners.
KinetaMap_UG_090401
8
KinetaMap User Guide
2009.04.01
If the configuration menu has been enabled in the configuration file, the device will not start logging data until a
special command is received over a bluetooth connection. In fact, the device will not do anything other than look for a
bluetooth connection once it is powered on! Once the KinetaMap has established an SPP Bluetooth connection with
another device the KinetaMap will send a configuration menu to the device.
Option 1: Read Directory
By pressing '1' from the Config Menu, the file names located in the Root directory of the SD card will be displayed. If
you've used the KinetaMap to log several sessions this is where the log files will be displayed. However reading the
directory will show all files on the SD card regardless of if they are log files or not.
Option 2: Read File
If you want to see the contents of a specific file then use option 2. If option 2 is selected the user will be prompted for
a file name to read; just enter the name of the file you wish to view and press 'enter.' Be careful though, the input is
case sensitive, and if you make a typo you will have to start over because the KinetaMap will not accept backspaces.
Once you've entered the file name and pressed enter the terminal will dump the contents of the selected file; after all
© 2009 SparkFun Electronics, Inc. All Rights Reserved. Product features, specifications, system requirements and availability are subject to change without notice.
KinetaMap (GPS-08275) is a trademark of SparkFun Electronics, Inc. All other trademarks contained herein are the property of their respective owners.
KinetaMap_UG_090401
9
KinetaMap User Guide
2009.04.01
of the contents have been displayed, the terminal program will write “end” and then the config menu will be brought
up again.
Option 3: Delete File
Option 3 allows you to delete a file on the SD card from the config menu. After selecting option 3, the user will be
prompted for a file name. After the file name has been entered press the 'enter' key to delete the file. Be careful
though, the input is case sensitive, and if you make a typo you will have to start over because the KinetaMap will not
accept backspaces.
Option 4: Format SD Card
Selecting option 4 will format the SD card. Be careful as this will delete all of the files on the SD card, including the
configuration file!
Option 5: Listen to GPS
Press '5' to see the GPS messages from the EM-408 module. Once this option is selected, the NMEA messages will
be displayed in the terminal program. THEY ARE NOT BEING LOGGED AT THIS POINT!! This option simply allows
you to view the messages in their native form without logging them to the SD card. Only the messages that have
been enabled in the system parameters will be displayed (i.e. RMC and/or GGA). If both the RMC and GGA
messages have been disabled in the parameters, than nothing will be displayed. Press any key to stop the messages
from being displayed in the terminal and return to the configuration menu.
Option 6: Check Accelerometer
If option 6 is selected, the accelerometer values for each axis (X, Y and Z) will start scrolling in the terminal window.
The accelerometer values are not being logged though! To exit and return to the config menu, press any key.
NOTE: The frequency of the values showing up in this mode does NOT reflect your accel_frequency parameter
setting. Don't worry if the refresh rate seems slow, this mode is purely for ensuring proper operation of the
accelerometer.
Option 7: Change settings in the config file
Option 7 allows you to change the configuration settings used in the startup sequence. Once selected, the user will
be prompted to configure all of the system parameters. See the Configuration File section of this user guide for
details about the configuration settings and the configuration file.
Be careful when selecting the options! If you disable the config menu, then you will have to manually modify the
config file to get the menu to show up again. Also, if the configuration menu is disabled at this point the device will
exit the menu and start logging immediately after all of the parameters are entered. The device will not return to the
configuration menu.
Option 9: Exit menu and start logging
Pressing '9' will exit the configuration menu and start logging the active parameters. By default, the KinetaMap will log
the GPS coordinates, the accelerometer values and the battery level. These parameters can be turned on or off in the
configuration file.
Once you have exited the configuration menu the KinetaMap will continue logging until power is no longer provided
(either the power is turned off or the battery dies) or a USB cable is plugged in. The only way to get back to the
© 2009 SparkFun Electronics, Inc. All Rights Reserved. Product features, specifications, system requirements and availability are subject to change without notice.
KinetaMap (GPS-08275) is a trademark of SparkFun Electronics, Inc. All other trademarks contained herein are the property of their respective owners.
KinetaMap_UG_090401
10
KinetaMap User Guide
2009.04.01
configuration menu is to turn the KinetaMap off and then back on again. At this point, if the config_menu parameter is
still enabled, the KinetaMap will wait for a bluetooth connection before displaying the configuration menu again.
Establishing a Bluetooth Connection
A bluetooth connection between the KinetaMap and another device is required in order to take advantage of the
configuration menu and the ability to wirelessly transmit GPS messages. This can be done with any SPP (Serial Port
Profile) enabled bluetooth device. To connect to the KinetaMap, use your bluetooth enabled device to search for
other available bluetooth devices. If the KinetaMap is powered on your device should find the KinetaMap. Once
you've used your bluetooth enabled device to find the KinetaMap, establish a connection to take advantage of the
bluetooth features.
Once a connection has been established the serial flow control settings need to be set like this:
Baud Rate: 115200
Data: 8 bit
Parity: None
Stop: 1 bit
Flow Control: None
If you are using a computer to connect to the KinetaMap you can use a terminal program(like HyperTerm or
TerraTerm) to view the data on the bluetooth connection.
Run Time
The battery life of the KinetaMap will vary significantly depending on the selected parameters. A brief explanation is
that with the configuration menu or the send_gps_to_bt parameters active, the current consumption is roughly
140mA. With the 1100mAh battery, the battery will be dead after about 7.5 hours. If the config menu and the
bluetooth functions are turned off, then the bluetooth module is left off; in this case the current draw drops to 110mA
which increases the battery life to about 10 hours.
It is possible to turn the bluetooth module off and put the LPC2148 into sleep mode using custom firmware; in this
scenario the current draw can be brought down to as low as 4mA. The default firmware does not utilize the sleep
functionality of the ARM, but fortunately the KinetaMap comes with the USB bootloader and so the user can create
their own firmware. By using the Real Time Clock on the board, and utilizing some clever logging algorithms, the
battery could last for days without being recharged.
Charging
The KinetaMap uses a 1100mAh LiPo battery. When plugged into a voltage source (3.7V to 7.0V), the battery will
charge at a maximum of 280mA. While the unit is charging the Status LED will turn RED. The LED will go off once
the charge is completed.
The charging characteristic curve of a LiPo battery is such that it slowly tapers off over time, and so the charge time
can be longer than one might expect as the battery slowly tops-up. But for the most part, the battery is essentially
charged after about 4 hours, whether the indicator LED goes off or not.
Creating Custom Firmware
In typical SparkFun fashion, the KinetaMap has been designed with the hacker in mind. The KinetaMap ships with the
SparkFun USB ARM Bootloader preloaded. This means that the board can be re-programmed simply be loading a
firmware file onto the SD card.
© 2009 SparkFun Electronics, Inc. All Rights Reserved. Product features, specifications, system requirements and availability are subject to change without notice.
KinetaMap (GPS-08275) is a trademark of SparkFun Electronics, Inc. All other trademarks contained herein are the property of their respective owners.
KinetaMap_UG_090401
11
KinetaMap User Guide
2009.04.01
For more information on using the the LPC2148 USB Bootloader, it would be helpful to read the USB Bootloader
tutorial on SparkFun's website, or just follow this URL:
http://www.sparkfun.com/commerce/tutorial_info.php?tutorials_id=94
By modifying the firmware on the KinetaMap, or by starting from scratch, you can do some pretty cool things with this
board! For example, by putting the KinetaMap to sleep between sensor readings you can save a ton of power and
extend the battery life. You can also increase or decrease the sample rate of the accelerometer reading, or change
the type of GPS messages to log, or change the data that gets sent through the bluetooth connection. There are tons
of possibilities; get creative and start coding!
We also broke out several pins for your own purposes. Pins P0.12,P0.13,P0.15, P0.17, P0.18 and P0.19 are
available on the KinetaMap PCB to allow you to expand the hardware. You can add an SPI peripheral device, a
sensor with an analog output, or even an RS232 device (You'll just have to bit-bang a serial port on the pin). By
providing you with these extra pins, and a simple way to reprogram the KinetaMap, this should be a great board to
hack!
© 2009 SparkFun Electronics, Inc. All Rights Reserved. Product features, specifications, system requirements and availability are subject to change without notice.
KinetaMap (GPS-08275) is a trademark of SparkFun Electronics, Inc. All other trademarks contained herein are the property of their respective owners.
KinetaMap_UG_090401
12