1
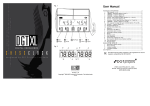
12/24
RST
U/D
L/R
S+1
S-1
START STOP
COUNTER
User's Manual
DISPLAY BOARD SECTION
1.KEYPAD LAYOUT
12/24
RST
U/D
L/R
S+1
S-1
START STOP
12/24 Key
RST key
U/D key
: Set 12/24 hour format (only for the TIMER)
: Reset the Counter.
: The Counter toggles between upcount
and downcount.
L/R key
: Select the left or right two digits to adjust.
S+1 key
: Increase by 1
S-1 key
: Decrease by 1
START key : Run the Counter.
STOP key : Stop the Counter.
2.POWER ON SET UP THE DISPLAY BOARD
100-240AV
1.Plug the appropriate end of the DC Power Adapter into the power receptacle on the
Display Board.
2.Plug the DC Power Adapter into a standard 100~240VAC outlet.
3.Once the Display Board is powered on, it begins to work. First It will cycle through a
diagnostic display and then run the last selected function.
3. SELECT THE DISPLAY BOARD FUNCTION
There are function selection switches on the side of the Display Board.
Below is the function list when selection switches are at different status.
The Counter function switch:
3
MODEL 109
Up-Counter
3
MODEL 110
Up/Down-Counter
1
Note: After selecting a new function by selection switches, you need to reboot the Display
Board to let the new function take effect.
4. OPERATION INSTRUCTION
1 up-counter(model 109)
1.Press S+1 key will increase by 1.
2.Press Reset key will make the Counter reset and display 0.
2 up/down-counter(model 110)
1.Press U/D key will make the Counter alternative between up-count and down-count.
2.Press S+1 will increase by 1 and press S-1 will decrease by 1.
3.To adjust the preset number, press L/R key to select two digits which will be adjusted.
The selected two digits will flash.
4.Press S+1 or S-1 to set desired number. If press S+1 or S-1 for 3 seconds, the number
will be adjusted quickly.
5.Press L/R key again to select the other two digits, and then adjust to desired number.
6.Press START to finish presetting the number.
5.COMMUNICATION PROTOCOL
1 Interface method
RS232/RS485 Baud Rate : 9600 bps( 8,N,1.)
2 Data structure
<STX>message…<ETX>
<STX> : are ASCII code '<', 'S', 'T', 'X', & '>',denotes the beginning of data package.
<ETX> : are ASCII code '<', 'E', 'T', 'X', & '>', denotes the end of data package.
The middle messages between '<STX>'and '<ETX>' may vary according to detailed
function or operation.
1)Set Display Board ID
<STX><ID><xx><ETX> <ID>: ASCII code '<', 'I', 'D', &'>'.
xx : the range from 00 to FF, the Hex number in ASCII format.
1) UP-COUNTER(MODEL 109)
<STX><xx><IN><ETX>
Increase the Counter by 1.
<STX><xx><RE><ETX>
Reset the Counter.
2) UP/DOWN-COUNTER(MODEL 110)
<STX><xx><DAyyyy><ETX> Send the preset number.
xx: denotes the ID, two ASCII characters.
yyyy: the preset number, 4 ASCII characters.
<STX><xx><IN><ETX>
Increase the Counter by 1.
xx: denotes the ID, two ASCII characters.
<STX><xx><DE><ETX>
Decrease the Counter by 1.
xx: denotes the ID, two ASCII characters.
<STX><xx><UP><ETX>
Begin to count up
<STX><xx><DN><ETX>
Begin to count down
<STX><xx><RE><ETX>
Reset the Counter
2
SOFTWARE SECTION
1.SOFTWARE SCREEN
2.SET UP - CONNECTING THE CABLE
1 Connect Display Board to the PC using RS232/RS485 cable.
2.On the back of your computer, identify a COM PORT. If you have trouble locating a
COM PORT on your computer, please reference your computer user manual or
contact the manufacturer of your computer.
3.Connect the 9-Pin connector end to the COM PORT you will be using.
If the 9-pin connector is not connected to the correct COM PORT, computer
communication will not work.
RS232/RS485
3.CONFIGURE SOFTWARE
1.Select COM port.
2.Click on OK when your settings are
complete.
Select the
Com Port
4.SET DISPLAY BOARD ID
1.Select proper ID number.
2.Click OK button.
3
5.FUNCTION INTERFACE
1.Up-Counter(Model 109)
2.Up/Down-Counter(Model 110)
SPECIFICATIONS
1 4" COUNTER
VIEWING DISTANCE:<131 Feet (40m)
DIMENSION: 16.7"(424mm)Width* 5.4"(137mm)Height* 1.8"(45mm)Depth
DISPLAY DIGIT:4
POWER INPUT:DC12V
CONSUMING POWER : 9 Watts
2 2.3" COUNTER
VIEWING DISTANCE:<75 Feet (23m)
DIMENSION: 10.8"(274mm)Width* 3.5"(89mm)Height* 1.9"(47mm)Depth
DISPLAY DIGIT:4
POWER INPUT:DC12V
CONSUMING POWER : 9 Watts
Cautions
For indoor use only. Avoid outdoor storage.
Keep away from high temperatures, humidity, dew, water and
direct sunlight.
Always disconnect power cord and other cables by holding plug.
Clean with damp cloth only.
4
1M062160010