1
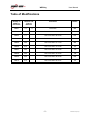
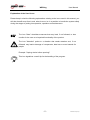
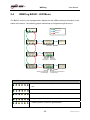
WEB’log PRO / BASIC / LIGHT+ Monitoring System User Manual English WEB’log: NR010 WEB’log User Manual Table of Modifications Number of WEB’log Document Release and Type of Revision Comments Author NR001 1.0 First issue MS NR002 2.0 Date of revision 23.07.02 MS NR003 2.1 Date of revision 09.09.02 RP NR004 2.19 Date of revision 04.02.03 MS NR005 2.60 Date of revision 27.10.03 MS NR006 2.70 Date of revision 14.03.05 TG NR007 2.80 Date of revision 07.09.05 TW NR008 2.90 Date of revision 12.09.05 TW NR009 3.00 Date of revision 30.05.06 BK NR010 3.10 Date of revision 22.02.07 TG A -2- Power-One Italy S.p.a WEB’log User Manual Information: Power-One does not assume liability for any errors contained in this manual, nor for accidental or consequential damages resulting from delivery, capability or usage of this device. Power-One assures that the product, if installed correctly and used as directed, will operate perfectly. Power-One shall not be held liable for any operation failure or interruption of the product. Warranty Information: Warranty period is one year from the date of installation and will be restricted to poor workmanship, defect in material or faulty design. Within this warranty period, Power-One will repair or substitute demonstrably defect products. In case of warranty please send the product to Power-One. Power-One bears the costs of the return shipment to the customer within Europe. In other respects, does not bear any costs resulting from installation, removal, customs duties, fees or shipment. -3- Power-One Italy S.p.a WEB’log User Manual Safety Instructions: • The monitoring system for PV plants must be installed exclusively by qualified staff. • All lines must only be connected or disconnected only when they are dead. • Before putting into operation the user has to read this manual carefully. • When operating this device, please follow the local regulations. • Defective devices have to be put out of operation or checked by qualified staff immediately. • The device must not be modified in any way. • It is illegal to open the device. • Do not remove the memory card during operation of the device. • When operated contrary to the described safety instructions, the safety of the device and its operator cannot be assured. -4- Power-One Italy S.p.a WEB’log User Manual Explanation of the Used Icons Please keep in mind the following explanations relating to the icons used in this manual; you will then benefit most from it and, what is more, be in a position to handle the system safely during the stages of putting into operation, operation and maintenance. The icon "Note" describes measures that may lead, if not followed, to less comfort for the user or to impaired functionality of the product. The icon "Attention" points to a situation that needs attention and, if not followed, may lead to damage of components, data loss or even hazards for people. Example: "Unplug device before opening!" This icon signalizes a useful tip for the handling of the program. -5- Power-One Italy S.p.a WEB’log User Manual Table of Contents 1 INSTALLATION ............................................................................................................................ 8 1.1 SAFETY INSTRUCTIONS: ............................................................................................................... 8 1.2 SPECIAL NOTES FOR WEB’LOG LIGHT+ ................................................................................. 9 1.3 INSTALLATION OF MAIN UNIT ................................................................................................... 10 1.4 COMMUNICATION CONNECTIONS ............................................................................................. 11 1.5 ANALOG / DIGITAL INPUTS......................................................................................................... 15 1.6 CIRCUIT DIAGRAM ..................................................................................................................... 16 2 PUTTING INTO SERVICE......................................................................................................... 17 2.1 WEB’LOG REGISTRATION ON THE PORTAL............................................................................. 17 2.2 PROCEDURE STEPS ..................................................................................................................... 17 2.3 WEB’LOG PRO: DISPLAY MENU AND STATUS LEDS ............................................................. 19 2.4 WEB’LOG BASIC: LED MENU ................................................................................................. 25 3 CONNECTION SET-UP .............................................................................................................. 26 3.1 CONNECTION VIA RDT: ............................................................................................................. 26 3.2 CONNECTION VIA ETHERNET NETWORK.................................................................................. 32 4 MENU DESCRIPTION................................................................................................................ 36 4.1 GENERAL ..................................................................................................................................... 36 4.2 ON-LINE VALUES ........................................................................................................................ 38 4.2.1 ANALOG - DIGITAL ................................................................................................................... 38 4.2.2 CURRENT SENSORS ................................................................................................................... 39 4.2.3 INVERTER .................................................................................................................................. 40 4.3 STATUS ........................................................................................................................................ 41 4.4 CONFIGURATION ........................................................................................................................ 49 4.4.1 PLANT DATA ............................................................................................................................. 49 4.4.2 DEFAULT CONTACT .................................................................................................................. 51 -6- Power-One Italy S.p.a WEB’log 4.4.3 4.5 User Manual DATE / TIME .............................................................................................................................. 53 ADMIN MONITORING.................................................................................................................. 54 4.5.1 NETWORK.................................................................................................................................. 54 4.5.2 SWITCHING OUTPUT (DIGITAL OUTPUT) .................................................................................. 61 4.5.3 PLANT MESSAGES ..................................................................................................................... 63 4.5.4 FORMULAS ................................................................................................................................ 67 4.5.5 STATUS ALARMS ....................................................................................................................... 68 4.6 ADMIN MEASUREMENT .............................................................................................................. 72 4.6.1 ANALOG CHANNELS ................................................................................................................. 72 4.6.2 DIGITAL CHANNELS .................................................................................................................. 73 4.6.3 EXTENSION MODULES .............................................................................................................. 74 4.6.4 CURRENT SENSORS (I’CHECKER) .............................................................................................. 76 4.6.5 INVERTER .................................................................................................................................. 77 4.6.6 ENERGY DIGITAL CHANNELS: .................................................................................................. 78 4.6.7 ENERGY INVERTERS .................................................................................................................. 79 4.6.8 TIME SYNCHRONIZATION.......................................................................................................... 79 5 SAMPLE CONFIGURATION .................................................................................................... 80 5.1 ANALOG CHANNELS ................................................................................................................... 80 5.1.1 INPUT VOLTAGE ........................................................................................................................ 80 5.1.2 CURRENT INPUT ........................................................................................................................ 81 5.2 DIGITAL INPUTS .......................................................................................................................... 82 5.3 ALARM CRITERIA ....................................................................................................................... 82 5.3.1 BASIC PRINCIPLE OF MONITORING ........................................................................................... 83 5.3.2 PARAMETERIZATION OF MEASURING DEVICES ........................................................................ 85 6 TECHNICAL DATA .................................................................................................................... 86 BATTERY ............................................................................................................................................... 87 7 LIST OF ABBREVIATIONS....................................................................................................... 88 UNIT....................................................................................................................................................... 88 -7- Power-One Italy S.p.a WEB’log 1 1.1 User Manual Installation Safety Instructions: The installation of the whole system must only be carried out by a skilled electrician. Defective cable connections may cause damages to people and hardware! You must only use the specified lines only. All cable connections must be prepared with wire end ferrules. All clamping joints have to be tightened with an adequate tool and checked. Do not remove the memory card during operation of the device. -8- Power-One Italy S.p.a WEB’log 1.2 User Manual Special notes for WEB’LOG LIGHT+ Please note that all the following information and wiring diagrams concerning WEB’log BASIC are also valid for WEB’log LIGHT+ devices as the BASIC and LIGHT+ hardware are similar. Please keep in mind that WEB’log LIGHT+ is limited in two points: • A maximum of five RS485 bus participants (inverters or current sensors) can be connected with WEB’log LIGHT+. • The maximum allowable installed system output per WEB’log LIGHT+ is 20 kWp. Due to the substantial resemblance of these device types, WEB’log LIGHT+ will not be mentioned additionally in the following. We recommend WEB’log LIGHT+ users to follow the WEB’log BASIC instructions on installation, setting-up and usage of the device. -9- Power-One Italy S.p.a WEB’log 1.3 User Manual Installation of Main Unit The device is adapted for top hat rail mounting (size 35mm). By means of a clamp, the device can be mounted easily. Just clip the device onto the top hat rail or release it. PRO: Analog Input 0 – 10V Analogeingang 00 – bis 20mA 10V für or PT 1000 Sensor Einstrahlungssensor 4 Digital Inputs Digital Input Digitaleingang opt. separated optisch getrennt 12bis – 24 12 24 VDC Vdc 90,0 mm 4 Digitaleingänge opt. separated optisch getrennt 24Vdc VDC 1212 bis–24 90,0 mm 4 Analog Inputs 4 Analogeingänge 0 – 10V bis 10V 0 bis020mA oder or PTPT 1000 Sensor 1000-Fühler BASIC: units 160,00 mm = 9 Einheiten units 160,00 mm = 9 Einheiten 90,0 mm 14,0 8,5 45,0 mm 8,5 14,0 PRO / BASIC: 26,5 mm 21,5 mm 25,0 mm 68,0 mm 73,0 mm - 10 - Power-One Italy S.p.a WEB’log 1.4 User Manual Communication Connections Phone (PRO only) A B C D E F G A) Power Supply: WEB'log has to be connected to 230 VAC and will be supplied by the integrated power unit. To supply external sensors, the power unit applies 24 VDC output voltage to the terminal named C. B) Telephone: The device is equipped with an internal modem (analog, GSM or ISDN). The cable joint to the telephone network is included in delivery. For the usage of other cables the following cable assignment shall apply: Analog Modem: ISDN Modem: RJ45 plug RJ45 plug TAE socket n coded - 11 - PIN ISDN / Analog 3 STB / (A2) 4 SRB / (A1) 5 SRA / (B1) 6 STA / (B2) Power-One Italy S.p.a WEB’log User Manual Phone (PRO only) A B C D E F G C) 24VDC Output: For the supply of external sensors 24 VDC (max. 230 mA) will be applied to this pin from the internal power unit. D) Ethernet: In addition to the integrated modem, a network connection is available for connecting directly to the Ethernet network. Please use a cross ethernet cable for direct PC connection and a 1:1 patch cable for hub or switch connection (assignment 1:1). Ethernet: RJ45 plug PIN 1 2 3 4 5 6 Ethernet TPTXTPTX+ TPTX+ TPTX- By default the IP address of a WEB’log is set to IP 192.168.30.40 and the net mask to 255.255.255.0. Please find a detailed instruction for connection set-up under section Connection via Ethernet Network. - 12 - Power-One Italy S.p.a WEB’log User Manual Phone (PRO only) A B C D E F G E) RS485 Connection: WEB’log disposes of a RS485 connection enabling the communication with external bus users, such as inverters or current sensors. The adequate cable will be included in delivery. For the usage of other cables the following pin assignment shall apply: RS485 RJ 12 plug PIN 1 2 3 4 5 6 Last name + 24 VDC a = Data Plus b = Data Minus GND Function Supply voltage (only current sensors) Data line, always required Data line, always required Ground, always required +24 VDC at PIN 1 is required only for the usage of current sensors. Please note that the integrated power unit cannot supply more than 5 sensors! F) Connection RS232 No usage. - 13 - Power-One Italy S.p.a WEB’log User Manual G) Digital Output D01 SO-Compliant The digital output can either be used to address buzzers or can be configured as a pulse output to connect displays. For configuration please connect to the WEB’log (see Connection Set-Up) and make the required settings under menu item "Admin Measurement -> Switching Output“ via browser. The output is designed as an optical coupler (make contact) and therefore has to be connected with an external voltage (max. 24V), if required. Its maximum load may not exceed 50mA. Connection with Display (PRO / BASIC): Display (+) (-) Pulse Input 6485 W 1516 kWh Connection with Buzzer (PRO / BASIC): - 14 - Power-One Italy S.p.a WEB’log 1.5 User Manual Analog / Digital Inputs 4 Analog Inputs 0 – 10V 4 Analog Inputs 0 bis 20mA 0 -1000 10V Sensor or or PT PRO: 44 Digital Inputs Digital Inputs opt. opt.separated separated 12 VDC 12–-24 24VDC Analog Input 0 – 10V Analog Input – 20mA 0 -010V or BASIC: or PT 1000 Sensor DigitalInput Input Digital opt.separated separated opt. 12 -–24VDC 24 VDC 12 Inputs - Analog The device is equipped with 4 (PRO) or 1 (BASIC) analog inputs preinstalled for voltage metering from 0..10V. A voltage higher than 12VDC or polarity reversal can destroy the measuring channel. Inputs - Digital The device is equipped with 4 (PRO) or 1 (BASIC) digital meter inputs for measuring the meter pulses (max. frequency: 14Hz). An interface in accordance with Specification S0 must be available. An external voltage higher than 24VDC or polarity reversal can destroy the input. 24 VDC are supplied at terminal DI+. - 15 - Power-One Italy S.p.a WEB’log 1.6 User Manual Circuit Diagram Connection with Irradiance Sensor and Energy Meter (PRO / BASIC): Analog input AI1 is preset for the connection with an irradiance sensor. Digital input DI1 is preset for the connection with an energy meter. orange 4 Analog Inputs – 10V Inputs 40 Analog 00bis 20mA – 10VC or PTor1000 Sensor PT 1000 Sensor Irradiance Sensor Sensor Signal GND VDD black 4 Digital Inputs opt. separated Low = 0-7 High = 9-24 red Phone Circuit breaker 6A Depending on device: Phone analog Phone ISDN Energy Meter Connection of inverters or current sensors via supplied cable (-) (+) Meter 1 Mains Connection 230VAC WR / Sensor 2 INV Patchkabel WR / Sensor 3 INV Patchkabel Basic Circuit Diagram for Wiring of Inverters and Current Sensors: Phone WR / Sensor 1 INV Easy-Connect-Kabel zum to ersten Wechselrichter oder Stromsensor Easy-Connect Cable the first inverter or current sensor The circuit diagrams differ depending on the inverter type. You will find the circuit diagrams on the CD ROM. - 16 - Power-One Italy S.p.a WEB’log 2 Putting into Service 2.1 WEB’log Registration on the Portal User Manual There is no need to configure the data logger on the spot. You have merely to make sure that sensor technology is connected properly and the telephone connection is fully functional. The configuration will be carried out via RDT connection. For this purpose please fill in the annexed Registration Form after having successfully installed the device. 2.2 Procedure Steps Step 1: Connection of Sensor Technology and Inverters / Current Sensors Before switching-on the device, all sensors must be completely connected and ready for operation. RS485 wiring should also be completed. Step 2: Connection of Telephone or Ethernet The telephone connection should first be checked up on proper functionality. For this purpose, please plug in a test telephone at the corresponding connection and check for a dial tone. Afterwards, please make wiring connections according to Communication Connections. Please find a detailed instruction for connection set-up via Ethernet under section Connection via Ethernet Network. Step 3: Switching-On the WEB’log For switching-on the device, the supply voltage must be applied. When the supply voltage has been applied, the LED "Power" should be illuminated permanently. - 17 - Power-One Italy S.p.a WEB’log User Manual The system takes 2 minutes until it will be completely initialized. This procedure is comparable with the booting of a PC. The termination of the booting phase will be indicated by the status LED. During the booting phase the status LED is off; it will start to blink not until its termination. Step 4: Checking the Status LED After having put the device into operation, the status LED indicates its condition. "Status LED off" -> "System is booting" "Status LED is blinking consistently" -> "System has booted successfully" Optional: Check of Measured Values via Browser After putting into service you can connect to the data logger via PC and RDT network or Ethernet as described in section Connection Set-Up. Then you can check the measured values directly via your browser. For further instructions please see On-line Values. - 18 - Power-One Italy S.p.a WEB’log 2.3 User Manual WEB’log PRO: Display Menu and Status LEDs The Four Status LEDs and their Meaning: LED "Power": permanently illuminated: Voltage is supplied to the device. Not illuminated: Voltage supply error. LED "Status": Not illuminated: System is booting, boot mode. Blinking: System has booted successfully, normal mode. LED "Connect": Not illuminated: No connection via analog modem, ISDN or GSM at the moment. Blinking: Setting up the connection to the called distant terminal. Permanently illuminated: Connection set up successfully. LED "Alarm": Not illuminated: Normal mode. Permanently illuminated: The device will trigger an alarm signal via the output D01 which has been configured as alarm output. Display Menu: The PRO version disposes of an integrated display that can be used to make certain installation settings, such as setting the WEB’log IP address or scanning for inverters. Furthermore, you may request current measured values and stored energy yield data during operation. The menu may be protected with the password 0030. Entering the password, please follow the tips on how to enter figures. - 19 - Power-One Italy S.p.a WEB’log User Manual Navigation in the Display Menu: Enter: Confirm the input or proceed to the next menu level Upward Arrow: Select a menu item above Downward Arrow: Select a menu item below ESC Escape: Cancel the input or go back to the previous menu level Input of Figures: Enter: To proceed to the next figure to be defined (highlighted with underscore) Upward Arrow: Increase the selected (underlined) figure by one Downward Arrow: Decrease the selected (underlined) figure by one ESC Escape: Cancel input - 20 - Power-One Italy S.p.a WEB’log User Manual Survey Ethernet Current IP Address Displays the current LAN IP address. GSM Field Strength Display of field strength. Settings Communication Ethernet Boot Protocol None DHCP BOOTP RARP No boot protocol is used. (Dynamic Host Configuration Protocol): A DHCP server assigns an IP address to the WEB'log. (Bootstrap-Protocol): A BOOTP server assigns an IP address to the WEB'log. (Reverse Address Resolution Protocol): A RARP server assigns an IP address to the WEB'log. Static IP Address IP address used if no boot protocol selected. Subnet Mask Subnet mask used if no boot protocol selected. Gateway Gateway used if no other has been assigned by BOOTP or DHCP server. - 21 - Power-One Italy S.p.a WEB’log User Manual Settings Communication Modem / ISDN / GSM Local IP Address WAN IP address of WEB'log. Remote IP Address WAN IP address of the caller. Subnet Mask WAN Subnet Mask. ISDN MSN MSN settings. PIN Code GSM PIN settings. Data Logger Inverter Scan Here you may scan for inverters provided that the inverter supports this feature. Set Factory Configuration Reset to factory settings: - ISDN: MSN number will be deleted - Analog: Call acceptance will be enabled - Ethernet: IP address will be set to auf 192.168.10.90 - GSM: GSM PIN will be deleted - 22 - Power-One Italy S.p.a WEB’log User Manual Inst. Value Analog Values Display of analog measured values. Digital Values Display of digital measured values. Current Sensors Measured value display of current sensors. Plant Energy DI If at least one digital channel has been selected for calculating the total plant power, the respective measured value will be indicated under the following submenus. Current Power Display of the current power. Daily Energy Yield Display of the daily energy yield. Energy Yield Yesterday Display of the energy yield of the previous day. Monthly Energy Yield Display of the monthly energy yield. Annual Energy Yield Display of the annual energy yield. Total Energy Yield Display of the total energy yield. - 23 - Power-One Italy S.p.a WEB’log User Manual Plant Energy INV If an inverter has been selected for calculating power and energy yield of the system, the respective measured value will be indicated under the following submenus. Current Power Display of the current power. Daily Energy Yield Display of the daily energy yield. Energy Yield Yesterday Display of the energy yield of the previous day. Monthly Energy Yield Display of the monthly energy yield. Annual Energy Yield Display of the annual energy yield. Total Energy Yield Display of the total energy yield. Alarms / Failures Communication The menu structure may differ depending on the type of the application (inverter, current sensors). - 24 - Power-One Italy S.p.a WEB’log 2.4 User Manual WEB’log BASIC: LED Menu The BASIC version is not equipped with a display but with LEDs providing information on the status of the device. The following graphic shows how to navigate through the menu: Enter short Start-Up State Enter long Escape Main Menu Communication Submenu Communication Blinking: Meaning see below Main Menu Analog / Digital Automatic Return Submenu Analog / Digital Blinking: Failure at analog input Main Menu Bus Devices Call Acceptance On Blinking: Failure at digital input Submenu Bus Devices Inverter Scan Automatic Return Blinking: At least one inverter ist not responding Blinking: At least one current sensor is not responding LED Display Description of Submenu "Communication": No Dial tone – No free line signal Device cannot access a subscriber line. No Carrier – Modem has lost the carrier signal or cannot detect it. No Answer – No answer The called distant terminal does not answer. Busy – Busy line The called distant terminal is busy. Initializing failure, unknown or general failure - 25 - Power-One Italy S.p.a WEB’log 3 User Manual Connection Set-Up Both WEB'log PRO and WEB'log BASIC are equipped with an integrated modem (ISDN, analog or GSM) and thus ready for RDT connection set-up. The PRO devices additionally include an Ethernet interface and therefore permit the connection to the WEB'log via network card on the spot. 3.1 Connection via RDT: Preconditions: • WEB’log is connected to the telephone network (analog / ISDN) or to a mobile network (GSM). • WEB’log with ISDN modem only: The PC or laptop from which you want to connect to the WEB’log is connected to the telephone network via ISDN card. • WEB’log with analog / GSM modem only: The PC or laptop from which you want to connect to the WEB’log is connected to the telephone network via analog modem. For the connection set-up to the device a new RDT connection must be created. To give an example, the following paragraph describes the procedure for Windows 98/95, Windows 2000 and Windows XP: After successful connection to the device see Menu Description to learn how to check the measured values. - 26 - Power-One Italy S.p.a WEB’log User Manual Example for Windows 95/98 and Windows 2000: Step 1: In the menu "START / PROGRAMS / ACCESSORIES / COMMUNICATIONS" click on the menu point "Network and Dial-Up Connections". The window "Network and Dial-Up Connections" will appear. Step 2: Select "Make New Connection" and enter a name for the new connection. Furthermore, you can specify in this window the modem that you will use for this connection. Before, a suitable modem has to be connected to your PC and installed. Windows 95/98: Windows 2000: - 27 - Power-One Italy S.p.a WEB’log User Manual Step 3: After having pressed "NEXT", please set your connection. On the tab "GENERAL", please enter the telephone number assigned for accessing "WEB’log". The further settings are set as default and need not be modified. Windows 95/98: Windows 2000: Entering the telephone number, please note that an external call prefix might be required (generally the external call prefix is “0”). For connection set-up some telephone systems might require an interdigital pause. By entering a comma after the external call prefix one can set such a pause. If a longer pause should be required, simply add a comma. - 28 - Power-One Italy S.p.a WEB’log User Manual Step 4: By double-clicking on the newly created connection, the window "Connect To " will be opened. Via the button "Connect" you can start the dialling procedure. User name: admin password: admin Windows 95/98: - 29 - Power-One Italy S.p.a WEB’log User Manual Windows 2000: Step 5: After connection set-up, the browser will be opened and the IP address of the device will be entered into the input field. The standard address is as follows: http://192.168.200.1 Special Settings for Windows 2000 In the window “Connect ‘name of the connection’" click on the button "Properties". - 30 - Power-One Italy S.p.a WEB’log User Manual The field “Use the following IP address" has to be selected and IP address “192.168.200.51“ has to be entered. - 31 - Power-One Italy S.p.a WEB’log User Manual Special Settings for Windows XP: Display the dial-up properties and click on "Networking". In the menu "Properties" please select the field "Use the following IP address" and enter 192.168.200.51. Select also the data field "Use the following DNS server addresses" and enter the IP address 192.168.200.51 as preferred DNS server. 3.2 Connection via Ethernet Network Preconditions: • Please use a cross-over cable for direct connection to the network board of a PC / laptop. • Please use a standard 1:1 (patch) network cable for intranet integration via hub or switch. - 32 - Power-One Italy S.p.a WEB’log User Manual PC crossed PC 1:1, patch Hub / Switch PC Network Connection Set-Up: For direct connection from data logger to your PC please use a network board. Normally this board is already integrated in new systems. To set up your network board, please go to: "Control Panel / Network and Internet Connections“. Click on the item: "Network Connections“; a new window will appear displaying your network connections. Select "Local Area Connection“ by double-clicking the icon. - 33 - Power-One Italy S.p.a WEB’log User Manual The following window will appear: Please select "Internet Protocol (TCP/IP)“ and click on the button "Properties". The settings of your network board will be displayed here. Please configure your network according to the example mentioned above. Attention: The IP address of your network board and the IP address of your data logger must not be identical. Example: Network board IP address: 192.168.30.1 Data logger IP address: 192.168.30.40 By default the IP address of a WEB’log is set to IP 192.168.30.40 and the net mask to 255.255.255.0. PC must be within the same address range, consequently its IP should be 192.168.30.XXX. Once connected via 192.168.30.40, you may change the WEB'log IP address. Once these requirements are met, WEB’log can be addressed with its IP address via http (browser) and via FTP. - 34 - Power-One Italy S.p.a WEB’log User Manual Please enter in your browser, e.g., Microsoft Internet Explorer, the network IP address of your WEB'log: After successful connection to the device see Menu Description to learn about how to check the measured values. - 35 - Power-One Italy S.p.a WEB’log 4 User Manual Menu Description After successfully setting-up the RDT or network connection, you can access the WEB’log menu structure via a browser. For an RDT connection please enter http://192.168.200.1/ in your browser. For a network connection please enter IP (default: http://192.168.30.40/) in your browser. The following menu items are accessible for standard users: 4.1 General 4.2 On-line Values 4.3 Status 4.4 Configuration The administrator can access the following menu items: 4.5 Admin Monitoring and 4.6 Admin Measurement. The administrator password is "ist02". 4.1 General The homepage shows the most important information on the measuring device. Hardware: This item gives an overview of the occupied channels or accessible bus users. Monitoring: Hereunder, the last occurred failure message and time of failure will be stated. Furthermore, the last data transfer will be shown. - 36 - Power-One Italy S.p.a WEB’log User Manual Plant Parameters: These entries serve as information on the connected photovoltaic system. The menu item "LOGIN" leads to a dial-in page for logging-in to the device as system administrator. The password is "ist02". - 37 - Power-One Italy S.p.a WEB’log 4.2 User Manual On-line Values Herunder you may find various measured values of the analog and digital inputs connected to the sensors and meters. If an inverter is connected to the RS 485 interface and the adequate driver is loaded, you may also check the inverter values. 4.2.1 Analog - Digital Survey of Selected Digital Inputs: Here you will get an overview of the total energy yield of your PV system. Under "Admin Measurement" -> "Energy - Digital Channels“ you can set the parameters to calculate the total sum. Example: The system consists of two subsystems whose separate meters are connected to the WEB’log. In order to get a correct sum, please enable the two subsystem meters under "Admin Measurement" -> "Energy - Digital Channels“. Selection Extension Module: This function allows you to recall the measuring data of a connected extension module making available additional analog/digital inputs. - 38 - Power-One Italy S.p.a WEB’log User Manual Details Digital Inputs: On this page the corresponding measured values for each digital channel will be displayed. • Current power: The metering pulses will be converted to power over a defined period by means of a pulse constant. (Indication in kW) • Minimum: The smallest measured value of the current day • Maximum: The highest measured value of the current day • Meter Reading: The total sum of the measured pulses will be displayed here. The indication can be compared with the actual value of the energy meter. (See menu item; "Admin Measurement / Digital Channels", displayed in kWh). Details Analog Inputs: The Analog Values are stated together with channel number and designation; the following information will be provided: • Value: Current on-line value (updated every 10sec) • Minimum: The smallest measured value of the current day • Maximum: The highest measured value of the current day 4.2.2 Current Sensors If current sensors (i’checker) are connected, the recent measured values of the current sensors will be displayed on this page. - 39 - Power-One Italy S.p.a WEB’log 4.2.3 User Manual Inverter If used in connection with inverters, application software may differ in that point. Instead of current sensors, inverters will be displayed. Depending on the type of the inverter connected, even more values (e.g. temperature, supply impedance) are available. - 40 - Power-One Italy S.p.a WEB’log 4.3 User Manual Status Plant Messages This menu item gives an overview of the possible alarm status. The Measuring Value Alarm results from the predefined criteria. The following information is listed in the status survey: • Designation: The Name defined in "FORMULA/Criteria" will be displayed here. • Status: Indicates if criterion is defined as "active / inactive". • Upper limit: The current upper limit of the monitoring criterion will be displayed. • Actual Value: The actual value of the monitoring criterion will be displayed. • Low limit: The current low limit of the monitoring criterion will be displayed. • Alarm Counter: Tells how often the criterion has already exceeded a limit value. • Transfer Status: Indicates if there are alarm messages in line for being sent. • Info: Indicates the point of time when the last alarm occurred. - 41 - Power-One Italy S.p.a WEB’log User Manual The Plant Alarms correspond to messages referring to monitoring system failures. • Designation: The reason of the failure message will be displayed here. • Alarm Type: States the type of alarming "e-mail / fax". • Alarm Target: Indicates the contact where the failure message has been sent to. • Alarm Counter: Displays how often an alarm has already occurred. • Transfer Status: Indicates if there are alarm messages in line for being sent. • Info: Indicates the point of time when the last alarm occurred. "E-Mail Transfer Status" informs about the system status. If, for instance, e-mails are in line for being sent at the moment, the field "Sending Status" will display "Busy". The normal status is: ”Ready to Send“. By clicking the button “Reset Alarm”, all alarm messages (incl. local output) will be reset, except plant alarms. - 42 - Power-One Italy S.p.a WEB’log User Manual (Aurora’s) PV-Inverter messages The Inverter section displays all the alarm conditions generated by the inverters. The AEC system detects all the error conditions generated by the inverters and available through the Aurora RS-485 communication protocol, as well as some general failure conditions that may occur at system level. The alarms and errors detected at single component level (inverters, sensors, etc..), as well as those at system level, are grouped in different categories. The different alarm/error conditions and the specific alarm management criteria used for each alarm is described below: Inverter not connected: This alarm is generated when the AEC system is not able to properly communicate with one or more inverters connected to the RS-485 serial link (in general this error is caused by a fault on the serial line or in the communication interface driver of the inverter). • Energy comparison error: Every day the system compares the daily energy produced by each inverter to that of all the other inverters of the plant (comparison in pairs), to allow a quick detection of “lower than expected” production levels (caused by shadows, PV module’s defect, etc…). An alarm will be generated whenever the system, during the comparison of the energy produced by each pair of inverters, detects a difference exceeding a predefined threshold (default setting is 30%). NOTE: we recommend to enable this alarm only in case each inverter of the PV plant is configured with the same number and type of modules (homogeneous configuration). - 43 - Power-One Italy S.p.a WEB’log • User Manual Error based on a formula: error conditions of the inverters based on a formula configured by the system administrator (normally the alarm generation requires the persistence of the error condition for a certain amount of time – ex.: the alarm: “grid outage for long time” is triggered if the fault condition persist for more than 1 hour). • Inverter alarm (group 1-2-3): The 51 error conditions included in the Aurora inverter protocol are divided in 3 Groups (categories). With respect to the errors based on a formula, this alarms are triggered only in case the error condition occurs a certain amount of times during the same day (see table below). • Group 1 – Includes the alarms that are relevant only for the manufacturer (for the errors included in this group the alarm message is delivered only to Power-One). • Group 2 – Includes the alarms that are relevant for the manufacturer and the PV plant operator/manager (by default setting, the alarm message for each error that falls in this group is delivered to Power-One technical staff and to the PV plant manager). • Group 3 – Includes the alarms that are important for the manufacturer as well as the PV plant manager and eventually the end customer (by default, the alarm message for each error that falls in this group is delivered to PowerOne, the PV plant manager and the end user). The table in the next page list all the error conditions generated by the Aurora inverter and the minimum number of occurrences per day considered by the AEC system to trigger an alarm message. - 44 - Power-One Italy S.p.a WEB’log User Manual The alarm is Warning n Error Error designation triggered when the Alarm n° of code code occurrences/day is Group equal to: 1 Input Voltage under threshold W001 // - - 2 Input Overcurrent // E001 1 3 3 Input Undervoltage W002 // - - 4 Input Overvoltage // E002 1 3 5 Input Voltage under threshold W001 // - - 6 No parameters // E003 10 1 7 Bulk Overvoltage // E004 1 1 8 Communication Error // E005 10 1 9 Output Overcurrent // E006 2 2 10 IGBT Sat // E007 2 1 11 Bulk Undervoltage W011 // - - 12 Internal Error // E009 10 1 13 Grid Fail W003 // 10 3 14 Bulk Low // E010 - - 15 Ramp Fail // E011 - - - 45 - Power-One Italy S.p.a WEB’log 16 17 DcDc Error revealed by inverter Wrong Input setting (Single instead of dual) User Manual // E012 10 1 // E013 10 3 18 Ground Fault (UL version) // // 2 3 19 Overtemperature // E014 2 1 20 Bulk Capacitor Fail // E015 2 1 21 Inverter fail revealed by DcDc // E016 10 1 22 Start Timeout // E017 - - 23 I leak fail // E018 2 1 24 Degauss Error (UL Version) // // 10 1 25 (Not Used) - - - 1 26 (Not Used) - - - 1 27 DcDc relay fail // E020 2 1 28 Inverter relay fail // E021 2 1 29 Ileak Sensor fail // E019 10 1 30 Autotest Timeout // E022 10 1 31 Dc-Injection Error // E023 10 1 32 Output Overvoltage W004 // 10 1 33 Output Undervoltage W005 // 10 1 - 46 - Power-One Italy S.p.a WEB’log User Manual 34 Output Overfrequency W006 // 10 1 35 Output Underfrequency W007 // 10 1 36 Z grid out of range W008 // 3 1 37 Unkown Error // E024 10 1 38 Riso Low (Log Only) // E025 10 1 39 VRef Error // E026 2 1 40 VGrid Measures Fault // E027 10 1 41 FGrid Measures Fault // E028 10 1 42 ZGrid Measures Fault // E029 10 1 43 ILeak Measures Fault // E030 10 3 44 Wrong V Measure // E031 10 3 45 Wrong I Measure // E032 10 3 W009 // - - W010 // 10 3 46 Empty Wind (AuroraWind Only) Table 47 Fan Fail 48 UnderTemperature // E033 200 3 49 Guard Fail // E034 2 3 50 Waiting remote ON // E035 51 Vout Avg // E036 - 47 - formula – the error persist for 2 hours formula 10 3 Power-One Italy S.p.a WEB’log 52 User Manual formula Grid outage for long time – the persist for 1 hour error formula NOTE – Daily management of the error messages: to prevent the generation/delivery of a large amount of alarm messages (in case of recurrent faults/errors), a single message will be delivered for each specific error/warning condition detected by the AEC during the same day (detected on a specific inverter of the PV plant). Only #1 Message / Day / Inverter / Error Code - 48 - Power-One Italy S.p.a WEB’log 4.4 Configuration 4.4.1 Plant Data User Manual The plant data will be needed more than once. This information is used in WEB’log on the front page to provide a quick system survey. For the definition of failure messages plant data are ready for access under "Admin Monitoring / Formula". Furthermore, information regarding operator, nominal plant output, module types, orientation, etc. can be specified here and settings regarding failure message transfer, sampling frequency, etc. can be made. • Plant Designation: This entry will appear on the start page and will be displayed on all alarm messages. • Operator: Documentation • Installed power: Used to calculate alarm criteria • Module area: Used to calculate alarm criteria • Module efficiency: Used to calculate alarm criteria • Inverter Efficiency: Used to calculate alarm criteria • Number of Subsystems: Used to calculate alarm criteria • Storage Interval: Data aggregation to 300, 600 900, 1800, 3600s • Orientation: Plant orientation - 49 - Power-One Italy S.p.a WEB’log • Inclination User Manual Inclination of modules • E-mail Contact for Data Transfer: Target for transfer of measuring data • External Call Prefix: Entry of external call prefix digits (depending on the telephone system) • Dual Tone Multi frequency Signalling (DTMF) or Pulse Dialling: Setting of calling method • Timeout (analog modem): • Connection Acceptance (analog modem): Maximal time between two bell signals Device either accepts incoming calls or not; required for parallel operation of further devices at one telephone connection. • Bell Signal (analog modem): Number of bell signals until answering of WEB'log Please do not set a value higher than 6, otherwise WEB’log cannot be reached. • Delivery via fax: Settings for the transmission of the daily file via fax. • Time of Delivery: Set the desired time for fax transmission here. - 50 - Power-One Italy S.p.a WEB’log User Manual Additional settings at connection acceptance = "off" • Start-Up Time for Connection Acceptance: • • Time of day from when the device should accept calls Stop Time for Connection Acceptance: Time of day from when the device should no longer accept calls Bell Signal (analog modem): Number of bell signals until answering of WEB'log Please do not set a value higher than 6, otherwise WEB’log cannot be reached. • Period for Connection Acceptance after Reset: Indicates the time slot in seconds in which the device should be accessible after a reset. Changes will only be accepted if Save button has been operated before. 4.4.2 Default Contact Using the WEB'log presetting all alarm messages and measured value files will be sent to the address indicated in the default contact. Changes can be made for alarm criteria, plant messages or plant parameters. • Company/Person: Value filled in here will be used as designation of the contact. It will be shown at the check boxes used for addressing an alarm message. • Street: Used for documentation purposes only. - 51 - Power-One Italy S.p.a WEB’log User Manual • Postal Code: Used for documentation purposes only. • Telephone: Used for documentation purposes only. • Contact person: Used for documentation purposes only. • Mobile Phone: Mobile phone number for alerting via SMS; the entry of the mobile phone number should not contain any formatting characters! • Fax: Fax number for alerting via fax machine; the entry of the fax number should not contain any formatting characters! • E-mail: E-mail address (max. 80 characters); if indicating two e-mail adresses, please separate them by comma or blank. Changes will only be accepted if Save button has been operated before. - 52 - Power-One Italy S.p.a WEB’log 4.4.3 User Manual Date / Time The settings of time and date can be modified here. Please keep in mind that the time setting directly influences data logging. Deviations in seconds should not be corrected. Changes will only be accepted if Save button has been operated before. - 53 - Power-One Italy S.p.a WEB’log 4.5 Admin Monitoring 4.5.1 Network User Manual The area Network is divided into four ranges. 1. Settings PPP Server settings affect network properties of the WEB'log web server: • Server IP Address: WEB’log IP address when dialling in via modem / ISDN / GSM (by default: 192.168.200.1). • Server Network Mask: Not to be modified • Caller IP Address: Not to be modified • Server Telephone Number: This telephone number is only used for documentation purposes. It indicates the number by which the WEB'log can be accessed. LAN Interface Settings (Ethernet) relates to the WEB’log network settings. • Current IP address: • Boot Protocol: Current IP Address of WEB’log. You may select between None, DHCP, BOOTP, RARP Protocol description see page 20. • Static IP Address: Enter desired IP address if no boot protocol is used. • Net Mask: Enter subnet mask if no other has been assigned by BOOTP or DHCP server. • Gateway: Enter gateway if no other has been assigned by BOOTP or DHCP server. • DNS Server Enter the DNS Server - 54 - Power-One Italy S.p.a WEB’log User Manual Using the device at an ISDN Extension, you have to insert the corresponding extension number. • MSN Number (ISDN modem): Telephone Number of ISDN Extension: e.g. 3466615 The Check of Alarm Mode settings have been designed for testing the WEB’log’s calling. You can check either the e-mail, fax or SMS contact. • Test contact: To whom do you wish to send this test? To enable the desired contact method, please click the corresponding check box: e-mail, fax or SMS. Changes will only be accepted if Save button has been operated before. - 55 - Power-One Italy S.p.a WEB’log User Manual 2. Internet Please define here the Internet Access Points (Providers) that the WEB’log is to use for dialling to the Internet. Please indicate designation, dial-in number, user name and password. Changes will only be accepted if Save button has been operated before. - 56 - Power-One Italy S.p.a WEB’log User Manual 3. E-mail Here you can define E-Mail Transfer Settings. SMTP Server Settings. • Server IP Address IP address of server you want to log-in (SMTP server!!). IP address of meteocontrol data processing centre: 213.179.128.176 • WEB’log e-mail address: In order to assure good operation, please indicate a valid e-mail address here. According to the e-mail address, the corresponding SMTP server has to be entered. • Group E-mail Address: meteocontrol provides the service to send e-mails via a meteocontrol server. Therefore, you must enter the following address: [email protected]. The emails will be forwarded to the actual e-mail address. Under Pop3 Server settings can be made regarding authentification, IP address, user name, password. These specifications should only be made if required for the e-mail account. Under Dial-in Services you can set the priority of the providers, i.e. the provider ranked first will be dialled into first. If no connection can be set up, WEB’log will dial into the next provider. If the WEB’log dials in to the Internet via network, and if the gateway number is posted, emails can be sent via Ethernet, too, provided that no dial-in service is selected under Network -> E-mail. If you are safer'Sun user, a copy of every alarm message can be sent to the safer'Sun portal. In this way, all alarm messages are shown in the alarm management. Synchronization with Database Server: Yes / No - 57 - Power-One Italy S.p.a WEB’log User Manual Changes will only be accepted if Save button has been operated before. 4. SMS In the section Settings for SMS Transfer you can indicate the appropriate SMS server number(s): - Prefix(es): Prefix(es) of SMS server, separated by semicolon. - SMSC Telephone Number (analog): Server telephone number(s) used for sending SMS. - SMSC Telephone Number (digital): Server telephone number(s) used for sending SMS. - 58 - Power-One Italy S.p.a WEB’log User Manual Changes will only be accepted if Save button has been operated before. - 59 - Power-One Italy S.p.a WEB’log User Manual 5. Contact Addresses In the section "Contact Addresses", you can define four further contacts additionally to the default contact to be notified in case of failure. Settings are made in the same way as for the default contact. Changes will only be accepted if save button has been operated before. - 60 - Power-One Italy S.p.a WEB’log 4.5.2 User Manual Switching Output (Digital Output) Under “Switching Output“ you may define the digital output’s usage. The following options can be selected: Inactive, Alarm Output and Meter Output If you want to use this output as meter output for connecting a display, please indicate the pulse constant first. The pulse constant indicates the amount of pulses the WEB’log logs at D01 for one kWh produced energy. - 61 - Power-One Italy S.p.a WEB’log User Manual Used as alarm output you may enable plant alarms and different criterion alarms. Changes will only be accepted if Save button has been operated before. For information on wiring of the output please see Communication Connections. - 62 - Power-One Italy S.p.a WEB’log 4.5.3 User Manual Plant Messages The Plant Messages refer only to information or failures regarding the monitoring system itself. The following settings can be made: • Status: You can set this criterion to "inactive"/"active". • Alarm Type: Defines the alarm delivery method: „E-mail / Fax / SMS" • Alarm Target: Sets the contact to be notified in case of alarm. • Alarm Counter: Informs about the occurrence of the corresponding alarm. • Current Information: • Reset: Informs about the last occurrence of an alarm. You can reset the alarm count by using the button "Reset Counter". Changes will only be accepted if Save button has been operated before. - 63 - Power-One Italy S.p.a WEB’log 4.5.4 User Manual (Aurora’s) PV-Inverter Messages In the section Inverter messages you can modify the settings used for the inverter alarm message management. For each alarm you can set up to 3 different recipients. Each recipient shall be configured with the following settings: • Active/Inactive: to respectively enable or disable the recipient for that alarm message. • Alarm Type: despatch method for that alarm (e-mail, SMS or fax). • Recipient: the recipient of that alarm message (selected among the active contacts for the system). Reset counter: by pressing this button you will reset the counter for all the alarms generated by the inverters so far. - 64 - Power-One Italy S.p.a WEB’log User Manual Default settings Below you will find listed the Power-One default settings for the inverter alarm delivery rules for each error category: • Inverter not connected: 2 recipients o “PV plant operator” (main contact) o “Power-One monitoring” (Power-One supervision on all the AEC systems installed) • Energy comparison error: 2 recipients o “PV plant operator” (main contact) o “Power-One monitoring” (Power-One supervision on all the AEC systems installed) • Error based on a formula: 2 recipients o “PV plant operator” (main contact) o “Power-One monitoring” (Power-One supervision on all the AEC systems installed) • Inverter alarm (Group 1): 1 recipient o “Power-One monitoring” (Power-One supervision on all the AEC systems installed) • Inverter alarm (Group 2): 2 recipients o o “PV plant operator” (main contact) “Power-One monitoring” (Power-One supervision on all the AEC systems installed) • Inverter alarm (Group 3): 2 recipients o o “PV plant operator” (main contact) “Power-One monitoring” (Power-One supervision on all the AEC systems installed) - 65 - Power-One Italy S.p.a WEB’log User Manual NOTE: we recommend to configure and enable and additional contact “customer” for the alarm messages included in Group #3 (in case this differs from the “PV plant operator, or main contact for the PV plant). Setting the tolerance (%) for the alarm “Energy comparison error” This option allows to set the tolerance range accepted for the comparison of the energy produced by the inverters. The alarm will be triggered in case the difference of the daily energy produced among a couple of inverters exceed the tolerance range specified (do not reduce excessively the tolerance range, because it will cause the proliferation of false alarm messages. Recommended value is 30%). - 66 - Power-One Italy S.p.a WEB’log 4.5.5 User Manual Formulas In the section Formulas, you can define various criteria for plant monitoring and fault detection. In the section Settings the following parameters are defined: • Designation: The name of the criterion will be entered here. • Status: You can set this criterion to "inactive"/"active". • Time frame: Analysis on interval or daily basis. • Alarm Target: Sets the contact to be notified in case of alarm. • Message Type: States the type of message: ”E-mail / Fax / SMS“ • Delay: Waiting period (indicated in “intervals or days”). If a criterion is in the state of alarm, a message will be released after expiration of this period. • Number of triggered alarms: The number of registered alarms will be displayed here. • Reset alarm counter: By using this feature, you can zero the number of alarms occurred. The Formula Settings are defined according to the reverse Polish notation. An example for criterion setting is given in the chapter Sample Configuration. - 67 - Power-One Italy S.p.a WEB’log User Manual Changes will only be accepted if Save button has been operated before. 4.5.6 Status Alarms In the section Status Alarms, you can define various stages of alarm for plant monitoring and fault detection. In the section Settings the following parameters are defined: • Status: You can set the alarm on "inactive"/"active". • Designation: The name of the alarm is to be entered here. • Alarm Target: Sets the contact to be notified in case of alarm. • Message Type: States the type of message: ”E-mail / Fax / SMS“ • Delay: Waiting period (indicated in seconds). If a status alarm is in the state of alarm, a message will be released after expiration of this period. • Alarm reactivation after resetting: - 68 - Power-One Italy S.p.a WEB’log User Manual Indicates the time span after which the alarm will be reactivated if the measuring value for this time span is smaller than the defined limit value. • Number of triggered alarms: The number of registered alarms will be displayed here. In the section Formula Settings the following parameters are defined: • Analog: If a certain limit value is exceeded, a message will be sent to the contact defined in the settings menu (e.g. channel 1 measurement >= limit value of 8.0 V). • Status: For instance, the message will be sent if the status channel 1 does not correspond anymore to the defined low or high failure level. - 69 - Power-One Italy S.p.a WEB’log • Pulse Counter: If a certain limit value is exceeded, a message will be sent to the contact measurement >= User Manual defined in the settings menu (e.g. meter 1 limit value of 1.0 kW). - 70 - Power-One Italy S.p.a WEB’log User Manual Changes will only be accepted if Save button has been operated before. - 71 - Power-One Italy S.p.a WEB’log 4.6 Admin Measurement 4.6.1 Analog Channels User Manual • Selection Extension Module: Please select here the values to be displayed: measured values of WEB’log or such of a connected extension module. • Status: The channel can be set to "inactive / active". Depending on the status, measured values are recorded in data files. • Channel- / Designation: Defines the channel name; this designation is used for the online presentation of the measured values. • Abbreviation: Defines the channel name; this channel abbreviation is used in the data files. To enable synchronization with the Internet the abbreviation must be selected from the pre- database, defined list (see: List of Abbreviations). • Unit Defines the unit of measured values; this designation is used for the online presentation of the measured values. • Decimal Places: Defines the number of decimal places in the data files for online representation and archiving. • Gradient: The measured input voltage is converted to physical values by means of the gradient. • Offset: Offset is indicated as a physical value. - 72 - Power-One Italy S.p.a WEB’log User Manual Changes will only be accepted if the Save button has been operated before. 4.6.2 Digital Channels • Selection Extension Module: Please select here the values to be displayed: measured values of WEB’log or such of a connected extension module. • Status: The channel can be set to "inactive / active". Depending on the status, measured values are recorded in data files. • Channel- / Designation: Defines the channel name; this designation is used for the online presentation of the measured values. • Abbreviation: Defines the channel name; this channel abbreviation is used in the data files. To enable synchronization with the Internet the abbreviation must be selected from the predefined database, list (see: List of Abbreviations). • Unit Defines the unit of measured values; this designation is used for the online presentation of the measured values. • Decimal Places: Defines the number of decimal places in the data files for online representation and archiving. - 73 - Power-One Italy S.p.a WEB’log • Pulse Constant: User Manual The pulse constant is used for converting the measured pulse rate in its physical representation. The constant is indicated as • Interval Power: pulses/kWh. Defines the calculation period of the recent power based on pulses. The period is defined in seconds (depending on the • pulse frequency). Meter Reading: Recent value of energy measurement: you can also enter values manually here. Changes will only be accepted if the Save button has been operated before. 4.6.3 Extension Modules • Request Interval: The request interval defines how often the data logger reads out the extension modules. • Number: Extension module number • Status: The channel can be set to "inactive / active". Depending on the status, measured values are recorded in data files. - 74 - Power-One Italy S.p.a WEB’log • Designation: User Manual Defines the channel name; this designation is used for the online presentation of the measured values. • IP Address: Network address of the corresponding extension module. • Port: Port address of the corresponding extension module. Set to 502 by default. • Device Type: Type of the corresponding extension module: io_441: 4 digital inputs, 4 analog inputs, 1 digital output io_081: 8 digital inputs, 1 digital output Changes will only be accepted if Save button has been operated before. - 75 - Power-One Italy S.p.a WEB’log 4.6.4 User Manual Current Sensors (i’checker) You can add or delete sensors here. Therefore, enter the bus address in the input field and click on the button "Add" or "Delete". After having finished the changes, the new address list will be accepted by clicking on the button Accept. Changes will only be accepted if Save button has been operated before. Under "Sensor Configuration" you can change the address of a sensor. Please contact meteocontrol for any further option you would like to have configured. As they should be supported also by the current sensors, such settings should be done only by meteocontrol or after consultation. - 76 - Power-One Italy S.p.a WEB’log 4.6.5 User Manual Inverter If inverters are connected, you may manage them here, e.g. enter inverters or delete them from the system (e.g. automatically via scan function). As the features vary depending on the manufacturer, you will find the corresponding instructions directly on this web site. Changes will only be accepted if Save button has been operated before. - 77 - Power-One Italy S.p.a WEB’log 4.6.6 User Manual Energy Digital Channels: This page refers to "On-line Values" -> "Analog / Digital": As administrator you may correct the indicated energy values, if necessary. Furthermore, you can determine which channels should be included in the sum under "Digital channels included in the sum". Changes will only be accepted if Save button has been operated before. - 78 - Power-One Italy S.p.a WEB’log 4.6.7 User Manual Energy Inverters If inverters are connected, you may revise the displayed energy values under menu item "On-line Values" -> "Inverter Survey". Changes will only be accepted if Save button has been operated before. 4.6.8 Time Synchronization This menu option enables you to either synchronize WEB’log via Internet or with the network clock. When synchronizing with the network, the time server’s IP address and port number have to be considered. Changes will only be accepted if Save button has been operated before. - 79 - Power-One Italy S.p.a WEB’log 5 Sample Configuration 5.1 Analog Channels 5.1.1 Input Voltage User Manual The rule for converting the measured value into a physical value is as follows: [ physical value] = ([ MW ] * [gradient ]) + offset [ gradient ] = ( [ full range output ] ) full range channel output [offset ] = [ pyhs. value] Legend: [MW]: Current measured value at the channel input in [V]. [Full range channel output]: If voltage input: 10V Example 1: A sensor (sensor constant: 10V=1500W/m²) should be connected to an analog channel. The full range output is 10V. According to that the gradient calculates as follows: Gradient = 1500W / m² = 150 10 If the channel shows no offset when calibrating, you can enter 0. Provided the channel has an offset of e.g. +15W/m² when calibrating, the following should be set on the channel: Offset = −15W / m² - 80 - Power-One Italy S.p.a WEB’log User Manual Example 2: A PT100 should be connected to a channel via a measuring transducer. The measuring transducer supplies an output voltage of 10V at +100°C and 0V at –50°C. From this results the full range output up to 150°. According to that the gradient calculates as follows: Gradient = 150°C = 15 10 As the temperature should be measured up to –50°C, the offset results in: Offset = −50°C 5.1.2 Current Input The rule for converting the measured value into a physical value is as follows: [phys.value] = ([MW]*[gradient]) + [offset] [ gradient ] = ( [full range output] ) [full range channel output] [offset ] = [measured value] Legend: [MW]: Current measured value at the channel input in [mV] [Full range channel output]: If current input: 20mA - 81 - Power-One Italy S.p.a WEB’log 5.2 User Manual Digital Inputs The basis of the conversion to a physical value is the following equation: measured value = Example: ∑ pulses meter constant A meter supplies 6000 pulse/kWh and should be connected to a digital input. This meter constant will be directly entered in the field [Pulse Constant (pulse/kWh] so that these values will be already displayed as energy yield [kWh] in the on-line presentation. To display the current power, you must enter a value, e.g. 60, in the field [Interval for current power (s)]. Thereby, the pulses will be added up over a period of 60 seconds and converted to a mean power in this interval timeframe. 5.3 Alarm Criteria The following example describes how to realize a simple and effective plant monitoring by using this device. Example: A PV plant is equipped with both a irradiance sensor measuring the solar irradiance on module plane and a generation meter with pulse output. Based on these quantities, limits should be defined for the release of an alarm message to notify a plant failure. - 82 - Power-One Italy S.p.a WEB’log 5.3.1 User Manual Basic Principle of Monitoring The physical basis forms the ratio of solar irradiance and generated energy which ideally is: [energy yield] = [ solar irradiance * Areamodule * etamodule * etainverter] For a PV module with an efficiency of 12%, an inverter efficiency of 91%, and a module area of 10m², this ideal relation can be represented as follows: 1,1 1 0,9 Power in [kW] 0,8 0,7 0,6 0,5 Pac = Gmod * eta mod * eta Inv * Area 0,4 0,3 0,2 0,1 0 0 100 200 300 400 500 600 700 800 900 1000 1100 Irradiance in [W/m²] As this ratio is not exactly linear over the whole range (minor irradiance => minor efficiency), it will not suffice as an useful alarm criterion. Therefore, you will have to define a span in which the measured values should range. Two linear equations shall mark the upper and the lower limit of the "feasible" range: - 83 - Power-One Italy S.p.a WEB’log User Manual 1,4 1,2 Alarm message: upper limit exceeded 1 Power in [kW] 0,8 Feasible Area 0,6 0,4 Alarm message: lower limit exceeded 0,2 0 0 100 200 300 400 500 600 700 800 900 1000 -0,2 -0,4 Irradiance in [W/m²] ideal Lower limit Upper limit You may define two different gradients, so that the range can be selected very flexibly. The shifting of the straight lines of tup und tlow will be indicated as an absolute value (e. g.: 0.2kW). The equation of the limiting lines can be described as follows: Low limit: Y < mlow ⊗ X ⊕ tlow Pac < mlow ⊗ (GModule⊗ AArray ⊗etaPV ⊗etaInverter ) ⊕ (tlow ⊗ Pnominal ) Upper limit: Y > mupper ⊗ X ⊕ tupper Pac > mupper ⊗ (GModule⊗ AArray⊗etaPV ⊗etaInverter ) ⊕ (tupper ⊗ Pnominal ) if: mlow = 0.85 mupper = 1,1 tlow = - 0.25 tupper = 0.15 - 84 - Power-One Italy S.p.a WEB’log 5.3.2 User Manual Parameterization of Measuring Devices Settings under menu item "Admin Monitoring / Formulas / Criterion x“ At first, the general definitions for the alarm criterion will be specified. • Designation: „Power over Solar Irradiance" • Status: "active" • Time frame: „Interval“ • Alarm Target: „Power-One“ • Message Type: „E-mail“ • Delay: "8“ (this causes an alarm delay of 2 hours at a measuring interval o 15 minutes). Before an alarm message can be sent, you must have defined a contact for the alarm target in the menu [Admin Monitoring / Contact addresses / Contact x]. The formula entries are as follows: Y Energy yield PVA (dig_0) m (low limit) 0,85 m (upper limit) 1,1 x Irradiance module(ana_0);plant area;*;etaPV;*;etaInverter;* c (low limit) 200 c (upper limit) 200 - 85 - Power-One Italy S.p.a WEB’log 6 User Manual Technical Data Ambient Temperature Operation: from 0°C to +55°C Storage and Transport: from -20°C to +65°C Electrical Data Voltage supply: 230 V AC 85 V AC - 260 V AC Analog Inputs: 0 V DC to 10V DC (adjustable) 0 mA – 20mA max. load: 24V DC max. load: 40mA / 3V DC PT-1000 Temperature input Digital Inputs: Low =0 V DC to 7 V DC High 9 V DC to 24 V DC Voltage supply directly from WEB’log! Digital Output: Opto output max. load: 70 V DC / 50 mA (check polarity!) Power Consumption: WEB’log pro 2.3W / WEB’log basic 2.1W Measuring Accuracy: Voltage Input: 0,5 % of full range output Current Input: 1 % of full range output Interfaces: Interface 1 (optional): PSTN connection GSM modem (PRO): ISDN Connection Interface 2: Ethernet connection Interface 3: RS – 485 Mechanical Data: Dimensions: 160 x 90 x 73 mm (WxHxD) Mounting: Top hat rail mounting Protective system: IP20 Weight: 360g - 86 - Power-One Italy S.p.a WEB’log User Manual WEB’log PRO/Basic Special Features: Memory: 32MB CF Memory Card Inputs: 4 x Analog (basic 1x) / 4 x Digital (basic 1x) / 1 x RS485 Power Supply: included Output: Pulse output (inverter energy output) Alternative alarm (fault detection) Battery Li2032 lithium cell. Storage life is longer than 10 years. Service life of the device battery is longer than 5 years. The battery changing must be done by the manufacturer (unsolder and solder). - 87 - Power-One Italy S.p.a WEB’log 7 User Manual List of Abbreviations Measured Values: WEB’log Unit Feed-in Meter Energy meter of subsystem 1 Energy meter of subsystem 2 Energy meter of subsystem 3 Irradiance on module plane 0 Irradiance on module plane, subsystem 1 Irradiance on module plane, subsystem 2 Irradiance on module plane, subsystem 3 Irradiance on a horizontal plane Temperature module Temperature module subsystem 1 Temperature module subsystem 2 Ambient temperature Ambient temperature 1 Temperature collector Temperature collector subsystem 1 Direct current Direct current subsystem 1 Direct current subsystem 2 Direct current subsystem 3 DC voltage DC voltage subsystem 1 DC voltage subsystem 2 DC voltage subsystem 3 Alternating current Alternating current subsystem 1 Alternating current subsystem 2 Alternating current subsystem 3 AC voltage AC voltage subsystem 1 AC voltage subsystem 2 AC voltage subsystem 3 E_Z_EVU E_Z_PV1 E_Z_PV2 E_Z_PV3 G_M0 G_M1 G_M2 G_M3 G_H0 T_M0 T_M1 T_M2 T_U0 T_U1 T_K0 T_K1 I_DC_0 I_DC_1 I_DC_2 I_DC_3 U_DC_0 U_DC_1 U_DC_2 U_DC_3 I_AC_0 I_AC_1 I_AC_2 I_AC_3 U_AC_0 U_AC_1 U_AC_2 U_AC_3 kWh kWh kWh kWh W/m² W/m² W/m² W/m² W/m² °C °C °C °C °C °C °C A A A A V V V V A A A A V V V V Wind speed Wind direction Humidity Heat quantity collector Heat quantity heating Heat quantity cogeneration unit W_V0 W_R0 F_L0 WM_K0 WM_H0 WM_BHKW0 m/s ° % kWh kWh kWh - 88 - Power-One Italy S.p.a