1
Product Description CobraCooler®
MK Manual Part Number
MK Form Number
NWSA Form Number
091-0570
CBRCLR/OM
550
Effective with Serial Number 05060001
Voltage Rating 100/120/208/240VAC
Printing Date & Revision June 2005
This manual applies to the
250-152
following model numbers
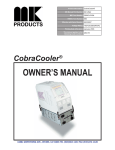
CobraCooler®
OWNER’S MANUAL
16882 ARMSTRONG AVE., IRVINE, CA 92606 TEL (949)863-1234 FAX (949)474-1428
SAFETY CONSIDERATIONS
ELECTRIC ARC WELDING EQUIPMENT
CAUTION : READ BEFORE ATTEMPTING INSTALLATION, OPERATION
OR MAINTENANCE OF THIS EQUIPMENT
1-1 INTRODUCTION
This equipment is intended for ultimate
application by commercial/industrial
users and for operation by persons
trained and experienced in the use and
maintenance of welding equipment.
Operation should not be undertaken
without adequate training in the use of
such equipment. Training is available
from many public and private schools or
similar facilities.
Safe practices in the installation, operation and maintenance of this equipment
requires proper training in the art, a
careful study of the information provided
with the equipment, and the use of
common sense. Rules for safe use
are generally provided by suppliers of
welding power sources, compressed
gas suppliers, and electrode suppliers.
Careful compliance with these rules will
promote safe use of this equipment.
The following Safety Rules cover some
of the more generally found situations.
READ THEM CAREFULLY. In case of
any doubt, obtain qualified help before
proceeding.
1-2 GENERAL PRECAUTIONS
A. Burn Prevention
ELECTRIC ARC WELDING PRODUCES
HIGH INTENSITY HEAT AND ULTRAVIOLET RADIANT ENERGY WHICH
MAY CAUSE SERIOUS AND PERMANENT EYE DAMAGE AND WHICH
MAY DAMAGE ANY EXPOSED SKIN
AREAS.
Wear helmet with safety goggles or
glasses with side shields underneath,
appropriate filter lenses or plates (protected by clear cover glass). This is a
must for welding or cutting (and chipping)
to protect the eyes from radiant energy
and flying metal. Replace cover glass
when broken, pitted, or spattered.
Medical first aid and eye treatment. First
aid facilities and a qualified first aid
person should be available for each shift
unless medical facilities are close by for
immediate treatment of flash burns of
the eyes and skin burns.
Wear protective clothing - leather (or
asbestos) gauntlet gloves, hat, and high
safety-toe shoes. Button shirt collar and
pocket flaps, and wear cuffless trousers
to avoid entry of sparks and slag.
Avoid oily or greasy clothing. A spark
may ignite them.
Flammable hair preparations should not
be used by persons intending to weld
or cut.
Hot metal such as electrode stubs and work
pieces should never be handled without
gloves.
Ear plugs should be worn when working
on overhead or in a confined space. A
hard hat should be worn when others work
overhead.
B. Toxic Fume Prevention
WARNING: The use of this product may
result in exposure to chemicals known
to the State of California to cause cancer
and birth defects or other reproductive
harm.
Adequate ventilation. Severe discomfort,
illness or death can result from fumes,
vapors, heat, or oxygen enrichment or
depletion that welding (or cutting) may
produce. Prevent them with adequate
ventilation. NEVER ventilate with oxygen.
Lead-, cadmium-, zinc-, mercury-, beryllium-bearing and similar materials, when
welded or cut, may produce harmful concentrations of toxic fumes. Adequate local
exhaust ventilation must be used, or each
person in the area, as well as the operator,
must wear an air-supplied respirator. For
beryllium, both must be used.
Metals coated with or containing materials
that emit toxic fumes should not be heated
unless coating is removed form the work
surface, the area is well ventilated, or the
operator wears an air-supplied respirator.
Work in a confined space only while it is
being ventilated and, if necessary, while
wearing an air-supplied respirator.
Causes of fire and explosion are: combustibles reached by the arc, flame,
flying sparks, hot slag, or heated material, misuse of compressed gases and
cylinders, and short circuits.
BE AWARE THAT flying sparks or falling
slag can pass through cracks, along
pipes, through windows or doors, and
through wall or floor openings, out of
sight of the goggled operator. Sparks
can fly many feet.
To prevent fires and explosion:
Keep equipment clean and operable,
free of oil, grease, and (in electrical
parts) of metallic particles that can cause
short circuits.
If combustibles are in area, do NOT weld
or cut. Move the work if practicable,
to an area free of combustibles. Avoid
paint spray rooms, dip tanks, storage
areas, ventilators. If the work cannot
be moved, move combustibles at least
35 feet away, out of reach of sparks and
heat; or protect against ignition with
suitable and snug-fitting, fire-resistant
covers or shields.
Walls touching combustibles on opposite
sides should not be welded on (or cut).
Walls, ceilings, and floor near work
should be protected by heat-resistant
covers or shields.
Fire watcher must be standing by with
suitable fire extinguishing equipment
during and for some time after welding
or cutting if:
Gas leaks in a confined space should be
avoided. Leaked gas in large quantities can
change oxygen concentration dangerously.
Do not bring gas cylinders into a confined
space.
1. Appreciable combustibles (including
building construction) are within 35 feet.
Leaving confined space, shut OFF gas
supply at source to prevent possible accumulation of gases in the space if downstream valves have been accidentally
opened or left open. Check to be sure that
the space is safe before reentering it.
3. Openings (concealed or visible) in
floors or walls within 35 feet may expose
combustibles to sparks.
Vapors from chlorinated solvents can be
decomposed by the heat of the arc (or
flame) to form PHOSGENE, a highly toxic
gas, and other lung and eye irritating products. The ultraviolet (radiant) energy of the
arc can also decompose trichloroethylene
and perchloroethylene vapors to form
phosgene. DO NOT WELD or cut where
solvent vapors can be drawn into the
welding or cutting atmosphere or where
the radiant energy can penetrate to atmospheres containing even minute amounts of
trichloroethylene or perchloroethylene.
C. Fire and Explosion Prevention
2. Appreciable combustibles are further
than 35 feet, but can be ignited by
sparks.
4. Combustibles adjacent to walls, ceilings, roofs, or metal partitions can be
ignited by radiant or conducted heat.
Hot work permit should be obtained
before operation to ensure supervisor’s
approval that adequate precautions have
been taken.
After work is done, check that area is
free of sparks, glowing embers, and
flames.
An empty container that held combustibles, or that can produce flammable or
toxic vapors when heated, must never
be welded on or cut, unless container
has first been cleaned in accordance
with industry standards.
This includes: a thorough steam or
caustic cleaning (or a solvent of water
washing, depending on the combustible’s
solubility), followed by purging and inerting with nitrogen or carbon dioxide, and
using protective equipment.
NEVER DEFACE or alter name, number,
or other markings on a cylinder. It is illegal
and hazardous.
Water-filling just below working level may
substitute for inerting.
Prohibited use. Never use a cylinder or its
contents for other than its intended use,
NEVER as a support or roller.
A container with unknown contents
should be cleaned (see paragraph
above). Do NOT depend on sense of
smell or sight to determine if it is safe
to weld or cut.
Hollow castings or containers must be
vented before welding or cutting. They
can explode.
Explosive atmospheres. NEVER weld or
cut where the air may contain flammable
dust, gas, or liquid vapors (such as
gasoline).
D. Compressed Gas Equipment
The safe handling of compressed gas
equipment is detailed in numerous
industry publications. The following
general rules cover many of the most
common situations.
1. Pressure Regulators
Regulator relief valve is designed to
protect only the regulator from overpressure; it is not intended to protect
any downstream equipment. Provide
such protection with one or more relief
devices.
Never connect a regulator to a cylinder
containing gas other than that for which
the regulator was designed.
Remove faulty regulator from service
immediately for repair (first close cylinder
valve). The following symptoms indicate
a faulty regulator:
Leaks - if gas leaks externally.
Excessive Creep - if delivery pressure
continues to rise with downstream valve
closed.
Faulty Gauge - if gauge pointer does
not move off stop pin when pressurized,
nor returns to stop pin after pressure
release.
Empties: Keep valves closed, replace caps
securely; mark MT; keep them separate
from FULLS, and return promptly.
Locate or secure cylinders so they cannot
be knocked over.
Passageways and work areas. Keep cylinders clear of areas where they may be
stuck.
Transporting cylinders. With a crane, use
a secure support such as a platform or
cradle. Do NOT lift cylinders off the ground
by their valves or caps, or by chains, slings,
or magnets.
Do NOT expose cylinders to excessive
heat, sparks, slag, and flame, etc. that may
cause rupture. Do not allow contents to
exceed 55 degrees C (130 degrees F.)
Cool with water spray where such exposure
exists.
Protect cylinders, particularly valves from
bumps, falls, falling objects, and weather.
Replace caps securely when moving cylinders.
Stuck valve. Do NOT use a hammer or
wrench to open a cylinder valve that cannot
be opened by hand. Notify your supplier.
Mixing gases. NEVER try to mix any gases
in a cylinder.
NEVER refill any cylinder.
Cylinder fittings should never be modified
or exchanged.
3. Hose
Prohibited use. Never use hose other
than that designed for the specified gas.
A general hose identification rule is: red
for fuel gas, green for oxygen, and black
for inert gases.
Use ferrules or clamps designed for the
hose (not ordinary wire or other substitute)
as a binding to connect hoses to fittings.
No copper tubing splices. Use only standard brass fittings to splice hose.
Wipe with a clean, lintless cloth.
Match regulator to cylinder. Before
connecting, check that the regulator label
and cylinder marking agree, and that the
regulator inlet and cylinder outlet match.
NEVER Connect a regulator designed
for a particular gas or gases to a cylinder
containing any other gas.
Tighten connections. When assembling
threaded connections, clean and smooth
seats where necessary. Tighten. If
connection leaks, disassemble, clean,
and retighten, using properly fitting
wrench.
Adapters. Use a CGA adapter (available
from your supplier) between cylinder
and regulator, if one is required. Use
two wrenches to tighten adapter marked
RIGHT and LEFT HAND threads.
Regulator outlet (or hose) connections
may be identified by right hand threads
for oxygen and left hand threads (with
grooved hex on nut or shank) for fuel
gas.
5. Pressurizing Steps:
Drain regulator of residual gas through
suitable vent before opening cylinder
(or manifold valve) by turning adjusting
screw in (clockwise). Draining prevents
excessive compression heat at high
pressure seat by allowing seat to open
on pressurization. Leave adjusting
screw engaged slightly on single-stage
regulators.
Stand to side of regulator while opening
cylinder valve.
Open cylinder valve slowly so that regulator pressure increases slowly. When
gauge is pressurized (gauge reaches
regulator maximum) leave cylinder valve
in following position: for oxygen and inert
gases, open fully to seal stem against
possible leak; for fuel gas, open to less
than one turn to permit quick emergency
shut-off.
Use pressure charts (available from
your supplier) for safe and efficient
recommended pressure settings on
regulators.
Avoid long runs to prevent kinks and abuse.
Suspend hose off ground to keep it from
being run over, stepped on, or otherwise
damaged.
Check for leaks on first pressurization
and regularly thereafter. Brush with
soap solution. Bubbles indicate leaks.
Clean off soapy water after test; dried
soap is combustible.
2. Cylinders
Cylinders must be handled carefully to
prevent leaks and damage to their walls,
valves, or safety devices:
Coil excess hose to prevent kinks and
tangles.
E. User Responsibilities
Protect hose from damage by sharp edges,
and by sparks, slag, and open flame.
Avoid electrical circuit contact with
cylinders including third rails, electrical
wires, or welding circuits. They can
produced short circuit arcs that may lead
to a serious accident. (See 1-3C)
Examine hose regularly for leaks, wear, and
loose connections. Immerse pressured
hose in water; bubbles indicate leaks
Remove leaky or defective equipment
from service immediately for repair. Read
and follow user manual instructions.
ICC or DOT marking must be on each
cylinder. It is an assurance of safety
when the cylinder is properly handled.
4. Proper Connections
Clean cylinder valve outlet of impurities that
may clog orifices and damage seats before
connecting regulator. Except for hydrogen,
crack valve momentarily, pointing outlet
away from people and sources of ignition.
Repair. Do NOT attempt repair. Send
faulty regulators for repair to manufacturer’s designated repair center, where
special techniques and tools are used
by trained personnel.
Identifying gas content. Use only cylinders with name of gas marked on them;
do not rely on color to identify gas
content. Notify supplier if unmarked.
Repair leaky or worn hose by cutting area
out and splicing. Do NOT use tape.
Follow all Safety Rules.
F. Leaving Equipment Unattended
Close gas supply at source and drain
gas.
G. Rope Staging-Support
Rope staging-support should not be
used for welding or cutting operation;
rope may burn.
1-3 ARC WELDING
Comply with precautions in 1-1, 1-2,
and this section. Arc Welding, properly
done, is a safe process, but a careless
operator invites trouble. The equipment
carries high currents at significant voltages. The arc is very bright and hot.
Sparks fly, fumes rise, ultraviolet and
infrared energy radiates, weldments
are hot, and compressed gases may
be used. The wise operator avoids
unnecessary risks and protects himself
and others from accidents.
bustible screens or panels. Allow for free air
circulation, particularly at floor level.
A. Burn Protection
Generator engine exhaust must be vented
to the outside air. Carbon monoxide can
kill.
Comply with precautions in 1-2.
The welding arc is intense and visibly
bright. Its radiation can damage eyes,
penetrate lightweight clothing, reflect
from light-colored surfaces, and burn
the skin and eyes. Skin burns resemble
acute sunburn; those from gas-shielded
arcs are more severe and painful. DON’T
GET BURNED; COMPLY WITH PRECAUTIONS.
1. Protective Clothing
Wear long-sleeve clothing in addition to
gloves, hat, and shoes. As necessary,
use additional protective clothing such
as leather jacket or sleeves, flameproof
apron, and fire-resistant leggings. Avoid
outer garments of untreated cotton.
Bare skin protection. Wear dark, substantial clothing. Button collar to protect
chest and neck, and button pockets to
prevent entry of sparks.
2. Eye and Head Protection
Protect eyes from exposure to arc. Eyes
may be damaged by radiant energy
when exposed to the electric arc, even
when not looking in the direction of the
arc. Never look at an electric arc without
protection.
Welding helmet or shield containing a
filter plate shade no. 12 or denser must
be used when welding. Place over face
before striking arc.
Protect filter plate with a clear cover
plate.
Cracked or broken helmet or shield
should NOT be worn; radiation can be
passed through to cause burns.
Cracked, broken, or loose filter plates
must be replaced IMMEDIATELY.
Replace clear cover plate when broken,
pitted, or spattered.
Flash goggles with side shields MUST
be worn under the helmet to give some
protection to the eyes should the helmet
not be lowered over the face before
an arc is struck. Looking at an arc
momentarily with unprotected eyes
(particularly a high intensity gas-shielded
arc) can cause a retinal burn that may
leave a permanent dark area in the field
of vision.
3. Protection of Nearby Personnel
Enclose the welding area. For production
welding, a separate room or enclosed
bay is best. In open areas, surround the
operation with low-reflective, noncom-
Viewing the weld. Provide face shields for
all persons who will be looking directly
at the weld.
Others working in area. See that all persons
are wearing flash goggles.
Before starting to weld, make sure that
screen flaps or bay doors are closed.
B. Toxic Fume Prevention
Comply with precautions in 1-2B.
C. Fire and Explosion Prevention
Comply with precautions in 1-2C.
Equipment’s rated capacity. Do not overload
arc welding equipment. It may overheat
cables and cause a fire.
Loose cable connections may overheat or
flash and cause afire.
Never strike an arc on a cylinder or other
pressure vessel. It creates a brittle area that
can cause a violent rupture or lead to such
a rupture later under rough handling.
D. Compressed Gas Equipment
Comply with precautions in 1-2D.
E. Shock Prevention
Exposed electrically hot conductors or
other bare metal in the welding circuit, or in
ungrounded, electrically - HOT equipment
can fatally shock a person whose body
becomes a conductor. DO NOT STAND,
SIT, LIE, LEAN ON, OR TOUCH a wet
surface when welding without suitable
protection.
To protect against shock:
Keep body and clothing dry. Never work
in damp area without adequate insulation
against electrical shock. Stay on a dry
duckboard, or rubber mat when dampness
or sweat cannot be avoided. Sweat, sea
water, or moisture between body and
an electrically HOT part - or grounded
metal - reduces the body surface electrical resistance, enabling dangerous and
possibly lethal currents to flow through
the body.
1. Grounding the Equipment
When installing, connect the frames of
each unit such as welding power source,
control, work table, and water circulator to
the building ground. Conductors must be
adequate to carry ground currents safely.
Equipment made electrically HOT by stray
currents may shock, possibly fatally. Do
NOT GROUND to electrical conduit, or to
a pipe carrying ANY gas or a flammable
liquid such as oil or fuel.
Three-phase connection. Check phase
requirement of equipment before installing.
If only three-phase power is available,
connect single-phase equipment to only
two wires of the three-phase line. Do NOT
connect the equipment ground lead to
the third (live) wire, or the equipment will
become electrically HOT - a dangerous
condition that can shock, possibly fatally.
Before welding, check ground for continuity. Be sure conductors are touching
bare metal of equipment frames at connections.
If a line cord with a ground lead is
provided with the equipment for connection to a switch box, connect the ground
lead to the grounded switch box. If a
three-prong plug is added for connection
to a grounded mating receptacle, the
ground lead must be connected to the
ground prong only. If the line cord comes
with a three-prong plug, connect to a
grounded mating receptacle. Never
remove the ground prong from a plug, or
use a plug with a broken ground prong.
2. Connectors
Fully insulated lock-type connectors
should be used to join welding cable
lengths.
3. Cables
Frequently inspect cables for wear,
cracks, and damage. IMMEDIATELY
REPLACE those with excessively worn
or damaged insulation to avoid possibly
lethal shock from bared cable. Cables
with damaged areas may be taped to
give resistance equivalent to original
cable.
Keep cable dry, free of oil and grease,
and protected from hot metal and
sparks.
4. Terminals and Other Exposed
Parts
Terminals and other exposed parts of
electrical units should have insulating
covers secured before operation.
5. Electrode Wire
Electrode wire becomes electrically HOT
when the power switch of gas metal-arc
welding equipment is ON and welding
gun trigger is pressed. Keep hands
and body clear of wire and other HOT
parts.
6. Safety Devices
Safety devices such as interlocks and
circuit breakers should not be disconnected or shunted out.
Before installation, inspection, or service
of equipment, shut OFF all power, and
remove line fuses (or lock or red-tag
switches) to prevent accidental turning
ON of power. Disconnect all cables from
welding power source, and pull all 115
volts line-cord plugs.
Do not open power circuit or change
polarity while welding. If, in an emergency, it must be disconnected, guard
against shock burns or flash from switch
arcing.
Leaving equipment unattended. Always
shut OFF, and disconnect all power to
equipment.
Power disconnect switch must be available near the welding power source.
THIS PAGE INTENTIONALLY BLANK
Table of Contents
Section 1
TECHNICAL INFORMATION...................................................... 8
Section 2
ELECTRICAL INFORMATION.................................................... 8
Section 3
MECHANICAL INFORMATION .................................................. 8
Section 4
POWER TAPPING ...................................................................... 8
Section 5
CONNECTIONS .......................................................................... 9
5.1 Weldhead............................................................................. 9
5.2 CobraTig® 150 Latches ....................................................... 9
Section 6
OPERATION................................................................................ 9
6.1 Coolant ................................................................................ 9
Section 7
ACCESSORIES ........................................................................ 10
Weldhead Extension Cable..................................................... 10
Section 8
SPARE PARTS.......................................................................... 10
8.1 Fuse ................................................................................... 10
8.2 Coolant Flow Filter ........................................................... 10
THIS PAGE INTENTIONALLY BLANK
Section 1
TECHNICAL INFORMATION
Line Power: 120, 230VAC 50/60 HZ, Single Phase ONLY
Reservoir Capacity: 0.78 gal /2.96 l
Coolant Type & Ratio: 3 parts distilled water : 1 part ethylene glycol :
1 tablespoon liquid glycerin
Flow Rate:
PSI
Section 2
0
1550
55
.43
5
1300
46
.36
10
1050
37
.29
15
750
26
.20
20
70
3
.023
ELECTRICAL INFORMATION
Pump:
Input Taps:
AC Power for Cooling Unit:
Front Panel Indicators:
Section 3
ML/MIN OZ/MIN GAL/MIN
120VAC, 50/60 Hz, 0.50 amps
120, 230VAC 50/60 Hz
Panel switchable, rear panel fuse holder
Spinning Flow Indicator
MECHANICAL INFORMATION
Dry Weight:
Height:
Width:
Depth:
Pump:
12.9 lbs. / 5.85 Kg
5.5 in. / 14.0 cm
8.5 in. / 21.6 cm
19 in. / 48.3 cm
Gear Mesh Pump
CAUTIONS:
Read and follow instructions prior to performing operational functions.
Section 4
POWER TAPPING
WARNING
DISCONNECT UNIT FROM ALL POWER SOURCES PRIOR
TO CHANGING POWER TAPS.
ELECTRIC SHOCK CAN KILL
Remove the cover of the CobraCooler®, looking down into the unit, locate the
power tapping terminal strip.
Move the jumper and affix to the required input power tap setting.
Change the plug on the end of the cable to suite the required input power
type.
Owner’s Manual - Page 8
Section 5
CONNECTIONS
5.1 Weldhead
The CobraCooler® is designed be used with CopperHead® model orbital
weldheads.
The connectors on the rear panel of the CobraCooler® include the coolant IN/
OUT (top/bottom) female quick-disconnect connectors. The male connectors
from a water-cooled orbital weldhead can be attached to this unit.
These coolant connectors are a double-end shut off valve type. This means,
if the cooler is turned on and there is nothing plugged into these connectors,
no fluid will flow out of the connector. Similarly, the connectors on the end of
the weldhead hose work in the same manner. No fluid will flow from the end
of the hose unless it is plugged into the cooler.
5.2 CobraTig® 150 Latches
The CobraCooler® easily attaches to the bottom of the CobraTig® 150 using
a four corner-mounted spring-locked latches. These latches are already
mounted to the four outside corners of the CobraCooler®. To the matching
corners of the CobraTig® 150, a screw and shoulder-washer are installed in
place of the existing sheet-metal screw.
Place the CobraTig® 150 on top of the CobraCooler®, so that all sides are
even and flush. Lift the finger handle of the latch and raise the spring up over
the shoulder-washer on the CobraTig® 150. Press down on the finger handle
until the locking spring engages.
Lift the finger handle to test the locking spring. Repeat process on all four
latches.
CAUTION
DO NOT ATTEMPT TO LIFT THE UNIT UNTIL ALL FOUR LATCHES ARE
LOCKED.
To disengage the CobraTig® 150 press on the locking spring and lift the finger
handle until the spring is released from the shoulder-washer.
Section 6
OPERATION
6.1 Coolant
CAUTION
COOLANT MUST BE ADDED PRIOR TO OPERATING.
From the top of the CobraCooler®, open the access panel, unscrew the fill
plug and pour in the recommended mixture of coolant (see TECHNICAL
INFORMATION section for proper mix ratios).
DO NOT SPILL COOLANT INTO THE UNIT.
An electrical short may occur if coolant is spilled into the unit
It is recommended that all coolant be removed from the CobraCooler® prior
to shipping. In order to drain the coolant, remove the rear panel and unscrew
Owner’s Manual - Page 9
the reservoir cap. Some coolant may still remain in the internal pump and
circulatory tubing.
Section 7
ACCESSORIES
Weldhead Extension Cable
Weldhead extension cable, P/N 005-0635. It comes complete with all the
necessary cabling to adapt the MK orbital weldheads: control cable with 24
pin connector, electrode and ground cables, inert gas hose and water hose
assembly with quick-disconnect connectors. This 25 ft. extension cable is to
mate any of the MK orbital 500X series weldheads to the CobraCooler®. A
50 ft is also available under P/N 005-0635-50.
Section 8
SPARE PARTS
8.1 Fuse
WARNING
DISCONNECT UNIT FROM ALL POWER SOURCES PRIOR TO CHANGING
FUSE.
ELECTRIC SHOCK CAN KILL
Located on the rear panel of the CobraCooler® is a 0.50 amp BUSS fuse.
If the unit does not turn on with the power switch, check the integrity of the
fuse.
Turn the fuse cap on the front panel and remove fuse. Check fuse using
continuity meter. Replace if necessary.
8.2 Coolant Flow Filter
Periodically, the mesh-screen filter may require cleaning and/or replacement.
It is recommended that all coolant be removed from the CobraCooler® prior
to changing filter.
WARNING
DISCONNECT UNIT FROM ALL POWER SOURCES PRIOR TO CHANGING
MESH FILTER.
ELECTRIC SHOCK CAN KILL
Replaceable Parts List
Gear Pump
Mesh Filter
Front Panel Flow Indicator
Expansion Cap Plug
Cap Plug O-Ring
Rear Panel O.D Fittings
On/Off Switch
Owner’s Manual - Page 10
THIS PAGE INTENTIONALLY BLANK
LIMITED WARRANTY
Effective May 1, 2005
This warranty supersedes all previous MK Products warranties and is
exclusive, with no other guarantees or warranties expressed or implied.
LIMITED WARRANTY - MK Products,Inc.,Irvine,California
warrants that all new and unused equipment furnished by MK
Products is free from defects in workmanship and material as
of the time and place of delivery by MK Products. No warranty
is made by MK Products with respect to trade accessories or
other items manufactured by others. Such trade accessories
and other items are sold subject to the warranties of their
respective manufacturers, if any.
MK Products’ warranty does not apply to components having
normal useful life of less than one (1) year, such as relay points,
wire conduit, tungsten, and welding gun parts that come in
contact with the welding wire, including gas cups, gas cup
insulators, and contact tips where failure does not result from
defect in workmanship or material.
MK Products shall, exclusively remedy the limited warranty
or any duties with respect to the quality of goods, based
upon the following options:
(1) repair
(2) replacement
(3) where authorized in writing by MK Products, the reasonable
cost of repair or replacement at our Irvine, California plant.
As a matter of general policy only, MK Products may honor
an original user’s warranty claims on warranted equipment
in the event of failure resulting from a defect within the following periods from the date of delivery of equipment to the
original user:
1. Power Supplies and Wire Feed Cabinets ...... 3 years
2. Weldheads, Positioners, Prince XL and Prince XL
Spool Guns, Python, CobraMAX, Cobra SX ..... 1 year
3. Sidewinder® Spool Gun, Prince SG Spool Guns,
Modules ..................................................... 180 days
4. Repairs/Exchanges/Parts .......................... 90 days
Classification of any item into the foregoing categories shall be
at the sole discretion of MK Products. Notification of any failure
must be made in writing within 30 days of such failure.
A copy of the invoice showing the date of sale must accompany
products returned for warranty repair or replacement.
All equipment returned to MK Products for service must be
properly packaged to guard against damage from shipping.
MK Products will not be responsible for any damages resulting
from shipping.
Normal surface transportation charges (one way) for products
returned for warranty repair or replacement will be borne by
MK Products, except for products sold to foreign markets.
ANY EXPRESS WARRANTY NOT PROVIDED HEREIN AND ANY
IMPLIED WARRANTY, GUARANTY, OR REPRESENTATION AS TO
PERFORMANCE, AND ANY REMEDY FOR BREACH OF CONTRACT
WHICH, BUT FOR THIS PROVISION, MIGHT ARISE BY IMPLICATION, OPERATION OF LAW, CUSTOM OF TRADE, OR COURSE
OF DEALING, INCLUDING ANY IMPLIED WARRANTY OF MERCHANTABILITY OR OF FITNESS FOR PARTICULAR PURPOSE,
WITH RESPECT TO ANY AND ALL EQUIPMENT FURNISHED
BY MK PRODUCTS, IS EXCLUDED AND DISCLAIMED BY MK
PRODUCTS.
EXCEPT AS EXPRESSLY PROVIDED BY MK PRODUCTS IN
WRITING, MK’s PRODUCTS ARE INTENDED FOR ULTIMATE
PURCHASE BY COMMERCIAL/INDUSTRIAL USERS AND FOR
OPERATION BY PERSONS TRAINED AND EXPERIENCED IN
THE USE AND MAINTENANCE OF WELDING EQUIPMENT AND
NOT FOR CONSUMERS OR CONSUMER USE. MK PRODUCTS’
WARRANTIES DO NOT EXTEND TO, AND NO RE-SELLER IS
AUTHORIZED TO EXTEND MK PRODUCTS’ WARRANTIES TO
ANY CONSUMER.
USE OF OTHER THAN GENUINE MK PRODUCTS’
CONSUMABLES, PARTS, AND ACCESSORIES MAY INVALIDATE
YOUR PRODUCT WARRANTY.
16882 Armstrong Ave.
Irvine, CA 92606
Tel (949)863-1234
Fax (949)474-1428
www.mkproducts.com
May 1, 2005
MK PRODUCTS, INC.
16882 ARMSTRONG AVE.
IRVINE,CALIFORNIA 92606
(949) 863-1234 FAX (949) 474-1428