1
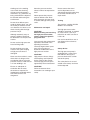
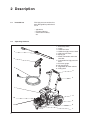
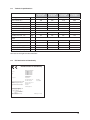
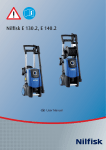
POSEIDON 2-31, 3-36, 5-67 PE
POSEIDON 5-54 DE
User Manual
Copyright © 2007 Gerni
Contents
Symbols
.................................................................................................4
1 Important safety notes
.................................................................................................6
2 Description
2.1 Intended use.............................................................................6
2.2 Operating elements ..................................................................6
3 Before starting the
pressure washer
3.1 Setting up the pressure washer ................................................7
4 Operation and use
4.1 Connections .............................................................................7
4.2 Start the pressure washer ........................................................8
4.3 Using detergents ......................................................................9
5 After using the pressure
washer
5.1 Switching off the pressure washer .........................................10
5.2 Disconnecting supply lines .....................................................10
5.3 Storing the cleaner (frost-free) ...............................................10
6 Maintenance
6.1 Maintenance plan ...................................................................11
6.2 Maintenance work ..................................................................11
7 Troubleshooting
8 Further information
...............................................................................................13
8.1
8.2
8.3
8.4
Recycling the pressure washer ..............................................14
Warranty .................................................................................14
Technical specifications ..........................................................15
Declaration of Conformity .......................................................15
3
Symbols
Before starting
up your highpressure washer
for the first time,
this instruction
manual must be
read through carefully. Save the
instructions for later use.
Safety instructions
marked with this
symbol must be
observed to
prevent danger
to persons.
,
This symbol is used
to mark safety
instructions
that must be
observed to prevent
damage to the machine and its
performance.
This symbol
indicates tips
and instructions to
simplify work and to
ensure a safe operation.
1 Important safety notes
Before using the high-pressure
washer, be sure to also read the
enclosed operating instructions
and keep them within reach at
all times.
Before use
The high-pressure washer
may only be used by persons
instructed in its use and
who have been expressly
authorised to do so.
Operate the pressure washer
only in an upright position!
General
Use of the high-pressure
washer is subject to the
applicable local regulations.
In addition to the operating
instructions and the binding
accident prevention regulations
in the country of use, the
generally recognised rules
for safe working must also be
observed.
Any method of use endangering
the safety of persons or
equipment is forbidden.
4
Before use, check that the highpressure cleaner is in a safe
and proper condition.
Important notes:
Do not connect the pressure
washer directly to the public
drinking water mains (observe
DIN 1988 and EN 1717).
A connection is permitted,
however:
• briefly to a pipe interrupter
with moving section
• with a free outlet
Water may also be drawn from
an open container or from
a well or surface water not
intended for the drinking water
supply. Please use suction set
for this. Ensure that neither dirty
water nor liquids containing
solvents are sucked in.
Please observe the regulations
and provisions applicable in
your country. Before putting
the high-pressure washer into
service, carry out a visual check
of all the major components.
High-pressure jets can be
dangerous if misused. The
jet must not be directed at
persons, animals, live electrical
equipment or the pressure
washer itself.
During operation of the washer,
recoil forces are produced at
the spray lance and, when
the lance is held at an angle,
a torque is also created. The
lance must therefore be held
firmly in both hands.
Risk of injury!
Do not direct the jet towards
yourself or towards other
persons in order to clean
clothes or footwear.
Do not use the washer when
other people without protective
clothing are in the working
area. Check that cleaning
will not result in dangerous
substances (e.g. asbestos, oil)
being washed off the object to
be cleaned and harming the
environment.
Do not clean delicate parts
made of rubber, fabric, etc. with
the round jet. Hold the nozzle
at a distance of at least 15 cm
when cleaning with the highpressure flat jet.
Although extremely easy to
operate, children should not
be allowed to use the pressure
washer.
Do not use the high-pressure
hose for lifting loads.
Do not continue to use the
washer if the quick coupling
or high-pressure hose is
damaged.
Never use the machine in areas
where there is danger of fire
or explosion. When using the
pressure washer, stand at least
1 m from buildings, etc.
Ensure an adequate air
circulation. Do not cover
the washer or operate it in
inadequately ventilated rooms!
The exhaust fumes are
dangerous!
Store the pressure washer
where it will not be exposed to
frost!
Never operate the pressure
washer without water. Even
brief shortages of water result
in severe damage to the pump
seals.
Please contact the Gerni
service department or an
authorised specialist work-shop
for all other maintenance or
repair work!
Testing
The machine satisfies IEC/EN
60335-2-79 standards.
Maintenace and repair
CAUTION!
Before cleaning and servicing
the high pressure washer,
always remove the ignition
plug cable first.
Carry out only the maintenance
operations described in the
operating instructions.
Use only original Gerni spare
parts. Do not make any
technical modifications to the
high pressure washer.
CAUTION!
High pressure hoses, fittings
and couplings are important
for the safety of the washer.
Use only high pressure parts
approved by the manufacturer!
The high pressure washer
should be examined as needed
or at least once a year by a
technician to make sure that it
is fail-safe.
Our service technicians are at
your disposal for assistance
and advice.
Safety device
The high pressure pump is
equipped with a safety valve
that redirects the by-pass
pressure back to the suction
side of the pump.
The safety device is set and
sealed at the factory and must
not be adjusted.
CAUTION!
Failure to observe these
instructions can endanger your
safety.
5
2 Description
2.1
Intended use
This high pressure washer has
been designed for professional
use in
- agriculture
- transport industry
- construction industry
etc.
2.2
Operating elements
1
2
3
4
5
6
7
8
9
10
11
12
Start/stop switch
Lance
Holder for lance
Holder for high pressure hose
High pressure hose
Spray gun
Water connection and water
inlet filter
Connection for high pressure
hose
Pressure gauge
Oil level gauge
Regulation of water volume
Filling of oil
6
3 Before starting the pressure washer
3.1
Setting up the pressure
washer
1. Before using the pressure
washer for the first time,
check it carefully to detect
any faults or damage.
2. In the event of any damage
contact your Gerni dealer
immediately.
3. Check whether the oil level
is in the middle of the oil
inspection glass. This also
applies to machines with
gear.
4 Operation and use
4.1 Connections
4.1.1 Connecting the lance to
the spray gun
A
C
B
1. Pull the blue quick coupling
of the spray gun forward and
lock it by turning it to the left.
2. Insert the nipple of the lance
into the quick coupling and
turn the blue quick coupling
grip to the right.
3. Pull the lance (or other
accessory) forward to check
that it is securely attached to
the spray gun.
NOTE!
Always remove any dirt from
the nipple before connecting
the lanse to the spray gun.
4.1.2 Connecting the high
pressure hose and the
water hose
1. Connect the high pressure
hose to the high pressure
inlet by means of the quick
coupling. Use max. 50 m
extension hose.
2. Before connecting the water
hose to the washer, rinse the
water hose briefly to prevent
sand and other dirt from
entering into the washer.
3. Open the tap.
(continued -->)
7
4.1.3 Fuelling
NOTE!
See chapter 8.3 for required
quantity of water and water
pressure.
In the case of poor water quality
(sand, etc.), we recommend
that a fine water filter is fitted in
the water inlet.
WARNING!
Always shut off the engine
and let it cool for at least two
minutes before fuelling.
Avoid spilling fuel.
If you do spill fuel when fuelling,
do not start the engine before
the spilled fuel has evaporated.
If the washer is on a trailer, any
fuel spills must be wiped up
before the machine is started.
Never expose the machine
to an open flame. Smoking is
prohibited during fuelling. Also
read the operating manual for
the fuel engine.
Note: Never operate the
machine in a closed room; the
exhaust fumes are dangerous.
4.2 Start the washer
4.2.1 Switching on the
washer when it is
connected to a water
supply
Follow the safety instructions
in chapter 1!
1. Start the engine. (See the
operating manual for the fuel
engine.)
2. Unlock the spray gun and
operate it.
3. Lock the safety catch even
during short pauses.
NOTE!
Operate the
spray gun several
times at short intervals to vent
the system.
4.2.2 Switching on the
washer when it is
connected to open
tanks (suction mode)
1. Before connecting the suction
hose to the washer, fill the
hose with water.
machine run without spray
lance mounted until all air
has escaped.
During work breaks of more
than three minutes, switch off
the washer.
2. Start the washer.
3. Unlock the spray gun and
activate it.
4. When using this machine in
suction mode, first ensure
that the system has been
bled of air by letting the
8
NOTE!
For automatic
suction from a tank,
watercourse or similar supply,
the inlet hose must be filled
with water before you start.
The suction height depends on
the water temperature. Max.
suction height (see section 8.3
Technical Data) is reached with
cold water (up to 8°C). With
70°C/60°C warm water, the
machine must be under or at
the water level.
(continued -->)
If the water being suctioned
contains particles, a suction
filter must be mounted on the
end of the hose.
In case of risk of running sands,
a sand filter must be attached.
4.2.3 Start POSEIDON PE
4.3
Using detergents
1. Switch on the ignition by
pushing the ON/OFF button
of the machine. The charging
+ oil light indicators will turn
on.
2. Move the throttle lever to
SLOW or RUN position.
3. Push the start button until
the machine starts. Now the
charging + oil light indicators
will turn off. If not, stop
the machine immediately
and contact Gerni service
department.
4. The machine can be started
by means of the starter rope
if the battery has gone flat.
See manual from Yanmar.
Detergent can be added by
means of the detergent injector.
1. Dilute detergent according
to the manufacturer's
instructions.
2. Set the pressure to the
lowest setting on the lance.
CAUTION!
Never allow
detergent to dry
on the surface to be cleaned
as this may cause damage.
9
5 After using the washer
5.1
Stop the pressure
washer
1. Stop the engine.
2. Close the tap.
3. Operate the spray gun until
the wasser is depressurized.
4. Lock the safety catch.
Switching off POSEIDON DE
1. Stop the washer by moving
the throttle lever to STOP
position.
2. Switch off the ignition by
pushing the ON/OFF button.
The light indicators will now
turn off.
5.2
Disconnecting supply
lines
1. Shut the fuel cock.
2. Remove the water hose from
the washer.
5.3
Storing the washer
(frost-protected)
1. Store the pressure washer in
a dry room without danger of
frost.
,
IMPORTANT!
If the high-pressure washer
is stored in a room with
temperatures around or
below 0°C, anti-freeze should
be drawn into the pump
beforehand:
1. Remove the water inlet hose
from the washer.
2. Remove the lance.
3. Start the washer and stop it
again after max. one minute.
10
4. Connect the suction hose
to the water inlet of the
washer and place it in a tank
containing anti-freeze.
5. Start the washer.
6. Hold the spray gun over the
tank containing anti-freeze
and activate it to start suction
of anti-freeze.
7. During suction operate the
spray gun two or three times.
8. Lift the suction hose from the
tank containing anti-freeze
and activate the spray gun to
pump out the remaining antifreeze.
9. Stop the washer.
6 Maintenance
6.1
Maintenance plan
weekly
every six
months or
500 operating
hours
as required
•
6.2.1 Clean water filter
•
6.2.2 Clean high pressure nozzle
•
6.2.3 Check oil level
6.2.4 Change oil - Note: First time after 50 hours
•
Maintenance of motor according to separate operating instructions from the engine supplier
6.2 Maintenance work
6.2.1 Clean water filter
A water filter is fitted on the
water inlet to prevent large
particles of dirt from entering
into the pump.
1. Unscrew the union nut.
2. Remove the filter and rinse it.
Replace damaged filter.
3. Tighten the union nut gently,
so as to avoid damaging the
gasket.
6.2.2 Clean high pressure
nozzle
A blocked nozzle causes
excessive pump pressure. It
must therefore be cleaned
immediately.
WARNING!
Use the cleaning needle only
when the spray lance has been
removed.
1. Stop the washer.
2. Remove the lance.
3. Clean the nozzle with a
needle.
4. Rinse the lance with water
from the nozzle side.
NOTE!
The fuel engine
stops automatically
if the oil level is low. You can
start the petrol engine again
once you have added oil (does
not apply to POSEIDON 2-31
PE).
11
6.2.3 Checking the oil level
1. Check whether the oil level
is in the middle of the oil
inspection glass. Top up with
oil if necessary (see section
8.3 for type of oil).
6.2.4 Changing the pump/
gear oil
1. Before changing the oil,
allow the pressure washer to
become warm.
2. Unscrew the plugs at the top
and the bottom of the pump.
3. Allow the oil to drain into a
suitable container (min. 1 l
capacity) and dispose of oil in
compliance with regulations.
4. Mount plug at the bottom of
the pump.
5. Fill pump with fresh oil (see
8.3 for oil type and quantity).
6. Check the oil level (see
6.2.3).
12
7 Troubleshooting
Fault
Pressure drop
Cause
Remedy
> Air in the system
• Vent the system by operating
the spray gun several
times at short intervals. If
necessary, dismount the
lance (see section 4.2.2).
> High-pressure nozzle
blocked/worn
• Clean/replace the highpressure nozzle.
> Pressure control on the lance
is not set correctly
• Set the required working
pressure.
> Engine speed too low
• Contact Gerni Service
Department.
> Lack of water
• Open the tap.
> Pump/accessories partially
frozen
• Thaw machine and
accessories.
> Water inlet hose is too long or
its cross-section too small
• Use prescribed size of water
inlet hose.
> Lack of water caused by
blocked water filter
• Clean the water filter in the
water connection (never
operate the machine without
water filter mounted!)
> Lack of water because max.
permissible suction height
has not been heeded
• See chapter 4.2.2.
> Water too hot
• See chapter 4.2.2.
> Pump draws in air (only
possible in suction mode)
• Check that the suction set is
air-tight. Repeat aeration.
Excess pressure
> Engine’s throttle control is
defective (accessory)
• Give less gas/contact Gerni
Service Department.
The motor does not start
> Low fuel level
• Open fuel cock/fill with fuel.
> Low oil level in engine
• Fill with oil.
> The pump is blocked or
frozen
• Thaw machine/contact Gerni
Service Department.
Pressure fluctuations
In suction mode
13
Cause
Fault
Remedy
The motor stops
> Low oil level in engine
• Fill with oil.
When a detergent injector is
used
> Injector is dirty or suction
hose is blocked
• Clean.
> Detergent tank is empty
• Fill the detergent tank.
> The lance is not set to low
pressure
• Adjust the lance to low
pressure.
> Low fuel level
• Open fuel cock/fill with fuel.
8 Further information
8.1
Recycling the pressure
washer
If the pressure washer is
discarded, make it unusable
immediately
1. Dismount the ignition plug.
be recycled. Contact your local
waste disposal site. If you have
any queries, please contact
your local authorities or your
nearest dealer.
The pressure washer contains
valuable materials that should
8.2
Warranty
Your Gerni product is
guaranteed for 12 months from
date of purchase (purchase
receipt must be presented) on
the following conditions:
•
•
•
14
that defects are attributable
to flaws or defects in
materials or workmanship.
(Usual wear and tear as well
as misuse are not covered
by the guarantee).
that repairs have not been
carried out or attempted
by other than Gerni-trained
service staff.
that only original
accessories have been
applied.
•
•
that the product has not
been exposed to abuse such
as knocks, bumps or frost.
that the instructions in the
manual have been carefully
observed.
A warranty repair comprises the
replacement of defective parts,
but it does not cover freight and
packaging charges. Besides we
refer to national Sale of Goods
Act.
Any illegitimate guarantee
repair will be invoiced. (I.e.
malfunctions due to causes
mentioned in section “7
Trouble shooting” of the
instruction manual).
8.3
Technical specifications
POSEIDON
2-31 PE
POSEIDON
3-36 PE
POSEIDON
5-67 PE
POSEIDON
5-54 DE
Working pressure
bar
140
140
230
195
Water volume Qmax
l/h
700
840
1150
1000
Water volume QIEC
l/h
650
750
1100
950
Cleaning impact
kg/Force
3.1
3.6
6.7
5.4
Max. water inlet temperature
°C
Min./max. water inlet pressure bar
60
60
70
70
1/10
1/10
1/10
1
Dimensions l x w x h
mm
800x565x1010
Weight
kg
35
38
68
110
Sound power level, Lwa
Vibration level at spray
handle
dB(A)
101
105
105
110
Thrust
N
24
58
45
1
1.5
1
1
Oil quantity in pump/gear
l
0.18
0.18
0.56/0.27
0.56/0.27
Oil quantity in motor
l
0.6
0.6
1.1
1.65
m/s2
1000x615x1150
< 2.5
Suction height (at max. 8°C)
Oil type (motor/pump/gear)
26
SAE 15 - 40
We reserve the right to make alterations.
8.4
EC Declaration of Conformity
EC Declaration of Conformity
High Pressure Washer
Product:
Type:
Description:
POSEIDON 2-31 PE
POSEIDON 3-36 PE
POSEIDON 5-67 PE
POSEIDON 5-54 DE
250 bar / 20 MPa
Petrol driven
Diesel driven
EEC Machine Directive
EEC EMC Directive
The design of the unit corresponds
to the following pertinent regulations:
Applied harmonised standards:
98/37/EEC
2004/108/EEC
EN 2100-1, EN 12100-2
EN 60335-2-79
EN 55012
DIN EN 60335-2-79
Applied national standards and
technical specifications:
Dipl.-Ing. Wolfgang Nieuwkamp
Test and Approvals
Bellenberg, 01.12.2005
15
Nilfisk-Advance Pty LTd
48 Egerton St
Silverwater NSW 2128
106169230 (01.2007)
Phone: 1300 556 710