1
POLAR ACTIVE
System Guide
ENGLISH
Contents
1. INTRODUCTION ..............................
3
2. POLARGOFIT.COM ...........................
Setting Up Polargofit.com ..................
4
5
3. FIRST STEPS ................................
6
4. ACTIVITY MONITOR MANAGEMENT
SYSTEM .....................................
7
5. DATA TRANSFER............................. 10
6. ACTIVITY PROGRESS POSTER............... 14
7. IMPORTANT INFORMATION ................. 15
Care and Maintenance .................. 15
Precautions ...............................
Medical Devices In Professional
Use ........................................
Copyright..................................
Disclaimer ................................
15
16
16
17
ENGLISH
1. INTRODUCTION
The Polar activity monitoring solution can consist
of the following parts and devices:
• polargofit.com web service for tracking and
sharing activity data,
• Polar Active™ activity monitor for following and
recording daily activity data,
• Polar FlowLink® data transfer unit and Polar
WebSync software for transferring activity data to
polargofit.com,
• Activity monitor management system case for
storage and transport of Polar Active activity
monitors,
• Lessons for Life teacher's guide book for
practical information and tips on applying
activity and heart rate monitoring in physical
education,
• Activity progress poster for manual tracking of
daily activity,
• Polar Active quick guide poster for simple
instructions of Polar Active use, and
• Activity zones poster for explanations of activity
zones.
Getting the most out of the activity monitoring
solution
See the following user guides for further
instructions and information:
• polargofit.com web service's user guide,
• Polar Active activity monitor's user manual,
• Polar WebSync software's help,
• Activity zones poster, and
• Polar Active quick guide poster.
Introduction
3
ENGLISH
2. POLARGOFIT.COM
The polargofit.com web service enables teachers
and students to track students' daily activity and
time spent in the different activity zones.
Teachers can use polargofit.com for organizing
courses and groups. They can also follow and
document each student's activity and
improvement in and out of the classroom. The web
service makes it easy to create reports and track
long-term progress. The data can also be shared
with parents and administrators.
Students can use polargofit.com to review their
daily activity and learn a healthy lifestyle.
Activarium
Activarium (purchased separately) is a game in
polargofit.com that students play individually and
as a group with the activity data they collect on
their activity monitors.
4
Polargofit.com
Computer requirements
• Internet connection
• Compatible web browser (Microsoft Internet
Explorer 7 or newer, Apple Safari 4 or newer,
Mozilla Firefox 3 or newer)
• 1024 x 768 resolution display or better
Additional requirements for data transfer with
FlowLink and WebSync:
• Microsoft Windows XP/Vista/7, or Mac OS X 10.5
or newer (running on Intel platform)
• Free USB port for FlowLink
Additional requirements for Activarium:
• Adobe Flash Player
ENGLISH
Setting Up Polargofit.com
The school receives the first user credentials to
polargofit.com service when the licenses are
purchased. After login, more user accounts can be
created within the limits of purchased licenses. It
is recommended that each teacher has their own
user account because created courses are
attached to teacher accounts. Separate accounts
help to organize courses more efficiently. Courses
are shown for all teachers but only the teacher
who created the course can edit it.
We recommend that the following steps are
completed when the polargofit.com web service is
taken into use. School settings can also be
modified later with any teacher user account.
1.
2.
3.
4.
5.
Log in to the web service on the polargofit.com
home page (www.polargofit.com).
Import or add students in the Students tab.
Add (register) the activity monitors to the web
service in the Monitors tab. A FlowLink and
WebSync are needed when adding monitors to
the web service. You can download WebSync at
www.polar.fi/support .
Configure evaluation types in the Evaluation
tab. The default grade limits can also be used.
Create user accounts for the other teachers in
the Teacher tab. The teacher user accounts are
limited based on the number of purchased
licenses. Remember to inform your colleagues
about the user accounts.
Continue by adding the first courses in the
Courses section.
All the steps are completed in the School section
of the web service. For further instructions, see
the web service's user guide online.
Polargofit.com
5
ENGLISH
3. FIRST STEPS
Follow the steps below to start using the activity
monitoring solution. In order to transfer activity
data from Polar Active activity monitors, you need
to add (register) Polar Active activity monitors to
the polargofit.com service.
1.
2.
3.
4.
6
Set up the polargofit.com web service
according to the instructions in chapter Setting
Up Polargofit.com. Make sure you have a
FlowLink data transfer device available and the
WebSync application installed.
Create a course in the web service.
Assign the activity monitors to students.
Activity monitors are set up individually for the
students.
Give the activity monitors to the students. The
activity monitors are worn on the wrist.
First Steps
5.
Download the activity data from the activity
monitors to the web service weekly by using
FlowLink and WebSync. Polar Active has room
for 21 days in the Activity diary. During an
activity measurement period, if the activity data
is not transferred from the activity monitor to
the web service, the activity monitor stops
recording activity data after 21 days of use.
If your school has not purchased polargofit.com
licenses, activity monitoring can be started
manually by setting up the Polar Active activity
monitors by hand. Daily activity can be tracked
without the web service by using Activity progress
poster. For more information on the activity
monitors, see the Polar Active's user manual.
ENGLISH
4. ACTIVITY MONITOR MANAGEMENT SYSTEM
With each activity monitor management system case you get:
• number strips and
• case identification pads.
A case can accommodate 12 activity monitors. The cases are
named according to the Polar Active monitor IDs. The
monitor IDs consist of a letter (A-Z) and a number (1-48).
The monitor ID tells which case the activity monitor belongs
to. The monitor IDs are set to the activity monitors in
polargofit.com when the monitors are added to the web
service.
Typically the activity monitors for the first case are A1-A12,
for the second case B1-B12 or A13-24, and so on. You can
also create a teacher specific case system, and name the
monitors and cases based on, for example, the first letter of
teacher's name.
Activity Monitor Management System
7
ENGLISH
Using the case
After adding the activity monitors to
polargofit.com (see Setting Up Polargofit.com),
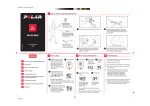
tag the cases accordingly. For instruction pictures,
see page 8 of this user manual.
1.
2.
3.
4.
Select the number strips and case
identification pads which correspond to the
monitor IDs of the first case.
Remove the adhesive cover from the back of
the number strips, and attach the strips on the
grooves on the case (see picture 1). Make sure
the number strips are attached in such a way
that the numbers are in an upright position
when the case is hung on the wall.
Insert the case identification pad to the case's
pocket (see picture 1).
Tag the remaining cases in the same way.
Placing the monitor in the case:
1.
2.
8
Fold the activity monitor as shown in picture 2.
Place the folded activity monitor into the slot so
that the monitor display can be easily read.
Activity Monitor Management System
The easiest way to pick up the activity monitor
from the slot is shown in picture 3.
After the activity monitors are assigned to the
students for the activity measurement period, the
top row of the activity monitor's display shows
either the monitor ID or the assigned student's
polargofit.com username. It is easy for the student
to locate their activity monitor from the case.
You can print out a student list for the course in
the polargofit.com web service and place the list
into the case's pocket on the top flap.
Hanging on the wall:
The case can be hung on the wall by the carrying
strap.
ENGLISH
Activity Monitor Management System
9
ENGLISH
5. DATA TRANSFER
A Polar FlowLink data transfer unit and Polar WebSync
software (version 2.4 or newer) are needed for data transfer
between the activity monitors and polargofit.com. WebSync
can be downloaded at www.polar.fi/support . To install
WebSync, download the installer, run it and follow the
instructions on the screen.
Use data transfer to:
• add activity monitors to the polargofit.com web service,
• assign activity monitors to students when creating courses,
and
• download activity data from the activity monitor to
polargofit.com.
The activity monitor is placed on the FlowLink with the
display facing down. When the activity monitor is detected
and WebSync is running, WebSync prompts for
polargofit.com user credentials. The WebSync icon turns
green in the task bar (Windows) / menu bar (OS X) at the
same time.
10
Data Transfer
ENGLISH
I want to
Location in
polargofit.com
WebSync
Flowlink
add activity monitors to
the web service for my
school
School > Monitors
Start if the software is not already
running.
Plug into USB port.
assign activity monitors
to students for a course
Courses > Create a
course > Assign monitors
/ Courses > select course
> Assign monitors
download activity data
from an activity monitor
to the web service
-
If there is a WebSync icon in the
task bar (Windows) / menu bar (OS
X), the software is ready to be
used.
Working with several activity monitors
When WebSync confirms with a green tick that the activity monitor is okay, leave the software running and place the next
activity monitor on the FlowLink. If you accidentally closed WebSync, it prompts for the user credentials again when
needed.
Student's username and password
Student needs user credentials if he/she wants to download activity data to the web service. The same user credentials are
used with polargofit.com and WebSync. Student's username is "school-alias/student-ID", for example
polar-school/johnadams. Student's password is generated in polargofit.com.
Data Transfer
11
ENGLISH
Adding activity monitors to web service
7.
Polar Active activity monitors must be added
(registered) to the polargofit.com web service
before they are taken into use.
8.
1.
9.
2.
3.
4.
5.
6.
Log in to the web service on the polargofit.com
home page (www.polargofit.com) with teacher
user credentials.
Go to School > Monitors.
Click Register monitors to school.
Select a label/case (A-Z) for the activity monitor
from the drop down list. Monitors can be added
to one letter at a time. Click Start.
Make sure WebSync is running and the
FlowLink is plugged into the USB port. If
WebSync is not installed, download the
installer at www.polar.fi/support .
Place the first activity monitor on the FlowLink
with the display facing down. The activity
monitor must be activated by pushing any of
the buttons before placing it on the FlowLink.
The monitor ID, date and time are updated to the
activity monitor when they are added to the web
service.
Assigning activity monitors to students
Activity monitors must be assigned to students
while creating a course to transfer activity data to
web service.
1.
2.
12
Data Transfer
WebSync prompts for polargofit.com user
credentials.
As soon as a green tick appears for the activity
monitor in WebSync and polargofit.com, place
another activity monitor on the FlowLink.
Follow the progress in WebSync.
After adding all the activity monitors for the
selected case letter, click Finish to return to
the Monitors tab.
Log in to the web service on the polargofit.com
home page (www.polargofit.com) with teacher
user credentials.
Create a new or edit an old course in Courses
section.
ENGLISH
3.
4.
5.
6.
7.
8.
Click Assign monitors on course page.
Make sure WebSync is running and the
FlowLink is plugged into the USB port. If
WebSync is not installed, download the
installer at www.polar.fi/support .
Place the first activity monitor on the FlowLink
with the display facing down.
WebSync prompts for polargofit.com user
credentials.
As soon as a green tick appears for the activity
monitor in WebSync and polargofit.com, place
another activity monitor on the FlowLink.
Follow the progress in WebSync.
Click Finish to return to the course page.
4.
monitor on the FlowLink.
Log in to the web service on the polargofit.com
home page (www.polargofit.com) using either
teacher or student user credentials to review
the activity data.
For more information, see WebSync help and
polargofit.com user guide.
Downloading activity data from activity monitor to
web service
1.
2.
3.
Make sure WebSync is running and the
FlowLink is plugged into the USB port. Place
the first activity monitor on the FlowLink with
the display facing down.
WebSync prompts for polargofit.com user
credentials.
As soon as a green tick appears for the activity
monitor in WebSync, place another activity
Data Transfer
13
ENGLISH
6. ACTIVITY PROGRESS POSTER
The poster is for manual follow-up of daily
activity. The poster is designed to be reusable.
Use a non-permanent marker to be able to wipe
the markings away.
1.
Fill in the dates as column headings on the top
row of the poster.
2.
Fill in student's names as row headings.
14
Activity Progress Poster
3.
Students color the activity bar based on daily
activity.
After the activity measurement period, each
student's activity bars are connected to get the
progress curve.
See the Polar Active's user manual or the Polar
Active quick guide poster for instructions on how
to read the activity monitor's diary.
ENGLISH
7. IMPORTANT INFORMATION
Care and Maintenance
Activity and heart rate monitors can be sanitized with a
disinfectant, such as Simple Green d Pro 5®.
Activity monitor management system
Clean the case with a damp cloth, excluding the foam
parts. Never use alcohol or any abrasive material (steel
wool or cleaning chemicals). Keep in a cool and dry place.
Do not store in a damp environment or inside
non-breathable material such as a plastic bag.
Activity progress poster
Use a non-permanent marker. Wipe the old markings away
with a dry or moistened cloth or paper towel.
Polar Active
Clean with a mild soap and water solution, dry with towel.
Do not press buttons under water. Never use alcohol or
any abrasive material (steel wool or cleaning chemicals).
Keep in a cool and dry place. Do not store in a damp
environment, in non-breathable material such as a plastic
bag or a sports bag. Do not expose to direct sunlight for
extended periods.
Precautions
Polargofit.com web service is designed to enable tracking
and documenting of students' daily activity and time spent
in different activity zones. No other use is intended or
implied.
We recommend teachers to obtain written consent from
the students' parents for using the activity monitor.
Minimizing Possible Risks
Physical activity and exercising may include some risks.
Before beginning a regular exercise program, answer the
following questions concerning your health status. If you
answer yes to any of these questions, consult a physician
before starting any exercise program.
Important Information
15
ENGLISH
The following questions are for children. You can find the
questions for adolescents and adults from the full user
manual.
• Have you been physically inactive?
• Do you have symptoms of any disease?
• Are you taking heart or any other medication?
• Do you have a history of breathing problems?
• Are you recovering from a serious illness or medical
treatment?
• Do you use a pacemaker or other implanted electronic
device?
If you feel unexpected pain or excessive fatigue when
exercising, stop the exercise or continue at a lighter
intensity.
If you are allergic to any substance that comes into
contact with your skin or if you suspect an allergic
reaction due to using the product, check the listed
materials in Technical Specifications.
16
Important Information
Medical Devices In Professional Use
Medical devices in professional use sets high standards
for the manufacturer, distributor and user of a medical
device. Polar offers user instructions and training for
professional users in order to ensure the safe use of Polar
devices.
Copyright
Copyright © 2012 Polar Electro Oy, FIN-90440
KEMPELE. All rights reserved. No part of this manual may
be used or reproduced in any form or by any means
without prior written permission of Polar Electro Oy.
Polar Electro Oy is a ISO 9001:2000 certified company.
The names and logos marked with a ™ symbol in this user
manual or in the package of this product are trademarks
of Polar Electro Oy. The names and logos marked with a ®
symbol in this user manual or in the package of this
product are registered trademarks of Polar Electro Oy.
Windows is a registered trademark of Microsoft
Corporation and Mac OS is a registered trademark of
Apple Inc.
ENGLISH
Disclaimer
The material in this manual is for informational purposes
only. The products it describes are subject to change
without prior notice, due to the manufacturer’s continuous
development program.
Polar Electro Inc./Polar Electro Oy makes no
representations or warranties with respect to this manual
or with respect to the products described herein.
Manufactured by
Polar Electro Oy
Professorintie 5
FIN-90440 KEMPELE
Tel +358 8 5202 100
Fax +358 8 5202 300
www.polar.fi
Polar Electro Inc./Polar Electro Oy shall not be liable for
any damages, losses, costs or expenses, direct, indirect or
incidental, consequential or special, arising out of, or
related to the use of this material or the products
described herein.
Important Information
17
Manufactured by
ENG .03
Polar Electro Oy
Professorintie 5
FIN-90440 KEMPELE
Tel +358 8 5202 100
Fax +358 8 5202 300
www.polar.com