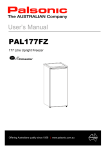
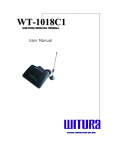
1
E-BODA mini 60 USB 2CH MPEG4/DVD player with USB Instruction Manual Contents 1. CAUTION AND SAFETY INSTRUCTIONS ……………………………………………………2 2. PRECAUTIONS…………………………………………………………..………………………3 3. SYSYTEM ELEMENTS………………………………………………..…..…………………….4 3.1 FRONT PANEL …………………………………………………….……………………….4 3.2 BACK PANEL ……………………………………………………….…………………….4 3.3 REMOTE CONTROL ………………………………………………….…………..………5 4. CONNECTIONS…………………………………………………………….……………………6 5. FUNCTION OPTIONS…………………………………………………..….……………………6 General setup page..………………………………………………………..………….……….7 Audio setup page…………..…………………………………………………………………….8 Dolby digital setup………………..……………………………………………………..……….9 Subtitle setup page..………………..…………………….…………………………...……….10 Video setup page..………………..……………………………………………………..……..11 Preferences page..………………..………………………………………….………....…..…12 Password setup…..………………..………………………………………………..….………12 6. Playing MPEG-1/2 files..…………………………………………………………………...…...13 7. Playing USB and Card files…………………………………………………………….....…....13 8. TROUBLE SHOOTING …………………………………..…..……..………………………..14 9. TECHNICAL SPECIFICATIONS ……………….………..…..……..………………………..15 10. RECYCLING ……………………………………………..…..……..………………………..15 -1- 1. Important Safety Instructions WARNING: TO REDUCE THE RISK OF FIRE OR ELECTRIC SHOCK, DO NOT EXPOSE THIS APPLIANCE TO RAIN OR MOISTURE. CAUTION: TO REDUCE THE RISK OF ELECTRIC SHOCK, DO NOT REMOVE COVER (OR BACK). NO USER SERVICEABLE PARTS INSIDE. REFER SERVICING TO QUALIFIED SERVICE PERSONNEL. The lightening flash with arrowhead symbol, within an equilateral triangle, is intended the alert the user to the presence of uninsulated dangerous voltage within the products enclosure that may be of sufficient magnitude to constitute a risk of electric shock to persons. The exclamation point within an equilateral triangle is intended to alert user to the presence of important operating and maintenance (servicing) instructions in the literature accompanying the appliance. Laser product symbol: located on the rear panel of the unit, indicate this player is a class 1M laser product, LASER RADIATION DO NOT VIEW DIRECTLY WITH OPTICAL INSTRUMENTS 1. Read through this instruction manual before installation and use. 2. Do not touch the power plug with wet hand. 3. Switch off the main power when the unit is not in use. (Disconnect the power plug from the power outlet when you do not intend to use the unit for a prolonged period of time.) Before moving the unit, remove the disc from the unit/ tray first. 4. Do not open the cover or touch any of the components exposed out of the unit, only for qualified technicians. 5. Do not expose the unit under direct sunlight or nearby objects that radiate heat to avoid damage the unit. 6. Do not place the unit in moist and humid conditions, which effect the pick-up of the unit lead to out of work. 7. Place the unit on a flat surface and ventilative condition. Please ensure the ventilation holes are not covered to avoid overheating and malfunction. 8. Clear the panel and case with soft dry cloth only, do not apply any kind of thinner, alcohol or sprays. 9. The apparatus shall not be exposed to dripping or splashing and that no objects filled with liquids, such as vases, shall be placed on the apparatus 10. unplug the apparatus when not using for a long time oriented to disconnect from the Mains power 11. No naked flame sources, such as lighted candles, should not be placed on the apparatus. 12.Make sure there is free circulation of air (do not place the device on shelves, on a thick carpet, on a bed, or anywhere that obstructs the ventilationslots, and leave at least 10cm clearance on all sides. 13. The apparatus shall not be exposed to dripping or splashing. 14. The mains plug is used as the disconnect device, the disconnect device shall remain readily operable. If the electric cable is damaged, it must be replaced by the manufacturer, or by the qualification persons, in order to avoid a danger. -2- 2.PRECAUTIONS Before using this unit, be sure to read the applicable items of the operating instructions and these safety suggestions carefully. Afterwards keep them handy for future reference. Take special care to follow the warnings indicated on the unit itself as well as in the operating instructions. Safety Power Source-The unit should be connected to power supply only of the type described in the operating instructions or as marked on the unit. Environment 1. Water and moisture do not use this unit near water. For example, near a bathtub, wash bowl, swimming pool, or the like, Damp basements should also be avoided. 2. Condensation-moisture may form on the lens in the following conditions. Immediately after a heater has been turned on. In a steamy or very humid room. When the unit is suddenly moved from a cold environment to a warm one, if moisture forms inside this unit, it may not operate properly, to correct this problem wait about one hour for the moisture to evaporate. 3. Heat never use or place this unit near a heat source. Do not leave it in an automobile exposed to direct sun light for a long time with the doors and windows closed as this may deform the cabinet. 4. The apparatus shall not be exposed to dripping or splashing and that no objects filled with liquids , such as vases , shall be placed on the apparatus . 5. Where the MAINS plug or an appliance coupler is used as the disconnect device , the disconnect device shall remain readily operable. -3- 3. SYSTEM ELEMENTS 3.1 Front panel 1. Disc Tray 2. Play/Pause Button 3. LED Display 4. Open/Close Button 5. STOP 6. On/Off button 7. USB port *When the unit is under STANDBY mode, it is not totally disconnected from the power supply. 3.2 Rear panel 1. Component Video output 2. SCART with RGB support 3. 2CH Digital Audio output 4. Coaxial Digital Audio output 5. Composite Video output 6. S-Video output 7. Digital Audio Optic output -4- 3.3 Remote control 1. On ST/BY 2. Numerical buttons 3. Go to 4. Pause 5. Back 6. Forward 7. Play 8. Up button 9. Left button 10. Settings 11. Down button 12. Title 13. Menu 14. Return 15. Angle 16. Program 17. Clear 18. Slow 19. Step 20. Zoom 21. L/R Channel 22. Reset 23. Video mode 24. Open/Close 25. Stop 26. Previous 27. Next 28. Enter 29. Right button 30. DVD/USB 31. Display 32. Subtitle 33. Wide 34. Language 35. Repeat A-B 36. Repeat 37. Mute 38. NTSC/PAL 39. PBC 40. Volume +/41. Random 1. 2. 3. 4. Do not expose the remote control handset to high temperatures, e.g. by leaving it in direct sunlight. Never allow foreign bodies, and in particular metal objects, to enter the battery compartment. The player's infrared sensor may be unable to receive signals from the remote control handset if it is directly exposed to sunlight or strong artificial lighting. To prevent any risk of leakage or corrosion, remove the batteries from the remote control unit if you do not intend to use it for an extended period. Important note: When replacing the batteries, always dispose of the used batteries in accordance with applicable regulations. Take them to a battery disposal point, so that they can be recycled safely without damaging the environment. -5- 4. CONNECTIONS Before connecting, make sure to turn off power of all apparatus. After finishing connection, turn on the power again. Wires must be connected properly, depended on the silkscreen on the rear panel. Especially the play shall be fully inserted. Warning: Do not connect any amplifier with coaxial connector that does not contain Dolby digital AC 3 or DTS decoder. Any attempt to do so and play of DVD disc will result in damaging your speakers and causing possible hearing injury. Other than DVD disc, VCD and CD can be operated normally without conforming to the above restriction. Setting of TV system If you find the image like non-fully zoomed picture, brim picture covered or black & white picture etc, please select PAL or NTSC by systems setting or press N/P button to switch the TV system on the remote control. This DVD disc is capable of supporting different scales picture, as a result, non-full zoomed picture could appear or picture be partially covered on user’s TV set. 5. FUNCTION OPTIONS You can use the player's setup menu to configure its functions and preferences. How to configure the player Press the SETUP button to enter the setup menu. ① Main menu: Use the left and right arrow (/) buttons to move the cursor to highlight the header of the main menu's submenu. ② Submenu: Press PLAY to enter the submenu. Pressing the button exits the submenu and returns you to the main menu. Press the / buttons to browse the various submenu options. ③ Option menu: Select the option that you want to configure and then press PLAY or to enter the option's setup menu. Use the / buttons to select the required setting and then press PLAY to enable it. Pressing returns you to the submenu. -6- General Setup Page TV Display · 4:3/PS: Pan & scan. Wide-screen images will be shown on 4:3 TV screen in full height with the left and right edges cut off. · 4:3/LB: Letter box. Wide-screen images will be shown on 4:3 TV screen in full width with black bands at the top and bottom. · 16:9: Select when the unit is connected to a wide-screen TV, the 4:3 images will be shown in full-screen with 16:9 ratio. Note: The image aspect ratio is preset on the DVD disc. Therefore the playback picture of some DVD discs may not conform to the option you select. OSD Lang: On-screen display language. You select the desired language for setup menu and on-screen messages. Angle Mark: Some DVDs include scenes recorded from different angles. This selection can show the marking automatically at the top right corner on screen. Captions: This selection can display or hide the closed captions. Note: This function can only used for DVD disc with closed caption. Closed captions are designed to aid the hearing impaired. Screen Saver: When disc/media file playback is stopped and there is not any operation on unit or remote for 5 minutes, the screen will change to black with a moving DVD logo. The screen saver prevents damage on your TV caused by leaving a still image on the screen for a long time. HDCD: User can setup the HDCD filter. · Off · 1X: 1X oversampling. · 2X: 2X oversampling -7- Last Memory: · ON: Once you carelessly press open button when you watch a DVD or shut down the power, it can go on to play the broken segment. · OFF: No memory function. Audio Setup Page Speaker Setup Downmix The player can mix multi-channel audio in order to code it as two-channel audio. This option is known as "downmixing". Lt/Rt: Dolby Pro Logic® Surround audio output. This matrix-based coding process enables stereo audio tracks to carry four channels (left, center, right and surround) of audio data. Stereo: Analog stereo audio output. The player sends the subwoofer and speech signals to your front right and front left speakers. 5.1CH: Disable downmix and enable discrete 5.1 channel surround sound. Front Speaker / Center Spearker / Rear Speaker / Subwoofer If Downmix mode is disabled, select the desired setting for your front, center and surround speakers: SML – Small (narrow range) mode. Treble sound are sent to the speakers. LRG – Large (wide range) mode. Both bass and treble sound are sent to the speakers. OFF – Disable Center speaker / Rear speaker / Subwoofer. Note: We recommend enabling (ON) the Subwoofer for an enhanced bass sound. -8- SPDIF Setup Setup Sony Philips Digital Interface (SP- DIF) which is designed for coaxial/optical digital audio transmission. SPDIF OFF: Disable digital audio trans- mission. SPDIF RAW: When the unit is connected with a 5.1 channel digital amplifier by coaxial/optical cable, select this option to transmit a raw digital audio signal without any decoding process. SPDIF PCM: When the unit is connected with a stereo digital amplifier by coaxial /optical cable, select this option to transmit a modulated stereo PCM audio signal. CH EQ Setup Channel equalizer setup. The internal equalizer has 7 preset modes for music playback – Rock, Pop, Live, Dance, Tenco, Classic, Soft. 3D Process Pro Logic II: Dolby Pro Logic II function. It processes high quality stereo signal source into 5 separate full frequency channels (right front, center, left front, right rear and left rear). Dolby Pro Logic II also decodes 5 channels from stereo signals encoded in traditional four- channel Dolby Surround. Reverb Mode: Reverb mode provides a virtual surround sound effect even when the DVD Player is connected to a Stereo or TV that has only left/right stereo sound capability. There are 7 preset reverb modes for selection – Concert, Living room, Hall, Bathroom, Cave, Arena, Church. Dual Mono Select LT/RT audio output mode. Stereo: The signal for the left channel is sent to the left speaker and the signal for the right channel to the right speaker. L-Mono: The signal for the left channel is sent to both the left and right speakers. R-Mono: The signal for the right channel is sent to both the left and right speakers. Mix-Mono: The left and right audio channels are mixed and coded as mono audio. The same sound is played on both speakers. -9- Dynamic This section on dynamic compression applies only to DVDs that use the Dolby Digital technique. Set to OFF: Low-frequency audio signals are amplified to increase the audio volume. Set between FULL and OFF: Audible sounds at the extremes of the Dolby Digital audio spectrum are compressed. Set to FULL: All audible sounds, irrespective of their frequency, are distinct and included in the Dolby Digital dynamic. Subtitle Setup Page Subtitle Code: You can select the subtitle code to fit the language of your desired external subtitle. · Latin(1250): Support subtitles in Serbian (Latin), Albanian, Croatian, Romanian. · Cyrillic(1251): Support subtitles in Russian, Bulgarian, Macedonian, Serbian (Cyrillic) and Ukrainian. Subtitle Font: There are three subtitle font size for selection - small, medium and large. Backgroud Colour: You can select the background color for subtitle. There are 8 colour for selection. Outline Colour: You can select the outline colour for subtitle. There are 8 colours for selection. Text Colour: You can select the text colour for subtitle. There are 8 colours for selection. Subtitle Hor. Align: Subtitle horizontal alignment. You can adjust the horizontal position of subtitle. Subtitle Ver. Align: Subtitle vertical alignment. You can adjust the vertical positon of subtitle. - 10 - Video Setup Page Component Select the appropriate video output for your connection type. · YUV: Choose this setting if your DVD player is connected to a TV with YUV video cables. · S-Video: Choose this setting if your DVD player is connected to a TV with S-VIDEO cable. · RGB: Set the video output to SCART output. If you select SCART connection, you should set up the play mode as RGB state, then it will output normally. TV Mode Select progressive-scan or interlaced video mode for your TV's signal output. · Interlace: Conventional (analog) televisions · P-scan: TVs supporting progressive scan signal inputs. Do not select this option lightly, as most TVs do not support progressive scan video and you will be left with a blank screen. Sharpness / Brightness / Contrast Sets the sharpness / brightness / contrast level of image. - 11 - Preference Page TV Type Specifies the standard used for the video output's color signals. · PAL: Broadcast system used in Europe. Your TV will receive this signal if you select "PAL TV ". · Auto: Broadcast system used in the Brazil. Your TV will receive this signal if you select "Auto". · NTSC: Broadcast system used in Korea, Japan, the USA, Canada and many other countries. Most DVDs are recorded in NTSC format. Your TV will receive this signal if you select "NTSC TV". Audio Selects the preferred language for DVD soundtracks. · The selected language is assigned high priority and can therefore be adopted automatically when the player begins playing a disc. · Languages vary between discs, depending on the DVD. · You can also select alternative languages by pressing the AUDIO button on the remote control handset. Subtitle Selects the preferred language for subtitles recorded on DVDs. · The selected subtitle language is assigned high priority and can therefore be adopted automatically when the player begins playing a disc. · Subtitles vary between discs, depending on the DVD. · You can also select alternative subtitle languages by pressing the SUBTITLE button on the remote control handset. Disc Menu Selects the preferred language for the disc menu recorded on the DVD. This choice varies between DVDs. Parental It is possible to restrict playback of certain DVDs to a certain level of user, based on their age, for example, certain scenes can be blocked or replaced with different scenes. The "Parental Control" function lets you set - 12 - the access control level. This function is password-protected. · The player will asks you to enter a password if you have enabled "PASSWORD" mode. Notes: If you play the disc which do not support the Parental Control function, the player cannot restrict access to the disc. Password Move the cursor over the "Change" menu option. Press PLAY. The Change Password menu is displayed. You must first enter the old password (the default password is 5168). Provided the old password is entered correctly, you can then change it by entering a new one. Default Restores the player's factory settings. 6. Playing MPEG-1/2 files The player can read files on the DVD (.VOB/. MPG/. DAT) in File Playback mode. If a .VOB file contains multiple tracks and multiple subtitles, you can also change the soundtrack and subtitle language settings by pressing the relevant button in the same way as for conventional video DVDs. 7. Playing USB/Card files 1. Power on you DVD PLAYER 2. Make sure that the tray has no disc in it; 3. Insert you moveable memorizer into USB connector or 3-in-1 card reader (support SD/MMC/MS) on your DVD player, then the files will be played automatically. 4. If you want to stop, you can take it out straight away. - 13 - 8.Troubleshooting In the event of a technical problem, check the following points before taking the player to the after-sales service. If you are unable to cure the problem by following our advice, contact your dealer or repair center. WARNING: Never attempt to repair this appliance yourself. Problem The POWER light does not come on. No picture No sound Distorted picture Flickering or unstable brightness Possible cause Solution The power cord is not plugged in Plug the power cord into a wall outlet You have not selected the video input connected to your TV The video cable is not connected correctly The audio cable is not connected correctly The stereo system is not switched on You have not selected the correct audio output Select the correct audio output in the setup menu Remove and clean the disc The player is in Cue or Review mode. Some distortion may occur during Cue and Review operations. This is normal. Disruption caused by a copy protection system. Connect the player directly to your TV There is no disc in the player Load a disc The disc has been loaded upside down The disc is not correctly positioned in the tray Load a compatible disc (check the disc's format and color signal coding standard). Check that the disc is correctly positioned Check that the disc is correctly positioned The disc is dirty Clean the disc The player is not configured correctly Parental control mode is active No response when buttons are pressed Switch on the stereo system The disc is dirty. Incompatible disc The player does not operate Select the appropriate video input format on your TV, in order to receive the player's output signals Fully insert the plugs on the video cable into the corresponding jacks Fully insert the plugs on the audio cable into the corresponding jacks. Interference from electromagnetic radiation or other factors such as static electricity - 14 - Use the setup menu to modify the setup Disable the parental control function or change the restriction level Switch off the player or unplug its power cord, and then switch it on or plug it in again. The remote control handset does not work The remote control is not aligned with the sensor on the player's front panel Point the remote control handset at the sensor. The remote control is out of range Check that the remote control is no more than 7 m from the sensor. The batteries are dead Replace the batteries with new ones. Note: This appliance uses copyright protection technology covered by claims under the terms of various US patents and other intellectual property rights of Macrovision Corporation and other holders. Use of the aforementioned copyright protection technology is subject to consent by Macrovision Corporation and is intended solely for private use or restricted broadcasting, unless otherwise authorized by Macrovision Corporation. Reverse engineering and disassembly prohibited. It may not be possible to play certain discs on this player, owing to the condition of the recording system or the CD-R/RW or DVDR/RW disc itself. 9.Technical Specifications Playback compatibilities DVD/DVD-R /CD/CD-R/CD-RW/JPEG/Mp3 Video Outputs Components Video Composite Video S-video Audio Outputs Analogical 2.0-CH-audio (2 Vrms (1 Khz)) Coaxial digital audio (1,5 Vp-p) General features Voltage: 100-240 V AC, 50/60 Hz. Power consumption: 20 W PAL/NTSC-video system Accessories RCA Audio/Video cables (composite video and L-R audio) Remote control unit Warranty card User manual 10. RECYCLING This product is marked with the selective sorting symbol for electrical and electronic waste. This symbol indicates that the product must be accepted by a selective waste collection system in accordance with EU directive 2002/96/CE, so that it can be recycled or dismantled in order to minimize any environmental impact. Note that unless selectively sorted, electronic products are potentially hazardous to the environment and human health, as they may contain hazardous substances. - 15 -