1
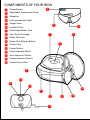
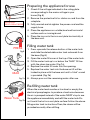
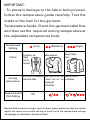
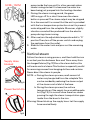
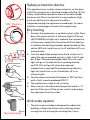
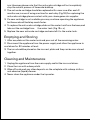
Steam Generator
Model: G-1028ST
Keep This Instruction Manual
Before using this appliance, please read these
instruction completely.
This product is intended for household use only.
IMPORTANT SAFEGUARDS
1. Make sure to read all the safety precautions
below and look at the illustrations before you
start using the appliance.
2. Use the appliance for its intended use only
described in this manual.
3. The appliance is intended for household use
only.
4. In order to protect against the risk of electric
short, do not immerse iron power base into
water or any other liquids.
5. Connect the appliance only to an alternating
current of the voltage specified on the rating
plate and only to an earthed socket. To avoid
a circuit overload, do not operate another
high wattage appliance in the same circuit.
6. Turn the appliance to OFF before plugging
or unplugging from outlet. Never yank cord
to disconnect from outlet; instead, grasp plug
and pull to disconnect.
7. Do not allow power cord or supply hose to
touch hot surface.
8. Unplug the appliance from main socket
before filling or empty or when not in use.
9. Do not operate the appliance with a
damaged cord or if the appliance has been
dropped or damaged. To avoid a hazard
such as the risk of electric shock, do not
disassemble the appliance, it must be taken
to a qualified serviceman or manufacturer or
its service agent for examination and repair.
Incorrect re-assembly can cause a risk of
electric shock when the iron is used.
10. Place the iron out of reach of children; close
supervision is necessary for any appliance
being used by or near children. Do not leave
the iron unattended while connected to the
supply mains.
11. During use, always place its stand on a
stable, level and horizontal surface or ironing
board.
12. Always place the iron on its stand, and do
not allow the hot soleplate touch power cord
or supply hose.
13. Burns can occur from touching hot metal
parts, hot water or steam. Use caution when
using the appliance.
14. Never use the iron facing towards people
because the steam can cause burns.
15.
The surfaces are liable to get hot during
use.
16. Never twist the supply hose during use.
17. The appliance must be used and rested on a
stable, level and horizontal surface.
18 .The iron shall be placed on the separate
stand only.
19. When placing the iron on its stand, ensure
that the surface on which the stand is placed
is stable.
20. The iron is not to be used if it has been
dropped, if there are visible signs of damage
or if it is leaking.
21. The iron must not be left unattended while it
is connected to the supply mains.
22. The appliance must be rest or stocked on a
stable, level and horizontal surface.
23. During use, if no water in the reservoir, it will
produce noise<70dBA.
24. This appliance can be used by children aged
from 8 years and above and persons with
reduced physical, sensory or mental
capabilities or lack of experience and
knowledge if they have been given
supervision or instruction concerning use of
the appliance in a safe way and understand
the hazards involved, children shall not play
with the appliance. cleaning and user
maintenance shall not be made by children
without supervision.
25. Keep the iron and its cord out of reach of
children less then 8 years of age when it is
energized or cooling down.
COMPONENTS OF YOUR IRON
1
2
3
4
5
6
7
8
9
10
11
12
13
14
15
16
8
Steam Button
Adjustable Temperature Knob
Soleplate
Heat up indicator (Red)
Supply Hose
9
10
Iron Rest Plate
Detachable Water Tank
Anti - Scale Cartridge
5
1
Water Fill Cover
Water Tank Release Button
2
Power Cord
Power Switch
Power Indicator (Red)
Heat Indicator (Yellow)
Steam Indicator (Green)
Steam Control Dial
7
13
15
14
16
6
3
11
4
12
Preparing the appliance for use
Rating Plate:
230V~ 50Hz 2300W
Fig.5
PRESS
Fig.6
MAX
Fig.7a
1. Check if the voltage indicated in the rating plate
corresponding to the mains voltage in your
home.(Fig.5)
2. Remove the protective foil or sticker or card from the
soleplate.
3. Fully unwind and straighten the power cord and the
supply hose.
4. Place the appliance on a stable,level and horizontal
surface such as ironing board.
5. Place the iron onto the iron rest plate horizontally at
the base unit.
Filling water tank
1. Press upwards the release button at the water tank
and slide the detachable water tank outwards from
the base.(Fig.6)
2. Open the water fill cover at the top of the water tank.
3. Fill the water tank up to or below the “MAX” fill line
with the clean tap water. (Fig.7a)
4. Replace the water fill cover into the opening.
5. Replace the water tank into the base unit.It will be
locked in place with the base unit until a “click” sound
is provided. (Fig.7b)
6. Always pour out the remaining water after use.
Re-filling water tank
Water Tank
Fig.7b
When the water level reaches a low level or empty,the
electrical pump begins to produce a loud noise because
the air is pumped instead of the water.MUST stop to use
the appliance immediately and refill the water tank.Do
not touch the hot iron rest plate surface.Follow the above
filling water tank instructions.Then,the steam will be
provided normally after refilling.
IMPORTANT:
- To prevent damage to the fabric being ironed,
follow the temperature guide carefully. Test the
inside of the hem for the garment.
Temperature Guide: Check the garment label first
and then set the required ironing temperature at
the adjustable temperature knob.
Temperature
Setting
Fabric
Ironing
Instructions
Steam Control
Dial Setting
(Low)
Synthetics, silk,
Nylon,
Acrylic,
Acetate
(Medium)
Wool, polyester
(High)
Rayon Cotton,
Linen
Dry iron on the opposite Use a press cloth and Iron while fabric
side of the fabric
steam iron on the is still damp
wrong side
of the fabric
Off
Remark: Before steam ironing or vertical steam, please make sure that you should
adjust the steam control dial setting to match with the temperature setting
accordingly as indicated in the above table.
Power Switch On
Steam ironing
1. Fill up the water tank with the clean tap water refer to
the above filling instructions.
2. Connect the appliance to a suitable socket
outlet.Press down the Power Switch at the base.The
red LED (POWER) will light up to indicate the
connection of the power supply.(Fig.8) Also,the
yellow LED will light up to indicate the heating
chamber being heated up.The yellow LED will cycle
Fig.8
from on to off and then off to on automatically.
3. Turn the adjustable temperature knob at the iron to
select the recommended position of dot-1,dot-2 and
dot-3.(Fig.9a) See “Temperature guide table”.The
iron’s red light will go on to indicate the iron being
heated up.(Fig.9b) It will go off when the required
temperature is reached.The temperature indicator
Fig.9a
light will cycle from on to off and then off to on
automatically.
4. Turn the steam control dial at the base to select the
recommended position of dot-1,dot-2 and dot-3.See
“Temperature guide table”. (Fig.10) In general, it is
strongly recommended that rotating the steam control
dial at base to the position of dot-1 or dot-2. These two
positions can be provided continuous steam for steam
Fig.9b
ironing or Vertical steam. If you need an extra steam rate
supply, you can rotate the steam control dial at base to
the position of dot-3 for steam ironing within one minute.
Warning: The steam vents at the soleplate may probably
have excessive water came out after one minute use.
This may make the clothes wet.
5. The appliance is ready for use when the iron’s indicator
Fig.10
light goes off at the first time. For every first time use,
press the steam button for one minute approximately to
1 minute
clean the steam generating system. After that, wait for
the yellow heat indicator at base gone off. Start to steam
ironing and the green LED will light up at the base when
pressing the steam button. (Fig.11)
Fig.11
6. For every first time use, it is normal that a slightly
vibration sound may be occurred from the electrical
5CM~ 15CM
Fig.12
Fig.13
Supply Hose
blocked
Fig.14
Power Switch On
Fig.15
pump inside the hose unit for a few seconds when
steam ironing started. It is because the water has
been being just pumped into the heating chamber.
7. During the steam ironing period, the green
LED may go off for a short time even the steam
button is pressed. The steam output may be stopped
for a few second. It is normal that the unit is provided
with the low temperature protection circuit to prevent
water dripped from the soleplate. Moreover, slightly
vibration sound will be produced from the electric
pump during steam ironing.
8. After use,turn the adjustable temperature dial to “0”
position.Then,turn off the power switch and unplug
the appliance from the outlet.
9. Slide out the water tank and pour out the remaining
water.
Vertical steam
Follow the steam ironing process, and then hold the iron
in vertical position between 5cm and 15cm away from
the hanged fabrics.(Fig.12)Press the steam button,this
will create vertical steam.This feature is especially useful
for removing creases from hanging clothes and curtains.
Never direct the steam to people.
NOTE: a. During the steam process,small amount of
water may be ejected from the soleplate.This
can be avoided by reducing the steam output
at the steam control dial at the base.
b. During the steam process,the surface
temperature of the supply hose would be quite
hot.(Fig.13) It is normal since there has steam
passing through the steam transportation pipe
inside from the base to the iron.
Warning: Never block up the supply hose. Let the supply
hose unwind freely.
Safety protection device
Fig.16
“OFF” Position
This appliance has a safety valve protection on the base
unit.If the supply hose is blocked accidentally,(Fig.14) the
safety valve will be opened to release the steam under
the base unit.This is normal that it may produce a high
pitch sound.Once this abnormal condition
happened,unplug the appliance immediately. To check
whether any damage is found in the supply hose.
Dry ironing
Fig.17
Fig.18
Fig.19a
Fig.19b
Fig.19c
New Cartridge
1. Connect the appliance to a suitable socket outlet. Press
down the power switch at the base.(Fig.15) The red
LED (POWER) will light up to indicate the connection
of the power supply.Also,the yellow LED will light up
to indicate the heating chamber being heated up.The
yellow LED will cycle from on to off and then off to on
automatically.
2. Turn the adjustable temperature knob at the iron to
select the recommended position of dot-1,dot-2 and
dot-3.See “Temperature guide table”.The iron’s red
light will go on to indicate the iron being heated
up.(FIG.16) It will go off when the required
temperature is reached.The temperature indicator
light will cycle from on to off and then off to on
automatically.
3. Turn the steam control dial at the base to “OFF” position
until a “click” sound is produced. (FIG.17)
4. The appliance is ready for dry ironing.
5. After use,turn the adjustable temperature dial to “0”
position.Then,turn off the power switch and unplug
the appliance from the outlet.
Anti-scale system
1. The anti-scale cartridge is designed to reduce the
build-up of limescale which occurs during steam
ironing,this will prolong the working life of your
2.
3.
4.
5.
iron.However,please note that the anti-scale cartridge will not completely
stop the natural process of limescale build-up.
The anti-scale cartridge should be replaced with a new one after each 3
months use,in case of using one time for each day. (Fig.18) For replacing the
anti-scale cartridge,please contact with your steam generator supplier.
If a new cartridge is not available,you may continue operating the appliance
but limescale will build up much faster.
To replace the anti-scale cartridge,slide out the water tank from the base,and
take out the cartridge from the water tank. (Fig.19a - c)
Replace the new anti-scale cartridge and reinstall it to the water tank.
Emptying and Storing
1. After use,slide out the water tank and pour out all the remaining water.
2. Disconnect the appliance from the power supply and allow the appliance to
cool down for 30 minutes at least.
3. The iron should be placed on the iron rest plate and they can be now stored
together.
Cleaning and Maintenance
1. Unplug the appliance from the main supply and let the iron cool down.
2. Clean the iron with a damp cloth.
3. Wipe off scale and any other deposits on the soleplate with a damp cloth or
non-abrasive (liquid) cleaner.
4. Never clean the appliance under the tap water.
TROUBLE SHOOTING GUIDE
Problem
Iron won’t heat.
Possible Cause(s)
Solution
The appliance has not Switch on the power
been switched on.
switch at the
base unit.
The adjustable
temperature knob is
set at “0” position.
Some smoke comes This is normal. Some
out from the appliance parts of the iron have
a little bit of grease.
after you have
switched the
appliance on for the
first time.
Select the required
ironing temperature
as indicated in the
temperature guide
table.
This phenomenon will
cease after a short
while.
The appliance has not Switch on the power
been switched on.
switch at the base
unit.
The appliance does
not produce steam.
The water tank is
empty.
Refill the water tank.
The steam control dial Turn on the steam
is set in “OFF” position. control dial to the
desirable setting.
TROUBLE SHOOTING GUIDE
Problem
Droplets of water
escape from the
solepate
Possible Cause(s)
Solution
The temperature knob
is set at a lower
temperature position
for steam ironing.
Select the required
ironing temperature as
indicated in the
temperature guide
table.
The setting of the
steam control dial is
too high.
Select the required
steam setting at the
steam control dial as
indicated in the
temperature guide
table.
Never dispose of your product with other
household waste. Please inform yourself about
the local rules on the separate collection of
electrical and electronic products. The correct
disposal of your old product helps prevent
potentially negative consequences on the
environment and human health.