1
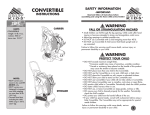
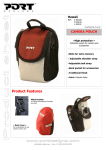
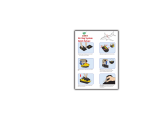
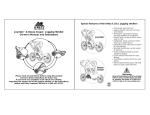
SAFETY INFORMATION
KANGAROO
INSTRUCTIONS
-IMPORTANTRead, and follow, all instructions before
assembling and using this soft carrier!
TIPS
WARNING
FACTS
KANGAROO
weight: 2 lb.
FALL HAZARD
volume: 100 in3
torso size: 13-21 ”
waist size: 26-60”
• Small children can fall through the leg opening.
• Child could suffer head injuries or become entangled in
straps and strangulation could occur.
• Adjust leg openings to smallest possible size.
• Only use this carrier for children weighing between 8 lb. and
25 lb.
• Child must face towards you until he or she can hold head upright.
NOTE:
• KELTY soft carriers
are meant to be used
BY ADULTS only.
• KELTY soft carriers
are designed to
transport one child
weighing no more
than 28 lb. (12.7 kg).
Failure to follow this warning could cause death, serious injury or
permanent disability to your child.
WARNING
PROTECT YOUR CHILD
•
•
•
•
•
•
•
•
DO NOT leave child unattended in the carrier.
DO NOT place more than one child in the carrier.
DO NOT bend over while using the carrier.
DO NOT place the carrier on uneven or elevated surfaces.
DO NOT allow your child to stand on the carrier seat.
DO NOT use carrier if your child will not ride calmly in carrier.
DO NOT place carrier near a campfire, cook stove or open flame.
DO monitor child while in carrier. Periodically check the
child’s position.
• DO assure your child is dressed properly for the weather.
Periodically check the child’s comfort.
• DO protect your child from the harmful effects of the sun.
• If your child has special needs, consult with a physician before
using Kelty carriers. This carrier may not be appropriate for special
needs children.
ADULT SUSPENSION
Failure to follow this warning could cause death, serious injury or
permanent disability to your child.
2
SAFETY INFORMATION
-IMPORTANTRead, and follow, all instructions before
assembling and using this soft carrier!
WARNING
THIS CARRIER MAY AFFECT YOUR
COORDINATION AND BALANCE
• Your balance may be adversely affected due to your movements
or the movements of child.
• DO NOT use the carrier while skating, biking or engaging in any
activity that will affect your balance.
• DO NOT bend at the waist when using the carrier. Bend at the
knees to avoid pitching the child forward.
• DO take special care when putting on or removing the carrier.
• Kelty frame carriers are to be used by adults only.
CHILD FACING IN
ADULT HARNESS
To assure proper fit and to ensure comfort, take
time to fit the harness to the adult carrying the
infant.
A. Put the harness on by slipping your arms
through the shoulder straps (Fig. 1). (Make
sure that the straps cross in the back and all
the buckles on the black webbing are facing
towards the front.)
NOTE: Double check that all webbing and straps
are lying flat and are NOT twisted.
TIPS
NOTE:
It is recommended
to wear the belt on
the hip bones, just
under the rib
cage, so that the
belt is roughly in
line with your belly
button.
Failure to follow this warning could cause death, serious injury or
permanent disability to your child.
WARNING
DO NOT USE A DAMAGED CARRIER
• DO check to assure all buckles, snaps, straps, and adjustments
are secure before each use.
• DO check the condition of carrier before each use.
• DO NOT use carrier if the fabric, straps or buckles are damaged.
• DO NOT use the carrier if the carrier is in any way damaged or
defective. Call Kelty Customer Support staff; toll free at
866-349-7225 (866-FIX-PACK).
• Keep instructions for future use.
Failure to follow this warning could cause death, serious injury or
permanent disability to your child.
CARE AND CLEANING
• Your carrier is machine washable.
• Machine wash separately in cold
water, on gentle cycle, using
mild detergent.
• Hang carrier to air dry.
• Do not use bleach or liquid
detergent.
Figure 1
ADULT SUSPENSION
B. To adjust the height of the harness, find the
elastic webbing that runs from the shoulder
strap to the waistbelt. Slide the 3-bar slider
up or down (Fig. 1 Inset) to adjust to the
proper height.
NOTE: See tip box for “proper height” fit.
C. Repeat step B with the other shoulder strap.
4
CHILD FACING IN
CHILD FACING IN
SECURING CHILD
IN THE POUCH
SECURING CHILD
IN THE POUCH
Before starting, make sure all of the buckles and hook and loop material
are NOT fastened.
D. Place pouch (KELTY logo side down) on a flat surface (Fig. 2D). If
required, remove cargo pocket to allow pouch to lay flat.
E. Lay child on the pouch, with the child’s head on the padded support
(Fig. 2E).
F. Lift the seat portion of pouch up between child’s legs (Fig. 2F), similar
to diapering.
H. Fasten the seat side-release strap buckles
(Fig. 3). Make sure both buckles are properly
engaged.
NOTE: The seat side straps should be adjusted
to provide a snug fit around child. Check
proper fit by inserting several fingers between
the pouch and child’s chest and the pouch
and each leg.
G. Wrap both end tabs around the child’s legs, and fasten the loop
material to the hook material on the back of the pouch (Fig. 2G).
2D
TIPS
NOTE:
The hook and
loop tabs alone
are NOT enough
to hold the child
in the pouch-you
must ALWAYS
fasten all of the
side-release
buckles.
2E
Figure 3
CHILD’S POUCH
2F
5
2G
Figure 2
CHILD’S POUCH
6
CHILD FACING IN
CHILD FACING IN
ATTACHING THE CHILD’S POUCH
TO THE ADULT HARNESS
ADJUSTING ADULT HARNESS
I. With the child secured in the pouch, lift the child to your chest, with the
baby facing you.
J. Cradle child to your chest and fasten the shoulder strap attachment
side-release buckle on one side (Fig. 4). Make sure buckle is properly
engaged.
K. Repeat step J on other side of pouch.
L. While still holding child securely to chest, fasten one of the waist belt
attachment side-release buckles (Fig. 5). Make sure buckle is properly
engaged.
The harness system of the Kangaroo is designed to carry the weight of
your child on your waist and hips, reducing strain on your neck and
shoulders.
N. Position the waist-belt in a comfortable place on your hips, and tighten
waist belt by pulling inward on the pieces of webbing threaded
through the Scherer Cinch (Fig. 6 Inset).
O. Tighten the shoulder straps by pulling towards your underarms on the
shoulder-strap webbing (Fig. 6).
M. Repeat step L on other side of pouch.
Figure 4
SHOULDER STRAP
SIDE-RELEASE BUCKLES
7
Figure 5
WAIST BELT
SIDE-RELEASE BUCKLES
Figure 6
8
TIPS
NOTE:
The harness must
be on, with pouch
attached, before
placing child into
carrier. This position works best
with cargo pocket
removed.
CHILD FACING OUT
CHILD FACING OUT
ADULT HARNESS
FOLDING THE CHILD’S POUCH
The outward facing position should only be used
when child is able to hold head and shoulders
upright.
A. Put the harness on by slipping your arms
through the shoulder straps (Fig. 7). (Make
sure that the straps cross in the back and all
the buckles on the black webbing are facing
towards the front).
NOTE: Double check that all webbing and straps
are lying flat and are NOT twisted.
It is recommended
to wear the belt on
the hip bones, just
under the rib
cage, so that the
belt is roughly in
line with your belly
button.
B. Place pouch (KELTY logo side down) on a flat surface (Fig. 8B). If
required, remove cargo pocket to allow pouch to lay flat.
C. Lift up the seat portion of pouch (Fig. 8C).
D. Wrap both end tabs around the back of the pouch, and fasten the
loop material to the hook material on the back (Fig. 8D).
E. Fasten the seat side-release strap buckles (Fig. 8E).
8B
8C
8D
8E
Figure 7
ADULT SUSPENSION
B. To adjust the height of the harness, find the
elastic webbing that runs from the shoulder
strap to the waistbelt. Slide the 3-bar slider
up or down, (Fig. 7 Inset), to adjust to the
proper height.
NOTE: See tip box for “proper height” fit.
9
C. Repeat step B with the other shoulder strap.
Figure 8
FOLDING CHILD’S POUCH
10
CHILD FACING OUT
ATTACHING THE CHILD’S POUCH
TO THE ADULTS HARNESS
F. Lift the pouch to your chest, with the pouch facing you.
G. Fasten the shoulder strap attachment side-release buckle on one side
(Fig. 9). Make sure buckle is properly engaged.
H. Repeat step G on other side of pouch.
I. Fasten one of the waist belt attachment side-release buckles (Fig. 10).
Make sure buckle is properly engaged.
J. Repeat step I on other side of pouch.
CHILD FACING OUT
FOLDING THE CHILD’S POUCH
K. Make sure zipper pulls for Privacy Sun/Rain Hood pocket are
positioned at the top/center of the pouch (Fig. 11).
L. Fold the padded head support down (Fig. 12) and away from you.
Secure the padded head support in the down position by threading
the red attachment webbing through both zipper pulls and fastening
the hook/loop material (Fig. 12 Inset) below the lower cargo bag
attachment point.
Figure 11
ZIPPER POSITIONING
Figure 9
SHOULDER STRAP
SIDE-RELEASE BUCKLES
11
Figure 10
WAIST BELT
SIDE-RELEASE BUCKLES
Figure 12
FOLDING PADDED
HEAD SUPPORT
12
CHILD FACING OUT
TAKING CHILD OUT
INSERTING CHILD
1. Carefully place your
hands under the
child’s arms and lift
up and out. Place
child on a flat, safe
surface before
removing the pouch
and harness from
your body.
M. While holding the child securely under their arms, place child in
carrier, facing away from you (Fig. 13). Make sure both legs go
through leg openings at bottom of pouch (Fig.14).
Figure 15
OPTION 1
Figure 13
13
Figure 14
2. Cradle child in pouch
securely with one
arm. Unbuckle waist
belt attachment
buckle on one side of
carrier pouch (Fig.
16A). Repeat with
other arm and other
waist belt buckle.
Next unbuckle shoulder strap attachment
16A
buckles on both sides
of carrier pouch with
one arm while
holding child securely
with the other arm
(Fig. 16B).
Carefully place child
on flat, safe surface.
Unbuckle side-release
buckles and unfasten
16B
the hook and loop
material on the
Figure 16
bottom of the pouch.
OPTION 2
TIPS
NOTE:
• There are two
ways to take
your child out of
the pouch.
Choose which
one works the
best for you.
14
8/04
ACCESSORIES
PRIVACY SUN/RAIN HOOD
The Kangaroo includes a stow-able hood for nursing privacy and for
protection from the sun or rain.
A. Unzip the pocket located at the
top of pouch (Fig. 17), behind
the child’s head suppor, and
unroll hood from pocket.
B. Attach the hook material to the
soft fleece material at the bottom
of shoulder straps (Fig. 18).
NOTE: To store, reverse steps A
and B above.
Figure 17
Figure 18
CARGO POCKET
The Kangaroo has a removable cargo pocket on the back of the pouch,
held in place with hook and loop material.
To remove:
A. Peel the hook and loop material
apart at the top of the cargo
pocket, just below Kelty KIDS
logo. Then peel the hook and
loop material apart at the bottom
of the cargo pocket
(Fig. 19).
15
Figure 19
NOTE: To attach, follow A above,
fastening the hook/loop material
instead of peeling.
KELTY’S LIFETIME WARRANTY
Kelty takes pride in its workmanship and commits to manufacture the
best possible products.
We warranty all Kelty products against defects in materials or workmanship to the original buyer for the lifetime of the product. Since no Kelty
product is indestructible, the warranty does not cover defects attributable to or resulting from normal wear and tear, natural hazard damage,
abuse, alteration, or UV damage. Service under this warranty is available to the original purchaser by returning the product to any authorized Kelty K.I.D.S. dealer, with proof of purchase, or to our Customer
Service Department (return authorization required) by calling 1-866349-7225 (866-FIX-PACK).
If, after inspection, Kelty determines a defect exists in the material or
workmanship of the product (not caused by normal wear and tear), we
will repair or replace it, at Kelty’s discretion, free of charge, without
delay. This warranty gives you, the original purchaser, specific legal
rights. Your rights may vary from state to state.
If you have any questions please call Kelty’s Customer Service
Department at 1-800-423-2320.
6235 Lookout Road, Boulder Colorado 80301
phone 800.423.2320 • fax 800.504.2745 • www.kelty.com