1
I
QuickStart
Basics
Tips & Ideas
○ ○ ○ ○ ○ ○ ○ ○ ○ ○ ○ ○ ○ ○ ○ ○ ○ ○ ○ ○ ○ ○ ○ ○ ○ ○ ○ ○ ○
Samples
Table of Contents
Introduction
Installation
Table of Contents
II
Magnificient Monograms II
Samples
Tips & Ideas
Basics
QuickStart
Introduction
Installation
Table of Contents
End User License Agreement............................pg 2
Computer Requirements....................................pg 8
Software Installation..........................................pg 9
Registration.....................................................pg 11
Introduction.....................................................pg 17
Program Overview..............................................pg 18
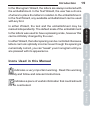
Icons Used in this Manual................................pg 19
Monogram Wizard............................................pg 20
Text Wizard......................................................pg 21
Menus..............................................................pg 22
File Menu.........................................................pg 22
View Menu.......................................................pg 23
Zoom....................................................................... pg 23
Realistic View ........................................................ pg 23
Options Menu...................................................pg 24
Hoop Size............................................................... pg 24
Preferences ............................................................ pg 24
Compatibility....................................................pg 28
Quick Start........................................... pg 29
Quick Start Lesson 1 .......................................pg 30
Create a Text Monogram ....................................... pg 30
Quick Start Lesson 2.......................................pg 38
Create a Self-Contained Monogram ..................... pg 38
Quick Start Lesson 3.......................................pg 41
Create a Freestyle Monogram .............................. pg 41
Tips and Ideas ..................................... pg 59
Selecting the Best Font .................................. pg 60
Creating Unique Monograms...........................pg 61
Inches to Millimeters Chart..............................pg 62
Installation
Introduction
QuickStart
Basics
Main Tool Bar...................................................pg 46
Wizard Tool Bar................................................pg 47
Print Instruction Sheet....................................pg 48
Print Template.................................................pg 50
Adjust Text Placement.....................................pg 51
Text Wizard ............................................................ pg 51
Adjust Text Placement.....................................pg 52
Swoosh Font ......................................................... pg 52
Adjust Text Placement.....................................pg 53
Monogram Wizard ................................................. pg 53
Using Envelopes..............................................pg 54
Text Wizard ............................................................ pg 54
Advanced Settings..........................................pg 55
Realistic View Control......................................pg 55
Text Wizard ............................................................ pg 55
Using the Fill Function.....................................pg 56
Changing the Background Color......................pg 58
Tips & Ideas
Basics .................................................. pg 45
III
Samples
Table of Contents
Samples
Tips & Ideas
Basics
QuickStart
Introduction
Installation
IV
Magnificient Monograms II
1
•
License Agreement
•
Computer Requirements
•
Installing Magnificent Monograms
•
Registering the Program
•
Starting the Program
QuickStart
Basics
In this section:
Tips & Ideas
○ ○ ○ ○ ○ ○ ○ ○ ○ ○ ○ ○ ○ ○ ○ ○ ○ ○ ○ ○ ○ ○ ○ ○ ○ ○ ○ ○ ○
Samples
Installation
Introduction
Installation
Installation
2
Magnificient Monograms II
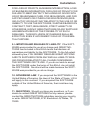
Be sure to carefully read and understand all of the rights and
restrictions described in this GREAT NOTIONS End-User
License Agreement ("EULA"). You will be asked to review and
either accept or not accept the terms of the EULA. This
software will not install on your computer unless or until you
accept the terms of this EULA.
Your click of the "OK" button is a symbol of your signature that
you accept the terms of the EULA.
For your reference, you may refer to the copy of this EULA
that can be found in the Help for this SOFTWARE. You may
also receive a copy of this EULA by contacting the GREAT
NOTIONS subsidiary serving your country, or write: GREAT
NOTIONS, 2751 Electronic LN, Dallas, TX 75220.
Samples
Tips & Ideas
Basics
Introduction
IMPORTANT-READ CAREFULLY:
QuickStart
Installation
End User License Agreement
This EULA is a legal agreement between you (either an individual or a single entity) and GREAT NOTIONS Corporation for
the GREAT NOTIONS software accompanying this EULA,
which includes the accompanying computer software, and may
include associated media, printed materials and any "online" or
electronic documentation ("SOFTWARE"). By installing the
SOFTWARE, you agree to be bound by the terms of this EULA.
If you do not agree to the terms of this EULA, you may not
install or use the SOFTWARE.
SOFTWARE PRODUCT LICENSE
The SOFTWARE is protected by copyright laws and international copyright treaties, as well as other intellectual property
laws and treaties. The SOFTWARE is licensed, not sold.
1. GRANT OF LICENSE. This EULA grants you the following
rights:
Software. You may install, use, access, display, run, or otherwise interact with ("RUN") one copy of the SOFTWARE, on a
single computer, workstation, terminal, handheld PC, pager,
Limitations of Reverse Engineering, Decompilation and
Disassembly. You may not reverse engineer, decompile, or
disassemble the SOFTWARE, except and only to the
extent that such activity is permitted by applicable law
notwithstanding this limitation.
Rental. You may not rent or lease or lend the SOFTWARE.
Software Transfer. Once registration is has been completed and the software has been registered. You can not
transfer registration of SOFTWARE (including all component
parts, the media and printed materials, any upgrades, this
EULA and, if applicable, the Certificate of Authenticity), to
another person (either an individual or a single entity).
What this means is you can not sell, trade, or give away the
software to any other person. Activation codes will only be
given to registered users of this software.
Support Services. GREAT NOTIONS may provide you
with support services related to the SOFTWARE ("Support
Services"), in its discretion. Use of Support Services, if any,
is governed by the GREAT NOTIONS policies and programs
described in the user manual, in "online" documentation,
and/or other GREAT NOTIONS-provided materials. Any
Installation
Introduction
2. RESTRICTIONS.
You must maintain all copyright notices on all copies of
the SOFTWARE.
QuickStart
Accessing Services Using the SOFTWARE. Your use of
any service accessible using the SOFTWARE is not
covered by this EULA and may be governed by separate
terms of use, conditions or notices.
Basics
Reservation of Rights. All rights not expressly granted are
reserved by GREAT NOTIONS.
Tips & Ideas
"smart phone," or other digital electronic device ("COMPUTER"). The primary user of the COMPUTER on which
the SOFTWARE is installed may make a second copy for
his or her exclusive use on a portable computer.
3
Samples
Installation
Samples
Tips & Ideas
Basics
QuickStart
Introduction
Installation
4
Magnificient Monograms II
supplemental software code provided to you as a part of
Support Services shall be considered part of the SOFTWARE
and subject to the terms of this EULA. With respect to
technical information you provide to GREAT NOTIONS as part
of the Support Services, GREAT NOTIONS may use such
information for its business purposes, including for product
support and development. GREAT NOTIONS will not utilize
such technical information in a form that personally identifies
you except to the extent necessary to provide you with
support.
Replacement, Modification and Upgrade of the Software.
GREAT NOTIONS reserves the right to replace, modify or
upgrade the SOFTWARE at any time by offering you a replacement or modified version of the SOFTWARE or such
upgrade and to charge for such replacement, modification or
upgrade. Any such replacement or modified software code or
upgrade to the SOFTWARE offered to you by GREAT NOTIONS shall be considered part of the SOFTWARE and
subject to the terms of this EULA (unless this EULA is superceded by a further EULA accompanying such replacement or
modified version of or upgrade to the SOFTWARE). In the
event that GREAT NOTIONS offers a replacement or modified
version of or any upgrade to the SOFTWARE, (a) your continued use of the SOFTWARE is conditioned on your acceptance
of such replacement or modified version of or upgrade to the
SOFTWARE and any accompanying superceding EULA and
(b) in the case of the replacement or modified SOFTWARE,
your use of all prior versions of the SOFTWARE is terminated.
Storage Limitations. The amount of storage space per user
is limited. Some files may not be processed due to space
constraints. You agree that GREAT NOTIONS is not responsible or liable for the deletion or failure to process files.
3. TERMINATION. Without prejudice to any other rights,
GREAT NOTIONS may terminate this EULA if you fail to
comply with the terms and conditions of this EULA. GREAT
NOTIONS may terminate this EULA by offering you a superceding EULA for the SOFTWARE or any replacement or
5. U.S. GOVERNMENT RESTRICTED RIGHTS. All SOFTWARE provided to the U.S. Government pursuant to solicitations issued on or after December 1, 1995 is provided with the
commercial rights and restrictions described elsewhere
herein. All SOFTWARE provided to the U.S. Government
pursuant to solicitations issued prior to December 1, 1995 is
provided with RESTRICTED RIGHTS as provided for in FAR,
48 CFR 52.227-14 (JUNE 1987) or DFAR, 48 CFR 252.2277013 (OCT 1988), as applicable.
6. EXPORT RESTRICTIONS. You agree that you will not
export or re-export the SOFTWARE, any part thereof, or any
process or service that is the direct product of the SOFTWARE (the foregoing collectively referred to as the "Re-
Installation
Introduction
QuickStart
Basics
4. COPYRIGHT. All title and copyrights in and to the SOFTWARE (including but not limited to any images, photographs,
animations, video, audio, music, text and "applets," incorporated into the SOFTWARE), the accompanying printed
materials, and any copies of the SOFTWARE, are owned by
GREAT NOTIONS or its suppliers. All title and intellectual
property rights in and to the content which may be accessed
through use of the SOFTWARE is the property of the respective content owner and may be protected by applicable
copyright or other intellectual property laws and treaties. This
EULA grants you no rights to use such content. If this
SOFTWARE contains documentation which is provided only
in electronic form, you may print one copy of such electronic
documentation. You may not copy the printed materials
accompanying the SOFTWARE.
Tips & Ideas
modified version of or upgrade to the SOFTWARE and
conditioning your continued use of the SOFTWARE or such
replacement, modified or upgraded version on your acceptance of such superceding EULA. In addition, GREAT
NOTIONS may terminate this EULA by notifying you that your
continued use of the SOFTWARE is prohibited. In the event
that GREAT NOTIONS terminates this EULA, you must
immediately stop using the SOFTWARE and destroy all
copies of the SOFTWARE and all of its component parts.
5
Samples
Installation
Samples
Tips & Ideas
Basics
QuickStart
Introduction
Installation
6
Magnificient Monograms II
stricted Components"), to any country, person or entity
subject to U.S. export restrictions. You specifically agree not
to export or re-export any of the Restricted Components (i) to
any country to which the U.S. has embargoed or restricted
the export of goods or services, which currently include, but
are not necessarily limited to Cuba, Iran, Iraq, Libya, North
Korea, Sudan and Syria, or to any national of any such
country, wherever located, who intends to transmit or transport the Restricted Components back to such country; (ii) to
any person or entity who you know or have reason to know
will utilize the Restricted Components in the design, development or production of nuclear, chemical or biological weapons; or (iii) to any person or entity who has been prohibited
from participating in U.S. export transactions by any federal
agency of the U.S. government. You warrant and represent
that neither the U.S. Commerce Department, Bureau of
Export Administration nor any other U.S. federal agency has
suspended, revoked or denied your export privileges.
7. DISCLAIMER OF WARRANTIES. GREAT NOTIONS AND
ITS SUPPLIERS PROVIDE THE SOFTWARE "AS IS" AND
WITH ALL FAULTS, AND HEREBY DISCLAIM ALL OTHER
WARRANTIES AND CONDITIONS, EITHER EXPRESS,
IMPLIED OR STATUTORY, INCLUDING BUT NOT LIMITED
TO ANY (IF ANY) IMPLIED WARRANTIES OR CONDITIONS
OF MERCHANTABILITY, OF FITNESS FOR A PARTICULAR
PURPOSE, OF LACK OF VIRUSES, AND OF LACK OF
NEGLIGENCE OR LACK OF WORKMANLIKE EFFORT.
ALSO, THERE IS NO WARRANTY OR CONDITION OF
TITLE, OF QUIET ENJOYMENT, OR OF
NONINFRINGEMENT. THE ENTIRE RISK ARISING OUT OF
THE USE OR PERFORMANCE OF THE SOFTWARE IS
WITH YOU.
8. EXCLUSION OF ALL DAMAGES. TO THE MAXIMUM
EXTENT PERMITTED BY APPLICABLE LAW, IN NO EVENT
SHALL GREAT NOTIONS OR ITS SUPPLIERS BE LIABLE
FOR ANY CONSEQUENTIAL, INCIDENTAL, DIRECT, INDIRECT, SPECIAL, PUNITIVE, OR OTHER DAMAGES WHATSOEVER (INCLUDING, WITHOUT LIMITATION, DAMAGES
FOR ANY INJURY TO PERSON OR PROPERTY, DAMAGES
10. GOVERNING LAW. If you acquired the SOFTWARE in the
United States of America, the laws of the State of Texas, U.S.A
will apply to this contract. If you acquired this SOFTWARE
outside of the United States of America, then local law may
apply.
11. QUESTIONS. Should you have any questions, or if you
desire to contact GREAT NOTIONS for any reason, please
contact the GREAT NOTIONS subsidiary serving your country,
or write: GREAT NOTIONS, 2751 Electronic LN, Dallas, TX
75220.
Installation
Introduction
QuickStart
Basics
9. LIMITATION AND RELEASE OF LIABILITY. If the SOFTWARE was provided to you at no charge and GREAT NOTIONS has included in this EULA terms that disclaim all
warranties and liability for the SOFTWARE. To the full extent
allowed by law, YOU HEREBY RELEASE GREAT NOTIONS
AND ITS SUPPLIERS FROM ANY AND ALL LIABILITY ARISING FROM OR RELATED TO ALL CLAIMS CONCERNING
THE SOFTWARE OR ITS USE. If you do not wish to accept
the SOFTWARE under the terms of this EULA, do not install
the SOFTWARE. No refund will be made because the SOFTWARE was provided to you at no charge.
Tips & Ideas
FOR LOSS OF PROFITS, BUSINESS INTERRUPTION, LOSS
OF BUSINESS INFORMATION, FOR LOSS OF PRIVACY FOR
FAILURE TO MEET ANY DUTY INCLUDING OF GOOD FAITH
OR OF REASONABLE CARE, FOR NEGLIGENCE, AND FOR
ANY PECUNIARY OR OTHER LOSS WHATSOEVER) ARISING OUT OF OR IN ANY WAY RELATED TO THE USE OF OR
INABILITY TO USE THE SOFTWARE, WHETHER BASED ON
CONTRACT, TORT, NEGLIGENCE, STRICT LIABILITY OR
OTHERWISE, EVEN IF GREAT NOTIONS OR ANY SUPPLIER
HAS BEEN ADVISED OF THE POSSIBILITY OF SUCH
DAMAGES. THIS EXCLUSION OF DAMAGES SHALL BE
EFFECTIVE EVEN IF ANY REMEDY FAILS OF ITS ESSENTIAL PURPOSE.
7
Samples
Installation
8
Magnificient Monograms II
Samples
Tips & Ideas
Basics
QuickStart
Introduction
Installation
Computer Requirements
Minimum Requirements:
Pentium III Processor or higher
Windows® 2000 or higher
128 MB RAM
220 MB available hard drive space
CD-ROM drive
800 x 600 video display
Mouse
Installation
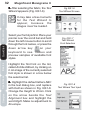
1. Begin installation on the
Windows Desktop. Close all
open programs.
Fig. Install-2
Welcome to InstallShield
Fig. Install-3
License Agreement
You may also press the Browse button and click on
the CD-ROM drive. Locate and click on the file
named setup.exe. Once highlighted, press Open.
This will copy the file name to the command prompt.
Press Return or Enter.
Basics
3. Read the entire license
agreement. If you agree to its
terms, click Next.
QuickStart
If installation does not begin,
From the Windows desktop, click
on the Start button. Click on the
Run button. At the Run prompt,
type the letter of your CD-ROM
Drive followed by Setup. (Ex:
D:\SETUP or E:\SETUP)
Tips & Ideas
2. Place the Magnificient
Monograms II CD in the CD-ROM
drive. An autorun routine will begin
the installation process.
Introduction
Installation
Fig. Install-1
Preparing to Install
Samples
Software Installation
9
Samples
Tips & Ideas
Basics
QuickStart
Introduction
Installation
10 Magnificient Monograms II
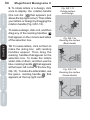
4. Enter requested
information, including the
serial number found on your
CD case (Fig. Install-4).
Click Next.
5. The next screen
determines where the
program is placed on your
computer, or its Destination
Folder. For normal
installation Click Next (Fig.
Install-5)
6. In the Ready screen, you
can click on Install to
proceed, or Back to change
settings in the previous
screens Fig. Install-6).
7. During installation, a
progress screen displays the
progress of the file copying
(Fig. Install-6).
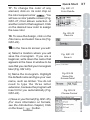
7. When installation is
complete, click Finish to exit
the installation wizard
(Fig.Install-7).
Fig. Install-4
User Information
Fig. Install-5
Destination Folder
Fig. Install-6
Installation Progress
Fig. Install-7
Installation Complete
Installation
11
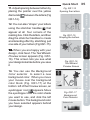
To start the program:
QuickStart
1. Go to Start and click on
Programs.
2. Click on Great Notions.
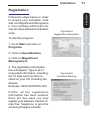
5.After all the registration
information has been entered,
there are five ways you may
register your software: Internet, Email, Fax, Telephone, or go to the
Amazing Designs website.
Fig.Install-9
Activation Warning
Tips & Ideas
Basics
3. Click on Magnificent
Monograms II.
4. The registration information
box will appear. Type in all of
requested information, including
the 15 digit serial number located on your CD, including the
dashes.
Example: 0000-00000000-000
Introduction
Fig.Install-8
Registration Information
Samples
Follow the steps below in order
to acquire your activation code
and run Magnificent Monograms
II. Your software will function for
only ten days without an activation
code.
Installation
Registration
Warning:
Once registration is complete, you cannot
transfer registration to another person. This
means you cannot sell, trade or give away the
software to any other person. Activation
codes will only be given to registered users of
the software.
1. Internet Registration
If your program is on a computer without internet
access:
A. Connect to the internet and go to
www.amazingdesigns.com
B. Click on Activation Codes in the top bar of the
Amazing Designs Home Page.
Tips & Ideas
C. At the bottom of the next page, click on “Click here
to go to the Activation Code Screen”. This will take
you to a dialog asking for the serial number of the
software program.
D. Type in the 15 digit serial number and click on
Submit.
Samples
Basics
QuickStart
Introduction
Installation
12 Magnificient Monograms II
F. Click on Submit.
E. Type in all the information exactly as it appears in
your software, including registration number.
G. Write down your activation code now.
4. Telephone Registration
Call 800-553-1691 and receive an activation
code from an Amazing Designs Technician.
Telephone support personnel are
available Monday through Friday, 8 a.m. to
9 p.m. Central Time. If you reach our voice
mail system, please leave your name,
telephone number and best time to call.
5. Website Registration:
1. Fill out registration form including the 15 digit
serial number
found on your CD, including the dashes.
Example: 0000-00000000-000.
2. Click on Website Registration and the Activation Code appears in the Activation Code
field, instantly.
Installation
Introduction
3. Fax Registration
Click on the Print Registration button and
fax the completed form to 214-352-7249.
QuickStart
2. E-mail Registration
E-mail registration information to
[email protected].
Basics
I. Click on Register Now.
Tips & Ideas
H. Run software and type the
activation code in the Activation Code
field.
13
Samples
Installation
Samples
Tips & Ideas
Basics
QuickStart
Introduction
Installation
14 Magnificient Monograms II
When you click on the Register Later button you
will see a warning box as shown in Fig. Magnificent
Monograms II will work for 10 days without
registering. After that time has expired, Magnificient
Monograms II will no longer function.
With a registered copy of Magnificent Monograms
II, you are licensed for two personal computers.
Installation must be completed for each computer,
and each computer will have a separate registration
number.
Software Transfer. Once registration has been
completed and the software registered, you cannot
transfer registration of SOFTWARE to another person
(either an individual or a single entity). This means
you cannot sell, trade, or give the software to any other
person. Activation codes will only be given to
registered users of this software.
Installation
15
Introduction
QuickStart
Basics
Fig.Install-10
Run Program
Tips & Ideas
After clicking OK on the Registration screen,
Magnificient Monograms II will appear on your
screen as shown in Fig.Install-10. Your
Magnificent Monograms II software is properly
installed and is ready to use.
Samples
To start the program:
1. Go to Start.
2. Click on Programs.
3. Click on Great Notions.
4. Click on Magnificent Monograms II.
Installation
Follow the steps below to run your Magnificent
Monograms II software.
Samples
Tips & Ideas
Basics
QuickStart
Introduction
Installation
16 Magnificient Monograms II
17
•
The program’s compatibility with
machines and software
•
An explanation of the Monogram and
Text modules of the program
•
An explanation of Menus and Icons
QuickStart
Basics
Overview of the program including:
Tips & Ideas
○ ○ ○ ○ ○ ○ ○ ○ ○ ○ ○ ○ ○ ○ ○ ○ ○ ○ ○ ○ ○ ○ ○ ○ ○ ○ ○ ○ ○
Samples
Introduction
Introduction
Installation
Introduction
18
Magnificent Monograms II
Magnificent Monograms is a Wizard-based program
designed to quickly create beautiful, artistic monograms that
can be embroidered on almost any embroidery machine. The
mix-and-match style of the program allows endless
combinations of lettering styles and accent designs.
Both the Monogram and the Text Wizards allow the user to
designate the type of fabric on which the monogram will be
applied. The Wizard uses this information to determine the
appropriate stitch spacing, amount of underlay stitching and
other parameters for creating the best monogram possible
for that fabric.
Tips & Ideas
The accent designs are programmed to scale in proportion
to the selected letter size. A default letter size will appear for
each style. The letters can be made larger or smaller than
the default size.
Plain font styles have a default size of 20 millimeters. This is
about three-quarters of an inch (a millimeter conversion chart
is located in the Tips and Ideas section). Certain fancy
monogram styles with extensive decorations have a larger
size as their default, because they can’t be reliably stitched
in very small sizes.
Samples
Basics
QuickStart
Introduction
Installation
Program Overview
The Monogram Wizard is used only for one, two or three letter
monograms. The Text Wizard may be used for names as well
as monograms. Each Wizard contains accent designs and
embellishments that are unique to that module.
In either Wizard, the text and the embellishment may be
resized independently. The default scale of the embellishment
to the letters was used to have a pleasing scale, however this
can be infinitely changed by the user.
In either Wizard, the letter spacing can be controlled. Because
letters can look optically incorrect even though the spacing is
numerically correct, you can “tweak” your monogram until you
are pleased with its appearance.
Introduction
In the Monogram Wizard, the letters are always centered with
the embellishment. In the Text Wizard, the user has a choice
of where to place the letters in relation to the embellishment.
In the Text Wizard, any available embellishment can be used
with any font.
Installation
19
QuickStart
Introduction
indicates a piece of useful information that could sshould
not be overlooked.
Tips & Ideas
closely and follow and relevant instructions.
Samples
indicates a very important warning. Read this warning
Basics
Icons Used in this Manual
20
Magnificent Monograms II
Samples
Tips & Ideas
Basics
QuickStart
Introduction
Installation
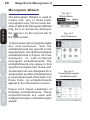
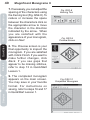
Monogram Wizard
The Monogram Wizard is used to
create one, two or three letter
monograms only. On the menu bar,
click on Wizards, Monogram Wizard
(Fig. Int-1) or, access by clicking on
the
icon on the top tool bar of
the main screen.
In some cases, the monogram styles
are self-contained, and the
embellishments are specific to the
selected style. The diamond-shaped
embellishments in Figure Int-2 are
examples of self-contained
monogram embellishments. The
embellishments are unique to that
specific monogram font. Some selfcontained fonts are designed for a
single initial, and the embellishment
is a permanent part of the letter. For
these fonts, no embellishments
appear in the Decorations screen.
Figure Int-3 shows examples of
freestyle embellishments. These
embellishments are used with
multiple font styles in the Monogram
wizard.
Fig. Int-1
Wizard Menu
Fig. Int-2
Self-Contained
Fig. Int-3
Freestyle Monogram
Embellishments
Introduction
21
Lettering can be placed above,
below, or to the right or left of any
design. Designs and lettering
can be resized and moved.
Certain decorative fonts are
intended for single initial use.
Introduction
QuickStart
Basics
This screen contains a font list
and a selections screen of
designs (Fig. Int-5). The program
does not require you to select a
motif to accompany your lettering
- you can create your text with or
without a design. Lettering is
limited to one line only.
Fig. Int-5
Text Wizard
Tips & Ideas
The Text Wizard contains many
more embellishments than the
Monogram Wizard. The Text
Wizard can be accessed from
the drop-down Wizards menu
(Fig. Int-4), or by clicking on the
icon on the top tool bar on
the main screen.
Samples
The Text Wizard is used to create
monograms that contain names,
which may be more than three
letters, and may include upper
and lower case characters.
Fig. Int-4
Wizard Menu
Installation
Text Wizard
22
Magnificent Monograms II
Samples
Tips & Ideas
Basics
QuickStart
Introduction
Installation
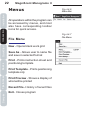
Menus
Fig. Int-6
Menu Bar
All operations within the program can
be accessed by menus, and most
also have corresponding toolbar
icons for quick access.
File Menu
New - Opens blank work grid
Save As - Allows user to name file
and save in selected format
Print - Prints instruction sheet and
positioning template
Print Template - Prints positioning
template only
Print Preview - Shows a display of
what will be printed
Recent File - History of recent files
Exit - Closes program
Fig. Int-7
File Menu
Introduction
23
Realistic View
A three-dimensional view will be
activated by clicking on the word
Realistic from the View menu. When
Realistic view is active, a check
appears to the left of the word
Realistic.
Introduction
QuickStart
Basics
Tips & Ideas
Zoom
The selection of Zoom and In
enlarges the on-screen image of the
monogram, while the monogram
size remains the same. The
selection of Zoom and Out reduces
the size of the on-screen image,
allowing for larger hoop sizes to be
displayed completely. Selection of
Zoom and Actual displays the
monogram in the size that it will
stitch. The magnifying glass icons
allow zoom in and out functions by
clicking on them directly from the
toolbar.
Fig. Int-8
View Menu
Samples
The View menu allows the user to
change the viewing scale and detail
of the monogram on the screen.
Installation
View Menu
24
Magnificent Monograms II
QuickStart
Introduction
Installation
Options Menu
Hoop Size
The user may select from most
popular hoop sizes for home
embroidery machines by
clicking on the word Hoop from
the Options menu, or by clicking
on the
icon from the toolbar.
Fig. Int-9
Options Menu
Fig. Int-10
Hoop Selection
If your hoop size is not listed, you
may create a custom hoop by
typing in the height and width,
and selecting the hoop shape.
Samples
Tips & Ideas
Basics
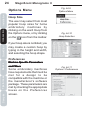
Preferences
Machine-Specific Parameters
and Filters
Some embroidery machines
have requirements that must be
met for a design to be
compatible with the machine or
the manufacturer’s software
package. These parameters are
met by checking the appropriate
boxes on the Preferences
screen.
Fig. Int-11
Options - Preferences
Introduction
Users of certain Janome models
should check “Print Janome
Crosshairs” to print offset crosshair
on positioning templates printed
from the program.
Installation
Introduction
Basics
Users of Janome or any related
machines should place a check in
the box beside the generation of
software that they use, if shown.
QuickStart
Janome/New Home/Elna/Kenmore
Fig. Int-13
Janome/New Home/Elna
Preferences
Fig. Int-14
Pfaff Preferences
For Pfaff PCS
Check the box “Split at 16 Colors”
for compatibility with Pfaff
embroidery models that predate
the 2140.
Singer XL5000/6000 users can check “Save EMD
files as Singer” in the Janome preferences box. When
left unchecked, the program will save as Elna EMD
files.
Tips & Ideas
This box must be checked for
designs that will be stitched on the
Viking #1 Plus or Rose models
when used with certain generations
of software. Early software for
these machines cannot hold more
than twelve color commands for a
single design. The software divides
the design into multiple files to
accommodate this requirement.
Fig. Int-12
Viking Preferences
Samples
Viking 1 Plus and Rose
25
26
Magnificent Monograms II
Basics
QuickStart
Introduction
Installation
Default “Save As” format
The default save format should be
set to the embroidery format that
you use most often. The formats
are listed according to the machine
with which they are associated.
Fig. Int-15
Default Format Selection
To select a default format, click on
the small arrowhead to view the
drop down list. Highlight the
machine that you use most
frequently, and release the mouse
button while highlighted. This will
be the format that is automatically
placed in the “Save as type” dialog
box each time you save a
monogram created in the program.
However, you always have the
option to save in any of the
supported formats.
Samples
Tips & Ideas
Custom Palettes
You may colorize your monogams
according to the color palette for
your specific machine brand. For
example, in Options, Preferences,
when you select Scan-n-Sew PCv1
you will get a different color palette
than if you select Dream Vision/
Customizer 2000.
Click on any color chip in the color
sequence bar at the lower left side
of your screen to bring up the
Fig. Int-16
Select Color
Introduction
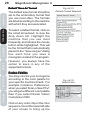
You may also change the stitch
length viewing threshold in the
Preview screen of either the
Monogram Wizard or the Text
Wizard when gaps begin to appear.
More on this in the Fill Function
lesson in the Basics chapter.
If you choose to correct the gaps using the “Change
to Fill” function, both the letters and the decoration
will be changed to fill in the Monogram Wizard.
However, in the Text Wizard, only the letters are
affected.
Introduction
QuickStart
Basics
The Realistic View Control is set to a
default stitch length of 10mm, just
under 1/2”. This is the longest stitch
length that the software will display.
Stitches that are longer will be omitted
from the display even though they exist
in the design file. This alerts you to the
fact that the stitches are too long to be
serviceable. In some cases the
monogram must be made smaller to
reduce the length of the stitches. In
other cases, you can recreate the
monogram, selecting the “Change to
Fill” option on the Text screen in the
wizard.
Tips & Ideas
Realistic View Control
Installation
Fig. Int-17
Realistic View Control
Samples
Select Color screen. Click down on
the arrow in the Palette Type box to
select your palette.
27
28
Magnificent Monograms II
Samples
Tips & Ideas
Basics
QuickStart
Introduction
Installation
Compatibility
The monograms created in Magnificent Monograms II
can be saved in most popular home embroidery machine
formats. The “Save” formats include:
•
.pcs - Pfaff
•
.pcm - Pfaff Macintosh
•
.pes - Baby Lock, Brother, Bernina Deco,
Simplicity
•
.xxx - Singer
•
.hus - Viking
•
.shv - Viking
•
. vip - Viking/Pfaff
•
.csd - Huskygram, POEM and Singer
Embroidery Unlimited
•
.sew - Elna, Janome, Kenmore, New Home
•
.emd - Elna or Singer
•
.jef - Janome
•
.dst - Tajima
•
.exp - DOS expanded
29
Create a Text Monogram
•
Create a Self-Contained Monogram
•
Create a Freestyle Monogram
QuickStart
Basics
•
Tips & Ideas
This section covers:
Samples
Quick Start
○ ○ ○ ○ ○ ○ ○ ○ ○ ○ ○ ○ ○ ○ ○ ○ ○ ○ ○ ○ ○ ○ ○ ○ ○ ○ ○ ○ ○
Introduction
Installation
Quick Start
30
Magnificent Monograms II
Samples
Tips & Ideas
Basics
QuickStart
Introduction
Installation
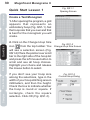
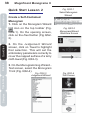
Quick Start Lesson 1
Fig. QS1-1
Opening Screen
Create a Text Monogram
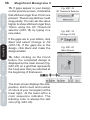
1. After opening the program, a grid
appears that represents an
embroidery hoop (Fig. QS1-1). Set
the hoop size that you own and that
is best for the monogram you will
create.
2. Click on the Change Hoop Size
Fig. QS1-2
icon
from the top toolbar. You Change Hoop Size Screen
will see a selection screen (Fig.
QS1-2) Place the pointer over scroll
bar to the right side of the hoop list
and press the left mouse button to
scroll and see all hoop choices.
Highlight your choice and release
the mouse button to select.
If you don’t see your hoop size
among the selections, type in the
width of your hoop stitching area in
millimeters, and then the height.
Check the box to indicate whether
the hoop is round or square. If
rectangle, check the square
selection. Click OK (Fig. QS1-3).
Fig. QS1-3
Custom Hoop Dialog
Fig. QS1-5b
Judgement Wizard
Screen Detail
Installation
Introduction
QuickStart
Fig. QS1-5a
Judgement Wizard
Screen
Basics
4. The next screen that appears is
the Judgement Wizard (Fig QS1-5a
and b). In this screen you will select
your monogram’s properties,
including the amount and type of
understitching, the density (distance
between the stitches) and other
parameters that are calculated
automatically based upon the type
of fabric that you select in the
Wizard. Make the selection that
most closely matches the properties
of the fabric to which you will apply
your monogram and then click Next.
(In the following example, the default
style, NORMAL, has been selected.)
Fig. QS1-4
Text Wizard
Welcome Screen
Tips & Ideas
3. After setting your hoop size, click
on the top toolbar to open
on the
the Text Wizard. The next screen is
the opening screen of the Text
Wizard (Fig. QS1-4). There are no
choices to make here - just click on
the word Next.
31
Samples
Quick Start
32
Magnificent Monograms II
Samples
Tips & Ideas
Basics
QuickStart
Introduction
Installation
5. After selecting the fabric, the Text
Wizard appears (Fig. QS1-6)
Fig.QS1-6
Text Wizard Screen
It may take a few moments
for the Text Wizard to
appear, because the
images must be loaded.
Select your font style first. Place your
pointer over the scroll bar and hold
down the left mouse button to scroll
through the font names, or press the
down arrow key
Fig. QS1-7
Text Wizard
Font Selection
on your
keyboard to see names and
preview samples of available font
styles.
Highlight the first font on the list,
called Architect Block, by clicking on
it. An image of the currently selected
font style is shown in a box below
the selection list.
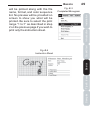
6. Highlight the default letters ABC
in the text dialog box, and replace
with Kelli as shown in Fig. QS1-8.
Change the Height to 30mm. Click
on the arrow beside the Text
Alignment box and highlight the
word Right. Make no adjustment to
Envelope.
Fig. QS1-8
Text Wizard Text Input
Introduction
drag and drop them where you wish
(Fig QS1-11a and QS1-11b).
Fig. QS1-11a
Move Letters
QuickStart
Basics
Fig. QS1-10
Text Wizard
Compose Screen
Fig. QS1-11b
Move Design
Tips & Ideas
8. The Text Wizard Compose screen
appears with the text to the right of the
design as designated (Fig. QS1-10).
You can both move and resize your
letters or design by clicking on them,
and then dragging the “handles” that
appear. To move your letters or
design, click on them, and when you
see the cursor change to a crosshair
hold the left mouse button and to
Fig. QS1-9
Text Wizard
Design Selections
Samples
7. Place your pointer over the scroll
bar at the right side of the Text
Wizard screen. Press and hold your
left mouse button over the scroll bar
as you roll the mouse to scroll
through the design selections. The
designs are in alphabetical order by
prefix. Select the Children’s design,
jumping frog CH19349 by clicking
on it (Fig. QS1-9). Click the Next
button.
33
Installation
Quick Start
9. To rotate letters or a design, click
once to display the rotation handle
(the red dot
that appears just
above the top right corner). Then rotate
your letters or design by dragging the
rotation handle (Fig. QS1-12).
To resize a design, click on it, and then
drag any of the resizing handles
that appear on the corners and sides
of the selection box.
Samples
Tips & Ideas
Basics
QuickStart
Installation
Magnificent Monograms II
Introduction
34
10. To resize letters, click on them to
make the sizing box with resizing
handles appear. Then drag the
resizing handles that appear on the
selection box. To make the letters
wider, click on them, and then use the
blue resizing handle that appears
at the lower left corner of the box Fig.
QS-13). To make the letters taller, use
the green resizing handle
that
appears at the top right corner.
Fig. QS1-12
Rotate Letters
and Design
Fig. QS-13a
Resizing the Letters
Blue Handle
Fig. QS-13b
Resizing the Letters
Green Handle
Quick Start
14. You can use the Background
Color selector to select a new
background color. When you move
your mouse over the background
color block (Fig. QS1-17) at the
bottom left of the Preview screen, an
eyedropper icon
appears. Move
the eyedropper over the color shade
you want to use, and click the left
mouse button. The background color
you have selected appears behind
your design.
Installation
Introduction
QuickStart
Fig. QS1-16
Text Wizard
Preview Screen
Basics
13. When you are happy with your
design, click Next. The Text WizardPreview screen appears (Fig. QS116). This screen lets you see what
your design looks like before you save
it.
Fig. QS1-15
Shaping the Letters
Tips & Ideas
12. You can also “shape” your letters
using the stretcher handles
that
appear at all four corners of the
resizing box. Click the letters, and then
drag the stretcher handles to create
an interesting effect by stretching just
one side of your letters (Fig QS1-15).
Fig. QS1-14
Spacing the Letters
Fig. QS1-17
Background
Color Selector
Samples
11. Adjust spacing between letters by
placing the pointer over the yellow
between the letters (Fig
diamonds
QS1-14).
35
Samples
Tips & Ideas
Basics
QuickStart
Introduction
Installation
36
Magnificent Monograms II
15. If gaps appear in your design
on the preview screen, it indicates
that stitches longer than 10mm are
present. These long stitches could
snag easily. You can set the value
higher to show stitches longer than
10mm using the 3D Threshold
selector (QS1-18) by typing in a
new value.
If the gaps are in your letters, click
Back and select Change to Fill
(QS1-19). If the gaps are in the
design, click Back and make the
design smaller.
16. After clicking on the Finish
button, the completed design is
displayed on the main screen (Fig.
QS1-20) on a grid that represents
the hoop size that you selected at
the beginning of this lesson.
The main screen displays the size,
position, stitch count and number
of colors of your monogram at the
lower right. At the lower left is a
color sequence indicator. The
lettering color is always the last
color (Fig. QS1-20).
Fig. QS1-18
3D Threshold Selector
Fig. QS1-19
Change To Fill
Fig. QS1-20
Main Screen
Quick Start
b) Name the monogram. Highlight
the default name and type your own
name, such as Amber. You do not
need to type the three letter
extension, because the program will
insert it for you automatically (Fig.
QS1-24).
c) Save in your format (Fig. QS1-25).
(For more information on formats,
see the Introduction chapter.) Click
on the Save
button.
Fig. QS1-23
Save In
Basics
a) Select a location where you will
save the monogram. If you are a
beginner, write down the name that
appears in the Save In window to be
sure that you can find your monogram
later (Fig. QS1-23).
Introduction
Installation
19. In the Save As screen you will:
QuickStart
Fig. QS-22
Save As
Fig. QS-24
Name File
Screen Detail
Fig. QS-25
Choose Format
Tips & Ideas
18. To save the design, click on the
File menu, and select Save As (Fig.
QS1-22).
Fig. QS1-21
Color Palette
Samples
17. To change the color of any
element, click on its color chip on
. You
the color sequence bar
will see a color palette screen (Fig.
QS1-21) that allows selection of
another color for that segment. Click
on the desired new color to assign
the new color.
37
38
Magnificent Monograms II
Samples
Tips & Ideas
Basics
QuickStart
Introduction
Installation
Quick Start Lesson 2
Create a Self-Contained
Monogram
1. Click on the Monogram Wizard
icon on the top toolbar (Fig.
QS2-1). On the opening screen,
click on the Next button (Fig QS22).
Fig. QS2-1
Select Monogram
Wizard
Fig. QS2-2
Monogram Wizard
Welcome Screen
2. On the Judgement Wizard
screen, click on Towel to highlight
that selection. This will set the
embroidery parameters correctly to
cover the napped surface of a terry
cloth towel (Fig. QS2-3).
3. On the Monogramming Wizard Text screen, select the Monogram
1 font (Fig. QS2-4). Fig. QS2-3
Judgement Wizard
Fig. QS2-4
Text Screen
Quick Start
Installation
Introduction
QuickStart
Fig. QS2-7a
Compose Screen
Basics
6. In the Compose screen, the
monogram itself appears larger than
the work grid. The grid relates to the
size of the hoop that was on the
opening screen. Click on the Select
tool, and then on the monogram to
get a selection box with stretcher
handles to resize the monogram to fit
inside the work grid (Fig. QS2-7a).
You will also need to click on the Zoom
Out tool to see the circular stretcher
handles. Click and drag the
monogram to fit inside your work area.
Fig. QS2-6
Choose Decoration
Fig. QS2-7b
Compose Screen
Tips & Ideas
5. Click on the Decoration labeled d1
(Fig. QS2-6). The decorations
displayed with the first twenty-six font
choices are uniquely associated with
that font. In this font, the decorations
are intended to be used with the
number of letters shown in the
examples. After selecting the
decoration, click on the Next button.
Fig. QS2-5
Text Dialog
Samples
4. Let’s do a monogram for Mary
Alice Smith. In this style of
monogram, the last name initial
appears large and in the center.
Type in MSA so that the last initial S
will appear in the center. Click on the
default letter height and type 50 (Fig.
QS2-5).
39
Samples
Tips & Ideas
Basics
QuickStart
Introduction
Installation
40
Magnificent Monograms II
7. If necessary, you can adjust the
spacing of the characters using
the Kerning tool (Fig. QS2-8). To
reduce or increase the space
between the characters click on
the appropriate arrow to move
the character in the direction
indicated by the arrow. When
you are satisfied with the
appearance of your monogram,
click on Next.
Fig. QS2-8
Kerning Tool
Fig. QS2-9
Preview Screen
8. The Preview screen is your
final opportunity to inspect the
monogram. If you are satisfied
with it click Finish. If you want to
make further changes, click
Back. If you see gaps that
appear to be missing stitches,
refer to step 13 in QuickStart
Lesson 1.
9. The completed monogram
appears on the main screen.
You may save in your favorite
format. For instructions on
saving, refer to steps 16 and 17
in QuickStart Lesson 1.
Fig. QS2-10
Completed Monogram
Quick Start
Installation
Fig. QS3-1
Change Hoop Size Screen
Create a Freestyle
Monogram
1. Click on the Change Hoop
Fig. QS3-2
Judgement Screen
QuickStart
Size icon
from the top
toolbar on the main screen. On
the hoop selection dialog (Fig
QS3-1) scroll and see all
choices. Select 130mm x
180mm by clicking on it. Click
OK to close the dialog and set
new hoop size on the main
screen.
Introduction
Quick Start Lesson 3
41
4. Select the font Simple Script
by scrolling down the font
selection box (Fig. QS3-3).
Tips & Ideas
3. On the Judgement Wizard
screen (Fig. QS3-2), click on
Satin to highlight that selection.
This will set the embroidery
parameters such as density and
underlay to correctly embroider
on satin fabric. Click Next.
Fig. QS3-3
Judgement Screen
Samples
Wizard
icon on the top
toolbar. On the Monogram
Wizard Welcome screen, click
the Next button.
Basics
2. Click on the Monogram
Samples
Tips & Ideas
Basics
QuickStart
Introduction
Installation
42
Magnificent Monograms II
5. In the Text input area,
highlight the default Height 20.0
and type in 40.0 (QS3-4). Leave
the letters ABC.
Fig. QS3-4
Monogram Wizard
Text Input
6. In the Decorations box, select
the decoration MON13151,
which is a bow (Fig. QS3-6).
7. When the decoration is
automatically scaled for 40mm
letters, the decoration does not
fit inside the selected hoop. Click
on the bow and a selection box
will appear. Use the sizing
handles on the four corners to
resize the bow. Use the Move
tool to place the resized bow
around the monogram. Click on
Next to see the Preview of the
newly created monogram.
Fig. QS3-6
Choose Decoration
Fig. QS3-7
Compose Screen
Because
of
the
difference in the width of
font characters, some
letters may not fit inside
the selected decoration.
You may resize either
the decoration or the
letters by clicking on it
and using the sizing
handles
on
the
selection box.
Quick Start
Installation
Introduction
QuickStart
Basics
Fig. QS3-9
Completed Monogram
Tips & Ideas
9. The monogram is sent to the
main screen to be saved for
stitching. You can also recolor
your monogram in the final main
screen by clicking on the color
chips in the color sequence bar
at the lower left portion of your
screen.
Fig. QS3-8
Preview Screen
Samples
8. The monogram is displayed
in the Preview screen for your
approval. If you want to make
adjustments, click on the Back
button. If you approve of the
monogram, click on Finish.
43
Samples
Tips & Ideas
Basics
QuickStart
Introduction
Installation
44
Magnificent Monograms II
45
Adjusting Text Placement
•
Printing a Template
•
Setting Text Kerning
•
Using the Fill Function
•
Changing the Background Color
•
Tools and Settings
QuickStart
Basics
•
Tips & Ideas
This section covers:
Samples
Basics
○ ○ ○ ○ ○ ○ ○ ○ ○ ○ ○ ○ ○ ○ ○ ○ ○ ○ ○ ○ ○ ○ ○ ○ ○ ○ ○ ○ ○
Introduction
Installation
Basics
46
Magnificent Monograms II
Installation
Main Tool Bar
1
2 3
4
5
6
7
8
9
1. File New - Provides fesh blank hoop grid
QuickStart
Introduction
2. Save As - Allows naming and savng of file on the grid
3. Print - Prints Instruction Sheet and Template
4. Print Template - Prints placement template only
5. Change Hoop Size - Allows user to select or define a
specific hoop size for the creation area.
6. Monogram Wizard - Launches the Monogram Wizard
Samples
Tips & Ideas
Basics
7. Text Wizard - Launches the Text Wizard
8. Zoom In - Enlarges the viewing scale
9. Zoom Out - Reduces the viewing scale
47
Basics
1. Zoom In - Enlarges the viewing scale. Zooms from center.
Use in cojunction with the Pan tool (4) to see any area of
monogram in an enlarged view.
2. Zoom Out - Reduces the viewing scale. When using a
large hoop size and a large monogram, it may be necessary
to zoom out to gain access to the handles of a selection box.
3. Zoom To Fit - Returns the screen zoom to normal.
4. Pan - Allows the workgrid in the Compose screen to be
moved. When in the Zoom In mode, it is helpful to move the
workgrid to view different sections of the monogram or
decoration.
5. Select - When this tool is active, you may click on a
selection and a selection box will appear around the object.
Introduction
5
QuickStart
4
Basics
3
Tips & Ideas
2
Samples
1
Installation
Wizard Tool Bar
48
Magnificent Monograms II
Samples
Tips & Ideas
Basics
QuickStart
Introduction
Installation
Print Instruction Sheet
1. Click on File, Print Setup
before you print for the first
time.To conserve your color ink,
select Print Setup from the File
menu (Fig. B-1a) and choose
Grayscale/Black or Black and
White(Fig. B-1b). These settings
differ among printer models.
Check your printer manual for
details.
2. Click on File, Print Preview
(Fig. B-2a) to confirm what will
be printed. Click on the Two
Page
button and you will
see a preview of both pages that
will be printed. The first page is
the instruction sheet, and the
second page is a placement
template. If you just need an
instruction sheet, you can just
print this page. To print only the
first page, change the Print
Range in the print dialog box to
read “from: 1 to: 1” (Fig. B-2b).
3. You may also click on File
Print or click on the Print icon
from the top tool bar. The image
Fig. B-1a
Print Setup
Fig. B-1b
Printer Settings
Fig. B-2a
Print Preview
Fig. B-2b
Print Range
Basics
Installation
Introduction
QuickStart
Basics
Tips & Ideas
Fig. B-4
Instruction Sheet
Fig. B-3
Completed Monogram
Samples
will be printed along with the file
name, format, and color sequence
list. No preview will be provided on
screen to show you what will be
printed. Be sure to select the print
range “1 to:1” as described in step
2 on the previous page if you wish to
print only the instruction sheet.
49
50
Magnificent Monograms II
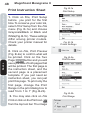
Fig. B-5
File, Print Template
You can print a placement template
from Magnificent Monograms II. A
template is different from an
instruction sheet because it doesn’t
include any color sequence
information. It is for placement only.
1. Click on File, Print Template (Fig.
B-5) or the Print Template icon
from the top tool bar.
2. After printing, place the
intersection of the dotted lines under
your needle to center the design with
most machines (Fig. B-6).
Fig. B-6
Template
Samples
Tips & Ideas
Basics
QuickStart
Introduction
Installation
Print Template
Owners of certain Janome, Elna, and Kenmore
machines should place a check beside “Print Janome
Crosshairs” in the Options, Preferences screen.
When working with a large hoop size, you may select
“Landscape” in your printer settings to print the
template sideways. You may also select a larger
paper size to accommodate very large hoops.
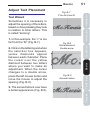
2. Click on the lettering and when
the selection box appears,
yellow diamonds appear
between each character. Place
the cursor over the yellow
diamond between two letters
where you want to make an
adjustment. When the cursor
changes to a double arrow,
press the left mouse button and
move the mouse to adjust the
spacing (Fig. B-8).
3. The kerned letters now have
a better appearance (Fig. B-9).
Installation
Introduction
Fig. B-8
Yellow diamond
Double arrow
Basics
1. In this example, the “c” is too
far from the “M” (Fig. B-7).
Fig. B-9
Kerned Letters
Tips & Ideas
Text Wizard
Sometimes it is necessary to
adjust the spacing of the letters,
based on how pleasing they look
in relation to other letters. This
is called “kerning”.
Fig. B-7
C too far from M
Samples
Adjust Text Placement
51
QuickStart
Basics
52
Magnificent Monograms II
Samples
Tips & Ideas
Basics
QuickStart
Introduction
Installation
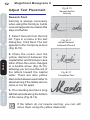
Adjust Text Placement
Fig. B-10
Swoosh before
Kerning
Swoosh Font
Kerning is always necessary
when using this font style, but its
unusual appearance makes this
step worthwhile.
1. Select Swoosh from the font
list. Type in a name in the text
dialog box. Click Next. The text
appears in the Compose screen
(Fig. B-10).
2. Place the cursor over the
yellow diamond between the
capital letter and first lower case
letter. When the cursor changes
to a double arrow (Fig. B-10),
allowing you to move the rest of
the letters toward the capital
letter. There are also yellow
diamonds between each letter to
allow kerning if the letters are too
close or too far apart.
Fig. B-11
Move Diamond
between M and A
Fig. B-12
Completed Text
3. The resulting text has a long
tail that extends along the bottom
of the name (Fig. B-12).
If the letters do not require kerning, you can still
move them using the yellow diamonds.
Basics
Monogram Wizard
1. In the Monogram Wizard, select
the Elegant Script font. Type the size
30, and the letters ABC in the text
input box. Click Next.
QuickStart
Fig. B-14b
Add space
between B and C
4. Continue until the letters are an
appropriate distance from each
other (Fig. B-15)
Fig. B-15
Completed Monogram
Basics
3. Click several times on the right
arrow between the A and the B in
the Kerning box Fig. B-14a). Then
click several times on the right arrow
between the B and the C (Fig. B14b).
Fig. B-14a
Add space
between A and B
Tips & Ideas
2. The monogram appears in the
Compose screen with the letters
crowded and too close together Fig.
B13).
Introduction
Installation
Fig. B-13
Letters Crowded
Samples
Adjust Text Placement
53
54
Magnificent Monograms II
Samples
Tips & Ideas
Basics
QuickStart
Introduction
Installation
Using Envelopes
Fig. B-16
Envelope Choices
Text Wizard
In the Text input screen of the
Text Wizard, you can select preshaped envelopes to create
special effects for your lettering
(Fig B-16).
1. Type in the lettering
ENVELOPE in Crisp Block
2. Select the envelope
Concave. The lettering will
appear as shown in Fig. B-17
3. Repeat with other envelopes to
see their effect on the letters. The
effects can be exaggerated using
the different stretcher handles.
The Red dot in the top right
corner rotates the design.
The Green dot in the top left
corner changes the height and
width
of
the
design
proportionally.
The Blue dot in the bottom right
corner changes the width of the
design. The black square
handles affect the shape of the
envelope.
Fig. B-17
Concave Effect
Basics
55
Pull Comp - This percentage value controls the pull
compensation that adds width to letters and shapes to
compensate for the pull of the stitches on the fabric. To see
bolder columns in your letters, use a larger number. It is helpful
to add pull compensation to small lettering or to thin letter
styles.
Underlay - Check this box if you want to add underlay stitches
to your lettering. This is helpful when applying your monogram
to heavily textured or napped fabrics.
Introduction
QuickStart
Basics
Density - The default value
is .4, which represents the
distance of four points, or
four-tenths of a millimeter,
between stitches. To spread the stitches farther apart, use a
larger number. To place the stitches closer together, use a
smaller number. It is helpful to use a lighter density (larger
number) on very small letters and heavier density (smaller
number) on very large letters.
Tips & Ideas
Fig. B-18
Advanced Text Settings
Samples
Text Wizard
In the Text screen of the
Text Wizard you can click
on the Advanced button to
access more options.
Installation
Advanced Settings
56
Magnificent Monograms II
Samples
Tips & Ideas
Basics
QuickStart
Introduction
Installation
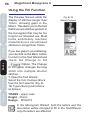
Using the Fill Function
The Preview Screen omits the
display of stitches longer than
10mm, showing gaps in the
letters. This alerts you to the fact
that there are stitches present in
the monogram that may be too
long for our intended use. Most
home embroidery machine
manufacturers recommend
stitches no longer than 10mm.
Fig. B-19
Select Campus
If you see gaps in your lettering,
you can click on the Back button
to return to the Text Wizard and
check the Change to Fill
Option. The Change
to Fill option changes the long
stitch into multiple shorter
stitches.
1. Open the Text Wizard.
Select the font Campus Block
from the font selector (Fig. B19).Type lettering instructions
as follows:
TITANS - upper case
Height - 55mm
Design - SP92412
In the Monogram Wizard, both the letters and the
decoration will be changed to fill. In the Text Wizard,
only the letters are affected.
Fig. B-20
Gaps in Stitching
Fig. B-21
Gaps Corrected
Samples
Fig. B-22
3-D Stitch Length
Threshold
Tips & Ideas
Basics
4. The preview shows the stitches
have been converted to shorter fill
stitches, creating a more servicable
monogram (Fig. B-21). Click the
Finish button.
Introduction
3. At the Text Wizard Screen, place
a check inside the box at the
Change to Fill
option.Click the Next button.
QuickStart
2. Click on the Next Button to see
the preview of the monogram.
Notice the gaps in the letters (Fig.
B-20). Click on the Back button to
return to the Text Wizard Text
Screen.
57
Installation
Basics
At the preview screen, you may change the stitch
length threshold where gaps begin to appear to a
longer or shorter stitch length (Fig. B-22).
58
Magnificent Monograms II
Samples
Tips & Ideas
Basics
QuickStart
Introduction
Installation
Changing the Background Color
You may change the background
color in the preview screen to
show what the monogram might
look like on various colors of
fabric.
When your design is on the
preview screen, click on the
desired background color within
the Background Color box (Fig.
B-22).
Fig. B-22
Background Color Box
59
Tips and Ideas
Introduction
Installation
Tips & Ideas
QuickStart
○ ○ ○ ○ ○ ○ ○ ○ ○ ○ ○ ○ ○ ○ ○ ○ ○ ○ ○ ○ ○ ○ ○ ○ ○ ○ ○ ○ ○
•
Creating Unique Monograms
•
Inches to Millimeter Conversion Chart
Tips & Ideas
Selecting the Best Font
Samples
•
Basics
This section covers:
60
Magnificent Monograms II
Installation
For example, if your embellishment is light and airy, look for a
light font so the final monogram will appear balanced. In other
instances, you must select a narrow font that will fit within the
desired freestyle monogram frame or hoop size. The more
narrow font styles are noted in the Introduction chapter.
Samples
Tips & Ideas
Basics
QuickStart
Experience will help you learn which font is best for your
intended use. When working with Freestyle monograms or
the Text Wizard, you should look for characteristics that are
similar or compatible to the embellishment.
Introduction
Selecting the Best Font
Some fonts require more manipulation in spacing than others,
however some of the fonts that must be manually kerned
(spaced) create outstanding monograms. Take a little time
to practice your kerning skill and you will soon be able to create
monograms quickly and easily using any of the fonts in the
program.
The last designs in the selector box of the Text Wizard are
specialty fonts. Some are stand-alone fonts, designed to be
used independently, without lettering typed in, to create a
stylish monogram. Some fonts contain capital letters that can
be used alone or in combination with other fonts to create
names.
Specialty fonts have only upper case characters.If you want
to create a name using one of these specialty fonts, here are
the suggested fonts for completing the rest of the name.
Tips & Ideas
61
Outer Space - Simple Block
Santa (SA) - Century Block
Santa (SN) - Extended Block
Creating Unique Monograms
The key to creating the best monograms is to make them
personal, and make them unique.
Consider using a date instead of a name with one of the
designs in the Special Occasion section.
Work with the placement of text in relation to the design in the
Text Wizard to create very special monograms. Here are a
couple of exercises for you to try:
Select Design AN7257 and position the monkey so that he
appears to be hanging from a letter.
Select CH19380 and make the airplane appear to be taking
off from a letter in your monogram.
Introduction
Name Drop Block - Simple Block or Paintbrush Script
QuickStart
Floral - Favorite Script
Basics
Daisy - Plume or Fairy Script
Tips & Ideas
Christmas Tree - Extended Block
Samples
Crayon - Simple Block
Installation
Angel Alphabet - Century Block
Samples
Tips & Ideas
Basics
QuickStart
Introduction
Installation
62
Magnificent Monograms II
Inches to Millimeters Chart
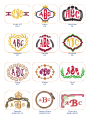
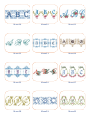
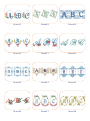
Monograms
To duplicate examples click on the
icon and select the
appropriate font and embellishment. Additional
embellishments are included with selected fonts.
Monogram1
D1
Monogram1
D3
Monogram1
D4
Monogram2
D2
Circle Monogram
D1
Circle Monogram
(without circle)
Circle Monogram
D2
Circle Monogram
(without circle)
Circle Monogram 2
D1
Circle Monogram 2
(without circle)
Triangle
Classic Monogram
Script MT
D10
Retro
D2
Backham
D1
Benquiat
D1
Davidia
D1
Mazama
D5
Meng
D3
Motler
D7
Terra
D9
Camelot
MON17470
Century Block
MON17002
Chancery
MON43605
Condensed Block
MON17483
Crisp Block
MON17374
Elegant Script
MON64022
Fairy Script
MON98244
Favorite Script
MON10721
Key Script
MON97110
Narrow Block
MON17483
Simple Script
MON44168
Mono01
Mono02
Mono03
Mono04
Mono05
Mono06
Mono07
Mono08
Mono09
Mono10
Mono11
Mono12
Mono13
Mono14
Mono15
Mono16
Mono17
Mono18
Mono19
Mono20
Mono21
Mono22
Mono23
Mono24
Mono25
Mono26
Mono27
Mono28
Mono29
Mono30
Mono31
Mono32
Mono33
Mono34
Mono35
Mono36
Mono37
Mono38
Mono39
Mono40
Mono41
Mono42
Mono44
Mono45
Mono43
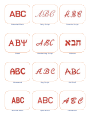
Text
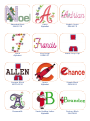
To duplicate examples click on the
icon and select the
appropriate font and embellishment. Additional
embellishments are included with selected fonts.
Architect Block
Athletic Outline
Bamboo
Bold Script
Camelot
Campus Block
Century Block
Chancery
Condensed Block
Crisp Block
Elegant Script
English Script
Extended Block
Fairy Script
Favorite Script
Greek
Handwriting Script
Hebrew
Homeward
Key Script
Kid Stuff
Narrow Block
Open Block
Paintbrush
Plain Block 5mm
Plume Script
Serif Block 5mm
Simple Block
Simple Block 2
Simple Script
Lace01
Lace02
Swoosh
Swoosh
Mono01
Mono02
Mono03
Mono04
Mono05
Mono06
Mono07
Mono08
Mono09
Mono10
Mono11
Mono12
Mono13
Mono14
Mono15
Mono16
Mono17
Mono18
Mono19
Mono20
Mono21
Mono22
Mono23
Mono24
Mono25
Mono26
Mono27
Mono28
Mono29
Mono30
Mono31
Mono32
Mono33
Mono34
Mono35
Mono36
Mono37
Mono38
Mono39
Mono40
Mono41
Mono42
Mono43
Mono44
Mono45
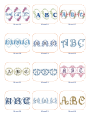
Angel
Alphabet
Century Block
AA86105
Crayon
Alphabet
Plain Block
CA86045
Christmas Tree
Alphabet
Extended Block
SN65278
Daisy
Alphabet
English Script
DA86079
Floral
Alphabet
Key Script
FA86057
Name Drop Cap
Campus Block
NDC54330
Space
Alphabet
Simple Block
OS86003
Rosemail-A
Santa Holding Letter
Alphabet
Century Block
SA43468
Scroll-A
Victorian-AC
Santa With Sack
Alphabet
Extended Block
SN65254