1
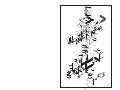
™
PD™
Personal Distiller
OWNERS MANUAL
Form #6565SP, ©1990, Pure & Secure LLC., Rev. 3/10
1
2
3
4
5
6
7
8
9
15
16
11
17
31
32
21
25
24
23
20
10
12
13
14
35
5
24
34
33
18
19
5
37
22
36
38
39
27
24
26
29
28
5
24
30
40
41
40
10
42
43
44
45
46
50
51
52
53
10
55
47
49
48
54
35
56
57
62
58
60
59
61
63
15
64
24
TABLE OF CONTENTS
STEAMPURE PD™ PARTS LISTING
Key # 120V
240V
1
8009
8009
2
6022
6022
3
519
519
4
6049
6049
5
9009
9009
6
9085
9085
7
402B
402B
8 224-0003 224-0003
•
409
409
9
636
636
10
638
638
11*
12
9530
9530
13
9510
9510
14
9545
9545
•
657
657
15
513
513
16
9018
9018
17
9519
9519
18
9080
9080
19
6021
6021
•
604
604
20
9024
9024
21
9082
9082
•
609
609
•
644
644
22
8070
8070
23
516
516
24
9045
9045
25
7200
7200
26
9041
9041
27
9001
9001
•
646
646
28
424A
424A
29
510
510
30
601
601
•
663
663
31
6010
6010
32 2590A-02 2590A-02
33
2102
2102
34
9032
9032
35
9061
9061
36 400A-02 400A-02
•
661
661
37
6005
6005
38
7022
70102
•
632
632V
39
2103
2103
40
9092
9092
41
7010
7010
•
639
639
42
7092
70103
•
653
653V
43
7230
7230
44
642
642
45
9043
9043
46
418
418
47
9095
9095
48
9003
9003
49
8011
8011
50*
51*
52
9056
9056
53
9046
9046
54
7275
7275
55*
56
9508
9508
57
87
87
58
84
84
59
518
518
Description
Key #
LID KNOB WITH STUD
•
O-RING
60
LID DISC
61
GASKET
62
FLAT WASHER, 1/4"
63
SPRING
64
CROSSBAR WITH NUT
LOCKNUT, 1/4-20
LID ASSY. (#1-8)
ACORN NUT (4 PACK)
SHEET METAL SCREWS (12 PACK)
S.S. TOP COVER (CALL FOR COLORS)
COMPRESSION FERRULE
COMPRESSION NUT
CONDENSING COIL
CONDENSING COIL KIT (#12-14)
FLOAT ROD
HEX NUT, 6-32
FLOAT BALL
BUSHING
O-RING
BUSHING AND O-RING KIT (#18-19)
SET SCREW
FLOAT ACTUATING ARM
ACTUATING ARM/SET SCREW KIT (#20-21)
FLOAT KIT (#15-21)
SPACER
SWITCH PLATE
HEX NUT, 1/4-20
MICROSWITCH
HEX NUT, 4-40
SCREW, 4-40 X 5/8
MICROSWITCH KIT (#25-27)
RESET RETAINER
RESET RETAINER BOARD
RESET
RESET KIT (#24,#24,#28-30)
BOILING TANK GASKET
BOILING TANK STUDDED
HEAT TAB
LOCK WASHER
HEX NUT, 10-24
U-CLAMP
U-CLAMP KIT (#5, #35-36)
HEATING ELEMENT GASKET
HEATING ELEMENT, 650 WATTS
HEATING ELEMENT KIT (#5, #35-38)
DEFLECTOR PLATE
PUSH NUT
FAN BLADE
FAN BLADE KIT (#43-44)
FAN MOTOR
FAN MOTOR KIT (#48, #40-42)
WIRE-CABLE HOLDER
ON/OFF SWITCH
HEX NUT, 8-32
TERMINAL BLOCK
SCREW, 8-32 X 1/2
LOCK NUT, 8-32
APPLIANCE FEET
SS FRONT PLATE
SS BASE
SCREW, 10-24 X 1/2
LOCK WASHER, #10
IEC CORD CONNECTOR
SS BACK PLATE
DRAIN VALVE (INCLUDES #57-58)
COMP. FERRULE
COMP. NUT
DRAIN EXT TUBE
14
120V
611
240V
611
19016
9233
745
7276
19016
9233
745
7276
Description
DRAIN EXT TUBE KIT (#57-59)
CONNECTION FITTING
POST FILTER (4 PACK)
BOTTLE LID WITH HANDLE
GLASS BOTTLE
IEC POWER CORD
IMPORTANT SAFETY INFORMATION .................................. 3
FOR THE RECORD ................................................................ 4
HOW DISTILLATION WORKS ............................................... 4
UNPACKING YOUR STEAMPURE PD™ .............................. 4
ELECTRICAL REQUIREMENTS ............................................ 5
SPECIAL NOTICE .................................................................. 5
GETTING AQUAINTED WITH YOUR STEAMPURE PD™.... 6
COMPONENT IDENTIFICATION............................................ 7
FIRST TIME START UP, RINSING & STERILIZING .............. 8
POST FILTER INSTALLATION............................................... 9
ACCESSORIES AND FILTER ............................................... 11
MAINTENANCE & CLEANING.............................................. 12
WARRANTY ........................................................................... 13
PARTS LIST AND DIAGRAM ................................................ 14
Please read through all instructions in this manual prior to installation. If you do not understand instructions, please seek assistance from an authorized SteamPure™ Dealer or Distributor.
IMPORTANT SAFETY INFORMATION
•
•
•
•
•
•
•
Operate indoors only.
The area MUST be well ventilated.
Always unplug the power cord before assembling, disassembling,
repairing or adjusting the system
NEVER immerse the distiller in water or any other liquid.
NEVER operate the distiller with a damaged cord or allow the cord
to become exposed to hot surfaces.
Don’t let children play with the distillation system.
IF YOU ARE NOT SURE THAT YOUR OUTLET IS PROPERLY
GROUNDED OR THAT THE CIRCUIT PROTECTION IS CORRECT, HAVE IT CHECKED BY A QUALIFIED ELECTRICIAN.
3
FOR THE RECORD
B. CLEANING THE BOILING TANK
The model and serial number are found on the back panel. You should
record both model and serial number for future reference.
We recommend that the boiling tank be cleaned at least once per month.
Use Lumen™ cleaner (stock #6603) and follow the directions below. Failure
to clean the interior can result in:
1. Contaminant build-up (scale) causing premature failure of the heating
element.
2. Reduced purity of the distilled water due to ‘splash over’ of contaminants
from the boiling tank.
STEAMPURE PD™ Date of Purchase _________________
Model _______________________
Serial Number ________________________________________________
HOW DISTILLATION WORKS
CAUTION: Under no circumstances should the cleaning solution be
heated and ran through a steam sterilization or distillation cycle.
Your system operates using the combined technology of evaporation/condensation and carbon filtration. This combined technology consistently produces
high quality water. The principle of operation is quite simple. Raw water is
poured into the machine where it is heated and boiled. As the water boils, it
kills bacteria and other biological contaminants. The steam then rises, leaving behind virtually all the contaminants in the raw water. The steam enters
the condenser where cool air reduces the temperature of the steam, converting it to distilled water as a final step; this water passes through an activated
carbon post filter to improve the taste of the water. The water is collected
and stored in a glass container.
UNPACKING YOUR STEAM PURE PD™
Your STEAMPURE PD™ is shipped to you in a durable carton. Carefully
remove the contents from the carton.
The STEAMPURE PD™ carton contains:
•
STEAMPURE PD™ distillation system
•
Glass container and lid
•
Parts kit #2560
•
Owners manual and warranty card
•
Power cord
Note: Save the carton and packaging material for future use in the unlikely
event your machine should require maintenance or repair.
4
Use the following procedures for cleaning the boiling tank in the
STEAM PURE PD:
1. Turn the power switch OFF. Turn the fan switch to STERILIZE. Let the
unit cool down for 15 minutes before continuing.
2. Remove the boiling tank lid. Open the drain valve and allow the boiling
tank to drain. Close the drain valve.
3. Pour water into the boiling tank so the water level is just above the scale
line.
4. Add the Lumen TM Cleaner following the directions on the package.
5. Mix well and let stand overnight.
6. Next morning, open the drain valve and drain and rinse the boiling tank
thoroughly. Close the drain valve.
7. Steam sterilize the unit by following the instructions for Steam Sterilization and Start Up on page 6.
WARRANTY
Your SteamPure PD™ water distiller is covered by a comprehensive warranty. Please refer to the warranty card for full details. If your warranty card
is missing, or if this is a replacement manual please contact your dealer or
distributor for full details. In order for the warranty to be registered, you must
return the warranty card within 10 days of purchase. Please be sure all the
information on the warranty card is filled in completely for valid registration.
If your SteamPure PD™ requires repair under warranty, contact your dealer
or distributor for instructions. Provided you have met your conditions under
the warranty, the system will be repaired free and returned to you. You are
responsible for the freight both to and from the service location.
13
MAINTENANCE & CLEANING
ELECTRICAL REQUIREMENTS
A. OVERALL MAINTENANCE REQUIREMENTS
•
The unit must be plugged directly into a fully grounded wall outlet.
The following guide should be used for maintenance of your
distiller. The timing will vary according to your local water conditions. It is your responsibility to maintain your equipment.
Without proper maintenance, your SteamPure PD™ may not
produce optimum results. The following times may need to
be adjusted for your particular area, so the first several times,
please keep track of the average time and adjust the schedule
below.
•
You will need to use an isolated 10 amp circuit breaker for this unit.
•
We offer this unit in two voltage configurations:
120V, 60 Hz models, 5.8 amps
OR
240V, 50 Hz models, 2.9 amps
Weekly or every 12 gallons*:
Monthly or every 30 gallons*:
Every 3 months:
Drain the boiling tank.
Clean the boiling tank. (See
Section B of Maintenance.)
1) Change the post filter
2) Clean the exterior.
3) Steam Sterilize.
(See page 6.)
* More frequent if feed water is hard.
Cleaning the exterior:
Use stainless steel cleaner and polish (stock #6606)
Replacing the post filter:
The post filter cartridge should be replaced at least every three
months. New filters can be purchased in packs of four through
your distributor or on our web site www.steampure.com. (stock
#19016). Replacement instructions are included with the filters.
12
SPECIAL NOTICE
1. A short power supply is provided to reduce the risks resulting
from becoming entangled in or tripping over a longer cord.
2. Extension cords may be used if care is exercised in their use.
3. If an extension cord is used, (a) the marked electrical rating of
the extension cord should be at least as great as the electrical rating of the product, (b) as the product is of the grounded
type, the extension cord should be a grounding type 3-wire
cord, and (c) the longer cord should be arranged so that it
will not drape over the countertop or tabletop where it can be
pulled on by children or tripped over unintentionally.
4. The physiological effects of the operation of this appliance,
beneficial or otherwise have not been investigated by Underwriters Laboratories.
5
GETTING ACQUAINTED WITH
YOUR STEAMPURE PD™
ACCESSORIES AND FILTER
ADDITIONAL GLASS JUGS
Many people like to have an additional glass jug, so that they
can have one jug in the refrigerator, and another jug at the water
distiller.
Condenser
with Volatile
Gas Vents
Maximum Water Level
Indicator
Boiling
Chamber
Heating
Element
Additional jugs can be purchased from your dealer, or from
www.steampure.com.
FILTERS
The SteamPure PD™ will boil water, collect the steam and then
cool it so that distilled water condensates into the glass jar.
There are some chemicals that have a lower boiling point than
water, that can carry over with the steam. The carbon filter will
remove these contaminants.
Filter Replacements can be purchased from your dealer, or from
www.steampure.com.
Condenser
Outlet
Float
Residue
Drain Valve
Fan
6
CLEANING COMPOUND
When the SteamPure PD™ boils water, the calcium and magnesium in the water (along with some other contaminants can
form scale. The scale will reduce the efficiency of the unit over
time. Once the scale starts to accumulate, it should be cleaned
off. We supply a powder that is allowed to sit overnight in a
cold boiling tank. This will soften the scale so that it is easier to
remove.
Lumen™ can be purchased from your dealer, or from www.
steampure.com.
11
POST FILTER INSTALLATION (CONT’D.)
4. Position the post-filter loosely into the mouth of the glass
jar as shown in Figure 2. The unit is now ready for normal
operation.
5. To remove the filter, the adjustable collet (A) must be loosened and the grey collet (B) must be depressed before pulling the fitting off of the condenser outlet.
If installation of the filter onto the condenser outlet is difficult,
you may apply a thin film of vegetable oil to the OUTSIDE
surface of the condenser outlet to aid installation.
COMPONENT IDENTIFICATION
Boiling chamber - The manually filled stainless steel boiling chamber
holds a maximum of 1.4 gallons (5.3 liters) of water.
Condenser – As the steam rises from the surface of the water in the
boiling tank, it enters the condenser where it is cooled by forced air
from the fan which converts it to distilled water. The condenser also
has volatile gas vents to allow gasses to escape
Residue drain valve – The drain valve, located on the rear panel of
the unit, provides a means of draining the residue from the boiling
chamber that remains after distillation.
Fan – The fan provides a constant flow of room temperature air
across the condenser during the distillation cycle to effectively condense the steam from the boiling water.
Fan Switch (not shown) – The fan switch must be in the PURIFY
position during the distillation cycle to provide efficient air flow across
the condenser. It is only in the STERILIZE position during steam
sterilization.
Float – The float is used to monitor the water level in the boiling
chamber. When the level reaches approximately 1” above the heating
element, the float trips a switch to shut the unit down.
Heating Element – The 650 watt heating element provides the heat
necessary to boil the water in the boiling chamber.
Maximum Water Level Indicator – A small diameter rod which
extends downward 1-1/2” from the top of the boiling chamber. When
operation the unit, fill the water no higher than the bottom of the indicator.
Power Switch (not shown) – Allows the user to turn power ON and
OFF.
Figure 2
10
5
FIRST TIME START-UP, RINSING AND STEAM STERILIZING
POST FILTER INSTALLATION
We recommend that you thoroughly rinse and steam sterilize your STEAMPURE PD before putting it into use. Distilled water from the first cycle should
be discarded.
NOTE: The post-filter must be removed during steam sterilization.
RINSING –
1. Remove the boiling tank lid.
2. Remove the wire restraining the float.
3. Remove the cap from the extension tube on the drain valve.
4. Pour tap water into the boiling tank until approximately ¾ full. Open the
boiling tank residue drain valve.
5. Close the residue drain valve after the water has drained.
This distillation system is equipped with an activated carbon post-filtering
system designed to polish the taste after distillation. The filter helps ensure
the distilled water produced is as fresh and great tasting as possible. This
combination of distillation and filtration produces “the Full Spectrum Solution
To Water Pollution”™.
To maintain the freshness of the water, the post-filter should be changed on a
periodic basis. See page 9 for the schedule.
NOTE: Steam sterilize the unit prior to installing the post filter.
STEAM STERILIZATION –
NOTE: Make sure the post filter is not installed at this point
6. Fill the boiling tank half full of hot tap water. Install the boiling tank lid.
7. Plug the power cord into the power source.
8. Turn the power switch ON.
9. Turn the fan switch to STERILIZE.
10. Allow the unit to steam sterilize for one hour. NOTE: Place a container
under the condensing coil outlet to catch any water or steam that drips
from the coil.
11. After one hour, turn the power switch OFF.
12. Allow the unit to cool for a minimum of 15 minutes. When cool, install
the post-filter as instructed on page 7.
1. Remove the plastic plug covering the filter outlet. Remove the post-filter
lid.
START UP –
Finger tighten the adjustable collet securely to seal the fitting onto the condenser outlet. Gently pull on the elbow to make sure it is locked in place.
2. Rinse the carbon by slowly pouring DISTILLED* water into the lid area
and allowing the black carbon fines to rinse away. Continue until the
water coming out the bottom of the filter is clear. Install the post filter lid
and snap it closed.
*Use distilled water only to rinse the post filter
3. While making sure the adjustable collet is loose, install the elbow and the
new filter onto the condenser outlet. This is done by pushing the elbow
straight into the condenser outlet tube until it bottoms on the shoulder
(approximately 1”). See figure 1.
13. Fill the unit with water, no higher than the maximum water level indicator
and place the glass jar under the post filter to catch the distilled water.
Turn the power switch ON and fan switch to DISTILL. Allow the unit to
run through a complete cycle. DISCARD THE FIRST BATCH.
With the power switch ON and the fan switch to DISTILL, the unit is now
ready for normal operation. We recommend steam sterilization cycle (steps
5-12) every 3 months or if the unit has not been used for one week.
Grey
Collet
Shoulder
Figure 1
8
9