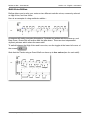
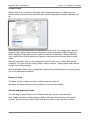
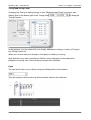
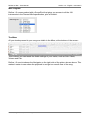
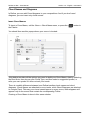
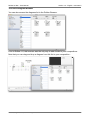
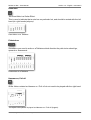
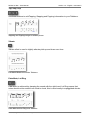
1
Reflow for Mac - User Manual!
Version 1.5 - English - 04/27/2012
Reflow for Mac
User Manual
© 2012, Gargant Studios, EURL - All rights reserved!
1
Reflow for Mac - User Manual!
Version 1.5 - English - 04/27/2012
Table of Contents
Getting Started!
4
The Reflow Start Screen!
4
Creating a New File!
5
The File Library!
6
The Reflow User Interface!
7
Entering Notes!
7
On a Tablature!
7
Using the Visual Fretboard!
7
Using a MIDI Keyboard!
8
Using the Visual Keypad!
8
Changing Rhythm!
9
Mouse Selection!
9
Multi-Voice Edition!
Reference!
10
11
File Properties!
11
Tracks!
12
Create a Track!
13
Remove a Track!
13
Reorder and Duplicate Tracks!
13
Tuning and String Count!
14
Capo!
14
MIDI Program!
15
The Mixer!
15
Parts!
16
Switching between Parts!
17
Adding a new Part!
17
Removing a Part!
17
Reorder and Duplicate Parts!
17
Measures!
18
Manipulate Measures!
18
Time Signature!
18
Key Signature!
19
Clef and Ottavia!
19
Sections!
Create and Remove Sections!
© 2012, Gargant Studios, EURL - All rights reserved!
20
20
2
Reflow for Mac - User Manual!
Reorder and Duplicate Sections!
Version 1.5 - English - 04/27/2012
20
Repeats and Directions!
21
Chord Names and Diagrams!
22
Insert Chord Names!
22
Insert Chord Diagrams!
23
The Chord Diagram Browser!
24
Effects and Articulations!
25
Dynamics!
25
Accents!
25
Staccato!
26
Drum Sticking!
26
Brush and Arpeggio!
26
Dead Note!
27
Pickstrokes!
27
Hammer-on, Pull-off!
27
Tap, Slap, Pop!
28
Vibrato!
28
Palm Mute, Let Ring!
28
Bends!
29
Slides!
29
Share your compositions!
30
MIDI Export!
30
WAVE Export!
30
Guitar Pro™ 5 Export!
30
PDF Export!
30
© 2012, Gargant Studios, EURL - All rights reserved!
3
Reflow for Mac - User Manual!
Version 1.5 - English - 04/27/2012
Getting Started
The Reflow Start Screen
The first time you start Reflow for Mac, you will see this empty document.
Here we have a One Measure long Guitar Song, with Tablature and Standard Notation
Staves.
Use the numeric keys of your Mac keyboard to enter notes quickly, and move your cursor
with the Arrow keys or by clicking on the score.
The Palette on the Right gives you access to all major editing features in Reflow. Do not
hesitate to try them, as they are all undoable (Edit > Undo or Cmd - Z).
On the bottom side of the picture, you can see the Visual Keyboard and the Visual
Fretboard, which you can use to input your notes, and see where the selected notes
should be played on a Piano or on a Guitar.
There is also a numeric keypad on the Right that is mostly used as a remainder of the
numeric keypad on your Mac Keyboard. Drummers will find this usefull as it directly maps
to drum elements.
© 2012, Gargant Studios, EURL - All rights reserved!
4
Reflow for Mac - User Manual!
Version 1.5 - English - 04/27/2012
Creating a New File
The easiest way to create an empty file is by calling the menu File > New. This will create
an empty song for an Acoustic Guitar, using a Standard Tuning (EADGBe).
You can also call the Browser Window, to bring a list of Template Songs. This is usefull if
you don’t play the Guitar, but Drums, Piano, Bass or Banjo.
Call the Browser with the View > Show Browser menu entry, or by clicking on the
button in the Toolbar. This will bring you the following window, then you can double-click on
a File to create an empty Song.
© 2012, Gargant Studios, EURL - All rights reserved!
5
Reflow for Mac - User Manual!
Version 1.5 - English - 04/27/2012
The File Library
The Browser window references all the Reflow files located on your iCloud storage.
To add files to your library, you can simply drag ‘n drop files on the Browser Window. They
will be copied to the Library.
© 2012, Gargant Studios, EURL - All rights reserved!
6
Reflow for Mac - User Manual!
Version 1.5 - English - 04/27/2012
The Reflow User Interface
Entering Notes
On a Tablature
If your cursor is located on a Tablature Staff, the easiest way to enter notes for Stringed
Instruments such as Guitars, Bass and Banjo, is to type fret numbers on the numeric
keypad of your Mac.
Using the Visual Fretboard
You can also use the Visual Fretboard and click where you want to add notes :
Clicking on a red note will remove it.
Notes in the same measure but not on the current chord will be shown as a circle, as
shown in the following picture :
© 2012, Gargant Studios, EURL - All rights reserved!
7
Reflow for Mac - User Manual!
Version 1.5 - English - 04/27/2012
Using a MIDI Keyboard
If you have a MIDI Keyboard connected, open the Preferences Window (Reflow >
Preferences menu), and select your MIDI Input Keyboard as you see in the following
picture :
You can then use your MIDI Keyboard to enter notes directly by playing them.
Every time you play a chord, Reflow will automatically insert and go to the next beat so
you can keep on playing notes without the need to move your cursor right.
This input mode is new to Reflow 1.5 and will simplify the sheet music creation for Piano
players.
Using the Visual Keypad
This last mode is similar to using the numeric keypad on your keyboard, but using a
Mouse.
As shown on the picture, this makes editing Drum easier. Press the “Hh” Button to enter a
Hi-Hat hit, Press the “Bd” button to enter a Bass Drum hit, and so on ...
Using the alt button on the lower right corner of the keypad, you have access to extra
drum elements.
© 2012, Gargant Studios, EURL - All rights reserved!
8
Reflow for Mac - User Manual!
Version 1.5 - English - 04/27/2012
Changing Rhythm
To select the note value of the selected chords, use the topmost line of the Tool Palette :
You can also use the palette to add Triplets, dotted notes and tied notes.
The “Split Beat” button (
) is quite interesting, especially for drummers. It can be used
to split a chord between two equal parts. For example, you can split a quarter note
between two eighth notes.
To increase or decrease the Note Value of the selected chords, you can also use the Plus /
Minus keys on your Keyboard.
Mouse Selection
Select multiple adjacent chords by dragging your mouse over Staves. This will start an
extended selection as following :
If you hold down the Alt key while dragging the mouse, you can start a rectangle selection,
which is usefull for selecting only a subset of strings of your tablature :
© 2012, Gargant Studios, EURL - All rights reserved!
9
Reflow for Mac - User Manual!
Version 1.5 - English - 04/27/2012
Multi-Voice Edition
Reflow allows you to write your notes on two different melodic voices, commonly referred
as High Voice, and Low Voice.
Here is an example of using multivoice edition :
Drummers will easily recognize this pattern; Cymbals are written with the stems up, and
Bass Drum / Snare Hits are written with the stem down. These are two independent
rhythmic phrases which share the same staff.
To switch between the High Voice and Low voice, use the toggle at the lower left corner of
the screen (
).
Note that the Tracks using a Grand Staff can have up to four voices (two for each staff) :
© 2012, Gargant Studios, EURL - All rights reserved!
10
Reflow for Mac - User Manual!
Version 1.5 - English - 04/27/2012
Reference
File Properties
Every file in Reflow comes with some extra information that can be used in different
places. The more important ones are the Song Title, and the Song Artist.
To change the File Properties, simply call File > File Properties (Cmd + Shift + i). This will
bring the following dialog :
Not all these properties are directly reflected to your score (at the moment), but title and
artist are shown up on your sheet :
Also, Title and Artist are used in your File Library to identify your files :
© 2012, Gargant Studios, EURL - All rights reserved!
11
Reflow for Mac - User Manual!
Version 1.5 - English - 04/27/2012
Tracks
Reflow is designed to separate the concept of Tracks with the concept of Parts (see the
following section for more details about the Parts, sometimes named Scores).
You can see a Reflow Track as an Instrument, or an entry on your Mixer. Whereas Parts
are physical sheet music that can group one or more instruments, hence tracks.
As an example, in a classical orchestra, the Conductor would use a Full Score which
contain all instruments of the composition, whereas every single instrument player should
have only the Part he or she has to play.
To manipulate the Tracks in your Reflow song, call the Score > Tracks and Parts (Cmd +
T) menu. Or press the
button in the Tool Bar.
This will bring you the following Properties window :
© 2012, Gargant Studios, EURL - All rights reserved!
12
Reflow for Mac - User Manual!
Version 1.5 - English - 04/27/2012
Create a Track
Simply click on the + button to bring the Track Templates popover, in which you can
choose which Instrument you would like your track to represent by double clicking in the
list :
Note that not all the instruments are represented in this List, for example if you want to
create a Violin Track, simply create a Keyboard track and change its MIDI Program to
Violin. Keyboard Track just refers to a generic instrument that uses a Single Standard
Staff. (while Grand Staff Keyboard is a generic instrument that uses one staff for each
hand).
Similarly, remember that you can change the String Count of your Track after having
created it. So if you need a 8 strings Guitar, simply create a 7 strings guitar and add one
string in the Tuning settings.
Note that Reflow allows you to manipulate Tracks while audio playback is running, giving
you a non interruptive workflow.
Remove a Track
To Delete a Track, simply press the - button below the track list.
Important: All these changes can be undone if you close this window.
Reorder and Duplicate Tracks
You can drag n’ drop Tracks in the Tracks list with your mouse to reorder them.
Also, if Alt is held down while dragging, Reflow will duplicate the whole track with its
content. This can be very useful if you don’t want to start a new track from scratch.
© 2012, Gargant Studios, EURL - All rights reserved!
13
Reflow for Mac - User Manual!
Version 1.5 - English - 04/27/2012
Tuning and String Count
Changing the Tuning or adding strings to your Tablature based Track is an easy task.
Simply click on the button right to the Tuning field (
Tuning Popover :
) to bring the
In this popover, you can detune all your strings, add/remove strings, or select a Tuning in
the Tuning Preset List.
When you’re done with your changes, click Apply to modify your tuning.
Note that like every other operations in Reflow, tuning changes can be made while
playback is running. And of course these changes are reversible.
Capo
You can add a Capo to your Guitar using the following field in this window :
This will transpose all the notes up and should be visible in the fretboard :
© 2012, Gargant Studios, EURL - All rights reserved!
14
Reflow for Mac - User Manual!
Version 1.5 - English - 04/27/2012
MIDI Program
Reflow 1.5 comes packed with a SoundFont that gives you access to all the 128
instruments in the General Midi specification, plus a Drumkit.
The Mixer
All your tracks present in your song are visible in the Mixer, at the bottom of the screen :
This is where you can tweak the Audio settings of your tracks, such as Solo / Mute,
Volume and Pan.
Reflow 1.5 now introduces the Navigator on the right side of the picture shown above. This
makes it easier to see where the playback is and get an overall view of the song.
© 2012, Gargant Studios, EURL - All rights reserved!
15
Reflow for Mac - User Manual!
Version 1.5 - English - 04/27/2012
Parts
Parts in Reflow are quite similar to physical sheet music.
Every Part contains one or more instruments from your track List, and has its own display
properties.
Manipulating Parts is done in the same window as the tracks properties window (see the
previous chapter), but on the second Tab.
You can bring this dialog with Score > Edit Tracks and Parts.
On the right side, you can select which instruments you want to display in every Parts.
Please note that you can create as many Parts as you want, and Removing a Part does
not delete the Track it contains. So feel free to add, remove and reorder your parts to get
the configuration you prefer.
You can choose to hide Standard Notation or Tablature by unchecking the corresponding
boxes in the Presentation Options.
Moreover, Reflow 1.5 introduced the Multi-bar Rests, which are automatically calculated
per score, by checking the Use Multibar Rests option, useful to reduce your Part page
count when printing.
© 2012, Gargant Studios, EURL - All rights reserved!
16
Reflow for Mac - User Manual!
Version 1.5 - English - 04/27/2012
Switching between Parts
If you want to work on a different part, you can click on the Part List in the Part Properties
window shown on the previous picture.
Alternatively, you can use the right panel of the main window to switch :
And finally there is the popup list at the left of the Tool Bar :
Adding a new Part
By clicking on the + button just below the Part List, you will create a new empty score.
Then you can select which tracks you want to present in it.
Removing a Part
This is done easily by clicking the minus button below the Part List while selecting the part
you want to erase.
Reorder and Duplicate Parts
Similarly to the way Tracks are handled, you can drag and drop your parts in the List to
reorder them.
If Alt is held down while dragging, you will duplicate your part.
© 2012, Gargant Studios, EURL - All rights reserved!
17
Reflow for Mac - User Manual!
Version 1.5 - English - 04/27/2012
Measures
Manipulate Measures
To manipulate measures in Reflow, you can use the Score menu, as shown on the
following picture :
These options are also available in the Palette (
).
Time Signature
Time Signature (or Time Meter) can be changed using the Time Signature dialog. Open it
using the Score > Time Signature menu, or the (
) Button in the Palette.
Please Note that if you select a Bar Range before calling this dialog, you will be able to
modify the Time Signature from the first selected bar, to the last selected bar.
© 2012, Gargant Studios, EURL - All rights reserved!
18
Reflow for Mac - User Manual!
Version 1.5 - English - 04/27/2012
Key Signature
Key Signature can be changed using the Key Signature dialog. Open it using the Score >
Key Signature menu, or the (
) button in the Palette.
In this dialog, you can choose your key, and switch between Minor and Major Keys.
Clef and Ottavia
Clef and ottavia can be changed in the Clef dialog. Open it using the Score > Clef menu or
the (
) button in the Palette.
In this dialog, you can choose between Treble and Bass clef. (Note: C-Clef will be added
in a future Reflow update).
You can also choose clef ottaviation (8va, 8vb, 15ma, 15 mb).
© 2012, Gargant Studios, EURL - All rights reserved!
19
Reflow for Mac - User Manual!
Version 1.5 - English - 04/27/2012
Sections
Sections in Reflow makes working on small chunks of your song easier.
Sections are listed on the right panel of the Main window :
Create and Remove Sections
Reflow recognizes sections with the Rehearsal Signs you define in your Song.
To add Rehearsal signs, press the Rehearsal button in the Palette (
Rehearsal Sign. This will bring you the following popup :
), or call Score >
The Section List is automatically updated when you insert or clear Rehearsal Signs.
Reorder and Duplicate Sections
You can reorder complete chunks of your song using the Sections. Drag and drop sections
in the Sections List and you will move the corresponding measures in your song.
Similarly, if you hold down the Alt button, you will be able to duplicate the corresponding
measures.
© 2012, Gargant Studios, EURL - All rights reserved!
20
Reflow for Mac - User Manual!
Version 1.5 - English - 04/27/2012
Repeats and Directions
All the repeats and musical directions in Reflow are handled in the same popup. You can
call it from Score > Repeats or by pressing the Repeats button in the Palette (
).
Starting at version 1.5, Reflow now handles the musical symbols and jumps, such as
Coda, Segno, D.C., ...
© 2012, Gargant Studios, EURL - All rights reserved!
21
Reflow for Mac - User Manual!
Version 1.5 - English - 04/27/2012
Chord Names and Diagrams
In Reflow, you can add Chord diagrams to your compositions. And if you don’t need
diagrams, you can insert only chord names.
Insert Chord Names
To insert a Chord Name, call the Score > Chord Name menu, or press the (
the Palette.
) button in
You should then see this popup where your cursor is located :
This window contains all the options you need to build your Chord Name, start by selecting
the Root Note, then choose your Chord Type, and then select a suggested symbol, or
write your own symbol if it does not suit your needs.
There is a subtile difference between how Reflow handles chord names and chord
diagrams. Chord Names are attached to every tracks, while Chord Diagrams are attached
to a single Track. This way your chord names appear on every score, while diagrams will
appear only for the scores that contain the corresponding Tracks.
Clearing a Chord Name is done in this same window.
© 2012, Gargant Studios, EURL - All rights reserved!
22
Reflow for Mac - User Manual!
Version 1.5 - English - 04/27/2012
Insert Chord Diagrams
Similarly to the Chord Names, you can insert Chord Diagrams, by calling the Score >
Chord Diagram menu, or by pressing the (
) button in the Palette.
It will bring the Chord Diagram Popup window, which is very similar to the Chord Name
popup with some Diagram additions :
To edit your diagram, you can click on a Suggested diagram in the Diagram Hints list, or
simply enter the Frets using the appropriate field.
When you’re done, click on the Insert button.
If you want to remove a chord diagram, simply put your cursor on the corresponding beat
the diagram is attached to, call this dialog and click on the Clear button.
Note that Reflow does not suggest Diagram Hints for all chord types, and does not validate
that your diagram you enter corresponds to the chord you requested. You should double
check that when typing the Diagram yourself. This behavior is likely to be improved in
future Reflow Versions.
© 2012, Gargant Studios, EURL - All rights reserved!
23
Reflow for Mac - User Manual!
Version 1.5 - English - 04/27/2012
The Chord Diagram Browser
You can also access the diagrams list in the Reflow Browser.
Prior to Reflow 1.5, this browser was the only way to add chords to your compositions.
Note that you can drag and drop a diagram from this list to your composition :
© 2012, Gargant Studios, EURL - All rights reserved!
24
Reflow for Mac - User Manual!
Version 1.5 - English - 04/27/2012
Effects and Articulations
The Reflow Palette contains many things you can add to your compositions.
All of these effects are also accessible in the Note or Effect menu.
Dynamics
Dynamics (illustrated below) gives information about the velocity at which the notes should
be played.
Dynamics (here are shown mf, ff, and ppp)
Accents
Accents are used to alterate velocity of the notes.
From left to right, you will find: Ghost Note, Accent, Strong Accent.
© 2012, Gargant Studios, EURL - All rights reserved!
25
Reflow for Mac - User Manual!
Version 1.5 - English - 04/27/2012
Staccato
Staccato indicates that the notes should be played briefly. It alters the notes duration but
not velocity.
Staccato Notes are notated with a small dot below the note head.
Drum Sticking
You can indicate which hand to use when dealing with drum patterns.
Some basic paradiddle with sticking
Brush and Arpeggio
Add Brush and Arpeggio effects to your compositions. Brush is used mostly by guitar
players, while Arpeggios can be used for other instruments such as Piano.
This effect that the notes in the brushed or arpeggiated chord should not be played simultaneously,
but progressively in time.
© 2012, Gargant Studios, EURL - All rights reserved!
26
Reflow for Mac - User Manual!
Version 1.5 - English - 04/27/2012
Dead Note
The Dead Note is a Guitar Effect.
This is used to indicate that a note has no particular fret, and should be muted with the left
hand (for right handed players).
Dead Notes on a Tablature
Pickstrokes
Sometimes you need to write on a Tablature which direction the pick stroke should go,
upwards or downwards.
Pickstrokes on a Tablature
Hammer-on, Pull-off
Guitar Notes notated as Hammer on / Pull off do not need to be played with the right hand.
The triplet in this phrase is played as Hammer-on / Pull-off (Legato).
© 2012, Gargant Studios, EURL - All rights reserved!
27
Reflow for Mac - User Manual!
Version 1.5 - English - 04/27/2012
Tap, Slap, Pop
Use these buttons to add Tapping, Slapping and Popping information to your Tablature.
Slapping and Popping strings on a Bass phrase
Vibrato
Vibrato effect is used to slightly alterate pitch up and down over time.
Left Hand Vibrato on a Guitar Tablature.
Palm Mute, Let Ring
Palm mute is achieved by damping the sound with the right hand. Let Ring means that
notes should not be muted from chord to chord, this is used mostly in arpeggiated chords.
Palm Mute and Let Ring on a Tablature
© 2012, Gargant Studios, EURL - All rights reserved!
28
Reflow for Mac - User Manual!
Version 1.5 - English - 04/27/2012
Bends
Clicking on this button will bring up the following Bend popup :
Select your Bend Type, and pitch at which the note should be bent, then released.
Slides
Slides are used to make a smooth transition between two notes.
© 2012, Gargant Studios, EURL - All rights reserved!
29
Reflow for Mac - User Manual!
Version 1.5 - English - 04/27/2012
Share your compositions
MIDI Export
Reflow can generate a MIDI file containing your entire song by calling File > Export >
Export as MIDI.
You can then easily import this MIDI file in your favorite DAW software such as Garage
Band, Logic, Live, Reason, ...
WAVE Export
You can export your song as an audio file, in the raw uncompressed WAVE format.
You can run this exporter using File > Export > Export as WAVE.
Guitar Pro™ 5 Export
If you wish to share your composition with a Guitar Pro™ user, simply call File > Export >
Export as Guitar Pro™ 5.
Please note that some elements won’t be exported because the file data formats are not
fully compatible. We’ll make our best to implement missing features.
PDF Export
Exporting as a PDF is done by Printing your document, and selecting the PDF menu.
© 2012, Gargant Studios, EURL - All rights reserved!
30