1
UK Location Programme
Location Information Interoperability Board
Data Publisher - How To Guide
Establish a Reference Implementation for an
INSPIRE View Service using a GeoServer
UK Location Programme
DOCUMENT CONTROL
Change Summary
Version
Date
Author/Editor
Change Summary
1.0
23 Nov 2010
Andrew Radburn
Initial Version
References
Ref.
Title/Version/Publication Date/Author
[1]
OS OpenData http://www.ordnancesurvey.co.uk/oswebsite/opendata/
[2]
GeoServer User Guide http://docs.geoserver.org/stable/en/user/
Reference Implementation
Page 2 of 23
UK Location Programme
CONTENTS
1
Reference Implementation........................................................................................................................... 4
2
System Requirements .................................................................................................................................. 5
2.1
Hardware ............................................................................................................................................. 5
2.2
Software ............................................................................................................................................... 5
3
Skills and Resources ................................................................................................................................... 6
4
Steps Taken .................................................................................................................................................. 7
4.1
Install Server ........................................................................................................................................ 7
4.2
Install PostgreSQL and PostGIS .......................................................................................................... 7
4.3
Install GDAL ......................................................................................................................................... 7
4.4
Install Java ........................................................................................................................................... 7
4.5
Install Apache and Tomcat Servers ..................................................................................................... 8
4.6
Configure Tomcat................................................................................................................................. 9
4.7
Install Java Advanced Imaging and JAI ImageIO Tools ....................................................................... 9
4.8
Install GeoServer ............................................................................................................................... 10
4.9
Configure PostGIS ............................................................................................................................. 11
4.10
Configure Putty .................................................................................................................................. 11
4.11
Configure Data ................................................................................................................................... 13
4.12
Load Data .......................................................................................................................................... 14
4.13
Configure Workspace......................................................................................................................... 14
4.14
Configure Data Store ......................................................................................................................... 14
4.15
Styling with SLDs ............................................................................................................................... 15
4.16
Configure the layers ........................................................................................................................... 16
4.17
Configure the layer group................................................................................................................... 16
5
Time Taken.................................................................................................................................................. 17
6
Handy Hints ................................................................................................................................................ 18
7
Lessons Learnt ........................................................................................................................................... 19
Reference Implementation
Page 3 of 23
UK Location Programme
1 REFERENCE IMPLEMENTATION
This document describes the building of a Reference Implementation of an INSPIRE View Service
using the Open Source software GeoServer and PostGIS.
The Reference Implementation holds the OS OpenData vector datasets Strategi and Vector Map
District [1].
Reference Implementation
Page 4 of 23
UK Location Programme
2 SYSTEM REQUIREMENTS
These are the hardware and software specifications used to build the Reference Implementation.
2.1 Hardware
•
An Amazon EC2 Machine Image running Ubuntu 10.04 LTS Server.
Large Instance
7.5 GB memory
4 EC2 Compute Units (2 virtual cores with 2 EC2 Compute Units each)
850 GB instance storage
64-bit platform
I/O Performance: High
AMI name: m1.large
•
Laptop / desktop computer
•
Internet connection between the two
2.2 Software
•
Ubuntu 10.04 LTS
•
Sun Java Runtime Environment 64 bit server VM 1.6.0_22
•
Java Advanced Imaging 1.1.3
•
JAI ImageIO Tools 1.1
•
Tomcat Servlet Container 6.0.24
•
Apache Web Server 2.2.14
•
GeoServer 2.0.2
•
PostgreSQL 8.4.5
•
PostGIS 1.4.0-2
•
PgAdmin 1.12.1
•
GDAL 1.6.3
•
Putty 0.60
•
Web browser (Chrome 7 and Firefox 3.6.10)
Reference Implementation
Page 5 of 23
UK Location Programme
3 SKILLS AND RESOURCES
The skills and knowledge required were
•
Ubuntu Linux administration
•
Using a command line via SSH
•
Shell scripts
•
Running GDAL and OGR2OGR programs
•
Database skills (Using PGAdmin)
•
Coordinate Reference Systems
•
Knowledge of the datasets to be published
Two IT resources were used with the above skills.
Reference Implementation
Page 6 of 23
UK Location Programme
4 STEPS TAKEN
4.1 Install Server
An Amazon AMI installation of Ubuntu (10.04) Lucid Lynx LTS Server was used as the basis of the
Reference Implementation. This AMI has a 64-bit hardware architecture and so 64-bit versions of
programs have to be used where appropriate.
When the server has been installed it first needs to be updated with any security and patch
upgrades. So login as the administrator and from the terminal command line, enter the commands:
sudo apt-get update
sudo apt-get upgrade
4.2 Install PostgreSQL and PostGIS
Installing PostGIS will also install PostgreSQL first as a dependency.
sudo apt-get install postgresql-8.4-postgis
4.3 Install GDAL
sudo apt-get install gdal-bin
4.4 Install Java
Install the Sun Java6 Java Runtime Environment
sudo add-apt-repository “deb http://archive.canonical.com/ lucid partner”
sudo apt-get update
sudo apt-get install sun-java6-jre sun-java6-fonts
sudo update-java-alternatives -s java-6-sun
To check the version of Java installed, use:
java –version
This should report back with:
java version "1.6.0_22"
Java(TM) SE Runtime Environment (build 1.6.0_22-b04)
Java HotSpot(TM) 64-Bit Server VM (build 17.1-b03, mixed mode)
Reference Implementation
Page 7 of 23
UK Location Programme
4.5 Install Apache and Tomcat Servers
Although strictly only a servlet container is needed to run GeoServer, installing both Apache and
Tomcat servers on the same machine enables it to be more flexible in serving other data from
Apache. This will enable the machine to act as a full web portal as well as a data server using such
packages as Drupal CMS or even a Wordpress Blog.
Install the server packages:
sudo apt-get install apache2
sudo apt-get install tomcat6 tomcat6-admin
Enable the communication between Apache2 and Tomcat.
sudo a2enmod proxy_ajp
sudo vi /etc/apache2/conf.d/proxy_ajp.conf
Add the following lines:
<Proxy *>
Order deny,allow
Allow from all
</Proxy>
ProxyPass /geoserver/ ajp://localhost:8009/geoserver/
ProxyPassReverse /geoserver/ ajp://localhost:8009/geoserver/
ProxyPass /manager/ ajp://localhost:8009/manager/
ProxyPassReverse /manager/ ajp://localhost:8009/manager/
Run this to reload the new apache configuration:
sudo /etc/init.d/apache2 reload
Uncomment out the lines in Tomcat server.xml to enable the AJP connector:
sudo vi /etc/tomcat6/server.xml
Remove the lines <!—and --> around the AJP connector definition.
The usernames, passwords and roles can be defined centrally in Tomcat 6.0 by editing the
/etc/tomcat6/tomcat-users.xml file:
sudo vi /etc/tomcat6/tomcat-users.xml
Add this between the tomcat-users tags:
<role rolename="admin"/>
<role rolename="manager"/>
<user username="admin" password="yourpassword" roles="manager,admin"/>
Restart Tomcat:
Reference Implementation
Page 8 of 23
UK Location Programme
sudo /etc/init.d/tomcat6 restart
You can then login to the Tomcat admin page using a web browser at:
http://yourhostname/manager/html/
4.6 Configure Tomcat
To customise Tomcat for running GeoServer in a production environment, edit the Java JVM
startup parameters here to utilise more memory:
sudo vi /etc/default/tomcat6
Find and alter the following lines:
# You may pass JVM startup parameters to Java here. If unset, the default
# options (-Djava.awt.headless=true -Xmx128m) will be used.
JAVA_OPTS="-Djava.awt.headless=true –server -Xms48m –Xmx512m"
Edit the java security permissions:
sudo vi /etc/tomcat6/policy.d/50local.policy
Add these lines at the bottom:
grant codebase "file:${catalina.base}/webapps/geoserver/WEB-INF/classes/-" {
permission java.security.AllPermission;
};
grant codebase "file:${catalina.base}/webapps/geoserver/WEB-INF/lib/-" {
permission java.security.AllPermission;
};
4.7 Install Java Advanced Imaging and JAI ImageIO Tools
Install the native Java Advanced Imaging (JAI) as defined in the GeoServer User Guide [2]:
wget http://download.java.net/media/jai/builds/release/1_1_3/jai-1_1_3-liblinux-amd64-jre.bin
sudo cp jai-1_1_3-lib-linux-amd64-jre.bin /usr/lib/jvm/java-6-sun/jre
cd /usr/lib/jvm/java-6-sun/jre
sudo sh jai-1_1_3-lib-linux-amd64-jre.bin
# Accept license agreement.
sudo rm jai-1_1_3-lib-linux-amd64-jre.bin
Install JAI ImageIO tools:
wget http://download.java.net/media/jai-imageio/builds/release/1.1/jai_imageio1_1-lib-linux-amd64-jre.bin
Reference Implementation
Page 9 of 23
UK Location Programme
sudo cp jai_imageio-1_1-lib-linux-amd64-jre.bin /usr/lib/jvm/java-6-sun/jre
cd /usr/lib/jvm/java-6-sun/jre
sudo su
export _POSIX2_VERSION=199209
sh jai_imageio-1_1-lib-linux-amd64-jre.bin
# Accept license agreement
rm ./ jai_imageio-1_1-lib-linux-amd64-jre.bin
exit
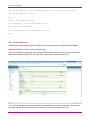
4.8 Install GeoServer
Download the latest stable GeoServer WAR file from http://geoserver.org/display/GEOS/Stable
Install this WAR file via the Tomcat manager page.
Go to the GeoServer main page: http;//yourserver/geoserver/ and log in at the top with username
admin and password geoserver. Go to the server status page and you should see:
You can then change the default password for the administrator under the Security – Users menu
link. Also change the contact information under the Contact Information menu link.
Reference Implementation
Page 10 of 23
UK Location Programme
4.9 Configure PostGIS
Add a password for the postgres database admin user:
sudo -u postgres -i
psql -U postgres
user postgres with password 'yourpassword';
\q
exit
To enable remote administration of the PostgreSQL database with PGAdmin, edit this file:
sudo vi /etc/postgresql/8.4/main/pg_hba.conf
Comment out the line and add the following line (with your machine’s IP address)
#local
host
all
all
all
all
62.25.96.244/32
ident
md5
sudo vi /etc/postgresql/8.4/main/postgresql.conf
Replace this line:
#listen_addresses = 'localhost'
# what IP address(es) to listen on;
listen_addresses = '*'
# what IP address(es) to listen on;
And edit the following lines:
shared_buffers = 128MB # 16384 for 8.1 and earlier
checkpoint_segments = 20
maintenance_work_mem = 256MB # 256000 for 8.1 and earlier
autovacuum = off
Edit the kernel parameter shmmax to increase maximum size of shared memory:
sudo sh -c "echo 'kernel.shmmax=268435456' > /etc/sysctl.d/60-shmmax.conf"
sudo service procps start
Restart PostgreSQL to enable the changes
sudo /etc/init.d/postgresql-8.4 restart:
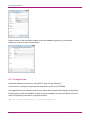
4.10 Configure Putty
Configure Putty for SSH port forwarding:
Reference Implementation
Page 11 of 23
UK Location Programme
You can now run PGAdmin and connect via localhost:9999
Create a POSTGIS template database
sudo -u postgres -i
createdb postgistemplate
createlang plpgsql postgistemplate
psql -d postgistemplate -f /usr/share/postgresql/8.4/contrib/postgis.sql
psql -d postgistemplate -f /usr/share/postgresql/8.4/contrib/spatial_ref_sys.sql
psql -d postgistemplate -f
/usr/share/postgresql/8.4/contrib/postgis_comments.sql
exit
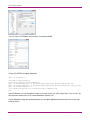
Using PGAdmin it is now possible to login and create a user via “New Login Role”. Use “vector” as
the username and tick the “Can create database objects” box.
Create database using the postgistemplate as a template database and the owner set to the user
created above:
Reference Implementation
Page 12 of 23
UK Location Programme
Alter the owner of the two tables created in the new database (geometry_columns and
spatial_ref_sys) to the user created above.
4.11 Configure Data
Upload the datasets to the server using PSFTP (part of Putty software).
Create and run a script to pre-process the data and re-project it into ETRS89.
See Appendix A for an example script used to collate and re-project the Strategi OS OpenData.
Possibly due to some incompatible versions of some packages, we found we had to link to the
correct Proj4 library to be able to re-project the data:
sudo ln -s /usr/lib/libproj.so.0 /usr/lib/libproj.so
Reference Implementation
Page 13 of 23
UK Location Programme
4.12 Load Data
Crate and run a load script to load the data into the PostGIS database. The ogr2ogr program
automatically creates any database tables and updates the geometry_columns table with the
required details. Sometimes the PGCLIENTENCODING environment variable has to be set to enable
accented characters to be handled correctly.
See Appendix B for an example of how to load pre-processed Strategi shapefile data into a
PostGIS database.
4.13 Configure Workspace
Add a new workspace which will group your layers together logically.
4.14 Configure Data Store
Add the PostGIS data store to GeoServer. Step by step instructions can be found in the GeoServer
User Manual, under the “Getting Started” - “Adding a PostGIS table” section.
Reference Implementation
Page 14 of 23
UK Location Programme
4.15 Styling with SLDs
In GeoServer, styling is accomplished using a markup language called Styled Layer Descriptor, or
SLD for short. See the GeoServer User manual for detailed instructions on how to write and load a
SLD into GeoServer.
Add the styles for each layer type using the admin panel of GeoServer.
The SLDs use external graphics for some of the map symbols, such as road name shields. In this
case, these symbols are referenced relative to the SLD, so copy over the directory of symbols:
cd /var/lib/tomcat6/webapps/geoserver/data/styles
sudo mkdir symbols
sudo chown tomcat6 symbols
sudo chgrp tomcat6 symbols
sudo chmod 777 symbols
# Use SFTP to copy over symbols directory
sudo chmod 755 symbols
The SLDs use a non default font for the text rendering, so we have to install some extra fonts:
Enable multiverse in /etc/apt/sources.list:
sudo vi /etc/apt/sources.list
Add the following line
deb http://eu-west-1.ec2.archive.ubuntu.com/ubuntu/ lucid main multiverse
Then install the fonts:
Reference Implementation
Page 15 of 23
UK Location Programme
sudo apt-get update
sudo apt-get install msttcorefonts
4.16 Configure the layers
Add the layers from the PostGIS data store as shown in the GeoServer User Guide. To each layer
add the appropriate style as defined in the section above.
4.17 Configure the layer group
A layer group can now be created with the layers defined in the following order:
•
Polygons
•
Lines
•
Roads
•
Points
•
Text
This will draw the combined layer in the correct order, with polygon areas on the bottom, overlaid
with lines, roads, then points and finally text on the top.
Reference Implementation
Page 16 of 23
UK Location Programme
5 TIME TAKEN
The Reference Implementation took two people about five days to build the system, install the
software, load the data, configure the system and test the results. The bulk of the time was taken
writing scripts to load and re-project the data.
Reference Implementation
Page 17 of 23
UK Location Programme
6 HANDY HINTS
At each stage check the data to see that the processes are working. So for the conversion process
you can look at the shapefiles in a GIS such as ESRI ArcGIS or an open source GIS such as
Quantum GIS (QGIS). When the data has been loaded into the database, you can check the
PostGIS tables have loaded correctly with a tool such as PgAdmin. You can also view the PostGIS
tables directly in QGIS to see if they are OK.
The field names referred to in a SLD are case sensitive, so make sure they match with the
columns named in your PostGIS database.
Some people prefer to work with a command interface and some with a GUI. All the tasks done via
PgAdmin can also be done on the command line using the psql command.
When creating a database from the PostGIS template with a different user as owner, make sure
you change the ownership of the “geometry_columns” table and “spatial_ref_sys” table to the same
user.
Reference Implementation
Page 18 of 23
UK Location Programme
7 LESSONS LEARNT
It may take longer than planned to write a script to gather, re-project and load the data into
PostGIS tables. Although this process may only be needed once, some data sets require a regular
update cycle and so the process should be as automated as possible.
Make sure documentation and articles read from the Web apply to the versions of software you are
currently using.
Reference Implementation
Page 19 of 23
UK Location Programme
APPENDIX A
#!/bin/bash
# Script to collate OS OpenData Strategi shapefiles
#
# Andy Radburn 17th Nov 2010
#
STRATEGI_DIR="/Data/OrdnanceSurvey/StrategiShape/data"
OUTPUT_DIR="TestStrategy"
OUTPUT_SRS=EPSG:4258
echo Processing OS OpenData Strategy from $STRATEGI_DIR
OUTFILE=Lines.shp
OUTNAME=Lines
OUTTYPE=LINESTRING
ogr2ogr -f "ESRI Shapefile" -s_srs EPSG:27700 -t_srs $OUTPUT_SRS -nln $OUTNAME -nlt $OUTTYPE
$OUTPUT_DIR/$OUTFILE $STRATEGI_DIR/GB_NORTH/admin_polyline.shp
ogr2ogr -append -update -f "ESRI Shapefile" -s_srs EPSG:27700 -t_srs $OUTPUT_SRS -nln $OUTNAME
$OUTTYPE $OUTPUT_DIR/$OUTFILE $STRATEGI_DIR/GB_NORTH/coast_polyline.shp
ogr2ogr -append -update -f "ESRI Shapefile" -s_srs EPSG:27700 -t_srs $OUTPUT_SRS -nln $OUTNAME
$OUTTYPE $OUTPUT_DIR/$OUTFILE $STRATEGI_DIR/GB_NORTH/ferry_polyline.shp
ogr2ogr -append -update -f "ESRI Shapefile" -s_srs EPSG:27700 -t_srs $OUTPUT_SRS -nln $OUTNAME
$OUTTYPE $OUTPUT_DIR/$OUTFILE $STRATEGI_DIR/GB_NORTH/land_use_polyline.shp
ogr2ogr -append -update -f "ESRI Shapefile" -s_srs EPSG:27700 -t_srs $OUTPUT_SRS -nln $OUTNAME
$OUTTYPE $OUTPUT_DIR/$OUTFILE $STRATEGI_DIR/GB_NORTH/nat_park_polyline.shp
ogr2ogr -append -update -f "ESRI Shapefile" -s_srs EPSG:27700 -t_srs $OUTPUT_SRS -nln $OUTNAME
$OUTTYPE $OUTPUT_DIR/$OUTFILE $STRATEGI_DIR/GB_NORTH/railway_polyline.shp
ogr2ogr -append -update -f "ESRI Shapefile" -s_srs EPSG:27700 -t_srs $OUTPUT_SRS -nln $OUTNAME
$OUTTYPE $OUTPUT_DIR/$OUTFILE $STRATEGI_DIR/GB_NORTH/rivers_polyline.shp
ogr2ogr -append -update -f "ESRI Shapefile" -s_srs EPSG:27700 -t_srs $OUTPUT_SRS -nln $OUTNAME
$OUTTYPE $OUTPUT_DIR/$OUTFILE $STRATEGI_DIR/GB_NORTH/txttrans_polyline.shp
ogr2ogr -append -update -f "ESRI Shapefile" -s_srs EPSG:27700 -t_srs $OUTPUT_SRS -nln $OUTNAME
$OUTTYPE $OUTPUT_DIR/$OUTFILE $STRATEGI_DIR/GB_SOUTH/admin_polyline.shp
ogr2ogr -append -update -f "ESRI Shapefile" -s_srs EPSG:27700 -t_srs $OUTPUT_SRS -nln $OUTNAME
$OUTTYPE $OUTPUT_DIR/$OUTFILE $STRATEGI_DIR/GB_SOUTH/coast_polyline.shp
ogr2ogr -append -update -f "ESRI Shapefile" -s_srs EPSG:27700 -t_srs $OUTPUT_SRS -nln $OUTNAME
$OUTTYPE $OUTPUT_DIR/$OUTFILE $STRATEGI_DIR/GB_SOUTH/ferry_polyline.shp
ogr2ogr -append -update -f "ESRI Shapefile" -s_srs EPSG:27700 -t_srs $OUTPUT_SRS -nln $OUTNAME
$OUTTYPE $OUTPUT_DIR/$OUTFILE $STRATEGI_DIR/GB_SOUTH/land_use_polyline.shp
ogr2ogr -append -update -f "ESRI Shapefile" -s_srs EPSG:27700 -t_srs $OUTPUT_SRS -nln $OUTNAME
$OUTTYPE $OUTPUT_DIR/$OUTFILE $STRATEGI_DIR/GB_SOUTH/nat_park_polyline.shp
ogr2ogr -append -update -f "ESRI Shapefile" -s_srs EPSG:27700 -t_srs $OUTPUT_SRS -nln $OUTNAME
$OUTTYPE $OUTPUT_DIR/$OUTFILE $STRATEGI_DIR/GB_SOUTH/railway_polyline.shp
ogr2ogr -append -update -f "ESRI Shapefile" -s_srs EPSG:27700 -t_srs $OUTPUT_SRS -nln $OUTNAME
$OUTTYPE $OUTPUT_DIR/$OUTFILE $STRATEGI_DIR/GB_SOUTH/rivers_polyline.shp
ogr2ogr -append -update -f "ESRI Shapefile" -s_srs EPSG:27700 -t_srs $OUTPUT_SRS -nln $OUTNAME
$OUTTYPE $OUTPUT_DIR/$OUTFILE $STRATEGI_DIR/GB_SOUTH/txttrans_polyline.shp
-nlt
-nlt
-nlt
-nlt
-nlt
-nlt
-nlt
-nlt
-nlt
-nlt
-nlt
-nlt
-nlt
-nlt
-nlt
echo Lines Done.
OUTFILE=Polygons.shp
OUTNAME=Polygons
OUTTYPE=MULTIPOLYGON
ogr2ogr -f "ESRI Shapefile" -s_srs EPSG:27700 -t_srs $OUTPUT_SRS -nln $OUTNAME -nlt $OUTTYPE
$OUTPUT_DIR/$OUTFILE $STRATEGI_DIR/GB_NORTH/foreshor_region.shp
ogr2ogr -append -update -f "ESRI Shapefile" -s_srs EPSG:27700 -t_srs $OUTPUT_SRS -nln $OUTNAME -nlt
$OUTTYPE $OUTPUT_DIR/$OUTFILE $STRATEGI_DIR/GB_NORTH/lakes_region.shp
ogr2ogr -append -update -f "ESRI Shapefile" -s_srs EPSG:27700 -t_srs $OUTPUT_SRS -nln $OUTNAME -nlt
$OUTTYPE $OUTPUT_DIR/$OUTFILE $STRATEGI_DIR/GB_NORTH/urban_region.shp
ogr2ogr -append -update -f "ESRI Shapefile" -s_srs EPSG:27700 -t_srs $OUTPUT_SRS -nln $OUTNAME -nlt
$OUTTYPE $OUTPUT_DIR/$OUTFILE $STRATEGI_DIR/GB_NORTH/woodland_region.shp
Reference Implementation
Page 20 of 23
UK Location Programme
ogr2ogr -append -update -f "ESRI Shapefile" -s_srs EPSG:27700 -t_srs $OUTPUT_SRS
$OUTTYPE $OUTPUT_DIR/$OUTFILE $STRATEGI_DIR/GB_SOUTH/foreshor_region.shp
ogr2ogr -append -update -f "ESRI Shapefile" -s_srs EPSG:27700 -t_srs $OUTPUT_SRS
$OUTTYPE $OUTPUT_DIR/$OUTFILE $STRATEGI_DIR/GB_SOUTH/lakes_region.shp
ogr2ogr -append -update -f "ESRI Shapefile" -s_srs EPSG:27700 -t_srs $OUTPUT_SRS
$OUTTYPE $OUTPUT_DIR/$OUTFILE $STRATEGI_DIR/GB_SOUTH/urban_region.shp
ogr2ogr -append -update -f "ESRI Shapefile" -s_srs EPSG:27700 -t_srs $OUTPUT_SRS
$OUTTYPE $OUTPUT_DIR/$OUTFILE $STRATEGI_DIR/GB_SOUTH/woodland_region.shp
-nln $OUTNAME -nlt
-nln $OUTNAME -nlt
-nln $OUTNAME -nlt
-nln $OUTNAME -nlt
echo Polygons Done.
OUTFILE=Points.shp
OUTNAME=Points
OUTTYPE=MULTIPOINT
ogr2ogr -f "ESRI Shapefile" -s_srs EPSG:27700 -t_srs $OUTPUT_SRS -nln $OUTNAME -nlt $OUTTYPE
$OUTPUT_DIR/$OUTFILE $STRATEGI_DIR/GB_NORTH/admin_font_point.shp
ogr2ogr -append -update -f "ESRI Shapefile" -s_srs EPSG:27700 -t_srs $OUTPUT_SRS -nln $OUTNAME
$OUTTYPE $OUTPUT_DIR/$OUTFILE $STRATEGI_DIR/GB_NORTH/airport_font_point.shp
ogr2ogr -append -update -f "ESRI Shapefile" -s_srs EPSG:27700 -t_srs $OUTPUT_SRS -nln $OUTNAME
$OUTTYPE $OUTPUT_DIR/$OUTFILE $STRATEGI_DIR/GB_NORTH/land_use_font_point.shp
ogr2ogr -append -update -f "ESRI Shapefile" -s_srs EPSG:27700 -t_srs $OUTPUT_SRS -nln $OUTNAME
$OUTTYPE $OUTPUT_DIR/$OUTFILE $STRATEGI_DIR/GB_NORTH/nat_park_font_point.shp
ogr2ogr -append -update -f "ESRI Shapefile" -s_srs EPSG:27700 -t_srs $OUTPUT_SRS -nln $OUTNAME
$OUTTYPE $OUTPUT_DIR/$OUTFILE $STRATEGI_DIR/GB_NORTH/seeds_font_point.shp
ogr2ogr -append -update -f "ESRI Shapefile" -s_srs EPSG:27700 -t_srs $OUTPUT_SRS -nln $OUTNAME
$OUTTYPE $OUTPUT_DIR/$OUTFILE $STRATEGI_DIR/GB_NORTH/settlmnt_font_point.shp
ogr2ogr -append -update -f "ESRI Shapefile" -s_srs EPSG:27700 -t_srs $OUTPUT_SRS -nln $OUTNAME
$OUTTYPE $OUTPUT_DIR/$OUTFILE $STRATEGI_DIR/GB_NORTH/settlmnt_point.shp
ogr2ogr -append -update -f "ESRI Shapefile" -s_srs EPSG:27700 -t_srs $OUTPUT_SRS -nln $OUTNAME
$OUTTYPE $OUTPUT_DIR/$OUTFILE $STRATEGI_DIR/GB_NORTH/tourist_font_point.shp
ogr2ogr -append -update -f "ESRI Shapefile" -s_srs EPSG:27700 -t_srs $OUTPUT_SRS -nln $OUTNAME
$OUTTYPE $OUTPUT_DIR/$OUTFILE $STRATEGI_DIR/GB_NORTH/trans_pt_font_point.shp
ogr2ogr -append -update -f "ESRI Shapefile" -s_srs EPSG:27700 -t_srs $OUTPUT_SRS -nln $OUTNAME
$OUTTYPE $OUTPUT_DIR/$OUTFILE $STRATEGI_DIR/GB_NORTH/trans_pt_point.shp
ogr2ogr -append -update -f "ESRI Shapefile" -s_srs EPSG:27700 -t_srs $OUTPUT_SRS -nln $OUTNAME
$OUTTYPE $OUTPUT_DIR/$OUTFILE $STRATEGI_DIR/GB_NORTH/txttrans_font_point.shp
ogr2ogr -append -update -f "ESRI Shapefile" -s_srs EPSG:27700 -t_srs $OUTPUT_SRS -nln $OUTNAME
$OUTTYPE $OUTPUT_DIR/$OUTFILE $STRATEGI_DIR/GB_NORTH/water_ft_font_point.shp
ogr2ogr -append -update -f "ESRI Shapefile" -s_srs EPSG:27700 -t_srs $OUTPUT_SRS -nln $OUTNAME
$OUTTYPE $OUTPUT_DIR/$OUTFILE $STRATEGI_DIR/GB_SOUTH/admin_font_point.shp
ogr2ogr -append -update -f "ESRI Shapefile" -s_srs EPSG:27700 -t_srs $OUTPUT_SRS -nln $OUTNAME
$OUTTYPE $OUTPUT_DIR/$OUTFILE $STRATEGI_DIR/GB_SOUTH/airport_font_point.shp
ogr2ogr -append -update -f "ESRI Shapefile" -s_srs EPSG:27700 -t_srs $OUTPUT_SRS -nln $OUTNAME
$OUTTYPE $OUTPUT_DIR/$OUTFILE $STRATEGI_DIR/GB_SOUTH/land_use_font_point.shp
ogr2ogr -append -update -f "ESRI Shapefile" -s_srs EPSG:27700 -t_srs $OUTPUT_SRS -nln $OUTNAME
$OUTTYPE $OUTPUT_DIR/$OUTFILE $STRATEGI_DIR/GB_SOUTH/nat_park_font_point.shp
ogr2ogr -append -update -f "ESRI Shapefile" -s_srs EPSG:27700 -t_srs $OUTPUT_SRS -nln $OUTNAME
$OUTTYPE $OUTPUT_DIR/$OUTFILE $STRATEGI_DIR/GB_SOUTH/seeds_font_point.shp
ogr2ogr -append -update -f "ESRI Shapefile" -s_srs EPSG:27700 -t_srs $OUTPUT_SRS -nln $OUTNAME
$OUTTYPE $OUTPUT_DIR/$OUTFILE $STRATEGI_DIR/GB_SOUTH/settlmnt_font_point.shp
ogr2ogr -append -update -f "ESRI Shapefile" -s_srs EPSG:27700 -t_srs $OUTPUT_SRS -nln $OUTNAME
$OUTTYPE $OUTPUT_DIR/$OUTFILE $STRATEGI_DIR/GB_SOUTH/settlmnt_point.shp
ogr2ogr -append -update -f "ESRI Shapefile" -s_srs EPSG:27700 -t_srs $OUTPUT_SRS -nln $OUTNAME
$OUTTYPE $OUTPUT_DIR/$OUTFILE $STRATEGI_DIR/GB_SOUTH/tourist_font_point.shp
ogr2ogr -append -update -f "ESRI Shapefile" -s_srs EPSG:27700 -t_srs $OUTPUT_SRS -nln $OUTNAME
$OUTTYPE $OUTPUT_DIR/$OUTFILE $STRATEGI_DIR/GB_SOUTH/trans_pt_font_point.shp
ogr2ogr -append -update -f "ESRI Shapefile" -s_srs EPSG:27700 -t_srs $OUTPUT_SRS -nln $OUTNAME
$OUTTYPE $OUTPUT_DIR/$OUTFILE $STRATEGI_DIR/GB_SOUTH/trans_pt_point.shp
ogr2ogr -append -update -f "ESRI Shapefile" -s_srs EPSG:27700 -t_srs $OUTPUT_SRS -nln $OUTNAME
$OUTTYPE $OUTPUT_DIR/$OUTFILE $STRATEGI_DIR/GB_SOUTH/txttrans_font_point.shp
ogr2ogr -append -update -f "ESRI Shapefile" -s_srs EPSG:27700 -t_srs $OUTPUT_SRS -nln $OUTNAME
$OUTTYPE $OUTPUT_DIR/$OUTFILE $STRATEGI_DIR/GB_SOUTH/water_ft_font_point.shp
echo Points Done.
Reference Implementation
Page 21 of 23
-nlt
-nlt
-nlt
-nlt
-nlt
-nlt
-nlt
-nlt
-nlt
-nlt
-nlt
-nlt
-nlt
-nlt
-nlt
-nlt
-nlt
-nlt
-nlt
-nlt
-nlt
-nlt
-nlt
UK Location Programme
OUTFILE=Roads.shp
OUTNAME=Roads
OUTTYPE=LINESTRING
ogr2ogr -f "ESRI Shapefile" -s_srs EPSG:27700 -t_srs $OUTPUT_SRS -nln $OUTNAME -nlt $OUTTYPE
$OUTPUT_DIR/$OUTFILE $STRATEGI_DIR/GB_NORTH/a_road_polyline.shp
ogr2ogr -append -update -f "ESRI Shapefile" -s_srs EPSG:27700 -t_srs $OUTPUT_SRS -nln $OUTNAME
$OUTTYPE $OUTPUT_DIR/$OUTFILE $STRATEGI_DIR/GB_NORTH/b_road_polyline.shp
ogr2ogr -append -update -f "ESRI Shapefile" -s_srs EPSG:27700 -t_srs $OUTPUT_SRS -nln $OUTNAME
$OUTTYPE $OUTPUT_DIR/$OUTFILE $STRATEGI_DIR/GB_NORTH/minor_rd_polyline.shp
ogr2ogr -append -update -f "ESRI Shapefile" -s_srs EPSG:27700 -t_srs $OUTPUT_SRS -nln $OUTNAME
$OUTTYPE $OUTPUT_DIR/$OUTFILE $STRATEGI_DIR/GB_NORTH/motorway_polyline.shp
ogr2ogr -append -update -f "ESRI Shapefile" -s_srs EPSG:27700 -t_srs $OUTPUT_SRS -nln $OUTNAME
$OUTTYPE $OUTPUT_DIR/$OUTFILE $STRATEGI_DIR/GB_NORTH/primy_rd_polyline.shp
ogr2ogr -append -update -f "ESRI Shapefile" -s_srs EPSG:27700 -t_srs $OUTPUT_SRS -nln $OUTNAME
$OUTTYPE $OUTPUT_DIR/$OUTFILE $STRATEGI_DIR/GB_SOUTH/a_road_polyline.shp
ogr2ogr -append -update -f "ESRI Shapefile" -s_srs EPSG:27700 -t_srs $OUTPUT_SRS -nln $OUTNAME
$OUTTYPE $OUTPUT_DIR/$OUTFILE $STRATEGI_DIR/GB_SOUTH/b_road_polyline.shp
ogr2ogr -append -update -f "ESRI Shapefile" -s_srs EPSG:27700 -t_srs $OUTPUT_SRS -nln $OUTNAME
$OUTTYPE $OUTPUT_DIR/$OUTFILE $STRATEGI_DIR/GB_SOUTH/minor_rd_polyline.shp
ogr2ogr -append -update -f "ESRI Shapefile" -s_srs EPSG:27700 -t_srs $OUTPUT_SRS -nln $OUTNAME
$OUTTYPE $OUTPUT_DIR/$OUTFILE $STRATEGI_DIR/GB_SOUTH/motorway_polyline.shp
ogr2ogr -append -update -f "ESRI Shapefile" -s_srs EPSG:27700 -t_srs $OUTPUT_SRS -nln $OUTNAME
$OUTTYPE $OUTPUT_DIR/$OUTFILE $STRATEGI_DIR/GB_SOUTH/primy_rd_polyline.shp
-nlt
-nlt
-nlt
-nlt
-nlt
-nlt
-nlt
-nlt
-nlt
echo Roads Done.
OUTFILE=Text.shp
OUTNAME=Text
OUTTYPE=POINT
ogr2ogr -f "ESRI Shapefile" -s_srs EPSG:27700 -t_srs $OUTPUT_SRS -nln $OUTNAME -nlt $OUTTYPE
$OUTPUT_DIR/$OUTFILE $STRATEGI_DIR/GB_NORTH/txtadmin_text.shp
ogr2ogr -append -update -f "ESRI Shapefile" -s_srs EPSG:27700 -t_srs $OUTPUT_SRS -nln $OUTNAME
$OUTTYPE $OUTPUT_DIR/$OUTFILE $STRATEGI_DIR/GB_NORTH/txtother_text.shp
ogr2ogr -append -update -f "ESRI Shapefile" -s_srs EPSG:27700 -t_srs $OUTPUT_SRS -nln $OUTNAME
$OUTTYPE $OUTPUT_DIR/$OUTFILE $STRATEGI_DIR/GB_NORTH/txttrans_text.shp
ogr2ogr -append -update -f "ESRI Shapefile" -s_srs EPSG:27700 -t_srs $OUTPUT_SRS -nln $OUTNAME
$OUTTYPE $OUTPUT_DIR/$OUTFILE $STRATEGI_DIR/GB_SOUTH/txtadmin_text.shp
ogr2ogr -append -update -f "ESRI Shapefile" -s_srs EPSG:27700 -t_srs $OUTPUT_SRS -nln $OUTNAME
$OUTTYPE $OUTPUT_DIR/$OUTFILE $STRATEGI_DIR/GB_SOUTH/txtother_text.shp
ogr2ogr -append -update -f "ESRI Shapefile" -s_srs EPSG:27700 -t_srs $OUTPUT_SRS -nln $OUTNAME
$OUTTYPE $OUTPUT_DIR/$OUTFILE $STRATEGI_DIR/GB_SOUTH/txttrans_text.shp
echo Text Done.
echo Finished.
Reference Implementation
Page 22 of 23
-nlt
-nlt
-nlt
-nlt
-nlt
UK Location Programme
APPENDIX B
export PGCLIENTENCODING=WIN1252
INPUT_DIR=TestStrategy
ogr2ogr -a_srs EPSG:4258 -f "PostgreSQL" PG:"host=localhost user=vector
dbname=vector password=yourpassword" $INPUT_DIR/Lines.shp
ogr2ogr -a_srs EPSG:4258 -nlt GEOMETRY -f "PostgreSQL" PG:"host=localhost
user=vector dbname=vector password= yourpassword " $INPUT_DIR/Polygons.shp
ogr2ogr -a_srs EPSG:4258 -f "PostgreSQL" PG:"host=localhost user=vector
dbname=vector password= yourpassword " $INPUT_DIR/Points.shp
ogr2ogr -a_srs EPSG:4258 -f "PostgreSQL" PG:"host=localhost user=vector
dbname=vector password= yourpassword " $INPUT_DIR/Roads.shp
ogr2ogr -a_srs EPSG:4258 -f "PostgreSQL" PG:"host=localhost user=vector
dbname=vector password= yourpassword " $INPUT_DIR/Text.shp
Reference Implementation
Page 23 of 23