1
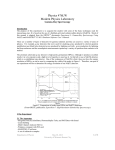
SENS - TECH
SENSOR TECHNOLOGIES
P25USB
P30USB
photodetector modules
Sens-Tech Limited
6A Langley Business Centre
Station Road, Langley, Berkshire, SL3 8DS, UK
tel:
+44 (0)1753 214714
fax:
+44 (0)1753 214715
email: [email protected]
www.sens-tech.com
registered in England 668759
an ISO 9001 registered company
© Sens-Tech Limited, 2010
the contents may not be copied or disclosed to any
unauthorised third party without written permission
user manual
issue 2 september 2010
SENS - TECH
SENSOR TECHNOLOGIES
P25USB P30USB
photodetector modules
page
1
2
3
4
precautions
1.1
light exposure
1.2
supply voltage
1.3
maintenance
1.4
cleaning
1.5
environment
1.6
magnetic fields
2
2
2
2
2
2
installation
2.1
system requirement
2.2
software installation
2.3
interfaces
2.4
light collection
3
3
3
3
start-up software
3.1
selecting module
3.2
control window
3.3
counter/timer window
4
5
7
programming
4.1
command description
9
5
troubleshooting
12
6
module design
13
7
photon counting techniques
7.1
operating principles
14
appendix
appendix A - interface characteristics
appendix B - environmental conditions
appendix C - outline drawings
®
appendix D - the ActiveX control
17
18
19
20
8
P25USB, P30USB user manual - issue 2, September 2010 © Sens-Tech Limited, 2010
page 1 of 21
SENS - TECH
SENSOR TECHNOLOGIES
1
precautions
1.1
light exposure
The photodetector module is extremely sensitive to light. It is recommended that the module is
stored in the dark. Exposure to bright light, such as fluorescent lighting or daylight, should be
minimised. After exposure to bright light, the dark current or dark count rate may take up to 24
hours to return to the expected low level.
note:
the photodetector module must not be switched on (using the <HV on> command) in
bright light; this may result in permanent damage to the product.
1.2
supply voltage
Ensure the +5 V supply voltage does not exceed +5.25 V. Exceeding +6.0 V on the module or
reversing the supply, may result in permanent damage (see appendix A, module interface
characteristics).
1.3
maintenance
Photodetector modules contain no user-maintainable components. Because of the High Voltages
present inside the package, dis-assembly must not be attempted by the user. Photodetector
modules must be returned to Sens-Tech for repair.
1.4
cleaning
The window of the photodetector module may be cleaned, using lens tissue and alcohol, but only
while it is disconnected from its power supply. The window should be treated as a normal optical
component. The housing may also be cleaned with alcohol and lens tissue. The use of other
cleaning agents is not recommended. When cleaning, observe the precautions stated under light
exposure.
1.5
environment
The photodetector module must not be exposed to levels outside those specified in appendix B,
environmental conditions.
1.6
magnetic fields
The module housing is made of mu-metal, providing good shielding from transverse magnetic
fields. For applications involving strong axial magnetic fields, please ask for assistance from our
technical sales staff.
P25USB, P30USB user manual - issue 2, September 2010 © Sens-Tech Limited, 2010
page 2 of 21
SENS - TECH
SENSOR TECHNOLOGIES
2
installation
2.1
system requirements
®
®
1
PC operating under Microsoft Windows XP or Windows 7 with a CD ROM drive
2
+5V power supply
2.2
software installation
Software has been provided with the module to allow immediate use of the product.
However, if custom user programmes are required then section 4, programming defines
the necessary interface protocol for users to follow.
Insert the counter/timer software compact disc into the CD-ROM drive of your
computer. The set-up program will install the counter/timer software on your PC together
with a virtual COM port driver for the USB interface.
note:
installation set-up starts automatically on most computers. If it does not run the
set-up programme on the CD.
2.3
interfaces (see appendix A, module interface characteristics)
2.3.1
connect the module to a light-tight housing or sample chamber.
2.3.2
connect the USB lead to the computer.
2.3.3
connect the power leads to the +5 V power supply. (red = +5 V, black = 0 V)
2.3.4
if used, make the appropriate connections to the trigger Input (grey) and user ouput
(violet).
5V
load
Light tight enclosure
Supply
Red
PxxUSB module
Violet
Grey
Black
0/5V logic levels
USB lead
PC
2.3.5
switch on the +5 V power supply.
note:
the photodetector module must be installed in a light-tight housing or sample
chamber before the selecting the <HV on> command; failure to do so may damage it.
2.3.6 Driver installation
After installation of the software, when the first module is connected to a USB port, the PC will
detect new hardware and install the two drivers. Follow the on-screen instructions to carry out this
process.
This process will repeat the first time a module is plugged into each of the PC's remaining USB
ports.
P25USB, P30USB user manual - issue 2, September 2010 © Sens-Tech Limited, 2010
page 3 of 21
SENS - TECH
SENSOR TECHNOLOGIES
2.4
light collection
When measuring low light levels, always try to collect as much light as possible onto the window of
the photomultiplier. For example, assuming a point source of emission at a distance of 22 mm
from, say, a 22 mm diameter active area photocathode, then straightforward solid angle
considerations indicate that only 12 % of emitted light reaches the photomultiplier. Some
enhancement may be achieved by the use of reflective surfaces or a light guide, or by simply
moving the window closer to the source.
3
start-up software
3.1
selecting module
If not already done, power up the module to be used and connect the USB lead to the PC.
Note:
If this is the first time any PxxUSB module has been connected to the USB port a new
hardware message will appear. Follow the on-screen instructions to install the two drivers.
The module to be used with the software must now be selected from a list of the devices connected
to the PC serial ports. To do this, select File, then Connect from the menu at the top of the Main
Window. A window called New will appear.
Select the module from the drop down list and click Open. A results window will then open for that
module showing an empty table and graph. (If it is not already present the control window will also
open at this time).
If you wish to use multiple modules the above process must be repeated for each one. The results
window for each package is identified on the title bar by the package serial number.
P25USB, P30USB user manual - issue 2, September 2010 © Sens-Tech Limited, 2010
page 4 of 21
SENS - TECH
SENSOR TECHNOLOGIES
3.2
control window
The control window opens automatically when a results window is opened. It may also be opened
by selecting Window and then Show control window.
Note:
If multiple modules are used, there will only be one control window and this will control all
the modules in unison. If you wish to control multiple modules individually you should open
an instance of the program for each package.
In the Control window set up the following:
3.2.1
external trigger
Select the external trigger mode as either Off, Fixed or Continuous. These operate as follows;
Off
When the start button is clicked counting beings immediately. Counting will then
continue until the set number of readings have been taken or the STOP button is
clicked.
Fixed
When the start button is clicked counting will not begin until the first falling edge on
the external trigger input (grey wire). Counting will then continue until the set
number of readings have been taken or the STOP button is clicked.
Continuous
When the start button is clicked readings will only be taken whilst the trigger input
is at logic high. Readings begin within 50us after the trigger input is taken high.
When the trigger input is taken low the current reading period will complete before
the gate is closed. Counting will continue until the set number of readings have
been taken or the STOP button is clicked.
3.2.2
readings
Select the total number of readings you wish to take (32000 max).
3.2.3
period
Select the gating period of the reading (10 ms to 300 s).
By clicking on the box that states the units of the period setting, the user can toggle between ms
(10 - 2500) and s (1 - 300). When ms (10 - 2500) is used, the software reads counts from the
hardware dependent on the period set. When s (1 - 300) is used, the software reads counts from
the hardware every 1 s and then accumulates the results until the desired period is achieved.
P25USB, P30USB user manual - issue 2, September 2010 © Sens-Tech Limited, 2010
page 5 of 21
SENS - TECH
SENSOR TECHNOLOGIES
3.2.4
high voltage
Select the HV voltage as Off or On or Follow start, noting the precautions stated in section 1.
The module will not count until the HV voltage has been activated. When Follow start is selected
the HV will switch on automatically when the start button is clicked. (see also Delay Start below).
3.2.5
user signal
Select the User Signal as Off or On or Follow start. This will then control the external output line
(violet wire) switching it between 0 volts (off) and +5 volts (on) to permit control of external
apparatus, such as a shutter mechanism (see appendix A, module interface characteristics).
When Follow start is selected the user output goes to +5V when the start button is clicked. This is
unaffected by the setting of the delay start.
3.2.6
start / stop
Selecting Start / Stop will either Start or Stop counting. On selecting Start, the software will
function in accordance with the selection made in the Control Window.
3.2.7
delay start
Setting a value here allows the start of the counting to be delayed by up to 10,000ms from clicking
the start button. This can be used, for example, when using Follow start to allow the HV to settle
before counting begins. The HV takes approximately 600ms to settle, however a warm up time of at
least 2 seconds is recommended.
P25USB, P30USB user manual - issue 2, September 2010 © Sens-Tech Limited, 2010
page 6 of 21
SENS - TECH
SENSOR TECHNOLOGIES
3.3
counter / timer software window
The following facilities are available from the Main Window, both as drop down menus and as items
on the toolbar.
file:
Connect
selects the module to be used, as stated in section 3.1.
Open
allows the user to select a previously saved set of results for
analysis.
Save
allows the user to save a set of results.
note: If there are multiple results windows open, the relevant
window must be selected by clicking on it.
Save as
allows the user to change the save file name.
Exit
exits the program.
copy
copies highlighted data to the clipboard to enable it to be pasted
into other software applications, such as a spreadsheet or word
processor.
select all
selects and highlights all of the data in the table.
edit:
window:
math
plots two existing sets of data as a ratio on a point by point basis.
statistics
allows previously recorded data to be analysed to find min, max,
mean and standard deviation.
show control window
displays the counter control window
P25USB, P30USB user manual - issue 2, September 2010 © Sens-Tech Limited, 2010
page 7 of 21
SENS - TECH
SENSOR TECHNOLOGIES
help:
technical support
this takes you to the Sens-Tech web site, where a list of technical
support contacts are available.
about
this states the software version being used.
P25USB, P30USB user manual - issue 2, September 2010 © Sens-Tech Limited, 2010
page 8 of 21
SENS - TECH
SENSOR TECHNOLOGIES
4
programming
The tables on the following pages list the commands available to operate the module. This
information is helpful when writing your own software.
In addition, an ActiveX® control driver is provided on the installation CD, together with example
programmes for use with Excel®, Lab View®, Visual Basic® and Delphi®. Details of this module are
®
shown in appendix D, the ActiveX control.
4.1
command description
All commands sent from the PC must consist of strings of ASCII characters terminated with CR and
LF, except the stop command which is just a CR. As shown by the following table, commands
consist of a single upper case letter which will, in some cases, be followed by a value. The value is
sent as a single ASCII character (except for command V which uses two). For example a decimal
value of 21 would be transmitted as a single byte with the value 14 (hex). Values are limited to the
range 0 to 255.
Commands will either be acknowledged with a pair of ASCII characters (as shown in the table) or
will initiate a flow of data back to the PC. Where the command is not recognized there will be no
reply. If the characters following a valid command are not as expected the reply BC (bad
command) will be sent to the PC. Replies to the PC are not terminated with CR and LF.
The commands S, C, B, L and E cause the module to transmit readings back to the PC. The
readings consist of blocks of four bytes which hold the binary value of each reading. The first byte
transmitted is the most significant byte. If the most significant bit of the first byte is a 1 an overflow
has occurred in the counter. The maximum possible uncorrected count for each reading is
67,108,863.
All commands will stop any reading in progress, or stop any EEPROM memory transmission to the
PC, and then perform the specified action.
An ST (Start Message) is sent to the PC at power-up and whenever a Reset occurs.
P25USB, P30USB user manual - issue 2, September 2010 © Sens-Tech Limited, 2010
page 9 of 21
SENS - TECH
SENSOR TECHNOLOGIES
command
action
returns to PC
Power up or reset.
The ST (start) message.
S
Starts R readings where each reading is timed over P*10ms.
At the end of each reading, the
reading is sent to the PC in binary
form as 4 bytes with the most
significant byte sent first. If the
count exceeds 67,108,863 during
a reading that reading is
terminated immediately and an
error reading is sent to the PC. The
software then continues with the
next reading.
An error reading is distinguished by
having the most significant bit of
the first byte as a 1, otherwise it is
0. Thus, a valid reading has a
maximum of 31 bits.
C
Starts continuous readings where each reading is timed over
P*10ms. The readings are terminated by sending the Stop
command (CR) or other command
L
Allows continuous readings. Readings are initiated, where each
Following the VA (Valid) message,
the readings are sent to the PC as
reading is timed over P*10ms, whenever the External Trigger
pin is 1; and readings are inhibited whenever the External Trigger for the S and C commands above.
pin is 0.
Sending the Stop command (CR) or other command terminates
this mode of operation.
E
Allows R readings, where each reading is timed over P*10ms.
Each reading is initiated at the falling edge of the external
Trigger pin. This may be repeated any number of times.
Sending the Stop command (CR) or other command terminates
this mode of operation.
M
Starts R readings where each reading is timed over P*10ms.
The readings are sequentially stored in the non-volatile
EEPROM along with the number of readings taken, overwriting
the currently stored readings. Overflowed readings are also
stored.
If R is greater than 126, only 126 readings are taken and stored.
No readings are sent to the PC,
but when all of the readings have
been taken the MF message is
sent to the PC.
B
Sends the readings held in the non-volatile memory to the PC.
These readings remain in the non-volatile memory until
overwritten by the consequences of an M command.
The readings held in the nonvolatile memory.
CR
(carriage
return)
R followed by
a character.
Cancels the current set of readings.
The SP (Stopped) message.
Sets the Number of Readings to the byte value of the
character following R. A 0 is seen as 1.
The default Number of Readings is 1.
The VA (Valid) message.
Sets the Periods setting P to the number following P.
A 0 is changed to 1.
This sets the counter gate interval in multiples of 10ms,
eg. P=100 gives a one second gate time.
The default Periods setting is 10.
The VA (Valid) message.
P followed by
a character.
P25USB, P30USB user manual - issue 2, September 2010 © Sens-Tech Limited, 2010
page 10 of 21
SENS - TECH
SENSOR TECHNOLOGIES
command
action
returns to PC
O followed by a Turns on the Output Signal 1 (+5V out) when the character
following the O has a byte value of 1, or turns off (0V out) the
character.
Output Signal 1 when it has a byte value of 0.
Byte values greater than 1 cause a BC message to be sent to the
PC
The default value is off.
The VA (Valid) message.
V followed by
two characters
Turns off the Voltage when both of the characters following the
V have byte values of zero, or turns on the Voltage if either one
of the characters has a byte value that is not zero (port 3.7 is 0)
The default value is off.
The VA (Valid) message.
D
Turns on the high voltage.
The VA (Valid) message.
example
To initialise and take 20 readings in fixed count mode using a 100ms gating period
Apply power to counter
Replies:
S T
After a power on reset, two ASCII characters are sent to PC to indicate
startup initialisation is complete
PC sends:
R x CR LF
(Four ASCII characters), where x represents an ASCII character with the
value in the range 1 to 255 setting the number of readings to be taken. In
this example we want the character with the decimal value 20 and should
transmit a single byte with the value 14 (hex).
replies:
V A
Two ASCII characters acknowledging a valid command
PC sends:
P y CR LF
(Four ASCII characters). This sets the gating period. y represents an
ASCII character with a value in the range 1 to 255 and sets the gating
period in multiples of 10ms. In this example we want 100ms and so y
would be the ASCII character with the decimal value of 10
(10x10ms=100ms).
replies:
V A
PC sends:
S CR LF
(Three ASCII characters) This starts the measuring process. No V A
reply is sent to PC.
replies:
b1 b2..b80
(80 bytes) The counter will transmit back a string of bytes containing the
reading in binary . Twenty readings will produce 80 bytes in total.
When the first reading is complete it will be transmitted as four binary
bytes as detailed above.
Whilst this transmission proceeds the next reading begins.
P25USB, P30USB user manual - issue 2, September 2010 © Sens-Tech Limited, 2010
page 11 of 21
SENS - TECH
SENSOR TECHNOLOGIES
5
troubleshooting
1
no counts
check all connections have been made correctly
check the +5 V power supply is on and correctly set
check the HV has been selected to on
2
count overflow or very high count rates
check for light leaks
3
software will not install
check that the computer is running Windows® XP or Windows® 7.
4
no readings can be taken
check count mode not selected to external trigger or trigger not available.
5
communication timeout
check the module is powered up and connected to the USB port. If a module is
momentarily powered down or disconnected, when in use, it will be necessary to restart the
software before it can be re-selected.
P25USB, P30USB user manual - issue 2, September 2010 © Sens-Tech Limited, 2010
page 12 of 21
SENS - TECH
SENSOR TECHNOLOGIES
6
module design
P25USB photodetector modules include a 25 mm diameter photomultiplier tube with a 22mm active
photocathode diameter. The P30USB photodetector modules includes of a 30 mm photomultiplier
tube with a 25 mm active photocathode diameter.
The photomultiplier is powered by a very efficient, +HV, Cockroft Walton power supply. Low power
dissipation ensures negligible heat generation within the module.
The high voltage is factory set, at the optimum operating voltage, to ensure stability of operation
and stable photon counting performance.
The signal from the photomultiplier is connected to a high performance amplifier discriminator
combination, which is factory preset to accept signal but to reject electrical noise. This is described
in section 7, photon counting techniques.
Pulses from the output of the amplifier/discriminator are passed to a counter which is gated on/off
by the microcontroller according to the gate period setting. The count is latched through to a
parallel to serial converter before continuing to the next counting period. This ensures the dead
time of the counter is kept to an absolute minimum (11.1µs gap between gate periods).
The microcontroller has a maximum count rate capability of 100 MHz after linearity correction. All
counts are automatically corrected for dead-time losses, caused by pulse pile up. This is
particularly important at high count rates.
The module also incorporates a watchdog circuit such that in the event of internal software failure,
the module will automatically reset itself to its default settings.
The module housing is mumetal®, providing good shielding from transverse magnetic fields.
P25USB, P30USB user manual - issue 2, September 2010 © Sens-Tech Limited, 2010
page 13 of 21
SENS - TECH
SENSOR TECHNOLOGIES
7
photon counting techniques
7.1
operating principles:
These photodetector modules use the photomultiplier in the photon counting mode. The following
paragraphs summarise the salient features of this technique and provide typical performance data
for these modules.
7.1.1
photon counting
The following section provides information on photon counting, the intended role for these
modules.
quantum efficiency (%)
Photon counting is the most sensitive method for measuring weak or short-lived light emissions.
The photocathode has a wavelength-dependent probability of releasing a photoelectron for each
incident photon. This probability is known as the quantum efficiency (QE) and is normally
expressed as a percentage. Typical spectral response characteristics for the photocathodes used
in photon counting detectors are shown in figure 1.
figure 1
photomultiplier light
sensitivity as a function
of wavelength described
as quantum efficiency (QE)
wavelength (nm)
Photoelectrons emitted by the photocathode are accelerated and focussed onto the first dynode of
the electron multiplier section of the photomultiplier. On impact, each photoelectron liberates a
number of secondary electrons which are, in turn, accelerated and focussed onto the second
dynode. The process is repeated at each subsequent dynode and the secondary electrons from
the last dynode are collected at the anode.
Individual charge pulses from the photomultiplier vary in magnitude because of the statistical nature
of the gain process but, so long as they exceed the preset threshold of the discriminator, each will
be counted as one pulse. Only small pulses, resulting from single electrons originating from
intermediate dynodes, will fall below the threshold and, thus, rejected.
The voltage applied to the photomultiplier in the detector is factory set to provide the optimum gain
for photon counting. At this operating point on the signal counts vs HV plateau characteristic, the
slope is less than 0.2 % per volt and, hence, we have stable performance.
P25USB, P30USB user manual - issue 2, September 2010 © Sens-Tech Limited, 2010
page 14 of 21
SENS - TECH
SENSOR TECHNOLOGIES
7.1.2
signal-to-noise
The photoelectric effect is a quantum mechanical process subject to fluctuations described by
Poisson statistics.
A steady light source generating m photoelectons per second for a period of t seconds will produce
1/2
an average of mt photoelectrons with a standard deviation of (mt) . Hence signal-to-noise ratio is
given by:
1/2
1/2
mt/(mt) = (mt)
In photon counting there is negligible additional noise generated in the gain process or in the
amplifier/discriminator hence this expression is also valid for the complete Detector.
It should be noted that the signal-to-noise ratio depends on the number of counts, hence for low
count rates an increased measurement period will always be advantageous.
7.1.3.
responsivity
The responsivity of the Detector is the output count rate, less dark counts, for a given light power
incident on the photomultiplier window:
responsivity = QE(l).f.
((
l
h.c
where QE(l) is the quantum efficiency of the photocathode at wavelength l,
-34
h is the Planck Constant, 6.626 x 10 Js,
8
-1
c is the speed of light, 3 x 10 ms ,
and f is the collection efficiency of the first dynode, typically 0.95 for the standard range of
photomultipliers used in photon counting.
Hence, when responding to light of 400 nm wavelength, a module with a bialkali photocathode, with
17
-1
typical QE of 0.25, has a responsivity of 4.78 x 10 counts W , so 1 fW of 400 nm light incident on
-1
the photomultiplier window will produce a mean output count rate of 478 s , excluding dark counts.
temperature coefficient (% / °C)
The temperature coefficient of quantum efficiency, and hence of responsivity, is shown in figure 2.
figure 2
temperature coefficient
of various photocathodes
used for photon counting
wavelength (nm)
P25USB, P30USB user manual - issue 2, September 2010 © Sens-Tech Limited, 2010
page 15 of 21
SENS - TECH
SENSOR TECHNOLOGIES
7.1.4
background
Background or dark count is the unwanted signal produced by the photomultiplier tube in the
absence of light stimulation. Dark counts in photon counting detectors are a function of
photocathode type and temperature as shown in figure 3.
dark count (s-1)
figure 3
The beneficial effect
of cooling a
photomultiplier
temperature ( °C)
Typical dynamic range is shown in figure 4.
output count (s-1)
figure 4
extension of the
dynamic range by
subtracting dark
counts
incident light power (W) at 400 nm and 20 °C
Over the majority of their useful operating range the responsivity of Photon Counting Detectors is
linear and will produce an output count rate which is proportional to input light power, as shown in
figure 4.
At low count rates the effect of dark counts becomes significant causing the curves of figure 4 to
flatten. Some improvement can be achieved by cooling, or at least preventing the module from
being heated by other apparatus. Dark count subtraction can be used down to the point at which
signal is less than about 1/10 of background. At lower signal rates the statistical uncertainty
associated with the subtraction process becomes excessive.
In background subtraction, the signal count rate,S, is deduced as the difference between the
measured rates of (S + B) for signal and background and (B) for background alone. It should
½
therefore be noted that the signal-to-noise ratio for the deduced signal rate will be S/(S + 2B) .
At high count rates, the dynamic range is limited by electronic dead-time effects caused by pulse
pile-up. Pulses that arrive whilst the discriminator is busy are not counted. Correction for
dead-time is automatically applied in the software, in the form:
N = n/(1-nt)
where N is the corrected count rate, n is the measured count rate and t is the count rate correction
factor.
P25USB, P30USB user manual - issue 2, September 2010 © Sens-Tech Limited, 2010
page 16 of 21
SENS - TECH
SENSOR TECHNOLOGIES
appendix A
module interface characteristics
absolute maximum ratings
test conditions
min
typ
supply voltage
user output load
-1.0
max
units
6.0
V
+7.0
V
max
units
0.9
V
dc characteristics (T = 25 °C, supply = +4.75 V to +5.25 V)
test conditions
trigger input (TTL)
min
typ
grey lead
input low volts (max)
input high volts (min)
1.9
user output
violet lead
output low volts (max)
output sinking 20 mA
output high volts (min)
output sourcing 80 µA
ouput sourcing 12 µA
V
0.5
2.4
4.5
P25USB, P30USB user manual - issue 2, September 2010 © Sens-Tech Limited, 2010
page 17 of 21
V
V
V
SENS - TECH
SENSOR TECHNOLOGIES
appendix B
environmental conditions
1
temperature (operating)
+5 to +55 °C
2
sinusoidal vibration (non-operating)
10 to 500 Hz for 10 cycles in each axis, at a peak amplitude of 2 g, 1 octave/min.
3
random vibration (non-operating)
20 Hz at 0.02 g²/Hz
to 50 Hz at 0.02 g²/Hz
falling to 500 Hz at 0.001 g²/Hz
4
humidity (non-condensing)
93 % at 30 ºC
5
pressure (operating)
can withstand pressure reductions from 68 kPa (0.68 bar) to 100 kPa (1 bar).
P25USB, P30USB user manual - issue 2, September 2010 © Sens-Tech Limited, 2010
page 18 of 21
SENS - TECH
SENSOR TECHNOLOGIES
appendix C
outline drawings (mm)
P25USB
P30USB
ø35.0 ±0.5
ø34.0 ± 0.5
22.0 active diameter
25.0 active diameter
photomultiplier
photomultiplier
®
mumetal case
120 ± 1
®
mumetal case
181.5 ±1
screened
cable
610 ± 50
screened
cable
1850 ± 50
610 ±50
USB type A
male plug
+5V Red
0V Black
I/O out Violet
I/O in Grey
1850 ±50
USB type A
male plug
+5V Red
0V Black
I/O out Violet
I/O in Grey
P25USB, P30USB user manual - issue 2, September 2010 © Sens-Tech Limited, 2010
page 19 of 21
SENS - TECH
SENSOR TECHNOLOGIES
appendix D
the activeX® control
This is the documentation for the ActiveX® control. It describes the function and parameters of
the methods, properties and events in the control.
Several examples are provided on the CD ROM to help in software development. Specifically, we
®
®
®
®
provide examples for Visual Basic , Labview , Excel and Delphi . The examples are intended as a
®
guide to programming with the ActiveX control and not as complete solutions.
The following example describes the correct sequence for using the ActiveX® control.
1
first, open the COM port
object.Open(1)
2
then setup the device
object.Continuous = false
sets non-continuous mode ie fixed number readings.
object.Triggered = false
disable external trigger input.
object.OutputSignal = false
sets the user output (violet wire) to 0 volts.
object.OutputVoltage = true
turns on the photomultiplier HV supply.
object.Period = 100
sets gate period to one second.
object.ReadingCount = 100
sets number of readings to be taken as 100
3
call the Start method and handle the events generated
object.Start
4
starts counting
finish by turning off the HV and closing the COM port
object.OutputVoltage = false
turns off the photomultiplier HV supply.
object.Close
remarks
it is not unusual for the com port to be open for the entire duration of the program.
P25USB, P30USB user manual - issue 2, September 2010 © Sens-Tech Limited, 2010
page 20 of 21
SENS - TECH
SENSOR TECHNOLOGIES
properties
BufferInUse
(read only)
Gets the number of readings currently in the buffer that are
awaiting processing
Buffersize
Gets or sets the number of slots available to the software FIFO
buffer
Continuous
Gets or sets the continuous mode of data acquisition. Setting
this property to TRUE causes data acquisition to be
continuous. Setting this value to false causes data acquisition
to stop after the number of readings specified in the
Reading Count property
Output Signal
Gets or sets the state of the output signal. Setting this property
to TRUE causes the output signal set to +5 volts.
Output Voltage
Gets or sets the state of the photomultiplier high voltage supply. Setting this
property to TRUE causes the high voltage to be switched on.
(caution; see precautions in section 1.1)
Period
Gets or sets the counter gate period in multiples of 10ms.
ReadingCount
Gets or sets the number of readings to be taken in noncontinuous acquisition mode
Triggered
Gets or sets the triggered mode of data acquisition. Setting this
property to TRUE enables
methods
Close
Closes the COM port used by the ActiveX® control.
Open
Opens a COM port for use by the ActiveX® control.
Start
Begins counting.
Stop
Ends counting.
events
Result
Occurs when a new reading is available for processing
OnBufferOverrun
Occurs when the FIFO buffer attempts to grow to a size
greater than the one specified in the BufferSize property.
P25USB, P30USB user manual - issue 2, September 2010 © Sens-Tech Limited, 2010
page 21 of 21