1
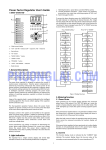
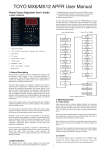
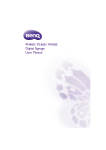
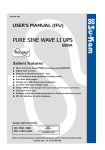
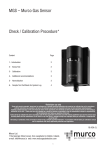
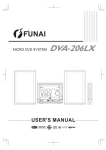
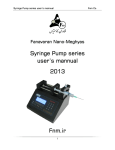
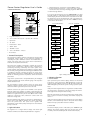
Power Factor Regulator User's Guide
a
i. Metering functions - power factor, current & THD for current.
ii. Control parameters functions - power factor, C/K, sensitivity,
reconnection time, rated step, switching program & THD Limit.
iii. Alarm messages function.
b
c
To access the above functions, press the "MODE/SCROLL" key until
the light indicator is indicating the desired function. The 3-digit
numeric display will show the value of the selected function. If there
are sub-functions on the selected function such as the function for
"rated step" & "alarm messages", press the "UP" or "DOWN" arrow key
to access these sub-functions.
A BRIEF OV ERV IEW
h
AUTO
MANUAL
CURRENT
CAP
IND
THD
SET Cos
C/K
i
1
2
3
4
5
6
7
8
9
10
11
12
13
14
SENSITIVITY
RECON TIME
RATED STEPS
PROGRAM
Press "MODE/SCROLL"
d
e
MODE/
SCROLL
SWITCH PROG
f
g
THD LIMIT
ALARM
POWER FACTOR REGULATOR
Power Factor
Measurement
Step 1
Coefficient
Current
Measurement
Step 2
Coefficient
THD
Measurement
Step 3
Coefficient
a - 3-digit numeric display
Power Factor
Setting
b - " CAP " and "IND " indicators (CAP = Capacitive, IND = Inductive)
Step 4
Coefficient
c - Step indicator
C/K
Setting
d - " UP" button
Step 5
Coefficient
e - " MODE /SCROLL " button
Sensitivity
Setting
f - " DOWN " button
Step 6
Coefficient
g - " PROGRAM " button
Reconnection
Time Setting
h - " AUTO " and "MANUAL " indicators
Press "UP" or "DOWN"
Step 7
Coefficient
i - Mode indicator
Rated Steps
Stepping
1. General Description
The power factor regulator combines comprehensive operation with
user-friendly control setting. It uses numerical techniques in
computing the phase difference between the fundamentals of
current and voltage, thus precise power factor measurement is
achieved even in presence of harmonics.
Switching
Pragram Setting
The power factor regulator is designed to optimize the control of
reactive power compensation. Reactive power compensation is
achieved by measuring continuously the reactive power of the
system and then compensated by the switching of capacitor banks.
The sensitivity setting optimizes the switching speed. With the builtin intelligent automatic switching program, the power factor
regulator further improves the switching efficiency by reducing the
number of switching operations required to achieve the desired
power factor.
Alarm
Step 14
Coefficient
THD Limit
Setting
Alarm Message 1
Alarm Message 2
Alarm Message 9
Figure 1: Display Structure
3. Metering function
3.1 Power factor
Usage of the capacitor bank is evenly distributed by the intelligent
switching algorithm. This ensures uniform ageing of the capacitors
and the contactors used.
Upon powered up, the numeric display indicates the measured
power factor of the system. If the "IND" LED lights up, it mean the
system is having inductive power factor. On the other hand, if the
"CAP" LED lights up, it means the system is having capacitive power
factor.
The four-quadrant operation feature allows the power factor
regulator to operate correctly in the case of active power feed back
to the mains where regenerative power sources are used.
If the power factor regulator detects a re-generative condition where
the energy flow is reversed, the power factor display will shown a
minus sign in front of the power factor reading.
Harmonic current in the system can be harmful to the capacitor
bank. This power factor regulator is capable of measuring the total
harmonic distortion (THD) in the system and produce an alarm if the
THD level is higher than the pre-set value. Other alarms include
under/over compensate alarm, under/over current alarm and
under/over voltage alarm.
When the load current is below the operating range and the power
factor cannot be measured accurately, the numeric display will
shows "---".
Current transformer (CT) polarity is important in determining the
correct phase angle different between the current and voltage
hence the power factor. This power factor regulator will
automatically correct the CT polarity internally in the event that the
polarity is reversed.
If the power factor regulator has been previously set to other display
function, it will automatically return to this power factor display
function if no key is pressed for more than 3 minutes.
2. Light indication
This function display mode is indicated by the "CURRENT" light
indicator. The numeric display shows the true-rms value of the
3.2 C urrent
The regulator has a 3-digit numeric display and several light
indicators of which can be functionally divided into 3 categories:-
secondary current measured by the 5A current transformer (CT).
1
E xample:
4.4 Reconnection Time
If a 1000/5A CT is used and the display shows "2.50", the primary
measured current is 500A.
This is the safety lockout time which is used to prohibit the
reconnection of the same capacitor step before it is fully discharged.
This parameter is usually set larger than the discharge time of the
largest capacitor size in used.
3.3 Current Total Harmonic Distortion (THD)
This mode is indicated by a "THD" light indicator. The numeric display
shows the total harmonic distortion of the current as according to
the formula below.
µ
å
THD =
n=2
i1
in
2
4.5 Rated Step
Every step in the power factor regulator is programmable except
Step 1. Step 1 is fixed as "1" and it is the smallest capacitor step used.
All other steps were programmed as multiple of Step 1.
i n = nth order harmonic current rms
i 1 = Fundamental current rms
2
This measurement is possible only if the total load is at least 10% of
the rated load. If the THD could not be displayed, the 3 -digit
numeric display will show "---".
Unless all steps are fully used, the unused steps should be set as
"000". The last step can be programmed as alarm/fan output by
setting the step to "ALA" /"FAn". When the last output is
programmed as alarm output, second last output can be
programmed as fan output.
4. Control Parameters
4.1 Target Power Factor (SET Cos
)
This set the targeted power factor required when the system is
under automatic mode. The power factor regulator will switch the
capacitors in or out in order to achieve this set value.
During the programming of the "Step", the corresponding light
indicator for that selected step will light up. Example, number "1"
light indicator indicates rated step for contact output number 1.
4.2 C/K
If the automatic C/K mode is enabled, the PFR will carry out the
automatic rated step measurement. Therefore, all steps are not
programmable except alarm/fan output.
This setting is used to set the switching hysteresis and it is calculated
based on the smallest size capacitor used.
With automatic C/K selection(C/K set to AtC), the reactive power
compensation is achieved without C/K setting. The PFR will measure
and evaluate all steps available when necessary and C/K value is then
computed.
The C/K value can also be obtained manually from table 1 or
calculated with the following formula :-
C/K =
Q´5
3 ´V ´ I
»
4.6 Switching Program
This setting allows the selection of one of the four available
switching algorithms.
a) Manual switching (n-A):
When this switching program is selected, the capacitor steps are
controlled manually by the "UP" or "DOWN" keys. The "UP" key will
connect the capacitor step and "DOWN" key will disconnect the
capacitor step. Steps are switched in a rotational manner based on
first-in-first-out basis.
2.88 ´ Q
V ´I
where Q = smallest capacitor step (var)
V = nominal primary system voltage (V)
I = primary rating of the current transformer (A)
b) Rotational switching (rot):
This switching program is similar to the manual switching method
and it is based on rotational first-in-first-out sequence. Unlike the
manual switching program, this option will automatically switch in
and out the capacitors according to the targeted power factor,
sensitivity setting and the reconnection time setting.
Example:If Q= 15kvar; V= 415V; I= 800A
=> C/K = (2.88 x15000)/ (415 x 800) = 0.13
C/K - Value for 415V
Smallest Capacitor in ( kvar )
C.T.
50
60
75
100
150
200
250
300
400
500
600
800
1000
1500
2000
:5
:5
:5
:5
:5
:5
:5
:5
:5
:5
:5
:5
:5
:5
:5
2.5
0.35
0.29
0.23
0.17
0.12
0.09
0.07
0.06
0.04
0.03
5
0.70
0.58
0.46
0.35
0.23
0.18
0.14
0.12
0.09
0.07
0.06
0.04
0.03
10
1.16
0.93
0.70
0.46
0.35
0.28
0.23
0.17
0.14
0.12
0.09
0.07
0.05
0.03
15
20
1.04
0.70
0.52
0.42
0.35
0.26
0.21
0.17
0.13
0.10
0.07
0.05
0.93
0.70
0.56
0.46
0.35
0.28
0.23
0.17
0.14
0.09
0.07
25
30
40
1.16
0.87
0.70
0.58
0.43
0.35
0.29
0.22
0.17
0.12
0.09
1.04
0.83
0.70
0.52
0.42
0.35
0.26
0.21
0.14
0.10
1.11
0.93
0.70
0.56
0.46
0.35
0.28
0.19
0.14
50
1.16
0.87
0.70
0.58
0.43
0.35
0.23
0.17
60
1.04
0.83
0.70
0.52
0.42
0.28
0.21
100
1.16
0.87
0.70
0.46
0.35
150
c) Automatic switching (Aut):
This automatic switching program uses intelligent switching
sequence. The step switching sequence is not fixed and the
program automatically select the most appropriate steps to switch
in or out in order to achieve shortest reaction time with minimum
number of steps. For equal ageing of the capacitor and contactors,
the program will select the least used step to be switched in if
there are two equally rated steps.
Under this switching program, the power factor regulator
automatically detects the CT polarity during power up. Once this
polarity reference is fixed, any subsequent re-generative power
condition detected will cause all the capacitor steps to be
disconnected.
1.04
0.70
0.52
Table 1: C/K Table for 415V
Note: (i) During automatic C/k measurement(C/K set to AtC), any step with C/K value lower than
0.03 may not be detected and will be excluded from the controlling process.
(ii) The user may encounter non-optimized regulating during the initial stage before the C/K
value is determined.
4.3 Sensitivity
d) Four-quadrant switching (Fqr):
This parameter set the speed of the switching. A larger sensitivity
value will result in slower switching speed and conversely, a smaller
sensitivity value will result in a faster switching speed. This sensitivity
applies to both switching on and switching off of the capacitor.
This switching program is similar to the automatic switching
program (Aut) except that this switching program allows the
power factor regulator to operate correctly under both import
power and export power (re-generative) conditions. Under export
power condition, the active power is fed back to the supply mains
by other energy sources such as solar power etc. If this option is
selected, the installer must ensure that the CT polarity is correctly
wired because the automatic CT polarity correction detection
feature is disabled.
The "Manual" light indicator on the power factor regulator lights up
if the switching program is set to Manual switching (n-A). For
Rotational (rot), Automatic (Aut) and Four-quadrant (Fqr) switching
programs, the "Auto" light indicator on the regulator lights up.
Under normal operating condition, the step indicators indicate the
ON/OFF status of every step. A steady ON light indicates the
particular step is switched in. A blinking light indicates that the
particular step is required to switch in but unable to do so
temporary due to reconnection time lockout.
2
Please note that all the steps will be disconnected if the power factor
regulator detects a re-generative condition under Rotational (rot) or
Automatic (Aut) switching program.
Alarm
Description
Delay time
Action
Message
Activate Deactivate
Current THD exceed set
*5 All steps
thd
5 min
2.5 min
THD Limit
disconnected
Current lower than 1%
10 s
5s
Lol
rated value
Current exceed 110% of 2 min
1 min
Hil
rated value
5
voltage lower than
* All steps
100 ms
5s
LoU
295VAC of rated value *6
disconnected
Voltage exceed 456VAC
15 min
7.5 min
HiU
*6
of rated value
15 min
7.5 min
UCo All capacitors are
connected and the
power factor lower than
set power factor
15 min
7.5 min
OCo All capacitors are
disconnected and the
power factor higher than
set power factor
Auto C/K or rated step
ESt
measurement error.
Manual setting required
Automatic CT polarity
ECt
detection error
*5- Automatic switching of steps are prohibited when this alarm occurred.
*6- For 200 ~240V model, LoU is 170V & HiU is 264V
4.7 THD Limit
This parameter specifies the limit of total harmonic distortion level
before an alarm is activated (More information on section 6). This
function can be disabled by setting the parameter to "oFF".
4.8 Procedure for Setting the Control Parameters
Step 1: Select the required item by stepping through all the items
using "MODE/SCOLL" key. The corresponding indicator of the
selected item will be lit. For "Rated step" setting, the
individual output can be selected via the "UP" or "DOWN"
keys, the step indicator corresponds to the step number.
Step 2: Press the "PROGRAM" key once, the indicator of the selected
item will blink to indicate that the system is now in
programming mode.
Step 3: Use the "UP" or "DOWN" keys to select the desired value.
Target power Factor
STEP
LED* 1
SET Cos
C/K
Setting
Range
Default
Factory
Setting
0.80 Ind - 0.80 Cap
0.98 Ind
C/K
Sensitivity
SENSITIVITY
Reconnection Time
RECON TIME
0.03 - 1.20/AtC
5 - 300 s/step
5 - 240s
Rated Step*2: Step 1
1
001- 002 - 003 - 004 -
Step 2
2
005 - 006 - 008 - 012 -
000
- disable
Blinks
On
Blinks
On
Blinks
On
Blinks
On
Blinks
On
Blinks
-
Blinks
-
During the power on start-up process, the power factor regulator, if
programmed under Rotational or Automatic switching program,
detects the CT polarity and correct it internally if the CT polarity is
reversed. If the power factor regulator is set for Four-quadrant
switching program, this feature is disabled.
8. Programming Lock
AtC
The power factor regulator is equipped with a programming lock to
prevent inadvertent changes to the control parameters. If locked, all
the control parameters can only be viewed at and cannot be
changed without unlocking it first.
45 s/step
30s
To lock or unlock, first ensure that the display is on the power factor
display function mode, then press "PROGRAM" key once followed by
"DOWN" key immediately. Hold the "DOWN" key until the numeric
display flashes "LOC" or "CLr". "LOC" indicates the power factor
regulator is locked and "CLr" indicates the regulator is unlocked.
016
RATED STEPS
-
7. Automatic CT polarity detection
To abort without saving the selected setting, press the
"MODE/SCROLL" key.
Indic ation
LED
Blinks
Table 3: Alarm table
Step 4: To save the selected value, press the "PROGRAM" key once,
the indicator stop blinking and the setting is saved.
Control
Paramen ter
Alarm outputs
LED
Relay
Blinks
On
001
ALA*3 - alarm ouput
FAn*4 - fan output
9. Technic al D ata
Step 14
Switching Program
14
SWITCH PROG
THD Limit
THD LIMIT
n-A - rot - Aut - Fqr
0.20 - 3.00/ oFF
9.1 Auxiliary Supply
Aut
Supply voltage
Operating Limits
Consumption
Frequency
0.50
*1- Under normal operation except for rated step display, the step indicator indicate step
ON/OFF status
*2- Number of steps depend on model
*3- Only last output can be configured as alarm output
*4- Last output can be configured as fan output, or second last output can be configured
as fan output only when last output is configured as alarm output.
: 200~240 VAC / 346 ~ 415 VAC
: -15% + 10%
: 10VA max
: 50Hz or 60Hz
9.2 C urrent Input
Rated current , ln
Operatings Limits
Rated Frequency
Table 2: Parameters setting
4.9 Reset To Factory Default Setting
To reset all programmable parameters to factory default, first power
off the power factor regulator. Press the "UP" & "DOWN" keys
simultaneously while turning on the power and holds it for more
than 5 sec until the display flashes "dEF" for 3 sec. Now the power
factor regulator is restored to factory default setting.
: 5A
: 0.05A - 6.5A
: 50Hz or 60Hz
9.3 Relay Output
Numbers of outputs : 6 / 8 / 12 / 14 ( PFR60 / PFR80 / PFR120/ PFR140)
Contact arrangment : NO contact type
Rated capacity
: 5A 250VAC (Cos ϕ = 1)
Max current for the : 12A continuous
common terminals
5. Fan Output
When the fan output is selected, the output will be energized with
9.4 C ontrol Range
any capacitor bank switched ON.
Power factor setting
C/K setting
Switching sensitivity
Reconnection time
for same step
THD threshold
Switching Program
6. Alarm
Alarm conditions detected by the power factor regulator are
indicated by the flashing "ALARM" light indicator. The last step of the
regulator, if required, can also be selectively programmed as alarm
contact in addition to the "ALARM" indicator. This additional alarm
contact is normally open and it closes when alarm is activated.
To view the alarm message, press the "MODE/SCROLL" key until the
"ALARM" function is selected. The numeric display will show the
alarm message as according to Table 3 below. If more than one alarm
messages are recorded, press the "UP" or "DOWN" keys to view the
others. The alarm indications are automatically reset to normal once
the alarm conditions are restored.
: 0.8 inductive - 0.8 capacitive
: 0.03 - 1. 20 / Auto
: 5 - 600 s/step
: 5 - 240 s
: 0.20 - 3.00 (20% - 300%) / OFF
: Automatic / Automatic Rotate / Manual/
Four- quadrant
Rated step coefficient : 0 / 1 / 2 / 3 / 4 / 6 / 8 / 12 /16
9.5 Mechanical
Mounting
: Panel mounting
Dimension ( h X w X d) : 144mm X 144mm X 91mm
Approximate weight : 1kg
3
10. Typical A pplic ation D iagr am
10.1 Diagram 1 - Without external discharge resistors for 380~415V model
MAIN
N L3 L2 L1
13
VOLTAGE
346 ~ 415V model
15
16
P1
17
CURRENT
/5A
18
19
P2
20
11
21
12
22
13
23
14
24
Power Factor Regulator
1
14
2
1
13
3
2
4
3
14
5
4
6
5
15
7
6
VOLTAGE
200 ~ 240V model
8
7
9
8
10
11
9
10
F or 200 ~240VAC model only
12
FUSE
K14
K13
K1
K2
LOAD
10.2 Diagram 2 - With external discharge resistor
MAIN
N L3 L2 L1
14
15
VOLTAGE
346 ~ 415VAC
16
P1
17
18
CURRENT
19
P2
20
11
21
12
22
13
23
14
24
Power Factor Regulator
13
1
1
2
3
4
5
6
7
8
9
10
2
3
4
5
6
7
8
9
10
11
12
FUSE
K14
K13
K1
K2
External
resistor
LOAD
11. Case D imensions
91mm
77mm
136mm
136mm
144mm
144mm
*Mikro reserves the right to make changes wiyhout further notice to any products herein to improve reliability, function or design. The figures shown are without obligation.
4