1
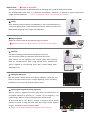
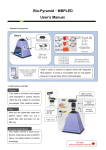
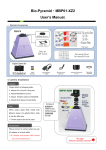
Bio‐Pyramid Mini・MBP‐Mini User’s Manual Standard Accessories Install a variety of cameras to φ52mm sleeve with designated Ring‐adapters. If camera is incompatible with any ring‐adapters, please try Universal Super Mount (*sold separately) Installing camera and filter Camera First, attach a conversion lens adapter (sold separately) to digital camera. Second, attach a ring‐adapter to conversion lens adapter. Filter Attach sharp cut filter to ring‐adapter. Attach φ52mm camera sleeve to sharp cut filter and set it up on the hood. Universal Super Mount First, attach camera to the super‐mount and adjust the camera position. Second, attach super mount to φ52mm sleeve, and set it up on the hood. Instruction・・・
★ mark is important
Set your camera manually as described below by following user’s guide of each camera model. Gel documentation takes place in a darkroom environment; therefore it is difficult to capture high quality images with full automatic. * Select “P” (program‐auto) or “M” (manual) for shooting ◆ Set Up After installing camera and filter, set MBP‐Mini on the UV Transilluminator in a way that lighting area is fully covered by the hood. Please use shield mat MBP‐FW when lighting area is larger than MBP‐Mini. ◆ Adjusting Zoom Adjust the camera zoom for the shooting range you desire. ★ when zoom level is too high, it will be out of focus on close ranges. ★ Focusing Use Macro‐Shooting mode when shooting with auto‐focus. Use manual focus when it is difficult to focus with auto‐focus. (Few cameras are not equipped with manual focus) Place focusing sheet on Transilluminator when using manual focus. Fluorescence agent is applied on the focusing sheet and it would radiate when subjected to UV. ★ Setting the ISO speed High ISO speed is preferred for dark subject. However, raising the ISO speed to the Max would result in images appearing coarse and blurry. Therefore use the second or third ISO speed instead.
★ Adjusting the brightness (setting exposure) When a camera is equipped only with auto mode, set mode dial to “P” and adjust exposure by pressing [+/‐ ] button ( [+] for brighter, [‐] for darker image). When a camera is equipped with manual mode, 1) Turn mode dial to “M”. 2) Set F number to minimum. 3) set shutter speed at 1 second. If image still looks dark, set a longer shutter speed. If image is too bright set shorter shutter speed. ★ When it is too bright, background might be captured along. ◆ Flash Turned off the flash for shooting. ◆ Image stabilization When captured image is unstable and shaky, please consider using a remote shutter or self‐timer feature for shooting. ◆ Black and White setting Black and White setting is preferred for Gel documentation for it provides higher contrast and makes observation easier. Nowadays, most digital camera is equipped with B/W mode. ◆ Registering Shooting Setting. Most of the cameras that are equipped with manual mode allow users to register commonly used shooting modes and settings. ◆Filter Accessory sharp cut filter would cut off excitation ray and transmit only emission ray. MF‐SC60 would cut off wavelength below 600nm Such fluorescence reagent as EtBr, GelRed, and SYBR Green can be used Bio‐Pyramid Mini : Specification ◆ Maximum shooting area 167mm × 147mm (= interior dimension) * May vary, depends on the camera. ◆ Shooting range Include φ52mm sleeve With super mount 203mm 235mm ★ Please select the camera that can be focused to shooting area within these ranges. ◆ Filter | Sharp Cut filter Use φ52mm filter ◆ Size W187 × D167mm (= Hood External Dimensions) x H 203mm (include camera mounting part) x H 315mm (include super‐mount) ◆ Weight Body/Super‐mount 500g / 184g