1
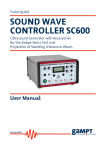
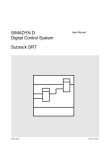
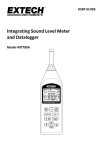
USER GUIDE Electronic Counting Scale/Balance Model SC600 Introduction Thank you for selecting the Extech Instruments Model SC600 Electronic Counting Scale/Balance. The SC600 is microprocessor controlled and uses a load cell transducer for high accuracy and optimum performance. The SC600 offers a large measurement capacity, high resolution, and large easy to read display. The slide switch on the back of the scale allows for the selection of measurement units (gram or ounce). A self‐calibration utility is built‐in and the calibration data is stored internally even upon power down. The RS‐232 PC interface allows for the transfer of measurement data between the SC600 and a PC. The SC600 includes ‘bubble’ level, adjustable rubber feet for leveling, and heavy duty ABS plastic housing. An AC adaptor may be used to power the unit or the unit may be used on battery power. This device is shipped fully tested and calibrated and, with proper use, will provide years of reliable service. Please visit our website (www.extech.com) to check for the latest version of this User Guide, Product Updates, and Customer Support. 2 SC600‐EU‐EN v1.1 1/14 Meter Description 1. 5‐digit multi‐function LCD Display 2. ‘Bubble’ Leveler 3. Weight Platform 4. AC Adaptor jack (9V/300mA) 5. 3.5mm RS‐232 PC interface jack 6. Unit of Measure select switch (grams or ounces) 7. Power ON‐OFF switch 8. TARE button 9. CAL (Calibration) button Battery compartment and adjustable leveling legs located on bottom of unit. 4 5 6 3 2 7 1 9 8 3 SC600‐EU‐EN v1.1 1/14 Operation Preparing the SC600 Place the SC600 on a firm, level surface. Adjust the rubber pad legs on the bottom of the unit to level; ensure that the SC600 is level before use. The ‘bubble’ level located on the top of the SC600 can be used as an accurate level guide. Remove the protective tape from the weight platform area and install the weight platform as shown in the diagram using the 4 screws (supplied). 4 SC600‐EU‐EN v1.1 1/14 Powering the meter Install six (6) 1.5V AA batteries into the battery compartment located on the bottom of the unit. The AC Adaptor can also be used to power the unit. The AC adaptor jack is located on the rear of the SC600. Power the unit ON or OFF using the ON‐OFF switch located on the right side of the SC600. The meter will perform a short self‐test during which the display will count down to zero; the unit will switch ON in its normal operating mode. Please allow 30 minutes of warm‐up and stabilization time before using the SC600. Selecting the units of measure (grams or ounces) Use the recessed selector switch on the rear of the unit to select the desired unit of measure grams or ounces. The LCD display will reflect the selected unit of measure. Scale (Weighing) Operation Follow the instructions above for SC600 preparation and, when the unit is ready, gently place an object on the weight platform and read the weight measurement on the LCD display. Ensure that the weight does not exceed the maximum capacity of the SC600 as published in the specifications of this User Guide. If the weight of an object exceeds the measurement capacity of the SC600, the display will show all dashes on the upper part of the LCD display (‐ ‐ ‐ ‐ ‐). For under‐range measurements the display shows dashes on the lower part of the display (_ _ _ _). TARE Function 1. After weighing the first item, press the TARE button; the display will reset to zero automatically and the display will show the TARE icon. 2. Remove the first item from the platform and place the second item on the platform. 3. The SC600 will now display only the weight of the second item. 4. The TARE display icon will switch OFF the next time that the SC600 is switched OFF. Tare Considerations: If the display shows a negative weight (minus sign shown) or all dashes on the lower area of the LCD _ _ _ _ _ (weight value below zero) an error may have occurred and the Tare procedure should be repeated. 5 SC600‐EU‐EN v1.1 1/14 Counter Operation For a collection of objects or pieces (each piece having the same weight as the next), the SC600 can calculate the number of these objects in a collection. A group of pieces can be used as a sample example in groups of 10, 20, 50, or 100 pieces. 1. Prepare a group of pieces (in a group size of 10, 20, 50, or 100 pieces). This will be the ‘standard’ that the SC600 uses to count subsequent collections of pieces. Do not place any pieces on the scale yet. 2. With the SC600 powered OFF, press and hold the CAL button while switching the SC600 ON 3. Hold the CAL button until one beep is heard 4. The display will count down to zero and the bottom of the display will show the COUNT and PCS (pieces) icons 5. The display will scroll through the group sizes (10, 20, 50, and 100) one group size per second 6. Place the group of pieces (from step 1) onto the weight platform 7. Press the CAL button when the appropriate group size (10, 20, 50, and 100) is displaying. The display will flash twice and freeze the group size number. 8. Remove the group of pieces from the platform. The SC600 is now ready for counting. 9. Place an unknown number of pieces (of the same weight as the ones from step 1) and the SC60 will display the number of pieces presently on the platform. Change the Count Sample Number 1. Remove all items from the SC600 platform 2. Press the CAL button once; the display will scroll the piece group sizes (10, 20, 50, and 100) once per second 3. Place a group of pieces (10, 20, 50, or 100) onto the weight platform and when the number on the SC600 display matches the number of pieces on the platform press the CAL button 4. The display will flash twice and freeze the count number 5. Remove the group of pieces from the platform. The SC600 is now ready for counting. 6. Place an unknown number of pieces (of the same weight as the ones from step 3) and the SC60 will display the number of pieces presently on the platform. Counter Operation Considerations The one piece weight should be larger than 0.1g otherwise errors may occur in counting. The accuracy of the counter depends on the number of units counted. It is strongly recommended that more samples, for example 50 units or more, be counted for the best accuracy. 6 SC600‐EU‐EN v1.1 1/14 Calibration Preparing the Calibration Standard weights are required for calibration (not supplied). A 200 gram or a 400 gram standard can be used. Warm up the SC600 for at least 30 minutes before starting the calibration. IMPORTANT CALIBRATION NOTE: Before calibrating the SC600 determine the expected weight measurements that will be encountered during normal use. For expected weight measurements up to 200 grams please perform a 200 gram calibration. For expected weights above 200 grams please calibrate to the 400 gram standard. 400 gram calibration: 1. After the SC600 is warmed up, gently place the 400 gram standard weight on the center of the weight platform. If the weight display does not show exactly 400 grams then continue with the procedure, otherwise calibration is not required and the procedure can end at this point 2. Press the CAL button once and the display will show ‘200 grams’ 3. Press the TARE button once and the display will show ‘400 grams’ 4. Press the CAL button once again and the display value (400g) will flash six (6) times. 5. Calibration is now complete. Calibration data will be stored internally in non‐volatile memory meaning that calibration data will be saved even when the SC600 is powered OFF. 200 gram calibration: 1. After the SC600 is warmed up, gently place the 200 gram standard weight on the center of the weight platform. If the weight display does not show exactly 200 grams then continue with the procedure, otherwise calibration is not required and the procedure can end at this point 2. Press the CAL button once and the display will show ‘200 grams’ 3. Press the CAL button once again and the display value (200g) will flash six (6) times. 4. Calibration is now complete. Calibration data will be stored internally in non‐volatile memory meaning that calibration data will be saved even when the SC600 is powered OFF. 7 SC600‐EU‐EN v1.1 1/14 RS‐232 PC Interface The SC600 can stream data to a PC via the rear 3.5mm RS232 Output jack, the optional 407001‐ USB kit (RS232 to USB cable and driver CD) along with the 407001 software (available free at www.extech.com) are required. Battery Replacement When the low battery icon appears on the LCD (LO), the batteries must be replaced. The battery compartment is located on the bottom of the SC600. Open the battery compartment using the battery compartment latches. Replace the batteries observing correct polarity and replace the compartment carefully. Never dispose of used batteries or rechargeable batteries in household waste. As consumers, users are legally required to take used batteries to appropriate collection sites, the retail store where the batteries were purchased, or wherever batteries are sold. Disposal: Do not dispose of this instrument in household waste. The user is obligated to take end‐ of‐life devices to a designated collection point for the disposal of electrical and electronic equipment. AC Power Adaptor The AC adaptor can be used to power the SC600 from a 110/220/240 VAC power source. The adaptor capacity is 300mA. The AC adaptor plugs into the SC600 via the jack at the rear of the instrument. 8 SC600‐EU‐EN v1.1 1/14 Specifications Display Ranges and Resolution Unit of measure Accuracy Sampling time Tare Control Transducer type User Calibration Data output Over range indication Under range indication Low battery indication Power supply Power consumption Operating Temperature Operating Humidity Dimensions Weight 5‐digit multi‐function LCD Digit height: 20.9mm (0.8”) 0.10 to 600g (resolution: 0.01g) 0.005 to 9.9995 oz. (resolution: 0.0005 oz.) 10.000 to 21.164 oz. (resolution: 0.001 oz.) Selectable via rear switch (grams/ounces) ± (0.05% + 0.04g); within 2 hours of calibration Accuracy applies at 23oC ±5oC (specifications tested under the following RF environmental conditions: field strength < 3V/M and frequency < 30Hz only) Approx. 1 measurement per second 600g maximum (approx.) Load cell Using 200g or 400g standard weights (not supplied) RS232 PC interface jack on rear of instrument Optional PC interface cable and software PN 407001 Optional USB adaptor PN 407001‐USB Upper dashes ‐ ‐ ‐ ‐ ‐ ‐ appear on the LCD Lower dashes _ _ _ _ appear on the LCD ‘LO’ Battery icon appears on the LCD 6 x 1.5V AA batteries or power adaptor 9V/300mA (supplied with multi‐plugs) 17mA DC approximately o o 0 to 50 C (32 to 122 F) < 80% RH Base: 250 x 190 x 70mm (9.8 x 7.5 x 2.8”) Platform diameter: 120 mm (4.7”) 1 kg (2.2 lbs.) Copyright © 2014 FLIR Systems, Inc. All rights reserved including the right of reproduction in whole or in part in any form www.extech.com 9 SC600‐EU‐EN v1.1 1/14