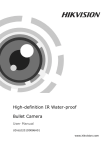
1
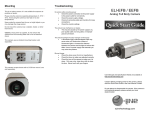
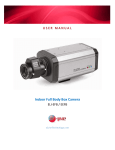
Camera installation:
XC700CM(DN)
700TVL Box camera
Installation instructions
1. CS lens mount
2. Back focus screw
3. DC lens socket
4. Bracket hole
Description:
This camera adopts the newest generation image
processing technology, this produces a 700TVL resolution
image as well as advanced D-DNR, D-WDR, HBLC and
other functions. Powerful OSD menu includes Brightness,
Contrast, Saturation adjusting functions; IR CUT
functions(optional); Multi-area, White Balance, AGC to
ensure clear bright pictures. Mirror, Privacy and other
functions make it suitable for various special environments
and realise simple and convenient round theclock
surveillance.
Precautions:
Please read these instructions carefully before installing the
camera, and keep them for future use.
1. Use the appropriate DC12V or AC24V, ensure the polarity
is correct
2. Do not disassemble the camera, there are no user
serviceable parts within.
3. Do not expose the camera to moisture, if mounting
externally use an appropriate weatherproof housing
4. Do not use strong detergents or abrasives to clean the
camera
5. Clean the CCD face plate carefully
6. Avoid installing he cameras in areas with excessive
interference
7. Avoid pointing the cameras directly at the sun, as this
may damage the CCD sensor.
Features:
700TVL High resolution
D-WDR
Back light compensation
OSD menu structure
DC12V / AC24V
True Day/Night
8 Privacy masks
XC700CM(DN user manual V1.0 DEC12
5. Video output
6. Power LED indicator
7. Power input
8. OSD Menu button
Direct drive lens connections
1. Control –
2. Control +
3. Drive +
4. Drive -
OSD Menu button
Camera Dimensions:
Camera specification:
Model Code
XC700CM(DN)
CCD
Resolution
Minimum Illumination
S/N Ratio
AES
AGC
Iris control
Video Output
White balance
Mirror
Day/Night
Privacy
Title
2D-DNR
D-WDR
Sync mode
Voltage
Power
Lens mount
Dimensions
Weight
Storage temp
Operating temp
1/3” Sony
700TVL
0.01Lux @ F1.2
>50dB
1/50 ~1/100000s
Auto/Manual
ELC and DC lens
1Vp-p ( BNC)
Manual/ ATW / USER
On/Off
Auto / Col / B&W (DN) Model
8 zones
On/Off 15 Characters
On/Off
On/Off
Internal
DC12V / AC24V
<150mA
CS
52(H) x 62(W) x 127(D)
400g
-20 ~ +50ºC
-10 ~ +50ºC
OSD Menu set up
MOTION
1. Move the cursor to MOTION, and set MOTION by left and right buttons: ON; OFF.
When MOTION is on, you can set 1~4 AREA; SENSITI.; DISPLAY ICON; ALARM.
EXPOSURE
1. Press MENU button to display SETUP. Move the cursor to EXPOSURE. And move
the cursor to LENS by UP and DOWN buttons and set lens by left and right buttons:
ELC ( manual iris lens); DC drive iris lens. E.SHUTTER and BRIGHT can be set.
PRIVACY
1. Move the cursor to PRIVACY, and set MASK1~8 by left and right buttons: OFF; ON.
When MASK 1~8 is on, you can set the privacy masks and colour.
2. Move the cursor to HBLC/D-WDR and set HBLC/D-WDR by left and right buttons:
BLC; set BLC by left and right buttons: MANUAL; AUTO. Set AGC: OFF; LOW;
MIDDLE; HIGH. Set HBLC by left and right buttons: ALL DAY; ON. When HBLC is
ON, you can set SET LEVEL, GRAY MODE and MASK SEL. Set D-WDR by left and
right buttons.
3. Move the cursor to AGC, and set AGC by left and right buttons: OFF; LOW;
MIDDLE; HIGH.
4. Set 2D-DNR by left and right buttons: OFF; LOW; MIDDLE; HIGH.
WHITE BALANCE
1. Move the cursor to COLOR, and set WB MODE by left and right buttons: MANUAL;
ATW; AWB; ATW LOCK. When MANUAL is selected, you can set colour temperature.
SET UP
1. Move the cursor to SETUP. Move the cursor to TITLE by up and down buttons, and
set TITLE by left and right buttons: ON; OFF. When TITLE is on, select different user
titles.
DAY/NIGHT
1. Move the cursor to DAY&NIGHT, and set DAY&NIGHT by left and right buttons:
AUTO; COLOR; WHITE; EXT.
2.Move the cursor to MANUAL DPC, and set MANUAL DPC by left and right buttons:
ON; OFF.
3. Move the cursor to AUTO DPC, and set AUTO DPC by left and right buttons: ON;
OFF.
4.Move the cursor to OLPF, and set OLPF by left and right buttons: 650; 850.
5.Move the cursor to MONITOR, and set MONITOR by left and right buttons: CRT;
LCD.
6 Move the cursor to GAMMA and set GAMMA by left and right buttons
0 45 0 6 1 other
FUNCTION
1. Move the cursor to FUNCTION. Move the cursor to MIRROR by up and down
buttons, and set MIRROR by left and right buttons: ON; OFF. Move the cursor to
SHARPNESS, and set SHARPNESS range. Move the cursor to MONITOR, and set
MODE type. Move to cursor GAMMA, and set GAMMA range. Move the cursor to
LSC, and set it: ON; OFF.
SYSTEM
1. Move the cursor to SYSTEM. Move the cursor to CAMERA ID by up and down
buttons and set CAMERA ID by left and right buttons. Move the cursor to COMMUNI.,
And set COMMUNI.: ON; OFF. When COMMUNI is on, you can select PROTOCOL
and BAUDRATE. Move the cursor to LANGUAGE, and set it: ENGLISH.
EXIT
1.Move the cursor to EXIT. Move the cursor to FACTORY SET by up and down
buttons and set it: YES; NO. Moving the cursor SAVE&EXIT is to save the changes
you have made and exit. Move the cursor to EXIT and exit the menu directly.
XC700CM(DN user manual V1.0 DEC12