1
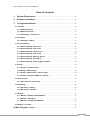
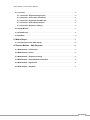
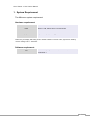
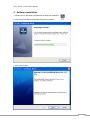
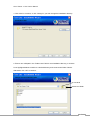
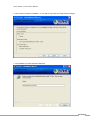
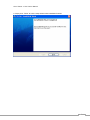
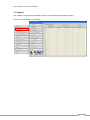
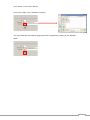
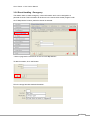
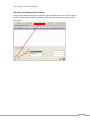
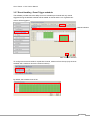
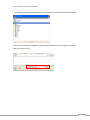
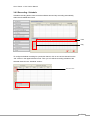
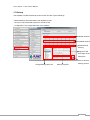
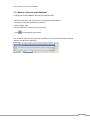
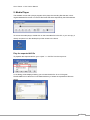
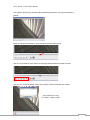
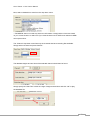
Central
Management Software
Cam Viewer 3 Lite
User Manual
Version 1.0.0
Cam Viewer 3 Lite User’s Manual
Table of Contents
1.
System Requirement........................................................................................4
2.
Software Installation.........................................................................................5
3.
Configuration Wizard .......................................................................................9
3.1 Channel.....................................................................................................................................10
3.1.1 Adding Cameras ............................................................................................................. 11
3.1.2 Remove Cameras ...........................................................................................................16
3.1.3 PTZ setting - Preset Point ............................................................................................17
3.2 Intelligent..................................................................................................................................20
3.2.1 Intelligent - Motion .........................................................................................................21
3.3 Event Handling........................................................................................................................24
3.3.1 Event Handling - Mail server .......................................................................................26
3.3.2 Event Handling - FTP server .......................................................................................27
3.3.3 Event Handling - HTTP server.....................................................................................28
3.3.4 Event Handling - TCP server .......................................................................................29
3.3.5 Event Handling - Warning Sound...............................................................................30
3.3.6 Event Handling - Emergency.......................................................................................32
3.3.7 Event Handling - Event Trigger schedule ................................................................34
3.4 E-map ........................................................................................................................................36
3.4.1 E-map - Location setting ..............................................................................................37
3.4.2 E-map - Detail setting....................................................................................................39
3.4.3 E-map - Detail setting - camera group ......................................................................40
3.4.4 E-map - Configure E-Map for a camera ....................................................................42
3.5 User account ...........................................................................................................................44
3.5.1 User account - User Group..........................................................................................45
3.6 Recording.................................................................................................................................46
3.6.1 Recording - Setting........................................................................................................48
3.6.2 Recording - Schedule....................................................................................................49
3.7 Backup ......................................................................................................................................51
3.7.1 Backup - Backup media Database .............................................................................52
3.7.2 Backup - AVI Export.......................................................................................................53
3.7.3 Backup - Configuration Backup .................................................................................54
3.8 Backup - Log View .................................................................................................................56
4. Main Program - Log In.......................................................................................57
2
Cam Viewer 3 Lite User’s Manual
4.1 Live View ..................................................................................................................................58
4.1.1 Live View - Adjust Viewing Layout ............................................................................60
4.1.2 Live View - Full screen monitoring ............................................................................61
4.1.3 Live View - Video Bar Quick Access .........................................................................62
4.1.4 Live View - PTZ & Preset Control...............................................................................65
4.1.5 Live View - Sequence Viewing ....................................................................................66
4.2 E-map Monitor.........................................................................................................................67
4.3 Event Monitor ..........................................................................................................................69
4.4 Playback ...................................................................................................................................70
5. Media Player.........................................................................................................73
5.1 Configuration of the OSD display ......................................................................................80
6. Remote Monitor - Web Browser......................................................................81
6.1 Web Browser - PTZ Control.................................................................................................83
6.2 Web Browser - Preset ...........................................................................................................84
6.3 Web Browser - Sequence Viewing.....................................................................................85
6.4 Web Browser - Video Window Control Bar......................................................................87
6.5 Web Browser - Digital PTZ ...................................................................................................88
6.6 Web Browser - Playback ......................................................................................................91
3
Cam Viewer 3 Lite User’s Manual
1. System Requirement
The Minimum system requirement
Hardware requirement:
CPU
Intel Core 2 Duo or above
RAM
Minimum 1 GB, 2GB or above is recommended
HDD
SATA 200GB or above is recommended
Display card
Ethernet interface
Independent display card suggested
10/100Mb Ethernet card or above
Make sure your display DPI setting is set to default at 96DPI To set DPI value, right-click on desktop,
choose “settings” tab >> “advanced”
Software requirement:
OS
Windows 2000(SP4), Windows XP, Windows 2003, Windows Vista,
and Windows 7
4
Cam Viewer 3 Lite User’s Manual
2. Software Installation
1. Double-click on the setup executable file to initiate the installation:
2. The setup wizard will be initialized and preparing to install:
3. Click “Next” to start:
5
Cam Viewer 3 Lite User’s Manual
4. Click “Next” to continue, or click “Change” if you wish change the installation directory:
5. Enter a new valid path in the “Folder name” field for new installation directory, or click the
icons highlighted below to switch to a desired directory and create a new folder if desire.
Afterwards, click “OK” to continue:
Up one level
Create new folder
6
Cam Viewer 3 Lite User’s Manual
6. Click “Install” to start the installation, or click “Back” to go back and make further changes:
7. The installation process should be displayed:
7
Cam Viewer 3 Lite User’s Manual
8. Simply click “Finish” to exit the setup wizard when installation finishes:
8
Cam Viewer 3 Lite User’s Manual
3. Configuration Wizard
To configure detail settings to the software, open up the config wizard program to do so. There
are two ways of accessing the config wizard:
z
Accessing the config wizard from the main program:
Open up the main program from the desktop shortcut or under the “Start” menu
Go to “Start” >> “All Programs” >> “PLANET” >> “Cam Viewer 3 Lite” >> “CV3 Lite”
Access the config wizard by either clicking the “CAM Setting” button, or the “System Setting”
button:
CAM Setting
System Setting
9
Cam Viewer 3 Lite User’s Manual
3.1 Channel
The “Channel List” page should be display which is an overview page that displays a list of
cameras currently added to the software.
10
Cam Viewer 3 Lite User’s Manual
3.1.1 Adding Cameras
To add cameras using the configuration wizard, go to “Channel” from the menu on the left.
To add a new camera, click on the “Channel Setting” tab and select an available channel from
the “Channel” drop-down menu, and then click on “Search” to begin:
1
2
3
* The “Search” function only works when the cameras are installed in the same subnet as the
PC the NVR software is installed
11
Cam Viewer 3 Lite User’s Manual
You can also click on any of the empty slot in the Camera List to start searching cameras on
the network:
The NVR software will perform a search and locate the cameras available within the same
subnet:
A new dialog should be prompted and displays a list of available cameras:
12
Cam Viewer 3 Lite User’s Manual
* For cameras located in different subnet (but within the same local network), enter its private
IP, HTTP port, user- name and password manually and click “Detect”.
Double-click on a camera from the list and it should direct you back to the “Channel Setting”
page. The camera’s IP address and HTTP port should be automatically filled in the “Network
Setting section:
Fill in the camera’s username and password (must be the root privilege account) in the
corresponding fields shown below and click “Detect”:
1
2
3
13
Cam Viewer 3 Lite User’s Manual
Upon a successful detection, the camera’s information and its current settings should be
detected: (as shown below)
The settings shown in the “Other Setting” section can be changed by using either the available
drop-down menu or by clicking the corresponding cell box:
Use the drop-down to make changes
Clear settings and exit this page
Click to confirm adding the camera
Removing an existing camera
14
Cam Viewer 3 Lite User’s Manual
Click the “Add Camera” button to confirm the settings and you should be directed back to the
“Channel List” page:
Confirm adding camera
You can click the “Cancel” button to cancel the configuration and you should be directed back
to the “Channel List” page:
Cancel adding camera
You should now see a list of cameras you’ve been added to the software from the “Channel
List” page:
15
Cam Viewer 3 Lite User’s Manual
3.1.2 Remove Cameras
To remove a camera, simply click on a camera from the list under the “Channel List” page; it
should direct you to the “Channel Setting” page:
Click
And all settings of the camera you just clicked on will be displayed. Click on the “Remove
camera” button to remove the camera:
16
Cam Viewer 3 Lite User’s Manual
3.1.3 PTZ setting - Preset Point
After adding cameras to the software, all the PTZ cameras will be available in the “PTZ
Setting” page (Channel >> PTZ Setting)
Only PTZ cameras will be listed in the “Channel” drop-down menu: (as shown be- low)
Its live video should then be displayed in the lower-right hand corner:
17
Cam Viewer 3 Lite User’s Manual
Use the on-screen PTZ panel to move the view point and select PTZ movement speed from
the “Speed” drop-down to determine the distance of each movement:
Next, type in a name in the “Preset Point Name” field to name the preset point and click “Add”
to finish:
The preset point will then be added and will be available in the “Preset Points List” (as shown
below)
18
Cam Viewer 3 Lite User’s Manual
Click to highlight the preset point will give you the options to “Modify”, or “Remove” the preset
point:
* To modify an existing preset point, click to highlight the preset point from the list, and then
move to a new view point with the PTZ panel. Finally, click “Modify” to confirm and save the
new point
19
Cam Viewer 3 Lite User’s Manual
3.2 Intelligent
The software has built-in motion detection function which needs to be configured and enabled
in the configuration wizard. The configuration page can be accessed in the configuration
wizard under “Intelligent” from the menu on the left. You should be greeted with an overview
list when first access this page.
The overview provides the overall configuration status of the motion detection function on the
available channels.
Channels
Status of the intelligent functions
Only the channels that have been configured with cameras (regardless if they are online or not)
would have the “X” or O” mark.
X: Disabled
O: Enabled
20
Cam Viewer 3 Lite User’s Manual
3.2.1 Intelligent - Motion
To configure the detail settings of each intelligent function, click on the “Intelligent Setting” tab
to access the detail configurations:
Apply setting Cancel setting
Channel selection
Clear defined area
Detail setting of a particular intelligent function
Defined detection area
* ROI: Region of Interest
To start configuring the detail settings, select a channel by clicking on the radio button first, and
its video should be displayed in the lower-right hand corner:
21
Cam Viewer 3 Lite User’s Manual
Check the “Start” checkbox to enable motion detection for the selected channel:
Adjust the detection sensitivity by altering the “Sensitivity” value (smaller number means less
sensitive)
Select the motion detection trigger source:
z
Server --> Use software’s built-in motion detection function
z
Camera --> Receive motion detection trigger from the camera
22
Cam Viewer 3 Lite User’s Manual
Finally click and hold the mouse left button to draw multiple squares on the video to define
motion detection region:
You can click the “Clear” button to remove the defined regions and re-define new motion
detection regions:
23
Cam Viewer 3 Lite User’s Manual
3.3 Event Handling
The software can receive different types of events and respond to certain actions such as
performing recording, send warnings to various event servers or FTP an event image...etc.
Users can also create an “action group” and apply it to a certain type of event on a particular
channel.
To create an event action group, go to the “Action Group” tab and click the “+” button to begin:
24
Cam Viewer 3 Lite User’s Manual
Noticing a new event action group has been added but the “Detail Setting” section is not
available for configuration yet:
By default, all the event servers are grayed out as none has been added to the soft- ware yet.
Settings of these event servers will be described in the next page.
25
Cam Viewer 3 Lite User’s Manual
3.3.1 Event Handling - Mail server
Mail servers are used to send warning emails with pre-defined text content to designated
recipients when events are triggered.
To add a new mail server, click on the “Add” button at the bottom:
Next, fill in the empty fields like shown below:
* Enter a valid public IP address or FQDN (Fully Qualified Domain Name) in the “Mail Server”
field
26
Cam Viewer 3 Lite User’s Manual
3.3.2 Event Handling - FTP server
FTP servers are used to send warning with pre-defined text content or camera snapshot to
designated FTP servers when events are triggered.
Click “Add” button at the bottom to add a new FTP server:
Fill in the empty fields as illustrated below:
Clear settings
Apply setting for the current page
* Enter a valid public IP address or FQDN (Fully Qualified Domain Name) in the “FTP Server”
field
* By default, the software uploads files to the top-level directory of the FTP server. Enter the
folder name after the “\” in the “Upload Path” field if you would like to soft- ware to upload to a
specific folder.
27
Cam Viewer 3 Lite User’s Manual
3.3.3 Event Handling - HTTP server
HTTP servers are used to send warning with pre-defined text content or camera snapshot to
designated HTTP servers when events are triggered.
Click “Add” button at the bottom to add a new HTTP server:
Fill in the empty fields as illustrated below:
* Enter a valid public IP address or FQDN (Fully Qualified Domain Name) in the “Host
Address” field.
28
Cam Viewer 3 Lite User’s Manual
3.3.4 Event Handling - TCP server
TCP servers are used to send warning with pre-defined text content to designated TCP
servers when events are triggered.
Click “Add” button at the bottom to add a new TCP server:
Fill in the empty fields as illustrated below:
* Enter a valid public IP address or FQDN (Fully Qualified Domain Name) in the “Host
Address” field.
29
Cam Viewer 3 Lite User’s Manual
3.3.5 Event Handling - Warning Sound
Users can set up sound files in the software and have the software play them when events are
triggered. Different warning sounds can be used for different types of triggered events.
* Only .Wav file is supported
To Configure, click the “Add” button:
Put in a description for the warning sound in the “Description” field (as shown below):
30
Cam Viewer 3 Lite User’s Manual
Click on the “folder” icon to locate the sound file:
You can preview the sound before applying the new configuration by clicking on the “Speaker”
button:
31
Cam Viewer 3 Lite User’s Manual
3.3.6 Event Handling - Emergency
This allows users to create emergency contact information and it can be assigned to a
particular channel. This information will be shown in the remote client viewer program under
the “E-Map Monitor” when a particular channel is selected:
* Refer to page 95 for instructions on how to use E-Map Monitor.
To add information, click “Add” button:
Fill in the empty field with desired information:
32
Cam Viewer 3 Lite User’s Manual
Finishing Configuring Action Group
Once you have all the event servers configured, you can go back to the “Action Group” tab and
finish the “Detail Setting” section by selecting the desired event servers for a particular event
action group:
1
3
2
33
Cam Viewer 3 Lite User’s Manual
3.3.7 Event Handling - Event Trigger schedule
The software provides users the ability to set one schedule per channel and only events
triggered during the defined schedule will be treated as events and the con- figured event
actions will be triggered.
Channel selection
Time that has been selected
Clear schedule selection
To configure an event schedule for a particular channel, select one from the top (only the ones
available will a checkbox next to the channel number):
By default, the schedule is set in full:
34
Cam Viewer 3 Lite User’s Manual
To quickly clear the default setting, click on the “Clear” button as shown below:
Click and hold the mouse then move the house cursor from left to right (horizontally or
diagonally) to define (add) new hours or days for event trigger:
* Click and hold the mouse then move it from right to left (horizontally or diagonally) will erase
the previously added hours/days
35
Cam Viewer 3 Lite User’s Manual
3.4 E-map
The software provides E-Map function in a multiple layered structure. Users can place
cameras on one map and create a “group” that contains those cameras, and then place the
camera “group” on a different map. Users can also create an additional group that contains
multiple camera groups and place the new group onto a different map.
When accessing the “E-Map” configuration page in the wizard, you should be prompted with
the “Overview” page first:
E-Map Types
Display E-Maps only contains cameras
Display all E-Maps
Camera or Camera group’s position based on coordinates
Display E-Maps only contains camera groups
* Cameras and camera groups can exist on the same layer of E-Map
36
Cam Viewer 3 Lite User’s Manual
3.4.1 E-map - Location setting
This page is an overview page based on the final E-Map settings. It displays all E-Maps and
the positions of each camera (or camera group).
E-Map Name
Camera Group
Camera
Double-click on a “camera group” (ex. Group 1) icon will direct you to the E-Map that
represents camera group 1 and displays the positions of each camera (or cam- era group) in
camera group 1.
To go back to the previous layer, simply double-click anywhere on the map in the current layer:
Double-click
37
Cam Viewer 3 Lite User’s Manual
* The position of each camera (or camera group) can not be re-arranged in this page. This can
only be done in the “Detail Setting” page.
A camera can be quickly placed to a new camera group (a group that’s on the same layer) on
the fly in this page. To do so, simply click and drag a camera icon then drop it onto a camera
group icon:
Drag and drop to place the camera
to a different camera group
38
Cam Viewer 3 Lite User’s Manual
3.4.2 E-map - Detail setting
This page allows users to define new camera groups, E-Map image, and the positions of each
camera (or camera group).
cameras not in a camera group
cameras in- side a camera group
Top group (E-Map layer) Sub group (Sub E-Map layer)
By default, all the cameras should be listed in the tree-view list on the left (as shown below). All
cameras should be listed under the “Home” group (or Group#1):
39
Cam Viewer 3 Lite User’s Manual
3.4.3 E-map - Detail setting - camera group
To create a new group, click on the “Add new group” button as shown below:
The next available group ID and group name should be automatically filled in to the
corresponding fields. If you’d like to configure this group as a sub group of another group,
choose the main group from the “Dependent” drop-down menu:
To change the map image, click on the icon (as shown below) to do so:
40
Cam Viewer 3 Lite User’s Manual
Then locate the new map image:
Finally, click on the “camera group” icon and hold the mouse then drag the icon to the desired
position on the map to determine its new position.
Move the icon on the map to determine its position
41
Cam Viewer 3 Lite User’s Manual
3.4.4 E-map - Configure E-Map for a camera
Similar to the instructions described from page 51 ~ 53, except you click on the camera from
the list on the left this time:
The “Channel” and “Name” fields will be automatically filled. Simply select a desired camera
group this camera will belong to from the “Dependent” drop-down menu:
Click and drag the camera icon to determine its new position:
Move the icon on the map to determine its position
42
Cam Viewer 3 Lite User’s Manual
You can also change the camera’s pointing direction on the map from the “Direction”
drop-down menu nased on its actual setup in the real world environment:
43
Cam Viewer 3 Lite User’s Manual
3.5 User account
The software provides the option to allow users to set different access privileges and they can
be assigned to different user groups. Users can then create multiple user accounts and
assigned them to different user groups to determine the access privilege of each user account.
Click and select
an existing user
from the list
and click the “-”
button to
remove a user
add new user
remove user
* By default, the software does not have any user account/user group created. It’s strongly
recommended that you create a user account to prevent unauthorized access to the software.
* Please do not create an additional user group account that has less access privilege and
assign the only user account to that group. You will be asked to log in next time you start the
software which you will then only have limited access.
* You can not create a user account until you create a user group (the first user group will be
the “Admin” group)
44
Cam Viewer 3 Lite User’s Manual
3.5.1 User account - User Group
To create a new user group account, click on the “User Group Setting” tab and click on the
“Add Group” button at the bottom:
You will then be able to assign access privileges to the new group. You may also change the
name of the group if you wish:
Group name
A particular function of a particular channel
that has not been granted for access
A particular function of a particular channel
that has been granted for access
45
Cam Viewer 3 Lite User’s Manual
3.6 Recording
The recording configuration page allows users to configure the followings:
* Quickly enable/disable certain types of recording
* Recording storage path
* Recording frame rate of each recording type on each channel
* Pre-alarm/Post-alarm time
* Schedule recording
You should first be prompted with the overview page that displays the current recording
configurations of each channel and the storage path.
To add a new storage path, click on the “Add” button (as shown below):
46
Cam Viewer 3 Lite User’s Manual
A new dialog should be prompted which you can select a new path to store the recording data:
You can also configure the software to always keep the previous number of days of recording
data if you wish to do so:
47
Cam Viewer 3 Lite User’s Manual
3.6.1 Recording - Setting
You can configure the detail recording settings in the “Recording Setting” page. In this page,
you can configure the followings:
* Enable/disable recording types
* Recording frame rate
* Pre-Alarm/post-alarm time
Channel selection
Recording type
Frame rate selection
Pre-alarm
Post-alarm
* The “FPS” is available only if the video for- mat of the selected channel is MJPEG.
* The “I/P Frame” is available only if the video format of the selected channel is
MPEG4 or H.264
48
Cam Viewer 3 Lite User’s Manual
3.6.2 Recording - Schedule
Schedule recording allows users to set the software start and stop recording automatically
within the scheduled time frame:
Hour
Day
To configure schedule recording for a particular channel, click on one of the channel from the
“CH” column in the upper-left hand corner. Then you can edit the recording schedule of the
selected channel in the “Schedule” section:
Double-click
49
Cam Viewer 3 Lite User’s Manual
Next, click on the cell boxes on the schedule table to configure the desired recording time.
Selected cell boxes will be marked in green which means recording will be started at that
particular time of that particular day:
* Each cell box represents 15 minutes
To set the software to record in consecutive hours on a particular day, click on a cell box (as
the starting point) and hold the mouse then move it horizontally. Release the mouse when you
are done.
To set the software to record on consecutive days during a particular hour, click on a cell box
(as the starting point) and hold the mouse then move it vertically. Release the mouse when
you are done.
Click and drag the mouse horizontally
Click and drag the mouse vertically to
to set consecutive hours
set consecutive days
* Click and drag the opposite direction to clear previously selected time frame
50
Cam Viewer 3 Lite User’s Manual
3.7 Backup
The software provides the backup function which can back up the followings:
* Media database: Recorded data in the database format
* AVI export: Recorded data exported to AVI file format
* Configuration: The configuration files of the software
Available channels
Unavailable channel
Default backup
directory
Begin time and
time length of the
backup file
Click to start the
Change backup path here
Backup progress
backup process
51
Cam Viewer 3 Lite User’s Manual
3.7.1 Backup - Backup media Database
To backup the media database, follow the procedures below:
* Select channels from the “Channel List” to back their media database
* Change or accept the default backup directory
* Set the “Begin Time
* Set the “End Time” or select the “Export length”
* Click
to begin the backup process
You should be notified once the process completes. The stored file name and the storage
directory should also be displayed:
52
Cam Viewer 3 Lite User’s Manual
3.7.2 Backup - AVI Export
The software provides the function to allow users to backup the recorded file of one or more
channels and export them as AVI file format. The file can then be played by the bundled media
player.
Available channels
Unavailable
channels
Begin time and
time length of
the backup file
Backup progress
Click to start the backup process
* The default directory that stores the exported AVI files is C:\Program Files\PLANET\CV3
Lite\AVI and this can’t not be changed.
53
Cam Viewer 3 Lite User’s Manual
3.7.3 Backup - Configuration Backup
To export the recorded video to AVI, follow the procedures below:
* Select channels from the “Channel List” for AVI export
* Set the “Begin Time
* Set the “End Time” or select the “Duration time”
* Click
to begin the backup process
In the “Configuration” page, you can backup the current settings or restore a previously saved
configuration file.
Change backup
directory here
Click to start the backup
Locate a previously save
configuration file
Click to start restoring
To backup the configuration file, select a folder of where you would like the configuration file to
be saved to and click “Backup”:
Click to start the backup
Change backup directory here
54
Cam Viewer 3 Lite User’s Manual
You should be notified once the backup is completed successfully (as shown below):
To restore a previously saved configuration file to the system, locate the file first and then click
“Restore”
Locate a previously save configuration file
Click to start restoring
You should be prompted to confirm the restore process: (as shown below)
Click “Yes” and restart the configuration wizard to complete the restoration.
55
Cam Viewer 3 Lite User’s Manual
3.8 Backup - Log View
The software provides a detailed log which records what has been done and who has done
what to the software:
Click “Export” to export the log file to text file. You should be prompted once it’s exported
successfully and the directory of where it’s saves to would also be displayed:
56
Cam Viewer 3 Lite User’s Manual
4. Main Program - Log In
Once the main program is started, you should be prompted with the login screen.
Click the “Login” button to enter the software:
57
Cam Viewer 3 Lite User’s Manual
4.1 Live View
Live or Playback Videos
Video Control Side Bar
PTZ Controls
main menus
Sub-pages in the “Video Control side Bar”
1. Camera list
2. Camera status
3. Sequence View Setup
58
Cam Viewer 3 Lite User’s Manual
Side Menu
Channel status:
Blue: Channel Online
Green: Recording in process
Red: Event Trigger and Event Recording in process
Gray: Channel Offline
59
Cam Viewer 3 Lite User’s Manual
4.1.1 Live View - Adjust Viewing Layout
The program starts up with the Live Monitor view by default and displays videos from cameras
with 64-video split view.
Single left-click on a video gets the video displayed in single view mode in full screen. Single
click on it again will return the screen to the previous display mode.
You can switch to different display modes by using the “pattern switch buttons” from the side
bar under the “Split” tab. The software allows users to display the monitoring area in single
video mode, quad video mode, 6-video mode, 9-video mode, 13-video mode, 16-video mode,
25-video mode, and 36-video mode...etc.
Despite the video display patterns the software provides, it also comes with a feature that
allows users to re-arrange the locations of each video window by doing a simple drag and drop.
Simply click on a video window you wish to move its location from and move the video with
your mouse left button keep holding down. Release it until you move it to a new location. You
may also use this feature to switch locations between two video windows.
60
Cam Viewer 3 Lite User’s Manual
4.1.2 Live View - Full screen monitoring
With a click of a button, you can quickly hide all the menu options and fill the monitor with live
video(s) only. This is quite helpful because the scale of each video window is enlarged while
the number of live videos that are being viewed can re- main unchanged. To switch to “Full
Screen Monitoring”, simply click on “Full Screen Button” (as shown below) at the bottom of the
“Live Monitor” screen. You can then left-click anywhere on the screen to return to the previous
state.
61
Cam Viewer 3 Lite User’s Manual
4.1.3 Live View - Video Bar Quick Access
Take Snapshot
You can find the “snapshot” icon on the upper-right hand corner of each video window which
allows you to take an instant snapshot of a live video. Click on the icon and the snapshot
should be displayed in a pop up window. You can then right-click on the image and choose
“Save” from the drop-down menu. The snapshot is saved at a pre-defined location under
C:\Program Files\PLANET\CV3 Lite\Snapshot
Simply close the window and you should be prompted with a message asking whether you
would like to save the snapshot picture. Simply click “Submit” to save it in the default directory
at C:\Program Files\PLANET\CV3 Lite\Snapshot
1
2
62
Cam Viewer 3 Lite User’s Manual
Manual Recording
You can quickly start recording of a particular channel from the video bar. Refer to the following
button to do so:
Motion Display
It will turn on the motion display and mark overlay paint on the object that’s moving in the video
* Please make sure motion detection has
been turned on and properly configured in
the config wizard and make sure “Server” is
chosen as the MD trigger source.
Audio
It allows the software to receive audio from the camera.
63
Cam Viewer 3 Lite User’s Manual
Reconnect
Overtime, some cameras may automatically adjust its frame rate depends on the network
traffic. They don’t tend to increase the frame rate back even when the available network
bandwidth is increased. Use the reconnect function to re-esablish the connection between the
cameras in order to get a better frame rate
Digital PTZ
Click on the digital PTZ button to enable the function. Once it’s enabled, click anywhere on the
video and hold the mouse left button. Move the mouse diagonally to draw a square on the
video to zoom. Use the mouse scroll button to zoom in and out. Right click the mouse to exit
the digital PTZ mode.
* This function is only available
in the single or quad window
viewing mode
64
Cam Viewer 3 Lite User’s Manual
4.1.4 Live View - PTZ & Preset Control
The virtual PTZ control keypad is available at the bottom-right hand corner of the Live Monitor
page. All the PTZ-capable cameras will be listed in the drop-down menu in this section. Use
the virtual keypad to control where the selected camera will be pointed to.
* You must select a camera from the drop-down menu first before using the virtual PTZ control
keypad
You can also find a list of the preset points of this camera that you previously configured
available in the drop-down menu under the “Preset” tab in the PTZ control section. Select a
preset point and click on the “Go to” button will make the camera to point to that spot right
away.
You can also make the camera to do a non-stop pan in clockwise by clicking on the “Auto
Right” button or in counter-clockwise by clicking on the “Auto Left”. To stop it, simply click on
the “Stop” button.
To do an automatic sequence viewing with the available preset points, select a dwell time from
the drop-down menu first then click “Start” to begin the preset sequence viewing.
65
Cam Viewer 3 Lite User’s Manual
4.1.5 Live View - Sequence Viewing
Sequence view is a feature that allows you to perform live monitoring from multiple cameras
and have the system automatically switch those live videos for you with a time interval you
desire. You can set the system to run the sequence view under different screen split modes
and display, for example, four videos at once and then display the other four in sequence. You
can manually pick out the cameras that you wish to perform the sequence view on, or simply
select to sequence them all. Below is the instruction to setting up the sequence view function:
1. Under the “Live Monitor” page, click on the “SEQ” tab under the main menu
2. Different screen split modes will be available depends on the number of cameras that are
currently connected to the system. For example, if there are only three cameras connected to
the system, only the single view mode will be available.
3. Set the time interval for the sequence view (time is calculated by second)
4. Finally, choose you would like to sequence all available channels by choosing “SEQ ALL”, or
sequence by camera groups:
66
Cam Viewer 3 Lite User’s Manual
4.2 E-map Monitor
E-Map Monitor provides monitoring with instant event notifications with the geographical
information of each camera (and camera group). Small-sized video of a channel will be shown
on the map during a trigger of an event.
Channel info &
event trigger info
Camera group
Camera
Video of the channel
with event trigger
Channel video
The E-Map Monitor displays the top layer of e-map by defaults. Double-click on the camera
group icon to go down a layer and enter the e-map of the camera group.
Double click on
the mini main map
to go back to the
Double-Click
top layer
When there is an event going on, the camera icon (or the camera group icon) will be
surrounded with red square flashes on the map:
67
Cam Viewer 3 Lite User’s Manual
Double-click on the “camera group” icon will direct you to the e-map of that camera group (like
what’s shown on page 95)
Double-click on the “camera” icon” will display the small-sized video of that channel:
68
Cam Viewer 3 Lite User’s Manual
4.3 Event Monitor
Event Monitor is a function that plays back videos that are recorded during event triggers. It’s a
convenient tool that allows users to play through a list of event recordings that are happening
at the moment:
Detail info of the event
Video of the event
triggered channel
triggered channel
Event trigger list
Location of the event
triggered channel
Events are received every 10 seconds and they will be listed in the event list with the newest
record on the top. Simply click on any of the event entry in the list to playback the video:
When the list is full, the older entries will be removed from the list, you can click on the “Event
Log Search” to search for older event recordings:
You can then perform a search by choosing the channel, event type or a particular time range:
69
Cam Viewer 3 Lite User’s Manual
4.4 Playback
Playback is a function that allows you to play videos that were previously recorded from one or
more cameras. The program allows you to playback videos in single view mode or quad view
mode. Multiple videos recorded from different cameras (up to four) can be played on a quad
view screen at the same time. The program provides certain ways for searching playback
videos.
You can perform a search by choosing one or more cameras listed at the bottom right hand
corner. The search starts automatically as soon as you select the one or more camera(s) you
wish to perform search on.
70
Cam Viewer 3 Lite User’s Manual
The search result will be displayed at the bottom with bars in either dark gray or red. The dark
gray bar representing videos that were recorded by manual, continuous, or schedule recording.
The red bar representing videos that were recorded by event trigger.
You can click and drag the green indicator horizontally to jump to a specific play time:
Click on the thumbnail image in the side bar on the right to playback event recording data from
one of the selected channels:
You can select one or more channels to export the recording videos to the local PC as AVI files.
Click “Start” to proceed:
71
Cam Viewer 3 Lite User’s Manual
You will then be prompted to choose the length of the export file. Make a selection from the
drop-down menu and click “Convert” to begin:
The process will be displayed, click “STOP” at any time to seize the conversion:
You will be notified when the conversion is done:
You can quickly access the exported files by clicking on the icon highlighted below, and it will
open up the Windows Explorer displaying the directory of where AVI files are saved:
72
Cam Viewer 3 Lite User’s Manual
5. Media Player
The software comes with a player program which plays the recording files that are in their
original database file format or in the AVI file format that were exported by the NVR software:
To access the media player, double-click on the executable file in the CD, or you can copy it
directly and place it on the desktop for quicker access in the future:
Play the exported AVI file
To playback the exported AVI file, go to “Open” >> “AVI File” from the top menu:
A new dialog will be displayed asking you to locate the AVI file. Go to C:\Program
Files\PLANET\CV3 Lite\AVI as it’s the default directory of where the exported AVI files are
saved:
73
Cam Viewer 3 Lite User’s Manual
The playback should begin and the video should be played back in its original resolution by
default:
Move the indicator horizontally to jump back and forth to a specific time:
Use the control buttons at the bottom to play/stop/pause/rewind/fast forward the video
You can click on the “Snapshot” button at the bottom to take a snapshot of the video:
* The snapshots can only
be saved in “JPEG” format
74
Cam Viewer 3 Lite User’s Manual
Click on the “OSD” button at the bottom displays the OSD on the video:
* The OSD displays in the upper-left hand corner
by default. More settings can be done to it such
as font size/color and display position. More
details about this will be covered in page 121.
The player also supports the digital function. Simply use the scroll button to zoom in/out. You
can also click and hold the house then drag diagonally to select a particular area to zoom in.
Draw a square on the video
to zoom in a particular area
75
Cam Viewer 3 Lite User’s Manual
Once the video is zoomed in, click and hold the mouse button then move the mouse to move
the zoomed area:
Click and hold the mouse button
then move the mouse to move
the zoomed in area
To exit digital PTZ mode, simply right-click anywhere on the video.
Play the database file
To play the media database file, simply go to “Open” >> “Media Data Base” from the top menu:
A dialog shown like below should be displayed:
76
Cam Viewer 3 Lite User’s Manual
The default MDB path should be displayed. If you have altered the database storage path in
the Config Wizard, click “Browse” to locate the new path:
A new dialog should be displayed to allow you to locate the directory of where the database
files are stored:
After the directory is selected, click on “Check”:
A pop-up message should be displayed once the database is successfully located (as shown
below):
77
Cam Viewer 3 Lite User’s Manual
Next, select a desired time zone from the drop-down menu:
* The MDB file does not contain any time zone information. Simply select a time zone based
on your current location or select one if you know the time zone of NVR server where the MDB
was exported from.
The “Channel” drop-down menu lists only the channels that have recording files available.
Simply select a channel and press “Search”:
The database begins and end time of the selected channel should then be found:
Simply specify the “Start Time” within the range of begin and end time and click “OK” to play
the database file:
78
Cam Viewer 3 Lite User’s Manual
The playback should begin and the video should be played back in its original resolution:
79
Cam Viewer 3 Lite User’s Manual
5.1 Configuration of the OSD display
To make changes of how OSD is displayed on the playback video, go to “Setting” >> “OSD”
from the top menu:
A new dialog should be displayed which lets you change the OSD setting (as shown below):
Choose the time zone
Select to display time or
of the displayed time
resolution or both
Position of the OSD
Change OSD text size
Change OSD text color
Change the background
color of the OSD texts
80
Cam Viewer 3 Lite User’s Manual
6. Remote Monitor - Web Browser
CV3 Lite has built-in web server which allows users to access the live video and payback video
through a web browser remotely. This is convenient because it doesn’t require users to install
remote application in order to see the live and playback videos.
You can view live videos of up to 16 channels at once simultaneously through the web browser.
As soon as you log in through the web browser, it displays live video of the first available
channel in single window view. You can switch the split mode by clicking the camera list on the
left:
Click to see live videos of first 16 channels in 16 split mode
Click a sub-group to see live videos of the 4 channels in that group
in quad window view
Click the camera icon to see the live video of that channel in single
window
81
Cam Viewer 3 Lite User’s Manual
The camera icons are marked with different colors representing their current status:
Online
Offline
Recording
Not configured with a camera
82
Cam Viewer 3 Lite User’s Manual
6.1 Web Browser - PTZ Control
The PTZ control is available at the lower-left hand corner. Select a camera from the drop-down
menu to use PTZ control:
* Only PTZ cameras will be listed
PTZ speed adjustment
Zoom in
Zoom out
Focus near
Focus far
Auto focus: ON
Auto focus: OFF
83
Cam Viewer 3 Lite User’s Manual
6.2 Web Browser - Preset
Click on “Preset” to access the preset menu. The drop-down menu should list the available
preset points of the selected channel that were previously configured. Simply select one from
the list and click “Go to”:
The buttons below the drop-down menu allows you to set the camera to pan right or left
automatically or pan 360 degrees if the camera supports such function:
You can also set the camera to “patrol” among the preset points continuously by clicking the
“Start” at the bottom:
84
Cam Viewer 3 Lite User’s Manual
6.3 Web Browser - Sequence Viewing
Select “All Channels” to start sequence view on all channels in single window view. You can
set the sequence interval by selecting one of the pre-defined options from the “Interval
drop-down menu. Click “Start” to begin:
Set sequence interval
Select “All Groups” to start sequence view in quad window view (4 cameras in one group):
85
Cam Viewer 3 Lite User’s Manual
You can also set to start sequence view in 16 window view by checking the “1 - 16”, “17 32”...etc checkboxes:
86
Cam Viewer 3 Lite User’s Manual
6.4 Web Browser - Video Window Control Bar
Each video window in live view comes with its control bar. The control bar allows users to:
* Take snapshot of the live video
* Turn on/off audio (speaker)
* Turn on/off audio post (Mic.)
Audio
Snapshot
Audio Post
To take a snapshot, click on the snapshot icon and a new window should be displayed. Simply
close the window to finish as the snapshot will be saved to C:\SnapshotFolder automatically:
87
Cam Viewer 3 Lite User’s Manual
6.5 Web Browser - Digital PTZ
The digital PTZ function is supported to all video window, which you can click and hold the
mouse and drag diagonally to draw a square to zoom in a particular area on the video:
Once zoomed in, an
icon will be available on the video. Simply click and hold the mouse
and then drag to move the zoomed in area to a desired direction:
You can right-click anywhere on the video to exit the digital PTZ mode at any time:
88
Cam Viewer 3 Lite User’s Manual
Keep video in original aspect ratio and full screen:
At all time, you can set to display all videos in their original aspect ratio by clicking the function
button available at the upper-right hand corner.
To display in full screen, click the button next to it:
Keep aspect ratio
Full screen
Change display language:
The web user interface supports display in different languages. To change the display
language, click the logged in user account at the upper-right hand corner:
A pop-up window should be displayed (as shown below):
89
Cam Viewer 3 Lite User’s Manual
Select a desired language from the “Language” drop-down menu and click “Apply”:
90
Cam Viewer 3 Lite User’s Manual
6.6 Web Browser - Playback
Playback is a function that allows you to play one or more videos that were previously
recorded by a chosen recording method or due to an event trigger. The web interface offers
synchronized playback from up to 4 channels and various types of search methods are
provided to help you find the footage you need quickly.
You can turn on or off the audio of a recorded video at your choice if audio was also recorded
during the recording of the video.
Playback video can be viewed in full screen and snapshots can be taken and saved during a
video playback.
Playback video
Playback video
control buttons
Channels to be played back
Methods to search playback
Methods to Search Playback Videos
The NVR offers four methods to quickly help users find videos that were previously recorded:
* Search by time chart: Select a desired date of recording from the time chart
* Search by specific time: Find videos by specifying a start time
* Search by event: Display recording data that were recorded due to event triggers
* Search by event (most recent): Display the most recent event recording data
91
Cam Viewer 3 Lite User’s Manual
Search by time chart
Start by selecting which channel(s) you would like to perform a search on:
* Selected channels will be marked in red
Select “Search by time chart” from the “Search Method” drop-down list and click “Go” to start
the search:
Results will then be displayed in a “Date/Channel” table and boxes marked in dark gray
represent videos found on those dates:
92
Cam Viewer 3 Lite User’s Manual
Click on any dark gray cell box should direct you to the hour/channel table if there were
multiple videos recorded during that date:
* Videos from other cameras that are recorded on the same date will also be displayed
Click on the cell box again will start playing back the videos if you have reached the end of
search results:
Videos found from other cameras that were recorded at the same time will also be played.
93
Cam Viewer 3 Lite User’s Manual
Search by event
Start by selecting which channel(s) you would like to perform a search on:
* Selected channels will be marked in red
Select “Search by event” from the “Search Method” drop-down list and click “Go” to start the
search: Results will then be listed like what is shown below (displays the oldest record top
down). Click on a particular result to start the playback:
* You can click “Next Search” to display the next 15 results.
You may also specify a new start time to search and display results from then on. You can
restrict the number of results to be displayed at once (max.30) and perform the search again
94
Cam Viewer 3 Lite User’s Manual
Play by specific time
If you know when a recording was taken place, you may choose the “Play by start time” from
the “Search Method” drop-down list
Then you will be prompted to enter a specific time and date for the recorded video.
Search by event (most recent)
This function quickly displays the most recent event recordings from the selected channels,
displaying the most recent result top down. You may click “Update” to update the list to display
the most recent result.
95