1
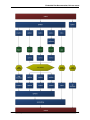
Embedded Xinu Documentation, Release master
user@host:tjtag$ ./tjtag -erase:nvram /wiggler /noemw /noreset
When the device reboots, it should reinitialize the correct NVRAM settings from the backup location within the CFE.
If you now have a serial console, success, you’re good to go. Don’t forget to reconfigure any custom NVRAM settings.
If that didn’t work, read on.
Erase the Kernel
Step 2. For whatever reason, it is possible for a corrupted kernel to prevent the bootloader from producing any output.
Again, use the same options you figured out during the -probeonly phase.
Example:
user@host:tjtag$ ./tjtag -erase:kernel /wiggler /noemw /noreset
After rebooting your router, you should get console output that indicates the CFE was upset to find there’s no kernel
to load from flash. This is normal; you did just erase this region of flash (hopefully). Now you can proceed to flashing
a new kernel or maybe you just want to load an elf image over the network.
Still got a blank serial console? Read on.
CFE Recovery
Step 3. Your last ditch effort is to replace the bootloader. If your CFE is corrupted then there’s no hope of booting.
Luckily, we can flash new one using TJTAG. The CFE contains a few settings unique to each router. If you made a
backup of your CFE before things went South, you can use that to restore the router to working order. If you don’t
have a backup, you can borrow a copy from another identical router. In the latter case you must customize the CFE
binary a bit before using it on a different router. In the event you don’t have access to a working router of the same
make and model, try searching around on the Internet for a pristine CFE. There have been a few “CFE collection”
projects out there; you might get lucky.
Transplant Another Router’s CFE
If you have the original CFE for this exact router, skip ahead to the next section. Otherwise, start by cloning the CFE
of your good router using the usual methods.
There are a few CFE variables unique to each router. For the WRT54GL, see our flash memory page for specific
locations. There should be a unique identifier and a pair of cryptography keys as well as the device MAC addresses.
We’re primarily concerned with the MAC address of the first physical Ethernet interface, but feel free to update the
others as well. For the WRT54GL, 0x1E00 contains the MAC address used by the CFE at boot time. While you can
override this setting later for your kernel in your local network configuration or NVRAM, you can’t fool the bootloader
(well you can, but not persistently). Especially, if you are running a pseudo-static DHCP configuration for a pool of
backends, you’ll get lots of network conflicts during the boot process unless this is set correctly. For the WRT54GL,
this MAC address should match the one on the bottom sticker. Other routers have various schemes/offsets for what
the address should be relative to the one printed on the case depending on how many physical interfaces the unit has
and how the manufacturer chose to allocate the addresses. If you are feeling ambitious, you can update the default
NVRAM settings in the CFE backup location so they are correct when you do a factory reset. Alternatively, these can
always be corrected later using the NVRAM utilities.
To edit the CFE, fire up your favorite hex editor and tweak each location as necessary. We happen to like shed, which
has a nice nano like interface. Note that with shed your changes are affecting the file directly as you make them.
There is no “quit without saving” option. It is always a good idea to make a copy of the CFE.BIN file you are planning
to edit so you can revert to the original without having to grab it off the good router again.
Example:
4.13. Recovering a router
73