1
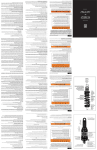
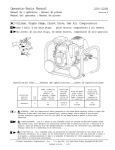
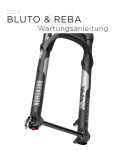
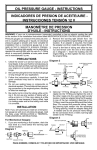
ADJUST REAR SHOCK
2004 U S E R M A N UA L
SRAM CORPORATION • 2004 SID REAR ADJUST USER MANUAL
ENGLISH
Congratulations! You have the best in suspension components on your
bicycle! This manual contains important information about the safe operation
and maintenance of your shock. To ensure that your RockShox shock performs
properly, we recommend you have a qualified bicycle mechanic service your
shock. We also urge you to follow our recommendations to help make your
bicycling experience more enjoyable and trouble-free.
Rebound Adjustment Knob
Au enliegender Einsteller f r Zugstufe
Adjustador externo de rebote
Bouton de rØglage externe du rebond
Regolatore del ritorno
Regolatore esterno del ritorno
Shaft Eyelet / se an der F hrungsstange /
Ojal del eje / illet de la tige /Occhiello
albero /
/
Schacht-oogje / Olhal do pistªo
Externe terugveringsknop
Regulador externo de recupera ªo
Positive Schrader Air Valve
Positiv-Luftventil
VÆlvula de aure positiva
VÆlva air positive
Valvola aria in pressione
Klep positieve lucht
VÆlvula de ar positivo (sem adaptador)
Negative Schrader Air Valve
Negativ-Luftfeder (ohne Adapter)
VÆlvula de aire negative (sin adaptor)
Valve air nØgative (sans adaptateur)
Valvola aria in depressione (senza adattatore)
Klep negatieve lucht (zonder adapter)
VÆlvula de ar negativo (sem adaptador)
Body Eyelet / se am Geh use /
Ojal de la carcasa / illet du corps /
Occhiello corpo /
/
Romp-oogje / Olhal do corpo
Threaded Collar / Ring mit Gewinde /
Casquillo roscado / Collier taraudØ /
Collare filettato /
/
Stelring met schroefdraad
Anilha roscada
Air Can
Beh lter
CÆpsula
Bo tier
Contenitore
Reservoir
Inv lucro
Body
Geh use
Carcasa
Corps
Corpo
Romp
Corpo
NOTE: YOUR SHOCK’S APPEARANCE MAY VARY FROM THE ILLUSTRATIONS/PHOTOS IN THIS MANUAL.
FOR THE LATEST INFORMATION ABOUT YOUR FORK VISIT OUR WEBSITE AT WWW.ROCKSHOX.COM.
SRAM CORPORATION • APRIL 2003
3
SRAM CORPORATION • 2004 SID REAR ADJUST USER MANUAL
ENGLISH
I
M
P
O
R T A
N
T
Consumer Safety Information
SRAM CORPORATION • 2004 SID REAR ADJUST USER MANUAL
S e l e c t i n g A i r P r e s s u r e ( Sp r i n g R a t e ) :
1.
2.
RIDING A BIKE IS DANGEROUS. NOT PROPERLY MAINTAINING OR
INSPECTING YOUR BIKE IS EVEN MORE DANGEROUS. IT’S ALSO
DANGEROUS NOT TO READ THESE INSTRUCTIONS.
1.
2.
3.
Before riding the bicycle, be sure the brakes are properly installed and
adjusted. If the brakes don’t work properly, the rider could suffer serious
and/or fatal injuries.
If the shock ever loses oil or if it makes sounds of excessive topping out,
stop riding the bicycle immediately and have the shock inspected by a
dealer or call RockShox. Continuing to ride with the shock in either of
these conditions could result in loss of control of the bicycle with possible
serious and/or fatal injuries.
Always use genuine RockShox parts. Use of after-market replacement
parts voids the warranty and could cause structural failure to the shock.
Structural failure could result in loss of control of the bicycle with possible
serious and/or fatal injuries.
ENGLISH
Depressurize the positive and negative air chamber by removing the air cap and depressing the valve
core stems.
Because every bike is different, a good starting point is to pressurize the positive air chamber to an air
pressure equaling your body weight.
NOTE: AS BICYCLE DESIGNS DIFFER SIGNIFICANTLY, YOUR BICYCLE MAY REQUIRE DIFFERENT PRESSURES
OR SET UP TECHNIQUES. THESE INSTRUCTIONS ARE INTENDED AS A GUIDELINE ONLY.
3.
4.
5.
After adding air to your shock based on your body weight, and without sitting on the bike, measure the
distance from the rear axle to the seat (rear height). Write it down.
While you sit in a normal riding position, have a friend measure the same distance. The difference
between the two measurements is sag. Determine what percentage of total wheel travel this sag
represents.
If the sag is less than your bicycle manufacturer’s recommendation, a lower air pressure should be used.
If the sag is greater than your bike manufacturer’s recommendation, a greater air pressure should be
used.
IMPORTANT: DO NOT USE AIR PRESSURE OUTSIDE THE 100 TO 250 PSI RANGE.
6.
Once sag has been set, pressurize the negative air chamber to match the positive air chamber pressure.
TIP: ADJUSTING
THE NEGATIVE AIR CHAMBER DETERMINES THE EASE OF INITIAL COMPRESSION.
THE
HIGHER THE AIR PRESSURE YOU PUT IN, THE EASIER IT IS TO COMPRESS THE SHOCK.
I N S TA L L AT I O N
It is extremely important that your RockShox rear shock is installed correctly by a qualified
bicycle mechanic with proper tools. Consult your bicycle manufacturer’s instructions for proper
installation of your rear shock.
! WARNING
IMPROPERLY INSTALLED REAR SHOCKS CAN BE EXTREMELY
DANGEROUS AND MAY RESULT IN SEVERE AND/OR FATAL INJURIES.
7.
8.
Measure the sag once again to make sure it is the same. Write down the measurement and air pressure
reading from the shock.
Install both air caps.
Example: If your bike has 4” of rear wheel travel and you want to set it up for cross-country
riding, your sag should be 0.6 - 1.2 in. If you weigh 175 lb., pressurize the positive chamber to
175 psi and measure your sag. Then pressurize the negative air chamber to 175 psi and
remeasure sag.
NOTE: IT IS IMPORTANT THAT THE SHOCK HAS THE AIR VALVE CAPS ON AT ALL TIMES OR THE SHOCK CAN
PREMATURELY LOSE AIR.
Rebound Damping Adjustment (Some Models)
PERFORMANCE TUNING
RockShox rear shocks can be tuned for your particular weight, riding style, and terrain.
IMPORTANT: BE SURE YOU TAKE YOUR BIKE FOR A TEST RIDE TO SEE IF THE REAR SHOCK IS SET UP FOR YOU
STRAIGHT OFF THE SHOWROOM FLOOR.
By adjusting the air pressure, the SID rear shock can be tuned for your particular weight, riding
style, and terrain. You may benefit by making tuning adjustments to suit your specific needs.
When tuning suspension, always make one change at a time and write it down. This allows you
to understand how each change affects your ride.
Setting Sag
Sag is the amount of shock travel that is used as the rider sits stationary on the bike. Typically,
sag is 15 to 30 percent of all available wheel travel. Check with your bicycle manufacturer to
determine the rear wheel travel and recommended sag for your particular bike before setting
sag. For the SID rear shock you will be changing the air spring rate to set sag.
The shock includes a red rebound damping adjustment knob. Rebound is the extension or return
stroke of the shock. Rebound damping adjustment allows you to control the rate at which the
shock extends after it is compressed. The shock’s rebound is quickest when the adjustment
knob is in the full counterclockwise position. Rebound is slowest when the adjustment knob is
in the full clockwise position.
SETTING REBOUND
When you are setting rebound, a good starting point is the “curb” test. Be sure this is done after
you set up your sag.
1.
2.
3.
4.
Set your rebound adjuster fully counterclockwise.
Ride the bike off the curb sitting in the saddle and count the number of times the shock bounces
before returning to nominal sag. You want to achieve one bounce.
Turn the rebound adjuster a quarter turn clockwise and ride off the curb again. Continue to do
this until one bounce is achieved.
Record the number of turns from the fully closed (full counterclockwise) position.
Adjusting positive air pressure determines the spring rate, or stiffness, of the shock. The more air
you put in, the firmer your shock will be.
4
954-308184-000, REV. A
SRAM CORPORATION • APRIL 2003
5
ENGLISH
SRAM CORPORATION • 2004 SID REAR ADJUST USER MANUAL
SRAM CORPORATION • 2004 SID REAR ADJUST USER MANUAL
WA R R A N T Y
MAINTENANCE
A ft e r E v e r y 8 h o u r s o f R i d i n g
•
•
•
•
Clean your shock with mild soap and a toothbrush.
Keep the body threads clean and lubricated.
Keep mounting hardware clean and lubricated.
Refer to bicycle’s owner’s manual for correct mounting hardware torque values. Also be sure to verify
that your shock’s mounting hardware is properly torqued (60 in-lb).
IMPORTANT: OVER-TORQUED MOUNTING HARDWARE WILL CAUSE THE SHOCK TO BIND
UNDER-TORQUED MOUNTING HARDWARE WILL DAMAGE FRAME, HARDWARE, AND SHOCK.
AND MALFUNCTION.
A ft e r e v e r y 2 0 h o u r s o f r i d i n g
Remove, clean, and grease mounting hardware.
IMPORTANT: NEVER USE A HIGH-POWERED WASHER TO CLEAN THE
ENGLISH
SHOCK.
SERVICE
Your rear shock should be fully serviced every year by a qualified technician with proper tools.
Contact your local RockShox dealer, RockShox Technical Services, or the nearest distributor
(see International Distributors List).
Read the Warranty section for further warranty repair and contact information.
SRAM Corporation warrants its products for a period of two years from original date of
purchase to be free from defects in materials or workmanship. SRAM, or an authorized SRAM
Agent must inspect all SRAM products. If a product is found by SRAM or its authorized agent
to be defective in materials or workmanship, replacement or repair is at the option of SRAM.
This warranty is the sole and exclusive remedy. SRAM shall not be held liable for any indirect,
special, or consequential damages.
E xc l u s i o n s o f Wa r ra n t y
This warranty does not apply to products which have not been properly installed and adjusted
according to RockShox installation instructions. The warranty does not cover any product that
has been subject to misuse or whose serial number has been altered, defaced or removed. This
warranty does not apply to damage to the product caused by a crash, impact, abuse of the
product, non-compliance with manufacturer's specifications, or any other circumstances in
which the product has been subjected to forces or loads beyond its design. This warranty does
not cover paint damage or modifications to the product.
Original proof of purchase is required. Warranty repair/replacement is only valid upon
presentation of proof of purchase, directly submitted to SRAM at the time of warranty
evaluation. Warranty repair or replacement is at the discretion of SRAM or its authorized
agent, upon physical product evaluation and proof of purchase.
This warranty does not include or cover common 'wear and tear' parts which are subject to
damage as a result of normal use, failure to service product according to SRAM
recommendations, wet conditions, racing, use of disc brakes, rider weight, riding or installation
in conditions or applications other than recommended.
'Wear and Tear' parts are identified as: External dust seals, bushings, foam rings, rubber
moving parts (such as air sealing o-rings and glide rings), stripped threaded shafts or bolts,
upper tubes (stanchions), rear shock mounting hardware and springs, and fork drop outs.
P i o n e e r S u p p o r t P ro g ra m
In the event parts are unavailable at the time of your repair, at the option of SRAM or its
authorized agent, a replacement fork may be provided at a determined discount price.
Wa r ra n t y E x p e n s e s I n c u r re d
The SRAM warranty policy excludes expenses incurred as a result of transportation of product
from a SRAM dealer to SRAM, or its authorized distributor, labor performed by a SRAM dealer
for removal of RockShox product, or warranty repair work performed by a SRAM dealer.
Warranty work performed by a SRAM dealer is voluntary.
Wa r ra n t y R e p a i r
If for any reason it should be necessary to have warranty work done, return the product to a SRAM
dealer. In the USA, dealers are required to call for a Return Authorization number (RA#) prior to
returning product. Outside the USA, dealers are required to call an authorized SRAM Distributor.
For more technical information, visit our website at www.rockshox.com. Dealers outside the USA must
contact their local distributor. For a complete list of Authorized Distributors outside the USA, visit
www.rockshox.com.
6
954-308184-000, REV. A
SRAM CORPORATION • APRIL 2003
7