1
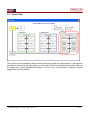
ENHANCED MODEL v2.0
USER’S GUIDE
SIMULATION MODEL OF PANAMA CANAL
VESSEL TRANSITS
February, 2005
Revision 1
Table of Contents
1
2
Introduction......................................................................................................................................... 5
Simulation System Concept ............................................................................................................... 5
2.1.1
Software requirements........................................................................................................ 6
2.1.2
Hardware requirements ...................................................................................................... 6
2.1.3
Installation........................................................................................................................... 7
2.1.4
Comments about ODBC ..................................................................................................... 8
2.1.5
System Files and Directories .............................................................................................. 9
3
Enhanced Model Interface................................................................................................................ 11
3.1
Main Menu ................................................................................................................................ 11
3.1.1
Scenario Name & Directories ........................................................................................... 12
3.1.1.1 Arena Directory ............................................................................................................. 12
3.1.1.2 File Directory................................................................................................................. 12
3.1.1.3 File Name...................................................................................................................... 12
3.1.1.4 Analyst Name................................................................................................................ 12
3.1.2
Simulation Parameters ..................................................................................................... 13
3.1.2.1 Animate......................................................................................................................... 13
3.1.2.2 Tandem......................................................................................................................... 13
3.1.2.3 Starting and Ending Dates ............................................................................................ 13
3.1.2.4 Number of Replications................................................................................................. 13
3.1.2.5 Activate Transits Log File ............................................................................................. 14
3.1.2.6 Maximum Period in Queue (at the Outer Anchorages)................................................. 14
3.1.3
Navigation Buttons............................................................................................................ 15
3.1.3.1 Sail Through ................................................................................................................. 15
3.1.3.2 Export Data ................................................................................................................... 16
3.1.3.3 Simulate ........................................................................................................................ 16
3.1.3.4 Update Results ............................................................................................................. 16
3.1.3.5 Print Manager ............................................................................................................... 17
3.1.3.6 Save Scenario............................................................................................................... 18
3.1.4
Scenario Description......................................................................................................... 18
3.1.4.1 Real Time Sequencing Option ...................................................................................... 19
3.1.4.2 Panamax Vessels at Post-panamax Locks Option (Allow Pnmx at PPLock) ............... 19
3.1.4.3 Extended Cut Option..................................................................................................... 20
3.1.4.4 Channel Restriction Option ........................................................................................... 20
3.1.4.5 Demand Origin.............................................................................................................. 20
3.1.4.6 Canal configuration ....................................................................................................... 20
3.1.4.7 Scheduling Strategy...................................................................................................... 20
3.1.4.8 # of Chambers at the Post-Panamax Locks ................................................................. 21
3.1.4.9 Locks operating modes................................................................................................. 21
3.1.4.10 Enhanced/Regular ........................................................................................................ 21
3.1.5
Comments ........................................................................................................................ 22
3.1.6
Demand Figures ............................................................................................................... 22
3.1.6.1 Manual Input ................................................................................................................. 23
3.1.6.2 Calculated Input ............................................................................................................ 23
3.2
Data Input ................................................................................................................................. 24
3.2.1
Configuring Main Sequencing Variables........................................................................... 26
ENHANCED MODEL v2.0 User’s GUIDE - Revision 1
3 of 82
3.2.2
Transit and Lockage Times .............................................................................................. 28
3.2.3
The Pre-sequencer ........................................................................................................... 30
3.2.3.1 Settings and Data Input ................................................................................................ 30
3.2.3.2 Running the Pre-sequencer.......................................................................................... 32
3.2.4
Configuring Rules and Restrictions .................................................................................. 36
3.2.4.1 Restriction Code Assignment ....................................................................................... 37
3.2.4.2 HML Assignment .......................................................................................................... 39
3.2.4.3 General Vessel Characteristics (PD, Booking and Draft Status) .................................. 40
3.2.5
Loading Demand .............................................................................................................. 42
3.2.5.1 Discrete Arrivals............................................................................................................ 43
3.2.5.2 Theoretical Demand ..................................................................................................... 44
3.2.6
Downtimes ........................................................................................................................ 54
3.2.7
Tug Requirements Setup.................................................................................................. 56
3.2.8
Counter of Number of Ships per Restriction ..................................................................... 57
3.3
Exporting Data.......................................................................................................................... 58
3.4
Simulation................................................................................................................................. 58
3.4.1
Batch Simulation (no animation)....................................................................................... 59
3.4.2
Animate (animated Model)............................................................................................... 60
3.4.2.1 Changing Speed ........................................................................................................... 60
3.4.2.2 Altering zoom and Views .............................................................................................. 60
3.4.2.3 Using Toolbar ............................................................................................................... 60
3.4.2.4 Zooms ..............................................................................Error! Bookmark not defined.
3.5
Scenario Results ...................................................................................................................... 61
3.5.1
Canal Waters Time (CWT) ............................................................................................... 62
3.5.2
In-transit Times (I.T.T.) ..................................................................................................... 64
3.5.3
Waiting Times ................................................................................................................... 66
3.5.4
Billing Tons ....................................................................................................................... 68
3.5.5
Number of Transits ........................................................................................................... 70
3.5.6
Locks Occupation ............................................................................................................. 73
3.5.7
Queue Length ................................................................................................................... 75
3.6
Transits Data ............................................................................................................................ 77
3.6.1
Tugs and Lock Crews (count of # of ships per lock shift) ................................................. 78
3.6.2
Transits Data .................................................................................................................... 81
3.6.3
Ships Generation Data ..................................................................................................... 85
3.6.4
Buckets Utilization Data.................................................................................................... 86
3.7
ITT and CWT Reports in the Logfile.mdb ................................................................................. 87
3.7.1
ITT Per Booking Status and Restriction............................................................................ 87
3.7.2
New CWT per Booking Status and Restriction ................................................................. 88
3.7.3
Old CWT per Booking Status and Restriction................................................................... 89
ENHANCED MODEL v2.0 User’s GUIDE - Revision 1
4 of 82
1 Introduction
This document aims at describing how to enter data to the simulation model of the Panama Canal vessel
transits and how to access the correspondent outputs generated.
2 Simulation System Concept
The simulation system design can be represented in the following diagram:
Through an excel spreadsheet the user inputs all the parameters necessary to run the model. The
parameters are read by the model, which runs and exports the outputs to access database files and to
the excel interface.
ENHANCED MODEL v2.0 User’s GUIDE - Revision 1
5 of 82
2.1.1 Software requirements
Operational System
Windows 98/Windows 2000/Windows XP
Regional settings adjust to English (USA)
ARENA 8.01 or above
Runs on the Windows certified platform mentioned above.
Ms Office
Despite of the fact that the RPS indicates that the Canal Simulator shall integrate with the MS Office
2000, we seriously recommend upgrades for MS Office XP edition, due to several VBA
improvements. Nevertheless, the interface shall be able to communicate with MS Office 2000.
2.1.2 Hardware requirements
The minimum hardware requirements for acceptable performance of the model must be no greater than a
Pentium III or equivalent running at 800 MHz with 128 Mb of RAM and 30 Mb of hard disk space.
Performance will depend on the computer design and also on the graphics board, but our team estimates
that the desired speed of 5 (five) minutes to complete one day of simulation run of the Canal vessel
transits will be accomplished easily using the batch run mode (no animation).
Hardware recommended by Rockwell/Paragon: Pentium IV, 2.4 Ghz or above, with at least 256 Mb RAM.
ENHANCED MODEL v2.0 User’s GUIDE - Revision 1
6 of 82
2.1.3 Installation
In order to install all correct files, user must access project CD, and RUN SETUP.EXE, activating the
following screen :
Available Options (by clicking on the left menu)
A) Panama Canal Project Documentation
All necessary documents are attached, for direct access by double-clicking the file on the white board
listings.
B) Install ARENA 8.01
Will start ARENA´s setup, installing it locally. Please refer to ARENA installation manual.
C) Install Adobe Acrobat
Add-in for documentation viewing. Will start Adobe´s setup.
D) Install ODBC
If User´s PC has no ODBC pre-installed, it can be added here, starting Microsoft´s Setup.exe
E) Install Project Files
Will copy all necessary files to User´s PC, at C:\Simulation\Enhanced_Model folder. No icons will be
created.
ENHANCED MODEL v2.0 User’s GUIDE - Revision 1
7 of 82
2.1.4 Comments about ODBC
After ODBC is installed properly, database connection must be established manually, between the
Simulation Model Database and Arena Simulation System.
Access <Control Panel>, <Administrative Tools> and <Data Sources ODBC>, as below:
1.
2.
3.
4.
Click on ADD;
Select a Microsoft Access Connection;
Type PANCANAL as name for this connection;
SELECT Database named PANCANAL.MDB (access file) in the folder where simulation files were
placed;
5. Click OK.
Please, note that if you change files folder later, this connection to the database must be updated
to the new folder.
ENHANCED MODEL v2.0 User’s GUIDE - Revision 1
8 of 82
2.1.5 System Files and Directories
The Simulation System requires that all files shall be kept in the same directory, in order to maintain
relationship between them and produce results.
In order to create a new scenario, USERS shall copy the entire directory to a new directory, and
renaming it, since the SCENARIO field will be used as prefix name. All files must remain with the existing
names.
See directory contents on next page.
ENHANCED MODEL v2.0 User’s GUIDE - Revision 1
9 of 82
File Name
Scenario_PNMX.xls
Scenario_PPNMX.xls
Pancanal_batch.doe
Pancanal_anima.doe
Res.tpo
Data.wks
Locks_failures.wks
Type
Excel
Excel
Arena
Arena
Arena
Excel
Excel
Discrete_NB.txt
Text
Discrete_SB.txt
Text
Schedule.txt
bucketscount.txt
Pancanal.mdb
Logfile.mdb
Schedule.xls
Pancanal_PNMX.doe
Pancanal_PPNMX.doe
Text
Text
Access
Access
Excel
Arena
Arena
ENHANCED MODEL v2.0 User’s GUIDE - Revision 1
Description
User Interface loaded with Panamax data
User Interface loaded with Post-Panamax data
Simulation Model – batch mode
Simulation Model – animation mode
Animation support file – template
Input data exported from the User Interface
Input data referred to outages exported from the User
Interface
Input data referred to discrete arrivals exported from the
User Interface
Input data referred to discrete arrivals exported from the
User Interface
Input data exported from the Pre-scheduler
Input data exported from the Pre-scheduler
Output data from ARENA
Output data from ARENA
Scheduler
Simulation source code with Panamax data
Simulation source code with Post Panamax data
10 of 82
3 Enhanced Model Interface
The Excel Interface file, named Scenario*.xls is the link between the ACP Analysts and the Arena Model
Simulation of the Panama Canal Vessel Transits.
Through the interface, the user will be able to modify the model behavior (causes) as well as view the
scenario performance key indicators.
Through this Interface, the analyst will be able to manage all input data necessary to run the model, set
different parameters to run Arena, run the model and read the results of each scenario created.
3.1
Main Menu
Through the Main Menu screen, the user will be able to access all the input, output screens and other
system modules to properly configure input parameters.
IMPORTANT: the user can only alter texts highlighted
in blue color
CTRL + m: back to Main Menu.
CTRL + i: activate Sail Through – Input Mode
ENHANCED MODEL v2.0 User’s GUIDE - Revision 1
CTRL + s: activate Sail Through
CTRL + o: activate Sail Through – Output Mode
11 of 82
3.1.1 Scenario Name & Directories
Follows a description of fields through which the user determines the Scenario name, respective data
files and Arena Software directories.
3.1.1.1 Arena Directory
The correct path of current Arena’s Version is required to activate the model. Please, review if ARENA
was installed using the default path, which is usually C:\Program Files\Rockwell Software\Arena 8.01\).
Without correct path, simulation model will not run.
Note that the path should have the character “\” in the end.
3.1.1.2 File Directory
Please, make sure that the file directory is inserted and corresponds to where all files were placed. The
model will not automatically detect it.
Note that the path should have the character “\” in the end.
3.1.1.3 File Name
This is the scenario name and the interface file name once you save it. In the example below, the
interface will receive the file name Scenario_panamax.xls.
3.1.1.4 Analyst Name
It is meant to identify the person who set-up the scenario saved under the name given.
ENHANCED MODEL v2.0 User’s GUIDE - Revision 1
12 of 82
3.1.2 Simulation Parameters
The simulation parameters basically refer to the run set-up parameters as per defined in the Run-set-up
Arena screen, which, in this model, should be set through the user interface.
3.1.2.1 Animate
If this box is checked, the Schematic animation will be turned-on once you click on the Simulation button.
3.1.2.2 Tandem
If checked, vessels will tandem whenever possible.
3.1.2.3 Starting and Ending Dates
Through these fields, the user specifies the simulation starting and end month and year. Make sure
simulation always starts in October, which is considered the first month of the Fiscal Year. The model
outputs will not be consistent in case this rule is not respected.
3.1.2.4 Number of Replications
Amount of consecutive simulation runs for statistical analysis of the results. Rockwell/Paragon
experience with the model indicates that no more than 10 (ten) replications are needed to obtain accurate
results. It must be an integer number.
ENHANCED MODEL v2.0 User’s GUIDE - Revision 1
13 of 82
3.1.2.5 Activate Transits Log File
The user can activate generation of LOGFILE.MDB file, which records all vessels transit statistics, ships
generation and queue data. If these files are accessed through the interface, no more than 65.000 (sixty
five thousand) registers can be seen on the screen, which corresponds to a simulation of approximately
10 (ten) years and 1 (one) replication. That is due to the maximum number of lines allowed by Excel
spreadsheets. If necessary, the user can read the full logs by accessing the same files straight from the
database.
3.1.2.6 Maximum Period in Queue (at the Outer Anchorages)
The user may establishes the time in days after which non-booked vessels receive priority for entering
the Canal based on their arrival time.
3.1.2.7 Warm-up Period
It must be a real number between 1 (one) and 20 (twenty) days. Rockwell/Paragon recommends the
model should be run with a warm-up period of 10 (ten) days.
ENHANCED MODEL v2.0 User’s GUIDE - Revision 1
14 of 82
3.1.3 Navigation Buttons
3.1.3.1 Sail Through
It is the preferred way to navigate though all features of the interface. Provides the user quick and easy
access to all input and output screens.
Input screens main sections:
I – Scenario Configuration;
II – Rules or Operational Identifiers;
III – Arrival Mix, which are split into Vessel Mix Forecast and Market Segment Forecast;
ENHANCED MODEL v2.0 User’s GUIDE - Revision 1
15 of 82
IV – Downtimes.
Output screens main sections:
I – Yearly Reports;
II – Monthly Reports;
III –Transits Data
3.1.3.2 Export Data
Used for exporting all input data to the ARENA Simulation Models.
3.1.3.3 Simulate
Activate ARENA Software and loads the model (animated or not). After ARENA is loaded, the user may
need to activate the Run toolbar on ARENA.
3.1.3.4 Update Results
After the simulation ends, the user shall return to Excel and update the output screens.
ENHANCED MODEL v2.0 User’s GUIDE - Revision 1
16 of 82
3.1.3.5 Print Manager
The Print Manager button brings up the following screen:
Through this menu, the user will be able to specify which screens to print. In case only an Executive
Summary is desired, the following screens can be printed:
-
Input Screens:
o Main Menu;
o Yearly Traffic;
o Monthly Traffic.
-
Output Screens (yearly reports):
o # of Transits;
o Billing Tons;
o CWT;
o ITT;
o Locks Occupation.
o Queue Length
ENHANCED MODEL v2.0 User’s GUIDE - Revision 1
17 of 82
Be aware that the table of typical vessels has about 6,500 lines, which would require more than 200 (two
hundred) pages of printout.
3.1.3.6 Save Scenario
Pressing this button, saves the scenario with the specified name given on the File Name field and in the
specified directory.
It is recommended to save the model:
a) After modifying data before simulation;
b) After simulation and updating results.
Please, keep in mind that if a scenario was saved after simulation and no update results were used; the
scenario will have blanks or previous results.
3.1.4 Scenario Description
In this section, the user is required to configure the main scenario parameters, which will be kept fixed
throughout the whole simulation run.
ENHANCED MODEL v2.0 User’s GUIDE - Revision 1
18 of 82
A scenario is defined based on a combination of the following parameters:
Parameter
Canal Configuration
Scheduling Strategy
Fog
Panamax Locks Operating Mode
Sunrise & Sunset Sets
NB & SB Upper Bound Queue Lengths
Post-panamax Locks Operating Mode
# or Chambers at the Post-panamax Locks
Total number of Scenarios:
Configuration
Panamax
PósPanamax
Semi-convoy
Convoy
Foggy
Not Foggy
All-Regular
All-Enhanced
L1-Enh_L2-Reg
Sands-Set1
Sands-Set2
Sands-Set3
Short-Short
Short-Medium
Short-Long
Medium-Short
Medium-Medium
Medium-Long
Long-Short
Long-Medium
Long-Long
All-Regular
All-Enhanced
2-chambers
3-chambers
Internal Index
1
2
1
2
1
2
1
2
3
1
2
3
1
2
3
4
5
6
7
8
9
1
2
1
2
2592
For further details concerning how a scenario is composed and determined on a daily basis during a
simulation run, please refer to the Pre-sequencing section in the User’s Manual.
3.1.4.1 Real Time Sequencing Option
If checked, allows vessels to be scheduled on the same day of their arrival if there are buckets available.
It is not a parameter considered by the Pre-sequencer for generating the timetables.
3.1.4.2 Panamax Vessels at Post-panamax Locks Option (Allow Pnmx at PPLock)
Though this feature has not been specified by the ACP, if checked, allows Panamax vessels to utilize
Post-panamax locks. It is not a parameter considered by the Pre-sequencer for generating the
timetables.
ENHANCED MODEL v2.0 User’s GUIDE - Revision 1
19 of 82
3.1.4.3 Extended Cut Option
With the Extended Cut option activated, Post-panamax vessels will not be able to meet other Postpanamax vessels in these channels. It is not a parameter considered by the Pre-sequencer for
generating the timetables.
3.1.4.4 Channel Restriction Option
If checked, those vessels assigned PCCHDL and PDLCCH restriction codes through the Restriction
Code Assignment Table will not be allowed to face opposing traffic at the Saltwater to Access Channels
and at the Galliard Cut extension. If not, they will respectively behave as PCCDL and PDLCC vessels. It
is not a parameter considered by the Pre-sequencer for generating the timetables.
3.1.4.5 Demand Origin
Even though it is not considered as a scenario component, as described above, the user is required to
set how the demand values in this section are to be loaded, whether it is based on discrete arrivals or on
theoretical distributions.
If Discrete Only option is selected, Seasonality, Yearly Traffic, Monthly Traffic and Yearly Evolution of
Transits screens will be inaccessible and the model will only generate discrete arrivals.
It is not a parameter considered by the Pre-sequencer for generating the timetables.
3.1.4.6 Canal configuration
Though this field the user must define whether she wants to run a Panamax or a Post-panamax scenario.
If a Post-panamax scenario is chosen, the Post-panamax locks will be turned-on. Note that if a Postpanamax scenario is to be simulated, the user must additionally update the following input data
accordingly:
•
•
•
•
Restriction Code Assignments;
HML Assignments;
General Vessel Characteristics;
Vessel Arrival Mix (vessel and market segment forecast).
3.1.4.7 Scheduling Strategy
At this time, as per specified, only semi-convoy option can be simulated by the system.
ENHANCED MODEL v2.0 User’s GUIDE - Revision 1
20 of 82
3.1.4.8 # of Chambers at the Post-Panamax Locks
The system allows the user to set whether there will be 2 (two) or 3 (three) chambers in the postPanamax locks. In case of a Panamax Canal simulation, this parameter shall be disregarded.
3.1.4.9 Locks operating modes
The user can specify whether the model will run throughout the whole simulation length in the manual
mode or on the automatic mode.
In case the option is manual, the user must specify the operating modes for the locks, otherwise the
model will specify the operating modes depending on the length of restricted vessels queues in the
Pacific and Atlantic Anchorages.
3.1.4.10
Enhanced/Regular
ENHANCED MODEL v2.0 User’s GUIDE - Revision 1
21 of 82
If the user decides to operate the locks in the manual mode throughout the whole simulation run, then the
following options for the Panamax Locks can be used:
•
•
•
All lanes in Regular Mode (All-Regular);
All lanes in Enhanced Mode (All-Enhanced);
Lane 1 Enhanced and Lane 2 Regular (L1-Enh_L2-Reg).
Miraflores Locks operating mode is set as being always equal to the Gatun Locks operating mode.
Post-panamax Pacific Locks also operate in the same way the Post-panamax Atlantic Locks are set,
which can be either:
•
•
Enhanced or
Regular.
Note that the Post-Panamax Locks operates with a single lane.
3.1.5 Comments
Relevant comments made by the analyst can be written in the space indicated bellow:
3.1.6 Demand Figures
Used for determining how the user wants to enter theoretical distributions.
They refer to the way the monthly number of transits and the yearly evolution of transits are inserted
(whether being calculated by the interface or by the user).
ENHANCED MODEL v2.0 User’s GUIDE - Revision 1
22 of 82
3.1.6.1 Manual Input
If the Manual Input option is chosen, the user has to calculate both the Monthly Number of Transits per
Market Segment and direction for the first year, as well as the yearly increase of traffic (Yearly Evolution
of Transits) up to 25 (twenty five) years. In this case, the Seasonality and the Yearly Traffic screens are
disabled and disregarded.
3.1.6.2 Calculated Input
If the analyst wants to have the number of monthly transits per Market Segment and direction calculated,
as well as yearly evolution of transits based on forecast breakdown, she should select the Calculated
Input option.
By doing so, the user has to input, in the Market Segment Forecast section of the Interface:
•
•
Through the Seasonality Screen: monthly seasonality per direction and Market Segment;
Through the Yearly Traffic: total number of transits per year and the respective share per Market
Segment as well as the percentage of traffic that flows on each direction.
ENHANCED MODEL v2.0 User’s GUIDE - Revision 1
23 of 82
3.2
Data Input
Data input are the heart of this simulation model. The quality of the input data will dramatically impact the
simulation results. If low quality data is used, low quality outputs will be generated.
The user should follow the input data hierarchy indicated in the Sail Through screen-illustrated below in
order to properly enter the data necessary to run the model. Apart from that, tug requirement parameters
should be input straight into the mode, as per described on item xxx of this guide.
Press CTRL + “i” for fast access to the inputs or go to the Sail Through from the Main Menu and then
click on the input box.
Basically, the following steps should be considered, when entering the data:
I – Configuring Sequencing Variables:
•
•
•
Main sequencing variables;
Transit and Lockage Times;
Run the Sequencer.
ENHANCED MODEL v2.0 User’s GUIDE - Revision 1
24 of 82
II – Rules setup (Operational Identifiers)
•
•
•
Restriction Code Assignment;
HML Assignment;
General Vessel Characteristics.
III – Demand Input (Arrival Mix)
•
•
•
Discrete Arrivals;
Vessel Mix Forecast;
Market Segment Forecast.
IV – Downtimes
ENHANCED MODEL v2.0 User’s GUIDE - Revision 1
25 of 82
3.2.1 Configuring Main Sequencing Variables
On this screen, the user specifies the sunrise and sunset times, the fog probability and the booking slots,
and the Time Boundaries necessary to run the Sequencer.
These data are also exported to the model.
Note that only text highlighted in blue can be changed.
ENHANCED MODEL v2.0 User’s GUIDE - Revision 1
26 of 82
January sunrise and sunset times specifies sunrise and sunset set #1, which is copied into February,
November and December months. The March sunrise and sunset (set #2) is copied into April, September
and October and the May sunrise and sunset (set #3) into June, July and August.
Time boundaries are aligned to the Restriction Codes meaning and used for cutting the flow of vessels
depending on their restriction and on other scenario parameters.
ENHANCED MODEL v2.0 User’s GUIDE - Revision 1
27 of 82
3.2.2 Transit and Lockage Times
On the following screen, the user can setup transit and lockage times for vessels heading south and
north. The beam and draft limits are exported to Arena, but she must copy the cells with white
background into Arena. The message boxes that appear after clicking any of the copy buttons will guide
the user to the correct place to paste each of the data columns into the Arena model.
The cells with yellow background are averages used by the Pre-sequencer to generate timetables.
IMPORTANT: whenever entering distributions never leave blank spaces at the end of the string.
Otherwise, the model will not run. Also, try not to leave blank spaces between characters in the
strings, so that it will be less probable to have errors during model running.
ENHANCED MODEL v2.0 User’s GUIDE - Revision 1
28 of 82
On the same section, the user shall enter the Time Between Vessels, the Locomotive Return Times and
the block coefficient level per vessel Market Segment:
Every ship will have stamped the attribute BlockC either equals to #1, in case it is a high block coefficient
(coefficient) ship or #0 otherwise. The Block Coefficient assignment table is automatically exported to the
model when the user presses the Export Data button.
ENHANCED MODEL v2.0 User’s GUIDE - Revision 1
29 of 82
3.2.3 The Pre-sequencer
Next is described the way the user should handle the Pre-sequencer.
3.2.3.1 Settings and Data Input
Open the Pre-sequencer by clicking on the Sequencer Block on the Sail Through Map in the User
Interface.
First, the user must specify the File Directory path and the User Interface file that shall be used by the
Pre-sequencer. Click on the “Change Data Source” button, in the Pre-sequencer Main Screen and then
select file as indicated by the red dashed ellipse in the picture above.
The next step is to define what is the short, medium and long restricted vessels queue lengths upper
limits both for the Panamax and Post-Panamax Canal scenarios (indicated by the blue dashed ellipse in
the picture above). The short and medium queues upper limits are exported to the model through the first
line of the Bucketscount.txt file. The long queue limit is not used by the model.
Note that the maximum queue length for restricted vessels that should be sent through the PostPanamax locks is equal to the difference between the Post-Panamax and Panamax Canal queue
lengths.
ENHANCED MODEL v2.0 User’s GUIDE - Revision 1
30 of 82
In the example indicated in the picture above, no more than 10 (ten) restricted vessels will be sent
through the Post-Panamax Canal in the Long Queue scenarios, while not more than 5 (five) will be sent
through it in the Short Queue scenarios.
The user must also determine the percentage of non-restricted buckets that are to be assigned to the
vessels with Combined Beam restriction (CR code).
Note that, buckets assigned to Combined Beam vessels can be used by Regular ships, but only
Regular ships can use Regular buckets.
Additionally, in order to calibrate the time interval that non-restricted ships are to enter the canal, the user
can also set the Time Between Vessels for the non-restricted vessels in the section of the main screen
illustrated below.
The times spent by the ships on both directions up to Gatun Lake are shown for reference only. The
longer the T.B.V., the less buckets for non-restricted vessels will be generated.
The shorter the T.B.V., the more non-restricted vessels will be allowed to enter the Canal, but that might
dramatically interfere in the time-boundaries of restricted vessels.
Remember that as more restricted vessels are allowed through the canal, there will be less space
for non-restricted vessels.
The parameters that are entered through the User Interface can only be changed in the User Interface.
They are, as per described in the previous items:
•
•
•
•
•
Average transit and lockage times;
Average minimum time between vessels (T.B.V.);
Locomotives return times;
Sunrise and sunset times for each set;
Time boundaries.
ENHANCED MODEL v2.0 User’s GUIDE - Revision 1
31 of 82
3.2.3.2 Running the Pre-sequencer
Once all the parameters have been set, the user can finally run the Pre-sequencer by pressing the “Run
Pre-Sequencer” button.
Preliminary tests has shown that it takes about 2 (two) hours to generate all the 2.592 timetables,
depending on how powerful is the computer used. Therefore, we highly recommend running it in a
powerful machine.
A progress bar in a message box will appear on the screen. Press ESC to stop running the Sequencer
before it finishes. This action might not allow all the timetables to be exported and printed. See next
section for further details.
ENHANCED MODEL v2.0 User’s GUIDE - Revision 1
32 of 82
3.2.3.3 Outputs
By clicking on the View buttons, also in the Main Screen, you will be able to verify the Timetables and the
Number of Buckets per restriction code generated in each scenario.
1) Timetables
A maximum of 55 (fifty five) vessel positions or Buckets can be generated per scenario and per direction,
being the last 30 (thirty) for restricted vessels, 10 (ten - yellow) for SV vessels and 15 (fifteen - orange)
reserved for CR’s and NR’s. The Pre-sequencer does not take into account CCNT vessels which are
allocated into buckets through the model logic.
For each bucket and travel direction, the table lists:
•
•
•
•
Underway time (in hours) from the Pacific or the Atlantic Anchorage;
Underway time from the Gatun Lake;
Designated restriction code;
The first lock lane suggested.
ENHANCED MODEL v2.0 User’s GUIDE - Revision 1
33 of 82
Figures are in hours.
NB Bucket UWayPac UWayGT RC SB Bucket UWayAtl UWayGT RC
1
2,17
12,02
2
1
2,75
13,05
2
2
3,07
17,68
2
2
3,80
13,95
2
3
3
2,48
17,52
2
3,17
13,58
2
4
3,98
18,63
2
4
4,83
12,22
1
5
3,77
19,35
2
5
5,00
12,38
1
6
4,90
14,47
1
6
5,88
14,88
2
7
7
5,07
13,42
1
6,85
14,72
2
8
5,82
13,85
1
8
7,02
15,78
2
9
6,35
15,50
1
9
8,68
17,47
3
10
10
6,72
15,68
1
7,97
16,17
3
11
7,65
16,55
1
11 10,52
18,75
3
12
7,48
21,20
2
12
9,02
16,70
3
13
2,85
10,38
6
13
2,98
15,05
6
14
14
4,40
11,93
7
3,15
16,58
8
15
4,65
13,47
7
15
4,52
11,80
7
16
6,18
15,02
7
16
4,68
11,97
7
17
7,73
16,55
7
17
6,07
13,50
7
18
18
9,27
18,10
6
6,23
18,13
8
19
0,00
0,00
0
19
7,62
19,68
8
20
0,00
0,00
0
20
7,78
21,22
8
21
0,00
0,00
0
21
0,00
0,00
0
22
22
0,00
0,00
0
0,00
0,00
0
23
0,00
0,00
0
23
0,00
0,00
0
24
0,00
0,00
0
24
0,00
0,00
0
25
25
0,00
0,00
0
0,00
0,00
0
26
26
0,00
0,00
0
0,00
0,00
0
27
0,00
0,00
0
27
0,00
0,00
0
28
0,00
0,00
0
28
0,00
0,00
0
29
29
0,00
0,00
0
0,00
0,00
0
30
0,00
0,00
0
30
0,00
0,00
0
31
8,05
18,27
5
31
0,23
9,02
5
32
32
8,45
18,67
5
0,78
9,57
5
33
33
8,85
19,07
5
1,33
10,12
5
34
9,25
19,47
5
34
1,88
10,67
5
35
9,65
19,87
5
35
2,43
11,22
5
36
36
10,05
20,27
5
2,98
11,77
5
37
10,45
20,67
5
37
0,00
0,00
0
38
0,00
0,00
0
38
0,00
0,00
0
39
0,00
0,00
0
39
0,00
0,00
0
40
40
0,00
0,00
0
0,00
0,00
0
41
21,78
29,92
4
41 17,17
20,72
5
42
42 17,33
21,95
29,74
4
21,52
5
43
22,18
30,32
4
43 17,72
21,27
5
44
22,35
30,14
4
44 17,88
22,07
5
45
45 18,27
22,58
30,72
4
21,82
5
46
22,75
30,54
4
46 18,43
22,62
5
47
22,98
31,12
4
47 18,82
22,37
5
48
23,15
30,94
4
48 18,98
23,17
5
49
49 19,37
23,38
31,52
5
22,92
5
50
23,55
31,34
5
50 19,53
23,72
5
51
23,78
31,92
5
51 19,92
23,47
5
52
23,95
31,74
5
52 20,08
24,27
5
53
53 20,47
24,18
32,32
5
24,02
4
54
24,35
32,14
5
54 20,63
33,00
4
55
24,58
33,00
5
55 21,02
24,42
4
ENHANCED MODEL v2.0 User’s GUIDE - Revision 1
34 of 82
2) Count of Buckets
The number of buckets per direction and Restriction can be analyzed by clicking on the “View Count of
Buckets” button. SV buckets count is exported through the 9th column to distinguish them from NR
buckets.
Main
Count of Buckets
Scenario
5
NR
3
CC
2
DLCC
1
CCDL
NorthBound
4
6
CR
PDLCC
7
PCCDL
8
PCC
5
SV
5
NR
3
CC
2
DLCC
1
CCDL
SouthBound
4
6
CR
PDLCC
7
PCCDL
8
PCC
Both Timetables and counters are exported in text file format to the directory specified by the user, which
should be equal to the one the model is recorded.
The Arena model will access the specific scenario information every midnight during the simulation run.
The numbers above the Restriction Codes are their respective indexes in the Pre-sequencer, which are
different from the ones used in the simulation model. For further details concerning this issue, please
refer to the User’s Manual.
PLEASE NOTE THAT SCHEDULER MUST BE FINE-TUNED BY THE USER, SINCE IT DRIVES
MODEL BEHAVIOR.
ENHANCED MODEL v2.0 User’s GUIDE - Revision 1
35 of 82
3.2.4 Configuring Rules and Restrictions
ENHANCED MODEL v2.0 User’s GUIDE - Revision 1
36 of 82
3.2.4.1 Restriction Code Assignment
The user must specify the Restriction Code and its respective the minimum and the maximum length,
Beam, Draft, HML and PD limits.
For the Beam, Draft and Length ranges, the lower bound is included in the range, while the upper bound
is excluded.
For the HML and PD codes, the upper bound is included in the range.
Figures in ft.
When filling the blanks, make sure the lower bound is lower then the upper bound. Also remember that
the model will assign the code to which the ship characteristics first matches the criteria by searching
from top to bottom of the table.
This table is exported to the model through the Data.wks file when pressing the Export Data button.
ENHANCED MODEL v2.0 User’s GUIDE - Revision 1
37 of 82
The behavior of the vessels under each Restriction Code are explained in User’s Manual.
Below are the indexes used by the model for PD and HML codes.
PD
Index
1
0
HML Code
Index
4
3
2
1
Yes
No
D
Y
C
N
ENHANCED MODEL v2.0 User’s GUIDE - Revision 1
38 of 82
3.2.4.2 HML Assignment
When filling the blanks, make sure the lower bound is lower then the upper bound. Also remember that
the model will assign the code to which the ship characteristics first matches the criteria by searching
from top to bottom of the table.
This table is exported to the model through the Data.wks file when pressing the Export Data button.
ENHANCED MODEL v2.0 User’s GUIDE - Revision 1
39 of 82
3.2.4.3 General Vessel Characteristics (PD, Booking and Draft Status)
The user must copy each of the columns of the spreadsheet below into the Arena model by using the
Copy Buttons Area:
The message boxes that appear after clicking any of the copy buttons will guide the user to the correct
place to paste each of the data columns into the Arena model.
Other types of discrete probabilistic distributions can be used, though we recommend using the one
described below:
DISC (prob(1), index(1), prob(2), index(2), …, prob(n), index(n))
Where “prob(1)” to “prob(n)” is the cumulative probabilistic distribution for “index(1)” to “index(n)”
respectively, being “prob(n)” no greater than 1 and “prob(1)” no smaller than 0. Additionally, “prob(i-1)”
must be no greater than “prob(i)”, where (i) is the index number
ENHANCED MODEL v2.0 User’s GUIDE - Revision 1
40 of 82
The characteristics of the vessel are translated into indexes read by the model as below:
Draft Status
Laden
Ballast
Index
1
100
Booking
Status
Booked
Non-booked
Index
PD
Index
1
0
HML Code
Index
4
3
2
1
Yes
No
D
Y
C
N
0
1
The same indexes should be used by the user in order to set the distributions.
ENHANCED MODEL v2.0 User’s GUIDE - Revision 1
41 of 82
3.2.5 Loading Demand
The demand can be defined as being either discrete only, theoretical or both theoretical and discrete. In
case the user defines the demand as being partially discrete, the discrete arrivals must be filled up with
vessels.
In case the user wants to input theoretical demand, both the Vessel Mix and the Market Segment
Forecasts must be introduced.
ENHANCED MODEL v2.0 User’s GUIDE - Revision 1
42 of 82
3.2.5.1 Discrete Arrivals
Through this screen, the user may specify the date and time the vessels should arrive at discrete
moments to the Canal heading either northbound or southbound. Additionally, the user must enter the
number of the vessel from the Table of Typical Vessels.
Both the number of the vessel and the arrival date and time are exported to the model. The PostPanamax vessels are highlighted in red.
ENHANCED MODEL v2.0 User’s GUIDE - Revision 1
43 of 82
3.2.5.2 Theoretical Demand
•
Table of Size Ranges
Vessels are distributed in terms of their dimensions based on the range limits as defined bellow:
Changes in these tables do not automatically change the vessel size ranges distributions. This must
separately be done by the User.
The user can set up to 16 (sixteen) upper bounds for Length Range limits and up to 30 (thirty) upper
bounds for Beam Ranges.
ENHANCED MODEL v2.0 User’s GUIDE - Revision 1
44 of 82
The combination of the Beam and Size Range generates a total of 480 possible Size Ranges, which can
be read in the first page of the Table of Size Ranges.
ENHANCED MODEL v2.0 User’s GUIDE - Revision 1
45 of 82
•
Size Ranges Distribution
Through this screen, the User is able to specify the vessels size ranges arrival distributions for each
Market Segment for up to 25 (twenty five) years. It is also on this screen that the user establishes the first
year of data to be input in the remaining tables.
To copy these distributions to the model, just press on the copy button and follow the instructions.
ENHANCED MODEL v2.0 User’s GUIDE - Revision 1
46 of 82
•
Table of Typical Vessels
The vessel population list is in the Typical Vessels Table, where the following information is supplied for
each vessel:
1. Internal number of the vessel (integer);
2. Vessel name (text string);
3. Her market segment (text string);
4. Beam range number (integer based on the table of beam ranges);
5. Length range number (integer based on the table of length ranges);
6. Size range number (integer based on the table of size ranges);
7. Beam (real);
8. Length (real);
9. Laden draft distribution;
10. Ballast draft distribution;
11. PCUMS (real).
ENHANCED MODEL v2.0 User’s GUIDE - Revision 1
47 of 82
Additionally, the user must specify the maximum allowed dimensions for both a Panamax and a PostPanamax Canal vessel to be read by the model.
A maximum of 6500 (six thousand and five hundred) vessels can be created and loaded into the model.
To copy the table of typical vessels to the model, just press the copy button and follow the instructions.
•
Vessels Distribution
Once the Yearly Size Ranges Distributions per Market Segment are entered, the User must then specify
how frequent the vessels listed in the Table of Typical Vessels appear on each Size Range throughout
the simulation.
To copy the distributions in the model, just press on the copy button and follow the instructions.
IMPORTANT: the length of the distributions should be no longer than 2.600 (two thousand and six
hundred) characters. This is a limit imposed by Excel, so try not to leave blank spaces between
characters neither use more than 3 (three) decimals in the number format.
ENHANCED MODEL v2.0 User’s GUIDE - Revision 1
48 of 82
•
Seasonality
Through this table, the user specifies the market segments monthly seasonality to be applied to the
yearly number of transits.
It is only used in case the user specifies that the interface will calculate the demand figures to be
exported to the Arena Model.
Note that the first month of the table is October, which is by definition the first month of the fiscal
year.
ENHANCED MODEL v2.0 User’s GUIDE - Revision 1
49 of 82
•
Yearly Traffic (per fiscal year)
It is only used in case the user specifies that the interface will calculate the demand figures to be
exported to the Arena Model.
In this table, the user must distribute the percentage of the total yearly traffic that is assigned to each of
the market segments, the total number of transits for up to 25 fiscal years and the type of distribution to
be used by the model to create the vessels as well as the Time Between Arrivals coefficient of variation.
The first (fiscal) year of the table is setup by the user through the Size Ranges Distribution Table.
ENHANCED MODEL v2.0 User’s GUIDE - Revision 1
50 of 82
On the same screen, the user must also distribute the percentage of traffic and market segment that shall
head southbound and northbound :
ENHANCED MODEL v2.0 User’s GUIDE - Revision 1
51 of 82
•
Monthly Traffic
This table is either filled up by the user, if the Manual Input option for demand figures was chosen or
calculated by the interface. It is exported to Arena in case the user has specified it will use Theoretical
Demand distributions. The first month per direction is also October, the first month of the fiscal year.
In the table above, the figures were specified by the user, rather than being calculated by the interface.
ENHANCED MODEL v2.0 User’s GUIDE - Revision 1
52 of 82
•
Yearly Evolution of Transits
This table is either filled by the user, if the Manual Input option for demand figures was chosen or
calculated by the interface. It is exported to Arena in case the user has specified it will use Theoretical
Demand distributions.
The specified multipliers refer to how much higher or lower will be the transits for future (fiscal) years
when compared to the first year of the table.
ENHANCED MODEL v2.0 User’s GUIDE - Revision 1
53 of 82
3.2.6 Downtimes
The user is allowed to setup only scheduled downtimes for Miraflores, Pedro Miguel, Gatun, Pacific and
Atlantic locks, by determining the resource, start date of downtime, and the duration in hours. When
during outage, only the west lane will be put down. The time before (T.B.D.) and after (T.A.D.) downtime
during which a traffic reduction should be applied (T.R.) should also be setup. The traffic reduction will
always be applied during downtime. The total downtime entered is summed up solely for guidance.
ENHANCED MODEL v2.0 User’s GUIDE - Revision 1
54 of 82
ENHANCED MODEL v2.0 User’s GUIDE - Revision 1
55 of 82
3.2.7 Tug Requirements Setup
First, the ships receive the value for the attribute ind_tug, which corresponds to the line number in the
table below, which is built into decide blocks named “decide index tug SB” and “decide index tug NB”.
Line
Index
ind_tug
1
2
3
4
5
6
7
8
9
10
11
12
13
14
Length Range
From
To
>
0
0
0
0
0
0
0
0
900
700
700
570
570
0
<
1200
1200
1200
1200
1200
1200
1200
1200
965
900
900
700
700
570
Beam Range
From
To
>
140
107
140
107
140
107
140
107
0
91
0
91
0
0
<
180
140
180
140
180
140
180
140
107
107
91
107
91
80
Market Segment
From
To
>
1
1
2
2
5
5
7
7
1
1
1
1
1
1
<
1
1
2
2
5
5
7
7
8
8
8
8
8
8
Then the Tug Requirements Assignment Table specified below is designated to the vessels through the
assign Arena modules associated to the decide blocks specified above.
The next table also indicates the names of the expressions which values should be changed in case of
necessity when the vessel is using a Post-panamax lock, when it is transiting through the Gaillard Cut or
when entering or departing the Panamax locks:
Line
Index
ind_tug
1
2
3
4
5
6
7
8
9
10
11
12
13
14
Tug Requirements
Panamax Locks
Post-Panamax
Locks
expression_tug_3_per_ship
2
DISC(.92,2,1,3)
DISC(.06,2,1,3)
DISC(.54,2,1,3)
3
2
DISC(.16,2,1,3)
DISC(.65,2,1,3)
2
2
2
2
2
2
In
expression_tug_1_per_ship
0
0
0
0
0
0
0
0
2
2
2
2
1
0
ENHANCED MODEL v2.0 User’s GUIDE - Revision 1
Out
expression_tug_2_per_ship
0
0
0
0
0
0
0
0
1
0
0
0
0
0
Cut
expression_tug_4_per_ship
1
1
1
1
1
1
1
1
1
1
0
1
0
0
56 of 82
3.2.8 Counter of Number of Ships per Restriction
Find below the names of the counters per each lock and vessel type as per described in the User’s
Manual.
COUNTER
#
1
2
3
4
5
6
7
8
9
10
11
12
Counter
Description
Miraflores – Regular vessels
Miraflores – Restricted vessels
Pedro Miguel – Regular vessels
Pedro Miguel – Restricted vessels
Gatún – Regular vessels
Gatún – Restricted vessels
PPMax Pacific – Regular vessels
PPMax Pacific – Restricted vessels
PPMax Pacific – Post-Panamax vessels
PPMax Atlantic – Regular vessels
PPMax Atlantic – Restricted vessels
PPMax Atlantic – Post-Panamax vessels
ENHANCED MODEL v2.0 User’s GUIDE - Revision 1
Counter
Internal
crew_1
crew_2
crew_3
crew_4
crew_5
crew_6
crew_7
crew_8
crew_9
crew_10
crew_11
crew_12
57 of 82
3.3
Exporting Data
After all the input data have been inserted, it must be exported to Arena model, by pressing the Export
Data button.
This operation generates files data.wks, locks_failures.wks, Discrete_NB.txt and Discrete_SB.txt in the
specified folder.
3.4
Simulation
The user may simulate the scenario with or without animation. However, the second option may
dramatically reduce simulation time and speed up analysis.
ENHANCED MODEL v2.0 User’s GUIDE - Revision 1
58 of 82
3.4.1 Batch Simulation (no animation)
This option will load ARENA into memory, start simulation automatically, and immediately quit ARENA
application upon finishing model run.
ENHANCED MODEL v2.0 User’s GUIDE - Revision 1
59 of 82
3.4.2 Animate (animated Model)
This option will load ARENA into memory, ask for simulation start. It will not quit ARENA application upon
finishing model run.
3.4.2.1 Changing Speed
The user can speed up / slow down simulation speed by using CTRL > and CTRL < during simulation
run.
3.4.2.2 Altering zoom and Views
Several zooms and views are available, and can be accessed by hotkeys.
3.4.2.3 Using Toolbar
Standard ARENA toolbar allows the user to save, print, run, stop and operate a simulation model, within
a familiar environment.
ENHANCED MODEL v2.0 User’s GUIDE - Revision 1
60 of 82
3.5
Scenario Results
After the scenario is simulated, any user may review the output tables indicated in the Sail Though
screen below.
Press CTRL + “o” for fast access to the outputs or go to the Sail Through from the Main Menu and then
click on the output box.
Through the output tables, circled, the user is able to access averages and standard deviation of the key
performance parameters obtained from the simulated scenario, aggregated per year, per month, and per
transit for ships heading southbound and northbound, this data, also, can be find in database file
pancanal.mdb :
•
•
•
•
•
•
•
Canal Waters Time per Restriction Code;
In-transit Time per Restriction Code;
Waiting Times at anchorages and tie-ups;
Billing Tons per Market Segment;
# of Transits per Market Segment;
Locks Occupation;
Average Queue Length.
ENHANCED MODEL v2.0 User’s GUIDE - Revision 1
61 of 82
Yearly results can be accessed in the Yearly Reports section of the output screens, the monthly results,
in the Monthly Reports section and the transits data, in the Transits section.
Note that the standard deviation will only be calculated in case more than one replication was
requested.
The interface also supplies consolidated average figures per year or month for the outputs listed above
except for Queue Length and Locks Occupation.
3.5.1 Canal Waters Time (CWT)
Below is the next the CWT tables layout for up to 25 (twenty five) years.
Figures in hours are merely illustrative.
Canal Waters Time is equal to the span of time starting from ready time until the ship passes buoy 1 on
the other side of the Canal.
ENHANCED MODEL v2.0 User’s GUIDE - Revision 1
62 of 82
The following is the first page of the CWT monthly averages table.
They can be calculated for up to 300 (three hundred) months (12 months for each of the 25 years):
ENHANCED MODEL v2.0 User’s GUIDE - Revision 1
63 of 82
3.5.2 In-transit Times (I.T.T.)
Below is the ITT tables layout for up to 25 (twenty five) years.
Figures in hours are merely illustrative.
In-transit Time is equal to the span of time that starts from Arrival at the first lock until from last lock.
ENHANCED MODEL v2.0 User’s GUIDE - Revision 1
64 of 82
The following is the first page of the ITT monthly averages table.
They can be calculated for up to 300 (three hundred) months (12 months for each of the 25 years):
ENHANCED MODEL v2.0 User’s GUIDE - Revision 1
65 of 82
3.5.3 Waiting Times
Waiting times are referred to the time spent by the ships when are waiting for the next resource to be
available. Waiting times are measured at the following points:
•
•
•
•
•
•
•
•
Pacific Anchorage;
Miraflores Locks Tie-up North;
Pedro Miguel Locks Tie-up South;
Post-Panamax Pacific Locks South;
Cucaracha Moorings;
Gatun Anchorage;
Gatun Locks Tie-up North;
Post-Panamax Atlantic Locks North;
•
•
•
•
•
•
•
•
Miraflores Locks Tie-up South;
Miraflores Moorings;
Pedro Miguel Locks Tie-up North;
Post-Panamax Pacific Locks North;
Gamboa Moorings;
Gatun Locks Tie-up South;
Post-Panamax Atlantic Locks South;
Atlantic Anchorage.
The following is the Waiting Times table layout for up to 25 (twenty five) years. Values are in hours.
ENHANCED MODEL v2.0 User’s GUIDE - Revision 1
66 of 82
The following is the first page of the Waiting Times monthly averages table.
They can be calculated for up to 300 (three hundred) months (12 months for each of the 25 years).
ENHANCED MODEL v2.0 User’s GUIDE - Revision 1
67 of 82
3.5.4 Billing Tons
Billing Tons are measured in PC/UMS units and obtained per Market Segment and per year for up to 25
(twenty five) years in the Yearly Report:
ENHANCED MODEL v2.0 User’s GUIDE - Revision 1
68 of 82
The following is the first page of the Billing Tons monthly report.
The figures are sum up per month and can be calculated for up to 300 (three hundred) months (12
months for each of the 25 years):
ENHANCED MODEL v2.0 User’s GUIDE - Revision 1
69 of 82
3.5.5 Number of Transits
The yearly number of transits is calculated per Market Segment and per year for up to 25 (twenty five)
years in the Yearly Report:
ENHANCED MODEL v2.0 User’s GUIDE - Revision 1
70 of 82
The following is the first page of the Monthly Number of Transits Report. The figures can be calculated
for up to 300 (three hundred) months (12 months for each of the 25 years):
Also in the same table, the user can compare the actual yearly or monthly throughput of the scenario with
the expected output by clicking on the “In versus Out” button on the right side of the screen.
ENHANCED MODEL v2.0 User’s GUIDE - Revision 1
71 of 82
Expected output is calculated both based on the first year monthly number of transits and on the yearly
traffic increase input or calculated in the Yearly Evolution of Transits table (see Sailing Through Inputs).
ENHANCED MODEL v2.0 User’s GUIDE - Revision 1
72 of 82
3.5.6 Locks Occupation
The rate (%) of occupation of each lock is calculated per year and per month for up to 25 (twenty five)
years and per direction of travel.
A lock is considered busy from the time a vessel enters it until it clears the lock. The lock occupation per
month is obtained by dividing the total busy time per the monthly available time considering that the locks
have 2 (two) lanes in the Panamax Canal and that the Post-Panamax locks have 1 (one) lane.
ENHANCED MODEL v2.0 User’s GUIDE - Revision 1
73 of 82
The following is the first page of the Locks Occupation Monthly Report.
They can be calculated for up to 300 (three hundred) months (12 months for each of the 25 years):
ENHANCED MODEL v2.0 User’s GUIDE - Revision 1
74 of 82
3.5.7 Queue Length
The rate (%) of occupation of each lock is calculated per year and per month for up to 25 (twenty five)
years and per direction of travel.
The queue lengths are measured every 30 (thirty) minutes.
ENHANCED MODEL v2.0 User’s GUIDE - Revision 1
75 of 82
The following is the first page of the Locks Occupation Monthly Report.
They can be calculated for up to 300 (three hundred) months (12 months for each of the 25 years):
ENHANCED MODEL v2.0 User’s GUIDE - Revision 1
76 of 82
3.6
Transits Data
The log files may be accessed by the user through the boxes circled in the picture above, if the logs were
generated. If opened through the interface, not more than 65.000 (sixty thousand lines) will be shown on
the screen due to Excel spreadsheet limitations. If the full log is to be analized, it should be opened
straight from the logfile.mdb file.
ENHANCED MODEL v2.0 User’s GUIDE - Revision 1
77 of 82
3.6.1 Tugs and Lock Crews (count of # of ships per lock shift)
File: Tug_Crew
This file contains information about tug requirements and count of number of ships that locked during the
simulation, including:
•
•
•
Average and Maximum number of tugs utilized per shift and tug area for up to 300 (three
hundred) months (25 years x 12 months);
Count of number of Non-restricted, Panamax Restricted and Post-panamax vessels that locked
per lock and shift for up to 300 (three hundred) months (25 years x 12 months), being NR and CR
ships as Regular ships, Restricted CC, DLCC and CCDL ships and Post-panamax PCC, PCCDL,
PDLCC, PCCHDL and PDLCCH ships;
Replication number.
Headings
AVG_Balboa_Tugs_A_S1
MAX_Balboa_Tugs_A_S1
AVG_Balboa_Tugs_A_S2
MAX_Balboa_Tugs_A_S2
AVG_Balboa_Tugs_A_S3
MAX_Balboa_Tugs_A_S3
AVG_Lake_Tugs_A_S1
MAX_Lake_Tugs_A_S1
AVG_Lake_Tugs_A_S2
MAX_Lake_Tugs_A_S2
AVG_Lake_Tugs_A_S3
MAX_Lake_Tugs_A_S3
AVG_PAC_PP_Tugs_A_S1
MAX_PAC_PP_Tugs_A_S1
AVG_PAC_PP_Tugs_A_S2
MAX_PAC_PP_Tugs_A_S2
AVG_PAC_PP_Tugs_A_S3
MAX_PAC_PP_Tugs_A_S3
AVG_PAC_PP_Tugs_B_S1
MAX_PAC_PP_Tugs_B_S1
AVG_PAC_PP_Tugs_B_S2
MAX_PAC_PP_Tugs_B_S2
AVG_PAC_PP_Tugs_B_S3
MAX_PAC_PP_Tugs_B_S3
AVG_CUT_Tugs_A_S1
MAX_CUT_Tugs_A_S1
AVG_CUT_Tugs_A_S2
MAX_CUT_Tugs_A_S2
AVG_CUT_Tugs_A_S3
MAX_CUT_Tugs_A_S3
ENHANCED MODEL v2.0 User’s GUIDE - Revision 1
Example
1,11
8,00
0,01
4,00
0,12
3,00
0,02
2,00
0,15
2,00
0,00
0,00
0,00
0,00
0,00
0,00
0,00
0,00
0,00
0,00
0,00
0,00
0,00
0,00
0,14
3,00
0,83
5,00
0,01
1,00
78 of 82
Northbound Headings
AVG_CUT_Tugs_B_S1
MAX_CUT_Tugs_B_S1
AVG_CUT_Tugs_B_S2
MAX_CUT_Tugs_B_S2
AVG_CUT_Tugs_B_S3
MAX_CUT_Tugs_B_S3
AVG_ATL_GT_Tugs_A_S1
MAX_ATL_GT_Tugs_A_S1
AVG_ATL_GT_Tugs_A_S2
MAX_ATL_GT_Tugs_A_S2
AVG_ATL_GT_Tugs_A_S3
MAX_ATL_GT_Tugs_A_S3
AVG_PP_Tugs_A_S1
MAX_PP_Tugs_A_S1
AVG_PP_Tugs_A_S2
MAX_PP_Tugs_A_S2
AVG_PP_Tugs_A_S3
MAX_PP_Tugs_A_S3
AVG_PP_Tugs_B_S1
MAX_PP_Tugs_B_S1
AVG_PP_Tugs_B_S2
MAX_PP_Tugs_B_S2
AVG_PP_Tugs_B_S3
MAX_PP_Tugs_B_S3
MF_Reg_S1
MF_Reg_S2
MF_Reg_S3
MF_Rest_S1
MF_Rest_S2
MF_Rest_S3
PM_Reg_S1
PM_Reg_S2
PM_Reg_S3
PM_Rest_S1
PM_Rest_S2
PM_Rest_S3
ENHANCED MODEL v2.0 User’s GUIDE - Revision 1
Example
0,00
0,00
0,00
0,00
0,00
0,00
1,06
2,00
0,01
10,00
0,11
8,00
0,00
0,00
0,00
0,00
0,00
0,00
0,00
0,00
0,00
0,00
0,00
0,00
6,37
0,87
6,40
7,53
2,90
6,73
7,63
1,13
4,87
4,10
8,50
4,57
79 of 82
Northbound Headings
GT_Reg_S1
GT_Reg_S2
GT_Reg_S3
GT_Rest_S1
GT_Rest_S2
GT_Rest_S3
PP_PAC_Reg_S1
PP_PAC_Reg_S2
PP_PAC_Reg_S3
PP_PAC_Rest_S1
PP_PAC_Rest_S2
PP_PAC_Rest_S3
PP_PAC_PP_S1
PP_PAC_PP_S2
PP_PAC_PP_S3
PP_ATL_Reg_S1
PP_ATL_Reg_S2
PP_ATL_Reg_S3
PP_ATL_Rest_S1
PP_ATL_Rest_S2
PP_ATL_Rest_S3
PP_ATL_PP_S1
PP_ATL_PP_S2
PP_ATL_PP_S3
NREP
ENHANCED MODEL v2.0 User’s GUIDE - Revision 1
Example
2,00
4,20
7,47
7,87
8,40
0,90
0,00
0,00
0,00
0,00
0,00
0,00
0,00
0,00
0,00
0,00
0,00
0,00
0,00
0,00
0,00
0,00
0,00
0,00
1
80 of 82
3.6.2 Transits Data
Files: NB_Traffic and SB_Traffic
These files contain detailed information about finished transits per direction, including:
•
•
•
•
•
•
•
•
•
Transit number;
Vessel characteristics;
Time at which the vessel passed by each point or mark of the Canal;
Spans of time between consecutive marks;
Replication and scenario numbers;
Old and New CWT calculations;
ITT;
If vessel was scheduled on the same day of her arrival (flow_traffic);
If channel restricted (restch).
The next table indicates examples of outputs per each heading for northbounds. Similar headings are
used for southbound transits.
Northbound Headings
transit_number
transit_number_t
day
month
year
week
category
vessel
N_MS_NB
Lenght
Beam
draft
ballast
booking
booking_ori
pd
Billing_tons
hml
restriction
itl
lane
Atr_scenario
ENHANCED MODEL v2.0 User’s GUIDE - Revision 1
Example
134
0
1
1
1
40
132
3278
6
456,17
69,05
21,50
1
0
0
0
6.640,00
1
1
2
2
82
81 of 82
Northbound Headings
T_arrival/1440+T_INIT
T_underway/1440+T_INIT
t_real_underway/1440+T_INIT
t_real_arrival_buoy_15/1440+T_INIT
t_real_leave_buoy_15/1440+T_INIT
t_real_arrival_buoy_26/1440+T_INIT
t_real_leave_buoy_26/1440+T_INIT
t_real_arrival_MF_northbound/1440+T_INIT
t_real_enter_MF_northbound/1440+T_INIT
t_real_clear_MF_northbound/1440+T_INIT
t_real_leave_MF_northbound/1440+T_INIT
t_real_arrival_tieup_MF_PM/1440+T_INIT
t_real_leave_tieup_MF_PM/1440+T_INIT
t_real_arrival_PM_northbound/1440+T_INIT
t_real_enter_PM_northbound/1440+T_INIT
t_real_clear_PM_northbound/1440+T_INIT
t_real_leave_PM_northbound/1440+T_INIT
T_real_arrival_PPMAX_Pac_NB/1440+T_INIT
T_real_enter_PPMAX_Pac_NB/1440+T_INIT
T_real_clear_PPMAX_Pac_NB/1440+T_INIT
T_real_leave_PPMAX_Pac_NB/1440+T_INIT
t_real_arrival_st_2035/1440+T_INIT
t_real_leave_st_2035/1440+T_INIT
t_real_arrival_cucachara_NB/1440+T_INIT
t_real_leave_cucachara_NB/1440+T_INIT
t_real_arrival_gamboa_moorings/1440+T_INIT
t_real_leave_gamboa_moorings/1440+T_INIT
t_real_arrival_buoy_79/1440+T_INIT
t_real_leave_buoy_79/1440+T_INIT
t_real_arrival_gt_anchor/1440+T_INIT
t_real_leave_gt_anchor/1440+T_INIT
t_leave_gtl/1440+T_INIT
t_real_arrival_gt_northbound/1440+T_INIT
t_real_enter_gt_northbound/1440+T_INIT
t_real_clear_gt_northbound/1440+T_INIT
ENHANCED MODEL v2.0 User’s GUIDE - Revision 1
Example
29/9/01 14:59
30/9/01 16:26
30/9/01 20:04
30/9/01 20:47
30/9/01 20:47
30/9/01 21:04
30/9/01 21:04
30/9/01 21:21
30/9/01 21:21
30/9/01 22:10
30/9/01 22:10
30/9/01 22:21
30/9/01 22:21
30/9/01 22:31
30/9/01 22:31
30/9/01 23:03
30/9/01 23:03
21/9/01 0:00
21/9/01 0:00
21/9/01 0:00
21/9/01 0:00
30/9/01 23:10
30/9/01 23:10
30/9/01 23:13
30/9/01 23:13
30/9/01 23:56
30/9/01 23:56
1/10/01 0:17
1/10/01 0:17
1/10/01 1:41
1/10/01 1:41
1/10/01 0:13
1/10/01 1:58
1/10/01 1:58
1/10/01 3:15
82 of 82
Northbound Headings
t_real_leave_gt_northbound/1440+T_INIT
T_real_arrival_PPMAX_Atl_NB/1440+T_INIT
T_real_enter_PPMAX_Atl_NB/1440+T_INIT
T_real_clear_PPMAX_Atl_NB/1440+T_INIT
T_real_leave_PPMAX_Atl_NB/1440+T_INIT
t_real_arrival_buoy_13/1440+T_INIT
t_real_leave_buoy_13/1440+T_INIT
t_real_arrival_buoy_7/1440+T_INIT
t_real_leave_buoy_7/1440+T_INIT
t_real_arrival_buoy_Atl_NB/1440+T_INIT
t_real_underway/60-t_underway/60
t_real_underway/60-T_arrival/60
t_real_arrival_buoy_15/60-t_real_underway/60
t_real_leave_buoy_15/60-t_real_arrival_buoy_15/60
t_real_arrival_buoy_26/60-t_real_leave_buoy_15/60
t_real_leave_buoy_26/60-t_real_arrival_buoy_26/60
t_real_arrival_MF_northbound/60-t_real_leave_buoy_26/60
t_real_enter_MF_northbound/60-t_real_arrival_MF_northbound/60
t_real_clear_MF_northbound/60-t_real_enter_MF_northbound/60
t_real_leave_MF_northbound/60-t_real_clear_MF_northbound/60
t_real_arrival_tieup_MF_PM/60-t_real_leave_MF_northbound/60
t_real_leave_tieup_MF_PM/60-t_real_arrival_tieup_MF_PM/60
t_real_arrival_PM_northbound/60-t_real_leave_tieup_MF_PM/60
t_real_enter_PM_northbound/60-t_real_arrival_PM_northbound/60
t_real_clear_PM_northbound/60-t_real_enter_PM_northbound/60
t_real_leave_PM_northbound/60-t_real_clear_PM_northbound/60
t_real_arrival_st_2035/60-t_real_leave_PM_northbound/60
T_real_arrival_PPMAX_Pac_NB/60-t_real_leave_buoy_26/60
T_real_enter_PPMAX_Pac_NB/60-T_real_arrival_PPMAX_Pac_NB/60
T_real_clear_PPMAX_Pac_NB/60-T_real_enter_PPMAX_Pac_NB/60
T_real_leave_PPMAX_Pac_NB/60-T_real_clear_PPMAX_Pac_NB/60
t_real_arrival_st_2035/60-T_real_leave_PPMAX_Pac_NB/60
t_real_leave_st_2035/60-t_real_arrival_st_2035/60
t_real_arrival_cucachara_NB/60-t_real_leave_st_2035/60
t_real_leave_cucachara_NB/60-t_real_arrival_cucachara_NB/60
t_real_arrival_gamboa_moorings/60-t_real_leave_cucachara_NB/60
t_real_leave_gamboa_moorings/60-t_real_arrival_gamboa_moorings/6
t_real_arrival_buoy_79/60-t_real_leave_gamboa_moorings/60
t_real_leave_buoy_79/60-t_real_arrival_buoy_79/60
t_real_arrival_gt_anchor/60-t_real_leave_buoy_79/60
ENHANCED MODEL v2.0 User’s GUIDE - Revision 1
Example
1/10/01 3:15
21/9/01 0:00
21/9/01 0:00
21/9/01 0:00
21/9/01 0:00
1/10/01 3:26
1/10/01 3:26
1/10/01 3:33
1/10/01 3:33
1/10/01 3:45
3,64
29,09
0,72
0,00
0,27
0,00
0,29
0,00
0,82
0,00
0,17
0,00
0,17
0,00
0,54
0,00
0,11
-237,07
0,00
0,00
0,00
239,17
0,00
0,06
0,00
0,71
0,00
0,35
0,00
1,41
83 of 82
Northbound Headings
t_real_leave_gt_anchor/60-t_real_arrival_gt_anchor/60
t_real_arrival_gt_northbound/60-t_real_leave_gt_Anchor/60
t_real_enter_gt_northbound/60-t_real_arrival_gt_northbound/60
t_real_clear_gt_northbound/60-t_real_enter_gt_northbound/60
t_real_leave_gt_northbound/60-t_real_clear_gt_northbound/60
t_real_arrival_buoy_13/60-t_real_leave_gt_northbound/60
T_real_arrival_PPMAX_Atl_NB/60-t_real_leave_gt_Anchor/60
T_real_enter_PPMAX_Atl_NB/60-T_real_arrival_PPMAX_Atl_NB/60
T_real_clear_PPMAX_Atl_NB/60-T_real_enter_PPMAX_Atl_NB/60
T_real_leave_PPMAX_Atl_NB/60-T_real_clear_PPMAX_Atl_NB/60
t_real_arrival_buoy_13/60-T_real_leave_PPMAX_Atl_NB/60
t_real_leave_buoy_13/60-t_real_arrival_buoy_13/60
t_real_arrival_buoy_7/60-t_real_leave_buoy_13/60
t_real_leave_buoy_7/60-t_real_arrival_buoy_7/60
t_real_arrival_buoy_Atl_NB/60-t_real_leave_buoy_7/60
NQ(Q3_NB_queue)+NQ(Q4_NB_queue)+NQ(Q2_NB_queue)+NQ(Q1_NB_queue)
+
NQ(Q3_NB_queue)+NQ(Q4_NB_queue)+NQ(Q2_NB_queue)
NQ(Q7_NB_queue)+NQ(Q6_NB_queue)
NQ(Q1_NB_queue)+NQ(Q5_NB_queue)
t_real_leave_GT_northbound/60+t_real_leave_PPMAX_Atl_NB/60-t_rea
t_real_arrival_buoy_atlantic_NB/60-T_arrival_old/60
t_real_arrival_buoy_Atl_NB/60-T_arrival/60
t_real_leave_gt_anchor/60-t_leave_gtl/60
NREP
Flow traffic
Restch
Sub_restriction
ENHANCED MODEL v2.0 User’s GUIDE - Revision 1
Example
0,00
0,27
0,00
1,29
0,00
0,18
-241,70
0,00
0,00
0,00
243,44
0,00
0,11
0,00
0,21
0,00
0,00
0,00
0,00
5,89
36,78
36,78
1,47
1
0
0
0
84 of 82
3.6.3 Ships Generation Data
Files: Ships_NB and Ships_SB
These files contain detailed information about the ships generated, but that had not necessarily
completed the transit, which includes:
•
•
•
•
•
Transit number;
Vessel characteristics;
Arrival time (in days) starting from beginning of day one (corrected if booked);
Replication number;
If channel restricted (restch).
The next table indicates examples of outputs per each heading for northbounds. Similar headings are
used for southbound transits.
Northbound Headings
transit_number
t_arrival/1440
category
vessel
N_MS_NB
Lenght
Beam
draft
ballast
booking
pd
Billing_tons
hml
restriction
itl
NREP
year
month
Restch
Sub_restriction
ENHANCED MODEL v2.0 User’s GUIDE - Revision 1
Example
1
10,07
262
1371
8
587,80
105,94
28,92
1
1
0
50.242,00
4
4
9
1
1
1
0
0
85 of 82
3.6.4 Buckets Utilization Data
Files: NB_Queue and SB_Queue
These files contain detailed information ships utilized the buckets available when entering the Canal:
•
•
•
•
•
•
•
Transit number;
Vessel main characteristics utilized for scheduling the ship;
Scenario and Replication numbers;
Number of ships waiting for entering the Canal per restriction and whether restricted or not;
Arrival, Underway from Outer and Gatun Anchorages, and in/out_of_queue times;
If channel restricted (restch);
The bucket restriction number utilized (islot).
The next table indicates examples of outputs per each heading for northbounds. Similar headings are
used for southbound transits.
Northbound Headings
transit_number
N_MS_NB
Restriction
Lane
booking
scenario
Total_Restr_In_Q
Total_In_Q
nq(Q3_SB_queue)
nq(Q4_SB_queue)
nq(Q2_SB_queue)
nq(Q5_SB_queue)
nq(Q1_SB_queue)
nq(Northbound_Queue_Queue)
T_arrival/1400
T_in_queue/1440
T_out_queue/1440
T_underway/1440
t_leave_gtl/1440
NREP
year
month
flow traffic
islot
Restch
Sub_restriction
ENHANCED MODEL v2.0 User’s GUIDE - Revision 1
Example
124
5
4
1
0
81
0
0
0
3
7
0
0
8
0,00
10,48
8,10
10,00
10,19
11
1
1
1
4
0
0
86 of 82
3.7
ITT and CWT Reports in the Logfile.mdb
Detailed reports per restriction code and booking status can be obtained from the logfile.mdb database
by running the macro named “Generate Time Reports per Direction”. See tables exemplified below under
the next items.
3.7.1 ITT Per Booking Status and Restriction
Direction
NB
NB
NB
NB
NB
NB
NB
NB
NB
NB
SB
SB
SB
SB
SB
SB
SB
SB
SB
SB
Booking St.
0
0
0
0
0
1
1
1
1
1
0
0
0
0
0
1
1
1
1
1
ENHANCED MODEL v2.0 User’s GUIDE - Revision 1
Restriction
ITT
1
2
3
4
5
1
2
3
4
5
1
2
3
4
5
1
2
3
4
5
9,84
9,69
9,63
9,68
11,17
11,69
9,99
10,09
9,72
12,69
9,02
15,06
13,89
9,61
9,84
10,05
13,94
13,52
9,79
11,96
87 of 82
3.7.2 New CWT per Booking Status and Restriction
Direction
NB
NB
NB
NB
NB
NB
NB
NB
NB
NB
SB
SB
SB
SB
SB
SB
SB
SB
SB
SB
Booking St.
ENHANCED MODEL v2.0 User’s GUIDE - Revision 1
Restriction
0
0
0
0
0
1
1
1
1
1
0
0
0
0
0
1
1
1
1
1
1
2
3
4
5
1
2
3
4
5
1
2
3
4
5
1
2
3
4
5
New CWT
13,28
11,87
11,88
11,98
14,40
28,26
28,24
28,16
31,89
35,85
10,86
17,42
16,29
12,03
12,56
27,64
37,68
37,24
37,69
37,06
88 of 82
3.7.3 Old CWT per Booking Status and Restriction
Direction
NB
NB
NB
NB
NB
NB
NB
NB
NB
NB
SB
SB
SB
SB
SB
SB
SB
SB
SB
SB
Booking St.
ENHANCED MODEL v2.0 User’s GUIDE - Revision 1
Restriction
0
0
0
0
0
1
1
1
1
1
0
0
0
0
0
1
1
1
1
1
1
2
3
4
5
1
2
3
4
5
1
2
3
4
5
1
2
3
4
5
Old CWT
37,71
25,85
26,92
41,66
36,48
28,26
28,24
28,16
51,89
35,85
40,26
33,63
32,39
30,08
41,43
27,64
37,68
37,24
37,69
37,06
89 of 82