1
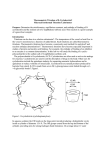
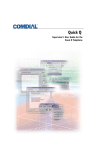
Northwood
Net Guide
Connecting to the Northwood Cable Network
2013–2014
1
Table of Contents
About Northwood Net ____________________________________________ 2
Cable Modem __________________________________________________ 2
What You Need to Connect _______________________________________ 3
Connect to the Internet: A Quick Start Guide __________________________ 4
Connect Your Computer __________________________________________ 5
Register Your Computer with DHCP _________________________________ 6
Connect to Wireless Internet_______________________________________ 9
Register a Game Console, Router, or Other Device ______________________ 10
Troubleshooting ________________________________________________ 11
Connect to UMphone _____________________________________________ 19
Connect to UMTV ________________________________________________ 21
For Question or Assistance with Northwood Net:
Contact the ITS Service Center:
• Submit a Service Request Online:
its.umich.edu/help/request
• 734-764-HELP (764-4357)
• its.umich.edu/help
For the latest updates and information:
its.umich.edu/northwood
1
About Northwood Net
Northwood Net provides three services to Northwood residents:
• Internet: up to 20Mb downstream and up to 5Mb upstream*
• Telephone: UMphone
• Cable Television: UMTV
Cable Modem
The modem and cable outlet in your apartment connect your computer, analog
phone, television, and other devices to the Northwood cable network. The modem
is permanently mounted (upside down) to the wall. Do not move the modem. It is
university property and must remain in the apartment when you move out.
Figure 1: Back Panel of Modem and Cables (Front View on page 11)
Note: The second port (Telephone 2) and the fourth port (USB) are
disabled and cannot be used.
Figure 1
*Actual speeds may vary. 2
What You Need to Connect to Northwood Net
In addition to the modem in your apartment, you need the following:
For Internet Service:
Figure 2
• Windows or Mac computer that meets recommended
minimum system requirements. For a list of requirements,
visit computershowcase.umich.edu/systems/general.php.
• You may experience less than optimal performance
with a computer that does not meet these requirements. Ethernet Cable
Only minimal troubleshooting assistance will be
(CAT5/RJ-45)
available from the ITS Service Center.
To Connect using an Ethernet Cable:
• Ethernet cable to connect the computer to the modem.
• A computer with a 10Base-T or faster Ethernet jack. Some
computers, including the MacBook Air, may need an
adapter or Network Interface Card (NIC).
• Ethernet hub or router to connect more than once device
using a wired connection. (optional)
To Connect to Wi-Fi:
• A wireless card. Most laptops come with an internal wireless
card. At a minimum the card should provide IEEE 802.11a/b/g
protocols. Newer devices are capable of the more
robust 802.11n.
• A wireless router (Northwood IV and V only).
Telephone Cord
(RJ-11)
Coaxial TV
Cable
For Telephone Service (UMphone):
• Analog telephone set and cord. See page 19 for more details.
For Cable Television (UMTV):
• Cable-ready television and coaxial cable. See page 21 for more details.
• A high-quality surge protector (Recommended)
Surge protectors prevent equipment failure caused by power outages and surges. If you do not use a surge protector, remember to unplug the modem, your computer, and other devices from the wall during severe weather, especially thunderstorms.
3
Connect to the Internet: A Quick Start Guide
Before you connect, make sure your computer meets requirements and you have all
necessary equipment (page 3).
To use the Internet in a Northwood apartment:
1. Connect your computer to the cable modem (page 5).
• You can connect one personal computer (Windows or Mac) directly to the
cable modem for Internet service.
• For additional computers or devices, you will need an Ethernet hub or
router (page 5). Only residents in Northwood IV and V may use a
wireless router.
2. Register your computer with DHCP (page 6).
• You must complete the registration process to connect to the Internet. You
will only be able to connect to the DHCP registration service page.
• If you are not able to successfully register, you may need to configure your computer, based on its operating system. Refer to Troubleshooting DHCP Registration for instructions (page 12).
3. Connect to wireless (page 9).
4. Connect and register additional devices (page 10).
The cable modem only has one port for an Internet connection. If you have
multiple devices, follow these additional steps to connect your Ethernet hub
or router.
• Connect the router to the modem and follow the router’s user manual for
directions on configuration (page 5).
• Register the device on the Network Registration page or by emailing the ITS
Service Center (page 10).
• Your router may not work until you complete this registration process.
If your router is setup to bridge only, it does not need to be registered.
• Note: The ITS Service Center can assist with registering your router but will
not provide additional technical assistance with personal routers.
4
Connect Your Computer to the Cable Modem
You can connect one personal computer (Windows or Mac) directly to the cable modem
for Internet service. To connect more than one computer or device, you will need an
Ethernet hub or router. You can purchase an Ethernet hub or router and cable at any
store that sells electronics, including the Computer Showcase
(computershowcase.umich.edu).
1. Turn off and unplug your computer.
2. If you are not using a hub or router:
• Plug one end of an Ethernet cable into the modem port
labeled Ethernet and the other end into the computer’s
Ethernet port.
If you are using a hub (aka switch or wired router):
• Plug the hub’s power cord into the electrical outlet.
• Plug one end of an Ethernet cable into the modem port
labeled Ethernet and the other end into the proper port on
the hub according to the hub user guide.
• Plug one end of another Ethernet cable into an open
Ethernet port on the hub and the other end into your
computer’s Ethernet port.
Figure 3
Hub
Wireless Router
(Northwood IV and
V only)
If you are using a wireless router (Northwood IV and V only):
• Set up the wireless router according to the directions (page 9).
3. Follow the directions in the next section: Register Your Computer with DHCP.
(page 6)
5
Register Your Computer with DHCP
To use your connection, you will need to register your computer with DHCP. DHCP is
a service that configures and manages IP addresses. When you register, your device
will be assigned an IP address, which is required to access the Internet.
If you receive an error during the registration process, refer to Troubleshooting
DHCP Registration (page 12).
Before You Register
As a condition of activating a connection to the cable network from your residence,
you are required to abide by Northwood Net Internet Service Conditions of Use
(itcom.itd.umich.edu/northwood/policy.php); Proper Use of Information
Resources, Information Technology, and Networks at the University of Michigan; and
Guidelines for Implementing the Proper Use Policy.
The Cable Modem Conditions of Use Statement articulates the shared community
values required to operate this network effectively and efficiently.
Cable Modem Conditions of Use
Basic Agreement
I am aware and understand that:
• My cable networking services can
be suspended or terminated at any
time if I violate these conditions. To
be considered for reactivation, it is
my responsibility to demonstrate that
I have corrected any violations.
•Violations of state and federal
law - including but not limited to misuse of intellectual property and malicious or unauthorized access to systems - may result in legal action.
• I am not guaranteed a network
connection or specific amount of
network bandwidth. Network
resources may be managed to
optimize performance of some
applications or resources and
slowdown other applications
orresources.
6
• The security of my computer system is my responsibility, and I am
responsible for all activity originating
from my computer, including but not
limited to: a) traffic generated by
viruses; b) the sharing of music or
other media files; and c) other users
who have gained access to my computer.
Access and Permitted Use
•I will not provide access to any
university resource for those not
rightfully due such access, nor will I
allow others to access resources
under my identity.
•I will not redistribute or provide
access to university resources for
any fee or other consideration.
(continued)
•I will not use my network connection
to run a commercial enterprise or
to support other activities designed
to provide me with income or
other consideration.
•I will not perform any action that
denies another network user access
to network resources.
•I will not engage in behavior that has
the effect of identifying weaknesses
in or gaining access to services,
resources, networks, or computers
for which I am not authorized. I will
not scan computers to detect access
points or vulnerabilities.
•I understand that excessive use of
the network is subject to restriction
and sanctions. Excessive use is
defined as using an amount of
network resources beyond what
is comparable to a single, interactive
network session such as
web browsing.
•I understand that servers and other
services are only permitted if they
utilize a sufficiently small portion
of the network resources. This
includes, but is not limited to, the
sharing of music and other
media files.
•I will not alter or remove network
wiring, equipment (including the
modem), or network jacks.
•I am aware that as a condition
of c onnecting my system to the
network, my system may be subject
to network monitoring and
vulnerability scanning to ensure the
security and reliability of the network
and to prevent my system from being
vulnerable to attack or being used to
launch attacks.
•I understand that violations of
university policies regarding
technology and network usage will
be subject to possible disconnection of my network service and
disciplinary action. University
policies include, but are not limited
to, the Proper Use of Information
Resources, Information Technology,
and Networks at the University of
Michigan (spg.umich.edu/
pdf/601.07-0.pdf) and Guidelines
for Implementing the Proper Use
Policy (itd.umich.edu/
itcsdocs/r1103/).
• Additional relevant policies and
links are available on the web page:
Information Technology Policies at
the University of Michigan
(cio.umich.edu/policy/).
Network Integrity
•I will not perform any action that
would impair the function or
compromise the integrity of the
computer network or result in the
denial or degradation of another
user’s access to the network.
7
DHCP Registration Steps
Your Internet connection will not work until you complete this
registration process!
You must complete the DHCP registration from each computer connected to the
modem in your apartment.
1.Start your web browser.
2.Go to northwood.umnet.umich.edu.
Note: This is the only address you can connect to at this time.
3.When prompted, enter your uniqname and UMICH password. Click Log in.
4.You should receive a confirmation message stating that registration
was successful.
5. Wait 10-15 minutes.
6. Restart your computer.
If you receive an error message, refer to Troubleshooting DHCP Registration
(page 12). You may need to complete additional steps to confirm your computer has
a provisional IP address that starts with 10.
Can’t access the Internet?
Delays are possible when many people
are registering simultaneously. Try
again later or refer to Troubleshooting
TCP/IP on page 18.
8
If you still have problems, contact
the ITS Service Center:
• Submit a Service Request Online:
its.umich.edu/help/request
• 734-764-HELP (764-4357)
• its.umich.edu/help
Connect to Wireless Internet
Community Centers
• The MWireless network is available in all of the Northwood community centers:
1000 McIntyre
2150 Cram Place
1588 Cram Circle
• Before using MWireless, you must configure your computer and other wireless devices. You will only need to configure each device once. MWireless is the
most secure and fastest wireless network on campus, and is available in
most university buildings. For detailed instructions for your operating system,
visit itcom.itd.umich.edu/wireless/connect.
• Visitors without a uniqname and password may access the Internet using MGuest, a limited wireless network.
Northwood I, II, and III Apartments
• The MWireless network is available in all Northwood I, II, and III apartments and laundry rooms.
• To connect to MWireless, follow the configuration instructions for your operating system at itcom.itd.umich.edu/wireless/connect.
• Residents may not use wireless routers in Northwood I, II, and III.
Northwood IV and V Apartments
• A wireless router is necessary to provide wireless Internet connections in Northwood IV and V apartments.
• The ITS Service Center can assist with registering your router but cannot
provide additional technical assistance for personal routers. Refer to University
Housing Wireless Access for Housing’s wireless router information at
housing.umich.edu/reshalls/rescomp-wireless.
What You Need
• Wireless router.
• Computer with built-in wireless networking support (most new computers
have this) or a wireless network adapter.
• An operating system that supports wireless networking, such as Mac OS,
Windows 7 or 8.
Install Your Router
1. Connect one end of an Ethernet cable to the Ethernet port on the cable
modem and the other to the Internet port on the router.
2.Follow the router’s user manual for directions on configuration.
3.Check the router’s status panel to see if the IP address begins with 10. If
not, a connection or configuration problem exists and must be resolved
before you can continue. Refer to your router’s user manual.
4.From your computer, select the network that you just set up, and proceed
to Register a Game Console, Router, or Other Device (page 10).
9
Register a Game Console, Router, or Other Device
After setting up a game console, router, or other device that connects to the Internet,
you must register that device.
Note: If your router is setup to bridge, it does not need to be registered.
From your U-M email account, send a message to [email protected] with your:
• Name
• Uniqname
• Your Northwood street address and building number
• Name and the WAN MAC address of the device
(The location of the WAN MAC address is unique to each device. Refer to the device’s documentation for instructions on how to locate the address.)
Northwood IV and V Only: Register Your Wireless Router
You may be able to register your wireless router yourself:
1.Go to the Network Registration page at northwood.umnet.umich.edu.
2.Authenticate with your uniqname and UMICH password. Once authenticated, the router will be automatically registered.
3.Wait 30 minutes and release/renew the router’s IP address using its control
panel; or unplug it from the electrical outlet, wait a few seconds, then plug it in.
If you can’t reach the registration page, try accessing it from a computer connected
directly to the modem. Failures to reach the registration page from behind the router
may indicate a problem with how the router or the connected computer is configured.
10
Troubleshooting
Troubleshooting the Modem
The front panel of the modem provides status LEDs that indicate levels of operation.
Figure 4
1.
POWER – Illuminates continuously when there is AC power.
2.
DS (Downstream) – Indicates the status of the connection for receiving data.
Illuminates continuously during normal operation; blinks to indicate the unit is
scanning for the downstream signal.
3.
US (Upstream) – Indicates the status of the connection for sending data.
Illuminates continuously during normal operation.
4.
ONLINE – Illuminates continuously when the modem is registered on the
network and fully operational. This indicator blinks to indicate one of the following
conditions: the modem is booting up and not ready for data; the modem is
scanning the network and attempting to register; the modem has lost registration
on the network and will continue blinking until it registers again.
5.
LINK (USB Port) — Illuminates and flashes when an Ethernet cable is plugged
into the Ethernet port.
6.
TEL 1 – Illuminates continuously when VoIP service is enabled. Blinks when line
1 is in use.
7.TEL 2 – Disabled.
8.BATTERY —Illuminates solid green to indicate the battery is charged. Blinks to
indicate the battery charge is low. The LED is off when operating from battery
power, when the battery charge is depleted, or the battery is defective.
Verify the following:
1.The plug to your modem AC cord is properly inserted into an electrical outlet.
2.All cables are properly connected, and that you are using the correct cables
(page 5).
3.The POWER, DS, US, ONLINE, TEL 1 LED status indicators are illuminated.
If they are not illuminated, reset the modem (page 12).
11
How to Reset the Modem:
1.Shut down your computer and other connected Internet devices.
2.Using the tip of a pen or paper clip, press the REBOOT EMTA button (on the
back of the modem) and hold down for at least 3 seconds. Release.
3.It will take a few minutes for the unit to recycle and the LEDs to illuminate.
You can also reset the modem by unplugging it from the electrical outlet and removing the battery for
two minutes and then reconnecting (Figure 5).
Troubleshooting DHCP Registration
When attempting to reach the registration page, you may
see this error message: Cannot connect to host.
Figure 5
This error appears when the browser automatically opens a default home page and
you are not yet registered with the DHCP service. Refer to the Get Help section on
the back cover of this booklet.
If you get an error message saying that registration has failed, you may need to
configure your computer.
If you continue to get an error after completing the configuration steps, check the
message at the very bottom of the page in small print. Write the error message down
completely before seeking assistance from the ITS Service Center.
Steps to Configure Your Computer
The configuration steps are different for each operating system:
• Windows XP – page 13
• Windows Vista, 7, or 8 – page 14
• Mac OS 10.4 (Tiger) – page 16
• Mac OS 10.5 (Leopard), 10.6 (Snow Leopard),
10.7 (Lion), 10.8 (Mountain Lion) – page 17
12
Windows XP Configuration Instructions
Part One – Network Setup
Begin by connecting your computer to the modem (or hub or
router). Turn on computer (and hub/router).
1. From the Start menu > Click Control Panel >
Network and Internet.
DON’T SEE THIS? You probably have your Control
Panel window set to Classic View.
2.Select Network Connections.
3.Double-click Local Area Connection.
4.In the Local Area Connection Properties window
(Figure 6):
a. Select Internet Protocol (TCP/IP). You may
need to scroll through the list.
b. Click Properties.
5.In the TCP/IP Properties panel (Figure 7):
a. Make sure the settings are:
• Obtain an IP address automatically.
• Obtain DNS server address automatically.
b. Click OK.
6. Click Close in the remaining open windows.
Figure 6
Figure 7
Part Two – Get Your Provisional IP Address
1. Click Start and select Run.
2. Type cmd and click OK.
3.In the black screen that opens up:
(Figure 8):
a. Type ipconfig /all (you must have a
space between the “g” and the “/”).
b. Press Enter. You’ll receive a long
Figure 8
list of networking information. Look
for Ethernet adapter Local Area Connection.
c. Type ipconfig /release (you must have a space between the “g” and the “/”).
d. Press Enter. The IP address for your Ethernet adapter will become 0.0.0.0
e. Type ipconfig /renew (you must have a space between the “g” and the “/”).
f. Press Enter. The IP address should change to begin with 10. (Figure 8)
(continued)
13
4. If your IP address:
• Begins with 10., type exit then press Enter.
• Begins with anything other than 10., repeat steps 1-3. If you still do not get
an address beginning with 10., see Troubleshooting TCP/IP (page 18).
5. Complete the DHCP Registration Steps (page 8). If your registration is successful, complete Part Three below.
Part Three - Final Registration Steps
1.Wait 10-15 minutes.
2. From the Start menu, select Run.
3. Type cmd and press Enter.
4. In the black window:
a. Type ipconfig /release and press Enter
(you must have a space between the “g” and the “/”).
b. Type ipconfig /renew and press Enter
(you must have a space between the “g” and the “/”).
c. Type exit and press Enter.
5.Wait 10-15 minutes.
6.Restart your computer.
Windows Vista, 7, or 8 Configuration Instructions
Part One – Network Setup
Begin by connecting your computer to the modem (or hub or router). Turn on your computer (and hub/router).
1.Windows Vista or 7: From the Start menu > Click Control Panel > Click
Network and Internet.
DON’T SEE THIS? You probably have your Control Panel window set to Classic View.
Windows 8: From the Start screen, type Control Panel. Under Apps, click
Control Panel.
2. Click Network and Sharing Center. From the Task list on the left,
Windows Vista: Click Manage Network Connections.
Windows 7 or 8: Click Change Adapter Settings.
3. Windows Vista or 7: Double-click Local Area Connection. In the Local Area
Connection Properties window, click Properties. If you receive a dialog box requesting your permission, click Continue.
Windows 8: Double-click Ethernet.
(continued)
14
4. In the Properties window:
a.Select Internet Protocol Version 4 (TCP/IPv4).
CAUTION: Do not select Internet Protocol Version 6 (TCP/IPv6).
b.
Click Properties (Figure 6).
5. In the Internet Protocol Version 4 (TCP/IPv4) Properties panel (Figure 7):
a. Make sure the settings are:
• Obtain an IP address automatically.
• Obtain DNS server address automatically.
b. Click OK.
6.Click Close in the remaining open windows.
Part Two – Get Your Provisional IP Address
1.Windows Vista or 7: From the Start menu > Click All Programs > Click Accessories.
Windows 8: From the Start screen, type Command.
2. Right-click on Command Prompt and select Run as administrator.
3.Click Continue (for Vista) or Yes (for Windows 7 or 8).
4. In the Command Prompt window (Figure 6; see page 14):
a.Type ipconfig /all (you must have a space between the “g” and the “/”).
b.Press Enter. You’ll receive a long list of networking information.
Look for Ethernet adapter Local Area Connection (Vista or 7) or for Ethernet (Windows 8).
c.Type ipconfig /release (you must have a space between the “g” and the “/”).
d.Press Enter. The IP address for your Ethernet adapter will become 0.0.0.0
e.Type ipconfig /renew (you must have a space between the “g” and the “/”).
f. Press Enter. The IP address should change to begin with 10.
5. If your IP address:
• Begins with 10., type exit then press Enter.
• Begins with anything other than 10., repeat steps 2-4. If you still do not get
an address beginning with 10., see Troubleshooting TCP/IP (page 18).
6. Complete the DHCP Registration Steps (page 8). If your registration is successful, complete Part Three below.
Part Three - Final Registration Steps
1. Wait 10-15 minutes.
2.Windows Vista or 7: From the Start menu > Click All Programs > Click Accessories.
Windows 8: From the Start screen, type Command.
3. Right-click on Command Prompt and choose Run as administrator.
(continued)
15
4.When Windows requests your permission, click Continue (for Vista) or Yes (for Windows 7 or 8).
5.In the Command Prompt window:
a. Type ipconfig /release (you must have a space between the “g” and the “/”)
and press Enter.
b. Type ipconfig /renew (you must have a space between the “g” and the “/”).
and press Enter.
c. Type exit and press Enter.
6.Wait 10-15 minutes.
7. Restart your computer.
Mac OS 10.4 (Tiger) Configuration Instructions
Part One – Network Setup and Get Your Provisional IP Address
Begin by connecting your computer to the modem (or hub /router). Turn on your
computer (and hub/router).
1. Under the Apple menu, select System Preferences.
2. In the System Preferences window, click Network.
3. In the Network window (Figure 9).
a.From the Location pull-down menu, select Automatic.
b.Select Built-in Ethernet.
c.Mac OS X 10.4 only: Click the TCP/IP tab.
d.From the Configure pull-down menu, select Using DHCP.
e.Click Apply Now.
4. Press Enter. The IP address
should change to begin with 10.
5. If your IP address:
• Begins with 10., close the
Network preferences window.
Proceed to DHCP
Registration Steps (page 8).
• Begins with anything other
than 10., repeat steps 1-3.
If you still do not get an
address beginning with 10.,
see Troubleshooting
TCP/IP (page 18).
6. Complete the DHCP Registration
Steps (page 8). If your registration
is successful, complete Part Two.
16
(continued)
Figure 9
Part Two - Final Registration Steps
1. Wait 10-15 minutes.
2. Restart your computer.
Mac OS 10.5 (Leopard), 10.6 (Snow Leopard), 10.7 (Lion), or
10.8 (Mountain Lion) Configuration Instructions
Part One – Network Setup and Get Your Provisional IP Address
Begin by connecting your computer to the modem (or hub or router). Turn on your
computer (and hub/router).
1. Under the Apple menu, select System Preferences.
2. In the System Preferences window, click Network.
3. In the Network window (Figure 10):
a. From the Location pull-down menu, select Automatic.
b. Select Ethernet.
c. Click the Advanced button.
d. Click the TCP/IP tab (Figure 11).
4. Complete the DHCP Registration Steps (page 8). If your registration is successful, complete Part Two below.
Part Two - Final Registration Steps
1. Wait 10-15 minutes.
2. Restart your computer.
Figure 10
Figure 11
17
Troubleshooting TCP/IP
After checking all physical connections, try the following tips in the order they are
listed. Try to reconnect after each.
1.Make sure the computer is properly configured. See Steps to Configure Your Computer (page 12).
2.Reset the cable modem (page 12).
3.Restart your computer.
4.Repeat the final registration steps listed for your operating system.
5.Check your IP address:
• If your IP address starts with 169, you may not have network connectivity or
the DHCP service may be down.
• If your IP address starts with 10, you have connectivity, but you need to
register (or re-register) your computer with the DHCP service.
• If your IP address starts with 67, you have connectivity and a working
connection, but there may be something wrong with the particular service or
website you are trying to reach. Try going to several different websites or
using more than one Internet application to help determine which service is affected. Wait 10-15 minutes and try again.
18
Connect to UMphone
To connect your telephone, plug the
RJ-11 cord on your analog telephone
into the first port on the cable modem
(Telephone 1/2). Your telephone line is
already configured for UMphone.
Note: Telephone Port 2 is disabled and
cannot be used.
Features include:
•Unlimited campus and local calls
•Long distance calling by:
• Authorization code (authcode) – individually assigned 7-digit number that ensures personalized and
secure billing
• Calling card
•Caller ID
•Call Waiting with Caller ID
•3-Way Calling
•Call Transfer (on-campus or local calls)
•Last Number Redial (if redial key is
on phone)
All telephone lines in Northwood
Apartments have a number in the
734 area code beginning with 565.
For example: 734-565-1234.
To find your:
•Telephone number
•Authcode for making direct-dialed long
distance calls
•Detail of calls made with authcode
and charges
•Voice mail user guide
Go to itcom.itcs.umich.edu, click:
and log in with your uniqname and
UMICH password.
Feature
Instructions
3-Way Calling
To Add Third Party
Press TAP, hear special dial tone, dial number of third party.
If Third Party Answers
Announce conference, press TAP.
If Busy or No Answer
Press TAP twice.
Call Transfer
To Transfer Call
Press TAP, hear special dial tone, dial 7-digit transfer number.
If Answered
Announce call, replace handset.
If Busy or No Answer
Press TAP twice.
To Connect to
Hear call waiting tone; press TAP.
Call Waiting
To return to original party, press TAP.
Note: On some phones the TAP key may be labeled FLASH or LINK. If no key is
available, you can quickly press the switchhook.
19
Dialing Instructions
Calls FROM a 565 Telephone
Dial:
Emergency (Fire, Police, Medical)
911
Campus Safety and Security
763-1131
Local and Campus
7-digit number
Domestic Long Distance*
1 + area code + 7-digit number
(wait for beeps) + authcode
International Long Distance*
011 + country code + city code + number
(wait for beeps) + authcode
U-M Operator-Assisted Long
0
Distance Calls
Campus Directory Assistance
0
Telephone Customer Service
763-2000
Non-U-M Directory Assistance
1+ area code + 5551212
AT&T Operator Assistance
00
*You can use a pre-paid calling card for long-distance instead of your authcode, if you choose.
Calls TO a 565 Telephone
Dial:
From another 565 telephone
565-xxxx
From a non-565 campus telephone
9+565-xxxx
From a local telephone
565-xxxx
From an out-of-area telephone
1-734-565-xxxx
1-900 and 1-700 numbers cannot be dialed from your apartment telephone. Collect calls to your
telephone cannot be accepted.
Opt-In Voice Mail
If you do not already have voice mail on your telephone,
you can request it by submitting the form at:
https://www.itcom.itd.umich.edu/telephone/students/voicemail.php
20
Connect to UMTV
UMTV Requirements
• Your television set must be cable-ready.
• UMTV offers digital programming only. An old-style, analog television set must
have a Clear QAM-compliant converter box to work with the UMTV system. The
ITS Service Center cannot provide technical assistance for converter boxes.
Setting up your TV to receive UMTV channels
1. Connect a coaxial cable from the cable splitter to the input port on the back of
your cable-ready TV. Gently insert the center pin into the port and then screw
down the outer ring.
2.Connect the TV power cord to the electrical outlet and turn on the TV.
3.Using your TV remote, select Menu and then select and run the Auto-Setup
feature. Refer to your user manual for additional set-up instructions.
UMTV Channel Lineup
See itcom.itd.umich.edu/umtv/channel-lineup.html
You can also download a pdf version.
Connecting Additional Devices
DVD players, DVRs, and game consoles can be used with UMTV but they are not
supported by UMTV staff. You will need to follow the directions in each device’s user
manual for setting up, operating, trouble-shooting and repair.
Note: If your DVR is compatible with signals transmitted in a Clear QAM format, then
it will be able to receive and record all of the UMTV digital channels. (There is one
exception with a TiVo DVR. See “Will a TiVo DVR work with UMTV?” at
itcom.itd.umich.edu/umtv/faq.html.)
If an Internet connection is required for any additional devices, connect the devices
to a router or wireless network, and register your devices (page 10).
21
2013-2014
Get Help
For question or assistance with Northwood Net,
contact the ITS Service Center:
• Submit a Service Request Online:
its.umich.edu/help/request
• 734-764-HELP (764-4357)
• its.umich.edu/help
For the latest updates and information:
its.umich.edu/northwood
Note: ITS consultants and Housing are not able to troubleshoot or make repairs
to any additional networking equipment other than that which is provided as part
of the cable service.
If it is necessary to enter your apartment to make repairs, an appointment will be
scheduled at a mutually convenient time. Please make sure your computer and
modem are readily accessible to the technician.
22