1
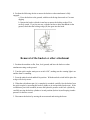
8. Perform the following checks to ensure the bucket or other attachment is fully
engaged:
a. Press the bucket to the ground, with the teeth facing downward as if to start
digging.
b. Operate the bucket cylinder in and out to ensure the locking wedge (D) is
securely seated. If you are not sure, with the bucket or other attachment on the
ground, check that the locking wedge (D) has gone into the hook.
Removal of the bucket or other attachment
1. Position the machine on flat, firm, level ground, and have the bucket or other
attachment resting on the ground.
2. Turn the quick coupler main power switch “ON”, making sure the warning light is on
and the alarm is sounding.
3. Press the unlock switch and hold in position. With the unlock switch held in place the
wedge will slowly retract.
4. When the red indicator pin (A) is completely extended, carefully free the bucket from
the quick coupler by operating the bucket cylinder to its end position (bucket out). If the
red indicator pin is not extended, increase the hydraulic pressure to the lock cylinder by
carefully moving the bucket cylinder to its end position (bucket in) and keeping it under
pressure for about a second.
5. Disconnect the bucket by moving the arm outward and raising the boom.
7